Resources section
The Resources tab shows resources that can be assigned to planned or active trips. You can drag any of the available resources onto trips to assign them.
There are nine resource tabs:
Details for each resource come from their respective Profiles application.
Resources toolbar

Each Resources tab has a toolbar. These toolbars have shared functions:
| Toolbar option | Definition |
|---|---|
|
Refreshes the data on the tab. |
|
Opens the Filter Trips window. In this window, you can create field-specific or SQL-based custom filters for the grid. |
|
Clears any applied filters. |
Search |
Searches for a specific record on the grid. |
Filter |
Filters records based on the selected grid column header. To filter the records:
|
Resource toolbar shortcut menu
The toolbars for the Resource tabs have shared shortcut menu options. Right-click any of the toolbars to open its shortcut menu.
| Menu option | Definition |
|---|---|
Toggle Design Mode |
Activates the Screen Design mode to create and save different layouts. For more information, see Custom Screen Design Mode and Screen Design tab. |
Set Filter |
Opens the Filter Trips window. In this window, you can create field-specific or SQL-based custom filters for the grid. |
Clear Filter |
Clears any custom filters. |
Load Quick Filters Layout |
Loads your saved Quick Filters layout. |
Save Quick Filters Layout |
Saves the currently applied Quick Filters as a layout. This layout loads when you select Load Quick Filters Layout. |
Your saved Quick Filters for the grid also appear in the shortcut menu:

Resource shortcut menu options
These shortcut menu options are available on most of the resource tabs:
| Menu option | Definition |
|---|---|
Toggle Design Mode |
Activates the Screen Design mode to create and save different layouts. |
Full Screen |
Expands this grid to fill the whole screen. Select Ctrl+F to return to the previous view. |
|
Opens the Filter Trips window. In this window, you can create field-specific or SQL-based custom filters for the grid. |
|
Clears any filter that has been applied to the tab. |
Anchored Columns |
Locks columns on the left side of the grid in place when scrolling to the right. Enter the number of columns you want to anchor. Set the value back to zero to remove the anchors. |
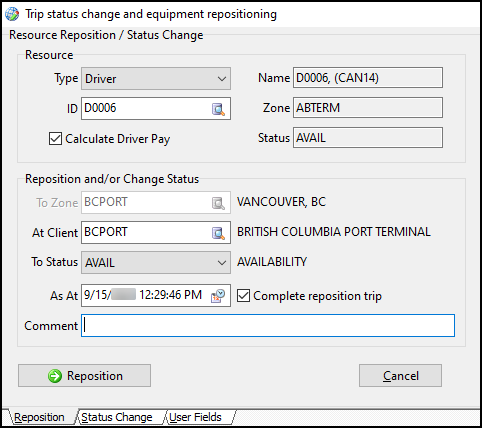
Reposition |
Opens the Trip status change and Equipment Repositioning window.
Select Reposition to create a trip that moves the resource to a new location. |
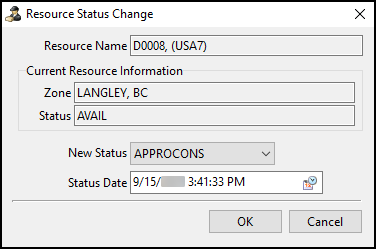
Status Change |
Opens the Resource Status Change window.
To change the resources status, select a status from the New Status dropdown menu and then select OK. You can select the |
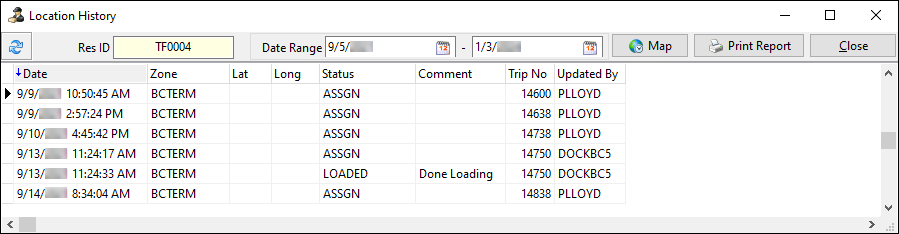
View Location History |
Shows the location history for the resource.
Select You can select Map to open Trimble Map View. |
Find Resource Near |
Opens the Find Near window for the type of resource you have selected. |
Find Trips Near |
Opens the Find Trip Near window to the Trip tab. |
New |
Opens the Profiles program for the selected resource type with a new blank record. |
View Profile |
Shows the resource’s details in its Profiles module. |
Special Events |
Shows any upcoming special events for the resource. |

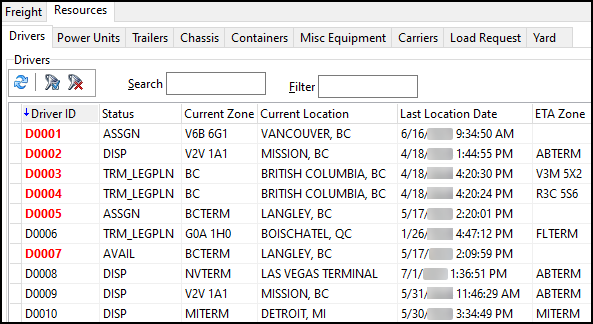
Drivers
The Drivers tab lists all your drivers. Driver codes must have the Active Dispatch checkbox selected on their profile to appear in this list.
Drivers shortcut menu
The Drivers tab has several unique shortcut menu options:
| Menu option | Definition |
|---|---|
Find Load for Driver |
Searches for available freight in the driver’s current or final zone using the Find Near window. |
View Driver Logbook |
Opens the Logbook window. This window pulls information from the Logbooks application for the selected driver. |
Shift Management |
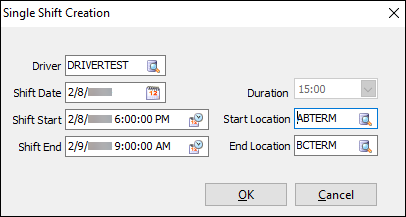
Opens the Shift Management window.
The data here matches the Driver Shifts grid on the Shift Management tab of Driver Profiles. Select
In this window can create a single shift for any driver. |
Driver Diary |
Allows you to access the Diary window for the selected driver. Access to this option is set in on the Clearance tab in Security Configuration. |
Driver Call-In |
Opens the Driver Call-in application. |
Manage Driver’s Fuel/Credit Cards |
Shows the driver’s fuel cards and credit cards. |
Manage Driver’s Fuel/Credit Child Accounts |
Shows the driver’s Child card accounts. |
Sort Planned Trips |
Opens the Auto Dispatch or Sort Driver Trips tab. The tab that opens is set by the Auto Dispatch Method application configuration option (app config). |


Power Units
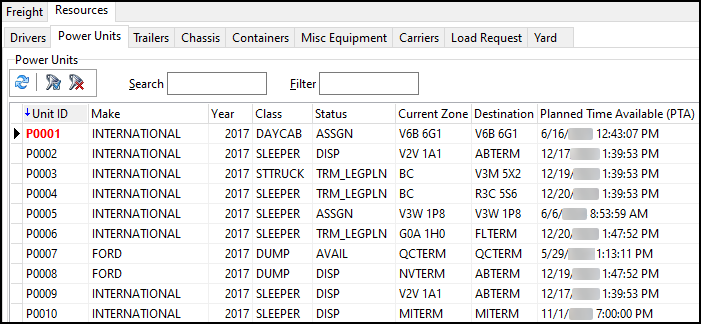
The Power Units tab lists all of your power units.
Power units shortcut menu
The Power Units tab has several unique shortcut menu options.
| Menu option | Definition |
|---|---|
Manage Punit’s Fuel/Credit Cards |
Shows card information for the power unit. |
Vehicle Health Score |
Opens TMT Vehicle Health Score. Vehicle Health Score integrates with several areas of TruckMate. If your company uses TMT Fleet Maintenance, you can use Vehicle Health Score to see VIN-based diagnostics and other predictive metrics. This can also be accessed from Power Unit Profiles by selecting Vehicle Health Score on the TMT Information tab.
|
Reefer Monitor Settings |
Opens the Reefer Monitoring window. In this window, you can set up scheduled ReeferTracs Monitoring for the power unit’s trailer. |


Trailers
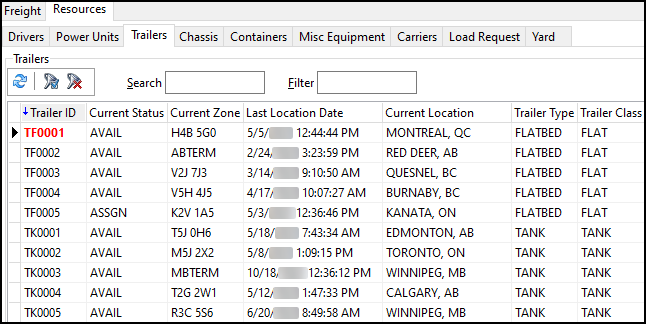
The Trailers tab lists all of your trailers.
Trailers shortcut menu
The Trailers tab has two unique shortcut menu options.
| Menu option | Definition |
|---|---|
Reefer Monitor Settings |
Opens the Reefer Monitoring window. In this window, you can set up scheduled ReeferTracs Monitoring for a trailer. |
View Reefer Events |
Opens the Reefer Events for Trailer <x> window. This window shows historical reefer events and alarms for the selected trailer. |
Chassis
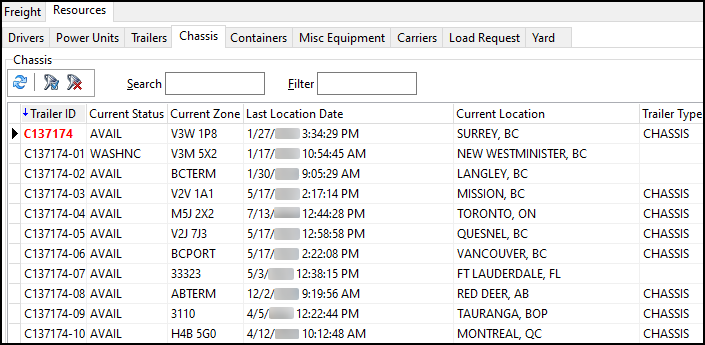
The Chassis tab lists all of your chassis.
The Chassis tab only has one unique shortcut menu option. Select View Genset Events to open the Genset Events for Chassis window.
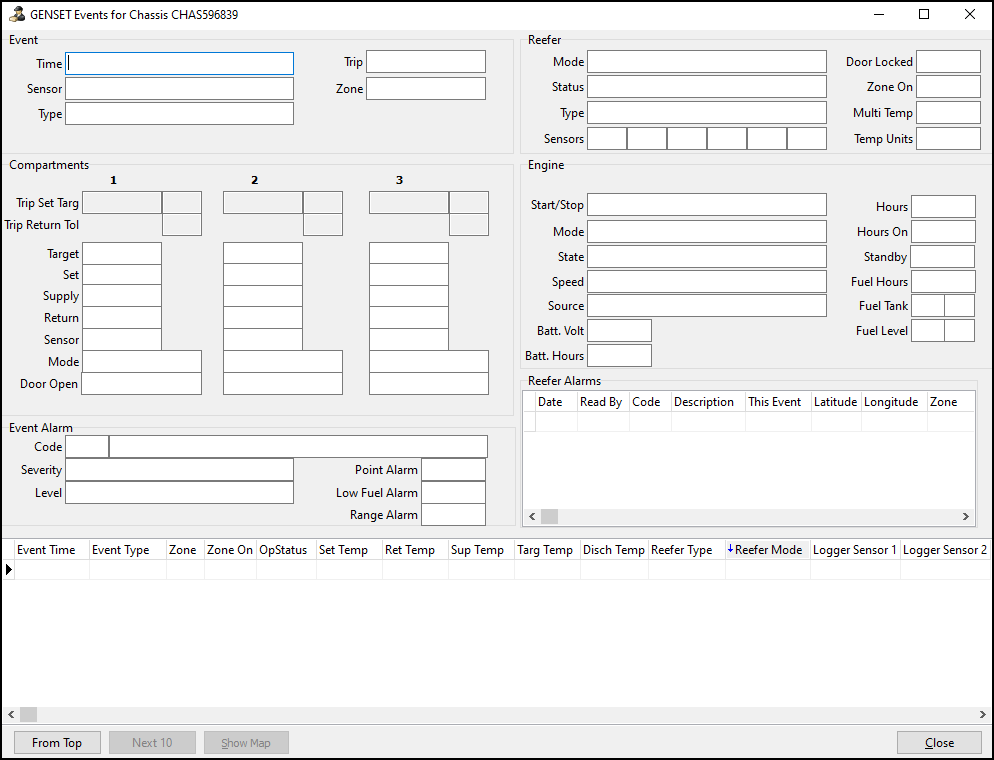
This shows any historical reefer events and alarms for a chassis that has an integration with ORBCOMM.
Containers
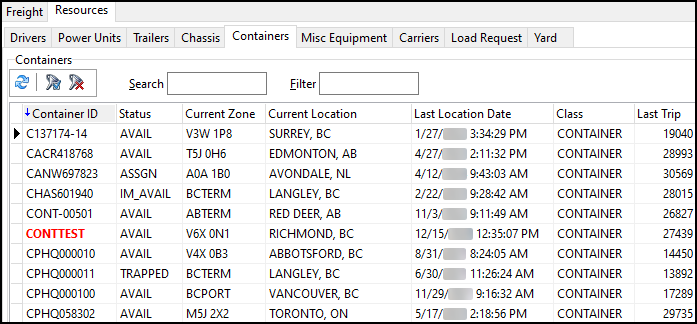
The Containers tab lists all of your containers.
Containers shortcut menu
The Containers tab has several unique shortcut menu options.
| Menu option | Definition |
|---|---|
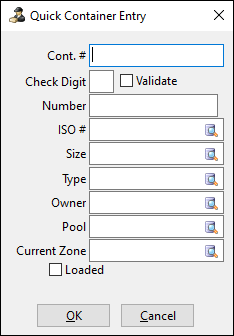
Quick New |
Opens the Quick Container Entry window. In this window, you can add a new container with the minimum required details.
|
Set Container Inactive |
Sets the currently selected container to Inactive. |
View IM Trace |
Opens the Intermodal Trace program. |
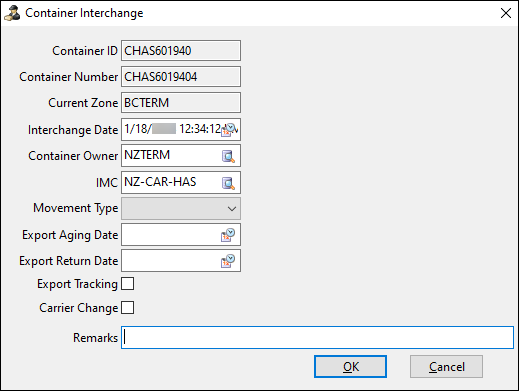
Inter Change Form |
Opens the Container Interchange window. You can only open this window if the selected container is Available.
In this window, you can complete a container interchange between two intermodal carriers. Select Select the Export Tracking checkbox if the interchange is an export movement type. Select the Carrier Change checkbox to mark the container as inactive if the container is going to another carrier. Select OK to complete the interchange. |
Misc Equipment
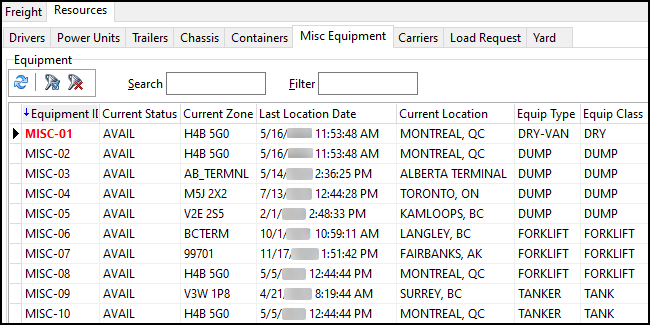
The Misc Equipment tab lists all of your miscellaneous equipment. It does not have any unique shortcut menu options.
Carriers
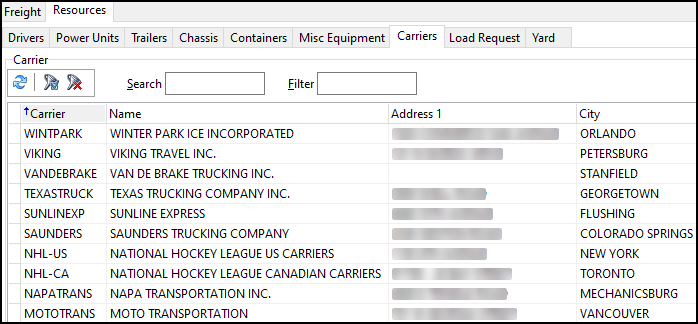
The Carriers tab lists all of the currently available carriers.
This tab only has one unique shortcut menu option. Select View Carrier Profile to show a carrier’s details from Customer & Vendor Profiles.
Load Request
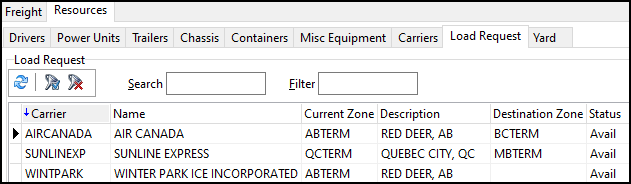
The Load Request tab lists any outstanding load requests.
Load Request shortcut menu
The Load Request tab has three unique shortcut menu options.
| Menu option | Definition |
|---|---|
New |
Opens the Enter a Load Request window without any details entered. |
Edit |
Opens the Enter a Load Request window with the selected load request’s details entered.
|
Delete |
Deletes the selected load request. |
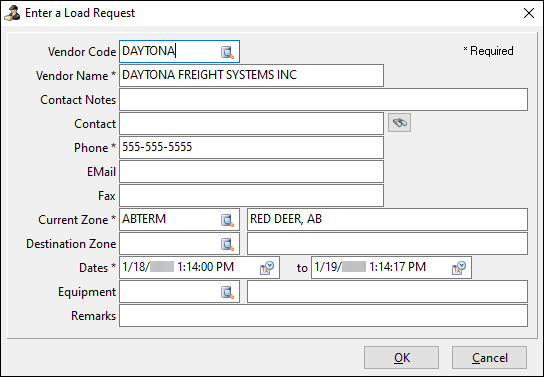
Create a load request
-
Right-click in the Load Request grid. The shortcut menu opens.
-
Select New. The Enter a Load Request window opens.
-
Do one of the following:
-
Select
 search to select a vendor in your system.
 -
Select the Vendor Code field and manually enter a vendor code.
If the vendor is in your system, their name populates the Vendor Name field automatically. If you manually enter a new vendor’s code, you will need to enter a name. This vendor will need to be added to Customer & Vendor Profiles before being added to a trip.
-
-
Enter relevant contact information for the vendor in the Contact, Phone, EMail, and Fax fields.
-
Enter the vendor’s Current Zone and Destination Zone.
-
Select the
 calendar to set the date range.
The default date range is the current date and time to one day ahead. The End Date is when the load request is removed from the system.
-
Enter an equipment class in the Equipment field.
-
Select OK. The load request appears on the Load Request grid.
Yard
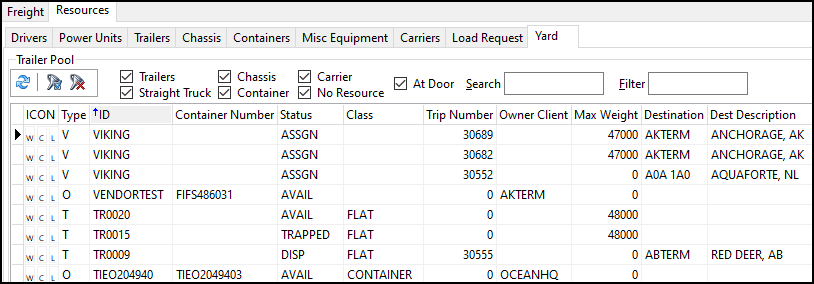
The Yard tab displays trailers, containers, and chassis:
-
That are in an Availability status as configured in Codes Maintenance.
-
Whose current zone matches your terminal view.
-
That have been set to a Park in Yard status.
Select ![]() Refresh regularly to update the available equipment on the Trailer Pool grid.
Refresh regularly to update the available equipment on the Trailer Pool grid.
You can drag these resources to the Doors tab to match them to trips.
Trailer Pool filters
These are the available Trailer Pool filters:
-
Trailers
-
Straight Truck
-
Chassis
-
Container
-
Carrier
-
No Resource
-
At Door
Some filters have specific functions:
-
Carrier: Shows trips that have been parked in the yard with only an interliner attached to them.
-
No Resource: Shows trips that have been parked in the yard without any attached resources. This can be useful for brokerage or non-asset based companies.
-
At Door: Shows resources that are at a door. This option can be hidden using the Yard - Show at door app config.
Yard shortcut menu
The Yard tab has several unique shortcut menu options.
| Menu option | Definition |
|---|---|
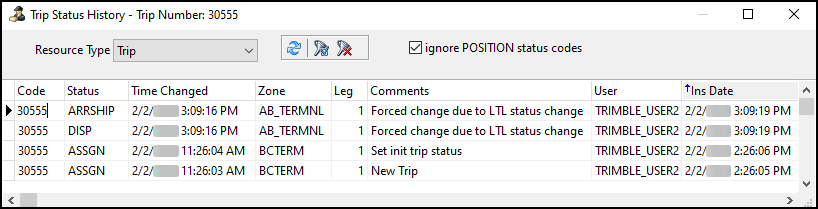
Show Trip Status |
Opens the Trip Status History window for the resource’s assigned trip.
|
Trip Operation Planning |
Opens Trip Operation Planning. |
Convert Trailer to Trap |
Select this option to convert the selected trailer into a trap. A trap is a temporary storage location for freight using resources that can house freight. This includes trailers, straight trucks, and containers. Traps allow for loading, unloading, and parking into the yard. You cannot select this option if the trailer’s trip is unloading at a door. Instead, you must select Finished Unloading and convert the remaining "loaded" items into a trap. When a trip is converted into a trap at a door, the trap remains at the door instead of being moved to the yard. This maintains a consistent conversion method that matches the one used in ConnectedDock. Only bills that are still partially loaded to the trap remain in the trap. The Yard grid allows multiple trips to hold the same resource ID. This accounts for scenarios where a resource is preplanned to multiple trips departing the terminal at the same time. |
Loaded To Go |
Sets the trip’s status to the Loaded to Go status code defined for the current working terminal. |
Barcode Item Details |
Opens the Barcode Item Details window. In this window, you can add, delete, and view barcode information. |