OSD and POD
You can enter over, short, and damaged (OS&D) claims and record proofs of delivery (POD) in the OSD and POD window. While this functionality also exists in Customer Service, you can create OS&D and POD records without leaving Multi Mode Dispatch.
Setup
You can control which users can edit OSD and POD fields. This is done in Security Configuration under Security > Allow Changes. The security settings include:
-
Allow Edit of OS&D/POD Fields
Allows the user to enter and edit OSD and POD claims. If this option is not selected for a user, the OSD and POD window is read-only. -
Allow Edit of OS&D/POD Fields After the Freight Bill is Approved
Allows the user to edit OSD and POD fields after a freight bill has been approved. -
Allow Edit of OS&D/POD Fields After the Freight Bill is Posted to A/R
Allows the user to edit OSD and POD fields after a bill has been posted via the Billing Register.
Access the OSD and POD window
-
Select a trip. The trip’s details appear on the Trip Summary tab.
This option is not available for freight bills that are on a terminal stop or a waypoint stop.
-
Select the Freight Bills tab. A list of the trip’s freight bills opens.
-
Right-click a freight bill. The shortcut menu opens.
-
Go to Update Freight Bill(s) > Update OSD/POD. The OSD and POD window opens.
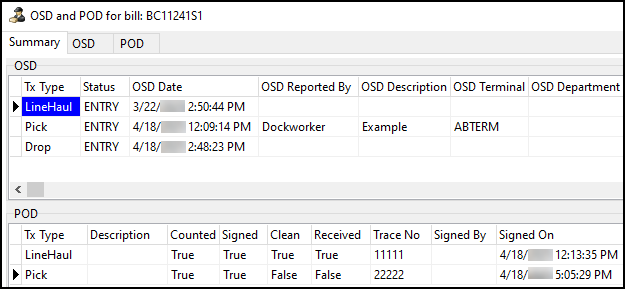
OSD
On the OSD tab you can create over, short, or damaged claims against a freight bill. You can enter multiple OSD records for a single freight bill.
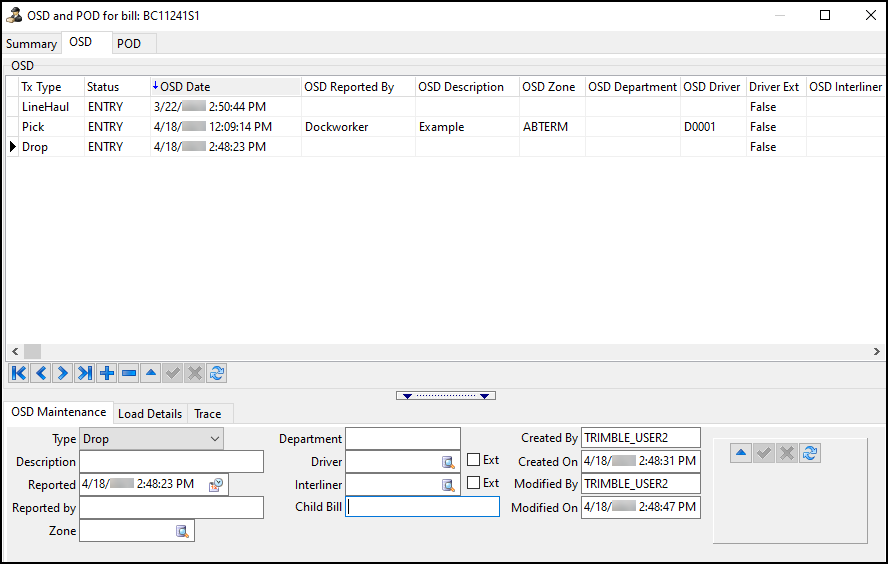
Create an OS&D record
-
Select
 Insert Record. An empty record appears on the OSD grid.
 -
Select the Type dropdown and choose a claim type.
The claim type indicates when the issue was noticed:
-
Pick
The issue was noticed while goods were being loaded. -
LineHaul
The driver noticed damages during shipment. -
Drop
The issue was noticed at the delivery dock.
-
-
Select the Description field and enter a description of the issue.
-
Select the
 calendar next to the Reported field and set the date and time that the issue was reported.
 -
Select the Reported By field and enter the name of the person who reported the issue.
-
Select the Zone field and enter the zone where the issue was noticed.
You can select the
 magnifying glass to look up a zone.
 -
(Optional) Select the Department field and enter a department name.
-
Select the Driver field and enter the driver’s name.
You can select the
magnifying glass to look up a driver. -
Select the Ext checkbox next to the Driver field to mark the driver as external to your company.
-
(Optional) Select the Interliner field and enter an interliner.
You can select the
magnifying glass to look up an interliner. To view the interliner’s full profile, right-click the field and select View in Vendor Profiles -
If the original bill is split, select the Child Bill field and enter the child bill number.
-
Select
 Post Edit to finish creating the record.
Load Details
You set whether the issue is over, short, or damaged on the OSD > Load Details tab.
-
Select an OSD record on the grid.
-
Select Load Details. The Load Details grid opens.
-
Select
Insert Record. The OSD Detail Entry window opens.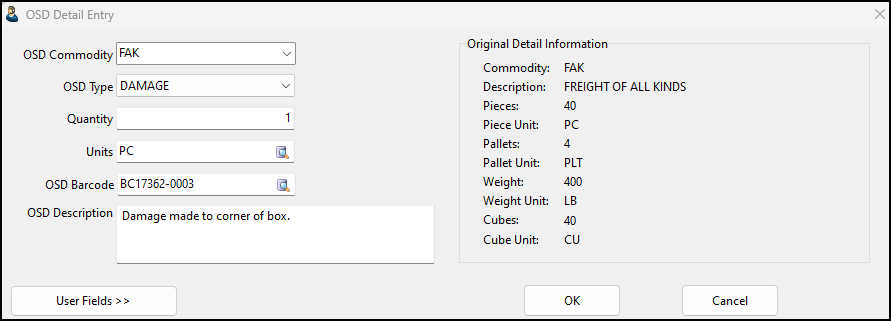
-
Select the OSD Type dropdown menu and choose a type:
-
DAMAGE
-
OVER
-
SHORT
-
-
Select the Quantity field and enter a quantity.
-
Select the Unit field and enter the unit type.
You can select the
magnifying glass to look up a unit type. -
If the claim is for a specific barcoded item, select the OSD Barcode field and enter the barcode.
If an entire shipment is affected, you can still enter a claim against an entire freight bill by not specifying a barcode. You can select the
magnifying glass to look up a barcode. -
Fill out any of your company-specific user fields:
-
Select User Fields. The list of user fields opens.
-
Select any field and enter a value.
-
-
Select OK. The OSD Detail Entry window closes and the Load Details grid updates.

| If you have configured Claim Types with Claim Type Rules, entering an OS&D record may automatically update the freight bill’s detail lines on the Details tab of Customer Service. See Claim Type Rules for more information. |
Trace
You can associate trace numbers with OSD records on the OSD > Trace tab.
-
Select a record on the OSD grid.
-
Select Trace. The Trace grid opens.
-
Select
Insert Record below the Trace grid. A blank record appears on the grid. -
Select the Trace Number field and enter a trace number.
-
Select the Quantity field and enter how many affected OSD items the trace number covers.
-
Select the Remark field and enter any remarks about the trace number.
-
Select
 Post Edit.
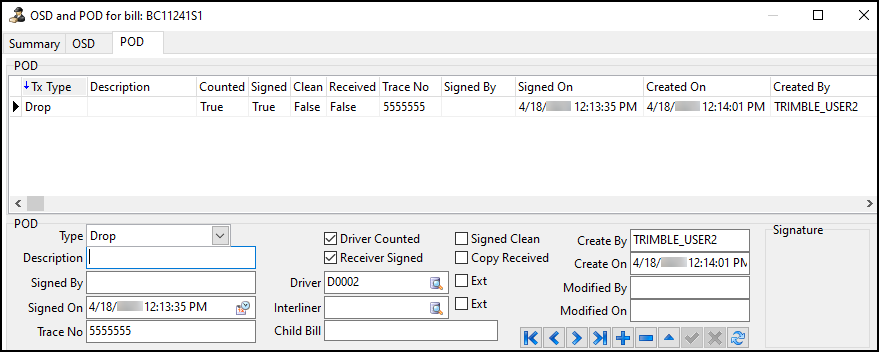
POD
On the POD tab you can create proof of delivery records for a freight bill. All POD fields will be copied onto credits/rebills.
Create a proof of delivery record
-
Select
Insert Record. A blank record appears on the POD grid. -
Select the Type dropdown menu and choose a type:
-
Pick
The proof of delivery was received while goods were being unloaded. -
LineHaul
The proof of delivery was received while the items were being unloaded. -
Drop
The proof of delivery was received when the items were delivered at the bill’s destination.
-
-
Select the Description field and enter a description of the proof of delivery.
-
Select the Signed By field and enter the name of the person who signed the proof of delivery.
-
Select the
calendar next to the Signed On field to set the date and time that the proof of delivery was signed. -
If there is a trace number associated with the proof of delivery, enter it in the Trace No field.
-
Select the Driver Counted checkbox if the driver has made a notation on the bill of lading or delivery receipt indicating that they counted the freight as the shipment was unloaded from the trailer.
-
Select the Receiver Signed checkbox if the receiver’s signature came with notation that the shipping particulars and count agree with the bill of lading.
-
Select the Signed Clean checkbox if:
-
The shipment was signed "SLC".
-
There is a notation that the shipment was unloaded according to the bill of lading with no noted overages, shortages, or damages.
-
-
Select the Copy Received checkbox if a copy of the bill of lading for this shipment was received.
-
Select the Driver field and enter the driver’s name.
You can select the
magnifying glass to look up a driver. -
Select the Ext checkbox next to the Driver field to mark the driver as external to your company.
-
(Optional) Select the Interliner field and enter the interliner.
You can select the
magnifying glass to look up an interliner. To view the interliner’s full profile, right-click the field and select View in Vendor Profiles. -
Select the Ext checkbox next to the Interliner field to mark the interliner as external to your company.
-
If the original bill is split, select the Child Bill field and enter the child bill number.
-
Select
Post Edit to finish creating the record.