Passenger profiles
Anyone aboard a tractor who is not an assigned driver is a passenger, and must have a passenger profile on file. You create passenger profiles in the File Maintenance application.
| Any person riding in the tractor who is not officially assigned to the trip as Driver 1 or Driver 2 is considered a passenger, even if that person is a driver employed by your company. |
Creating an ACE/ACI compliant passenger profile
The profile of a passenger assigned to ACE or ACI trips requires the following information:
-
Passenger ID
-
Name
-
Address
-
Citizenship information
-
License information
-
ACE Compliance information
Creating the passenger profile in TMWSuite
To create or edit a passenger profile in TMWSuite Passenger File Maintenance, follow these steps:
-
In File Maintenance, go to Edit > Passenger.
The Edit Passengers window opens.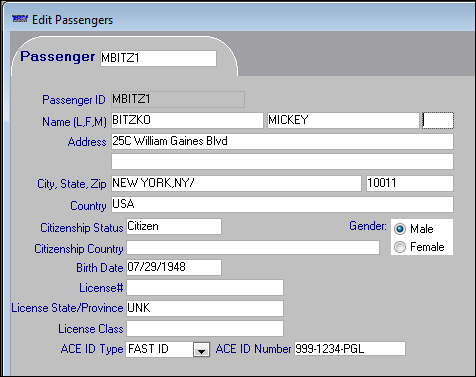
-
Do one of the following:
-
To create a new passenger profile, click
 New.
New. -
To edit an existing passenger profile, enter the passenger’s ID in the Passenger field, and click
 Open.
Open.
-
-
Make the following entries:
Required field: *
Field Definition Passenger ID *
Passenger’s identification code
Enter up to eight alphanumeric characters. The code is defined by your company.
Name (L, F, M) *
Passenger’s last name, first name, and middle initial
Press TAB to move between fields.
Address *
First of two address lines for the passenger’s street address
Address (2)
Second of two address lines for the passenger’s street address
City, State, ZIP *
In the first field, enter the city and state/province in which the passenger resides.
In the second field, enter the five-digit or nine-digit ZIP or postal code.
Country *
Country in which the passenger resides
Citizenship Status *
Select the status that applies to the country code entered in the Citizenship Country field:
-
Citizen (default)
The driver is a citizen of the country specified in the Citizenship Country field. -
Unknown
The driver’s citizenship status is unknown.
Note: These options are defined in the CitizenshipStatus label. They are the only options accepted by ACE and ACI. Any other options your company may have added will be ignored by eManifest.
Citizenship Country *
Enter the two-character ISO country code for the passenger’s country.
For ISO country codes, visit:
Birth Date *
Passenger’s date of birth
License # (optional)
Passenger’s license number
The maximum field length is 25 alphanumeric characters.
License State/Province (optional)
Where applicable, click the field and select the two-character code for the state/province issuing the license.
License Class (optional)
Where applicable, enter the class of vehicle for which the license was issued. This is a free-form text field accepting up to 15 alphanumeric characters.
Gender *
Select the Male or Female radio button.
ACE ID Type *
Select the appropriate ID type from the drop-down list. The default options are:
-
ACE ID
A unique ID issued by U.S. Customs and Border Protection (CBP) that can be assigned to a driver, passenger, tractor, or trailer. -
FAST ID
The FAST ID card is an approved travel document for identification at the U.S. border that can be used as an alternative to a passport under the U.S. travel document requirements for U.S. and Canadian citizens. Fast IDs can be assigned only to drivers and passengers.Note: If FAST lanes will be used at a border crossing, all personnel on board, including passengers, must have a valid FAST ID.
Note: The field displays all default options defined by the AceIDtype label. Only the options listed here are applicable to passenger profiles.
ACE ID Number *
Enter the ID appropriate to the type you selected in the ACE ID Type field.
-
-
Click
 Save.
Save.
Creating the passenger profile in TMW Operations
To create or edit a passenger profile in the TMW Operations Passenger Profile window, follow these steps:
-
Go to Tools > Profiles > Passenger Profile.
The Passenger Profile window opens.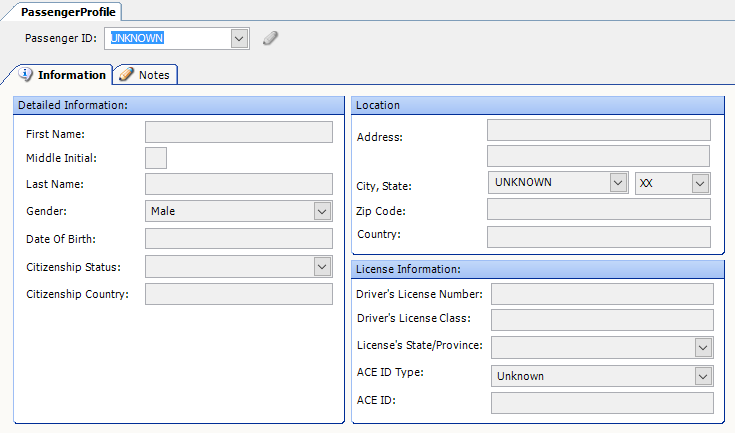
-
Do one of the following:
-
To create a new passenger profile, click
 New.
New. -
To edit an existing passenger profile, enter the passenger’s ID in the Passenger ID field, and click
 Open.
Open.
-
-
On the Information tab, make the following entries:
Required field: *
Field Definition Passenger ID *
Passenger’s identification code
Enter up to eight alphanumeric characters. The code is defined by your company.
Detailed Information
First Name *
Passenger’s first name
Press TAB to move between fields.
Middle Initial *
Passenger’s middle initial
Last Name *
Passenger’s last name
Gender *
Select the Male or Female option.
Date of Birth *
Enter the passenger’s date of birth in MM/DD/YYYY format.
Citizenship Status *
Select the status that applies to the country code entered in the Citizenship Country field:
-
Citizen (default)
The driver is a citizen of the country specified in the Citizenship Country field. -
Unknown
The driver’s citizenship status is unknown.
Note: These options are defined in the CitizenshipStatus label. They are the only options accepted by ACE and ACI. Any other options your company may have added will be ignored by eManifest.
Citizenship Country *
Enter the two-character ISO country code for the country of which the passenger is a citizen
For ISO country codes, visit:
Location
Address *
Enter the first and second lines of the passenger’s street address.
City, State *
In the first field, enter the city in which the passenger resides.
In the second field, enter the state/province in which the passenger resides.
Zip Code *
Enter the five-digit or nine-digit ZIP or postal code.
Country *
Enter the two-character ISO country code for the country where the passenger resides.
License Information
Driver’s License Number (optional)
Passenger’s license number
The maximum field length is 25 alphanumeric characters.
Driver’s License Class (optional)
Where applicable, enter the class of vehicle for which the license was issued. This is a free-form text field accepting up to 15 alphanumeric characters.
License’s State/Province (optional)
Where applicable, click the field and select the two-character code for the state/province issuing the license.
ACE ID Type *
This field lists the following options:
-
ACE ID
A unique ID issued by U.S. Customs and Border Protection (CBP) that can be assigned to a driver, passenger, tractor, or trailer. -
FAST ID
The FAST ID card is an approved travel document for identification at the U.S. border that can be used as an alternative to a passport under the U.S. travel document requirements for U.S. and Canadian citizens. Fast IDs can be assigned only to drivers and passengers.
Note: If FAST lanes will be used at a border crossing, all personnel on board, including passengers, must have a valid FAST ID.
Note: The field displays all default options defined by the AceIDtype label. Only the options listed here are applicable to passenger profiles.
ACE ID *
Enter the ID of the type you selected in the ACE ID Type field.
-
-
Click
 Save.
Save.
Editing document information for a passenger
An eManifest must list at least one proof-of-citizenship document for a passenger. With the passenger profile displayed in File Maintenance, follow these steps:
-
Go to Edit > Passenger.
The Edit Passenger window opens. -
Open the passenger’s profile.
-
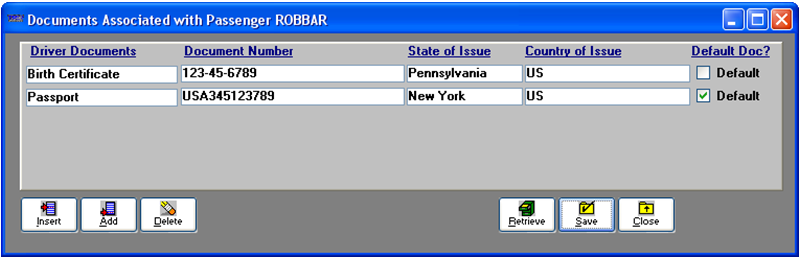
Go to Edit > Passenger Documents.
The Documents Associated with Passenger window opens.Note: Document types are sorted according to the Driver Documents field.
This illustration shows the window with documents already listed. The Driver Document column heading applies to passenger documents.
-
If you need to delete an existing document, do the following.
-
Select the document’s Document Number field.
-
Click Delete.
A confirmation message appears. -
Click Yes.
-
To delete another document, repeat steps a - c.
-
-
To add a document, do one of the following:
-
To insert a row within the documents listed:
-
Select the row below the one you want to insert.
-
Click Insert.
-
-
To add a document at the end of the list, click Add.
A row is added to the end of the list.
-
-
Make entries in the following fields:
Required field: *
Field Definition Driver Documents *
Select the document type from the drop-down list. The default options are:
-
Passport
-
Per ResidentDoc
-
Border Xing Perming
-
Birth Certificate
-
Citizenship Card
-
Cert of Naturalization
-
Other Travel Doc ID
-
Reentry Permit
-
Refugee travel permit
-
US Government Visa
-
Enhanced Drivers Lic
Note: The Enhanced Drivers License document can serve as both a driver’s license and proof of citizenship. If a driver possesses an Enhanced Drivers License, you can enter its number in the Document Number field. It will be included in 309 and 358 messages by default. The driver’s standard license number is not required.
Note: The available document types are defined in the DriverDocuments label in System Administration. The default name for this label is Driver Documents, but the label options also apply to passengers. If you want to use a more generic column name, such as Document Type, you can change the display name in the label.
For details, see:
Guide: System Administration
Document Number *
Enter the document number. The field accepts up to 18 characters.
State of Issue *
Select the state or province that issued the document.
Note: These options are user-defined in the State label in System Administration. If the state or province you need is not available in the list, you must add it as a label option.
Country of Issue *
Enter the two-character ISO country code for the country that issued the document. For ISO country codes, visit:
Default Doc? *
-
-
Click Save.
-
Click Close.
Note: If you try to close the window without saving your work, the system displays a confirmation request. Click Yes or No to continue.