Work with customer records
The Customers page allows you to:
-
Assign customers to units
-
Reassign units to different customers
-
Add or remove customer contacts, pricing, and taxes
-
Create a customer hierarchy
-
Specify a customer’s Bill To
Open a customer’s record
-
Go to Menu > Masters > Customers.
The Customers page opens. -
In the Customer field, enter the customer’s ID and press ENTER.

Note: If you enter an invalid customer ID, an error message window opens. It states, "ABC is not a valid customer." Click OK to close the message.
Add, edit, or delete customer contacts
You use the Contacts tab on the Customers page to:
-
Add contacts to customer records
-
Edit existing customer contacts
-
Remove customer contacts
Add contacts to a customer record
-
Click the Contacts tab.
The Contact Information section is displayed. -
Click Add in the lower-right corner.
The Add Contact pop-up window opens. -
Complete these fields:
Required field: *
Field Definition Contact Type *
Select a contact type from the dropdown list, such as Billing Contact.
Contact Name *
Contact’s first and last names
Phone
Contact’s main phone number
Ext.
Contact’s phone extension, if there is one
Email
Contact’s email address
-
Do one of the following:
-
To save the contact, click OK.
The system saves the contact information. The window closes. -
To save and add another contact, click Save & Add New.
The system saves the contact information. The window remains open to allow you to add another contact. -
To close the window without saving your changes, click Cancel.
-
Edit a customer’s contacts
-
Click the Contacts tab.
The Contact Information section is displayed. -
Select the contact you want to edit.
-
Click Edit.
The Edit Contact window opens. -
Make changes as needed.
-
Click OK.
The system saves your changes. The window closes.To close the window without saving your changes, click Cancel.
Delete a customer’s contacts
-
Click the Contacts tab.
The Contact Information section is displayed. -
Select the contact you want to delete.
-
Click Delete.
The Delete Contact confirmation message window opens. It asks, "Are you sure you want to delete the contact: Contact Name?" -
Click Delete Contact.
That contact is removed. The window closes.To close this message without deleting the contact, click Cancel.
Work with a customer’s units
You use the Units tab on the Customers page to:
-
Assign a unit to a customer
-
Remove a unit
-
Reassign a unit
-
Switch a unit type to Company/Non-Company
Assign units to a customer record
-
Click the Units tab.
The Unit Information section is displayed. -
Click Assign.
The Assign Unit window opens. -
Enter the unit’s ID in the Unit field.
Note: If you enter an invalid unit ID, the system displays an error message. It states, "ABC is not a valid unit." Click OK to close the message.
-
Click OK.
The system adds the unit to the Unit Information section and updates the Effective field with the date and time.
Reassign a unit to a different customer
-
Open the customer’s record to which the unit is assigned.
-
Click the Units tab.
The Unit Information section is displayed. -
Select the unit that you want to reassign.
-
Click Reassign.
The Reassign Unit window opens. -
In the Customer field, enter the ID of the customer to which you are reassigning the unit.
-
Click OK.
The system reassigns the unit to the customer you identified.
Remove a unit from a customer
| You cannot remove a Non-Company Unit from a customer. All non-company units must have a customer assigned. |
-
Click the Units tab.
The Unit Information section is displayed. -
Select the unit that you want to remove.
-
Click Unassign.
The Unassign Unit confirmation window opens. It asks, "Are you sure you want to unassign the unit: Unit ID?" -
Click Unassign Unit.
The system removes the unit record from the customer. The window closes.To close the window without unassigning the unit, click Cancel.
Switch a unit type
First available in TMT Fleet Maintenance: 2018.1
Depending on your license, units are either:
-
Non-Company
When you change a unit type to a Non-Company unit, the system changes the unit license type. A Non-Company unit is not included as part of the program’s unit licensing limit. -
Company
When you change a unit type to a Company unit, the system changes the unit license type. A Company unit is included as part of the program’s unit licensing limit.
For details about the different license types, see TMT Fleet Maintenance overview.
-
Click the Units tab.
The Unit Information section is displayed. -
Select the unit that you want to change.
Depending on the unit’s current assignment, the system displays:
-
A Make Non-Company button next to the other command buttons

-
A Make Company button next to the other command buttons

-
-
Do one of the following:
-
Click Make Non-Company.
The system clears the Company Unit checkbox. -
Click Make Company.
The system selects the Company Unit checkbox.
-
Work with customer taxes
First available in TMT Fleet Maintenance: 2018.1
You use the Taxes tab on the Customers page to:
-
Add tax rates to a customer record
-
Edit a customer’s tax rate
-
Remove a customer’s tax rate
-
Identify specific unit types that are tax-exempt
This illustration shows how the system applies tax rates when you create invoices for customers.
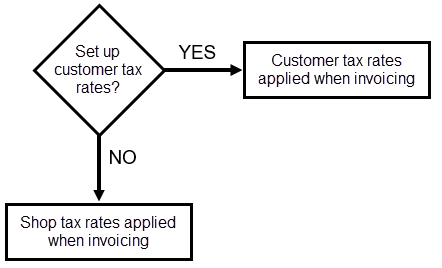
There may be times (after you set up customer tax rates) when you do not want to charge tax. The system allows you to identify specific unit types that are tax-exempt. When you do this, tax rates are not applied to any unit that belongs to that exempted unit type. For example, you could specify all units that belong to the Forklift unit type are tax-exempt.
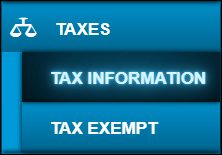
This illustration shows the Taxes tab and the Tax Information and Tax Exempt sub tabs.
Add tax rates to a customer record
-
Click the Taxes tab.
The Tax Information section is displayed. -
Click Add in the lower-right corner.
The Add Tax window opens. -
Complete these fields:
Required field: *
Read-only field: §Field Definition Tax Code *
Select a tax code ID from the dropdown list.
Description §
Tax Code ID description
Note: The system displays the description automatically, based on the value in the Tax Code field.
Tax Percent §
Tax rate as a percentage
Note: This field is blank if the tax code uses the Flat Tax option.
Flat Tax §
Tax rate as a flat rate
Note: This field shows 0 if the tax code uses the Tax Percent option.
Tax Sequence
Order in which taxes are calculated when using the Tax On Tax method
Tax on Parts
Determines if taxes are applied to parts
-
When set to YES, taxes are applied to parts.
-
When set to NO, taxes are not applied to parts.
Tax on Labor
Determines if taxes are applied to labor charges
-
When set to YES, taxes are applied to labor.
-
When set to NO, taxes are not applied to labor.
Tax on Services
Determines if taxes are applied to services
-
When set to YES, taxes are applied to services.
-
When set to NO, taxes are not applied to services.
Tax on Fees
Determines whether to apply tax on fees
-
When set to YES, taxes are applied to fees.
-
When set to NO, taxes are not applied to fees.
Tax on Supplies
Determines whether to apply tax on supplies
-
When set to YES, taxes are applied to supplies.
-
When set to NO, taxes are not applied to supplies.
Tax on Fluids
Determines whether to apply tax on fluids
-
When set to YES, taxes are applied to fluids.
-
When set to NO, taxes are not applied to fluids.
-
-
Do one of the following:
-
To save the tax rate, click OK.
The system saves the tax information. The window closes. -
To save and add another tax rate, click Save & Add New.
The system saves the tax information. The window remains open to allow you to add another tax rate. -
To close the window without saving your changes, click Cancel.
-
Edit a customer’s tax rate
-
Click the Taxes tab.
The Tax Information section is displayed. -
Select the tax you want to edit.
-
Click Edit.
The Edit Tax window opens. -
Make changes as needed.
-
Do one of the following:
-
To save your changes, click OK. The window closes.
-
To close the window without saving your changes, click Cancel.
-
Delete a customer’s tax rate
-
Click the Taxes tab.
The Tax Information section is displayed. -
Select the tax rate you want to delete.
-
Click Delete.
The Delete Tax confirmation message window opens. It asks "Are you sure you want to delete Tax Description?" -
Click Delete Tax.
That tax rate is removed. The message closes.To close the message without deleting the tax, click Cancel.
Identify a customer’s tax-exempt unit types
-
Click the Taxes tab.
The Tax Information section is displayed. -
Click the Tax Exempt sub tab.
The Tax Exempt section is displayed. -
Click Add in the lower-right corner.
The Add Tax window opens. -
In the Unit Type field, select the unit type.
-
Do one of the following:
-
To save the tax exemption, click OK.
The system saves the tax exemption. The window closes. -
To save and add another tax exemption, click Save & Add New.
The system saves the tax exemption. The window remains open to allow you to add another tax exemption. -
To close the window without saving your changes, click Cancel.
-
Remove customer’s tax-exempt unit types
-
Click the Taxes tab.
The Tax Information section is displayed. -
Click the Tax Exempt sub tab.
The Tax Exempt section is displayed. -
Select the tax exemption you want to delete.
-
Click Delete.
The Delete Tax Exempt confirmation message window opens. It asks, "Are you sure you want to delete the selected item?" -
Click OK.
That tax-exempt unit type is removed. The message closes.
To close the message without deleting the tax exemption, click Cancel.
Set up exceptions to a customer’s price structure
You use the Pricing tab on the Customers page to set up exceptions, by unit type, to the customer’s pricing structure.
You base this structure on a Unit Type and/or a Repair Site.
-
Unit Type
Rates based on the Unit Type have a higher priority than rates based on a Repair Site and rates specified on the Definition tab. -
Repair Site
Rates based on the Repair Site have a higher priority than rates specified on the Definition tab.
Set up a customer’s pricing structure
-
Click the Pricing tab.
The Pricing Information section is displayed. -
Click Add in the lower-right corner.
The Add Pricing window opens. -
Do one of the following to specify the price structure:
-
Click Price Table.
-
Click Pay Grade.
-
-
Complete these fields:
Required field: *
Field Definition Unit Type
Unit type used for invoice pricing
Repair Site
Location where the repairs will be made
-
CUSTOMER
You perform the repair at the customer’s facility. -
FACILITY
You perform the repair at your company’s facility. -
FIELD
You perform the repair in the field (for example, on the side of a highway). -
OUTSIDE COMP
An outside company performs the repair.
Pay Grade *
Default pay grade identified in the invoice pricing table
Price Table *
Invoice price table used to bill the customer
An invoice price table or pay grade is required to add unit type pricing.
-
-
Do one of the following:
-
To add the pricing structure to the customer’s record, click Save.
The system adds the pricing structure to the customer. The window closes. -
To assign multiple pricing structures to this customer’s record, click Save & Add New.
The system saves the pricing structure. The window remains open to allow you to add another pricing structure. -
To close the window without saving your changes, click Cancel.
-
Edit a customer’s pricing structure
-
Click the Pricing tab.
The Pricing Information section is displayed. -
Select the row you want to edit.
-
Click Edit.
The Edit Pricing window opens. -
Make changes as needed.
Required field: *
Field Definition Unit Type
Unit type used for invoice pricing
Repair Site
Location where the repairs will be made
-
CUSTOMER
You perform the repair at the customer’s facility. -
FACILITY
You perform the repair at your company’s facility. -
FIELD
You perform the repair in the field (for example, on the side of a highway). -
OUTSIDE COMP
An outside company performs the repair.
Pay Grade *
Default pay grade identified in the invoice pricing table
Price Table *
Invoice price table used to bill the customer
An invoice price table or pay grade is required to add unit type pricing.
-
-
Do one of the following:
-
To save the pricing structure to the customer’s record, click Save.
The system adds the pricing structure to the customer. The window closes. -
To assign multiple pricing structures to this customer’s record, click Save & Add New.
The system saves the pricing structure. The window remains open to allow you to add another pricing structure. -
To close the window without saving your changes, click Cancel.
-
Remove a customer’s pricing structure
-
Click the Pricing tab.
The Pricing Information section is displayed. -
Select the row you want to delete.
-
Click Delete.
The Delete Pricing message window opens. It asks, "Are you sure you want to delete the pricing record for unit type Unit Type Name and repair site Repair Site Name?" -
Click Delete Pricing.
The system either removes the pricing structure. The message closes.To close this window without deleting the pricing structure, click Cancel.
Update a customer’s billing address
If a customer wants invoices sent to an address other than their mailing address, you would update that customer’s Bill To information. The default billing address and billing name are the same as the customer’s address and name on the Definition tab. For details on this tab, see Definition tab.
-
Click the Bill To tab.
The Bill Information and Bill Address sections are displayed. -
Complete these fields:
Field Definition Bill Name
Customer’s billing name
Billing Address 1
Customer’s billing address, such as 123 Main St.
Billing Address 2
Customer’s secondary billing address, such as Suite 300
City
Customer’s billing address, city location
State
Customer’s billing address, state location
Zip Code
Customer’s billing address, ZIP/postal code
-
Click Save.