Create a unit record
You use the Units page to set up all pertinent information for tracking units. When you create a repair order, you must assign units to that order. Before your shop can make repairs to a unit, you must first create that Unit master record.
The system supports three unit categories:
-
Company units (full units)
-
Non-company units (retail units)
-
Miscellaneous units
For details on units and unit categories, see Unit categories.
| Once you create a unit, you can copy or clone that record to make similar units. For more information, see Clone a unit record. |
-
Open the Units master page:
-
For versions prior to V.2024.2, go to Menu > Masters > Units. The Units page opens and displays information about the first record automatically.
-
For versions V.2024.2 and later, select Units in the left navigation pane.
-
-
Click Add New. The Add New Unit window opens.
-
In the Unit Identifier field, enter the new unit’s ID and press ENTER. You can now edit the fields in the Unit Details section.
-
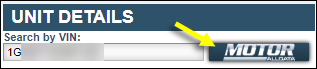
In the Search by VIN field, do one of the following:
-
For versions 2024.1 and later, enter the unit’s VIN. The program looks for the number in the Trimble Transportation Cloud (TTC) VIN Service to populate the applicable fields.
-
For V.2019.4.6 and earlier, if your company has the Motors module:
-
Enter the unit’s VIN number in the Search by VIN field.
-
Click the MOTOR ALLDATA icon.
Notes:
-
If you entered an incorrect VIN number, the system displays an error message that states, "No matching VIN in the system at this time!"
-
As of V.2020.1, the Motors module is no longer supported.
-
-
-
-
Complete the following fields:
Required field: *
Field Definition Description *
Enter the unit’s description.
Note: You can enter up to 60 alphanumeric characters.
Make *
Enter the unit’s manufacturer or use
 Search to find one.
Model *
Select the manufacturer’s model from the dropdown list.
Year *
Enter the year the unit was manufactured.
Note: This field defaults to the current year.
Unit Type *
Select an option from the dropdown list. The options vary based on your setup.
Status *
Select an option from the dropdown list. The options vary based on your setup.
Activity *
Select an option from the dropdown list. The options vary based on your setup.
Division *
Select an option from the dropdown list. The options vary based on your setup.
Department *
Select an option from the dropdown list. The options vary based on your setup.
Domicile *
Enter a shop or use the
Search to select one.Cost Center *
Select an option from the dropdown list. The options vary based on your setup.
Title
Enter the title document number.
VIN / Serial
Enter the serial number or Vehicle Identification Number (VIN).
License
Enter the license plate number or other identification.
Engine
Enter the engine type.
Wheelbase
Enter the distance between axles on the unit.
Note: The system recognizes 110, 110", and 110 In. as three different wheelbases.
Capacity
Enter the unit’s capacity.
Note: The system recognizes 80000; 80,000; and 80K as three different capacities.
State
Enter the state where the unit is licensed.
Note: The system recognizes D-466, D466, and D 466 as three different engine types.
-
When you are finished, click Save. The program creates the new record and returns you to the Units page. The page now shows the details for the new unit.
To close the window without saving your changes, click Cancel.