2022.1
This section contains the following for the latest version:
-
System requirements
-
Enhancements (new or updated features)
-
Resolved issues (application improvements)
| Before upgrading your production environment, Trimble Transportation recommends that you read the system requirements and install the latest version in a test environment. If you have questions, please contact your Trimble customer representative. |
Requirements
Before you begin installing LTL Operations Module version 2022.1, check that these requirements are met:
-
TMWSuite®
You must be using TMWSuite V.2018.18_01.0192 or later.
-
Microsoft® .NET Framework
Version 4.6.2 or later (full package not client)
The framework must be installed on the LTL Operations Module server, client, and administrator systems before you install LTL Operations Module. If it is not present, the system displays an advisory message during the installation. Install the framework before running the application.
-
Internet Information Services (IIS) for Microsoft® Windows Server®
IIS Microsoft Windows Server 2008 R2 or later
-
Microsoft® SQL Server®
Microsoft SQL Server 2012 or later
Note: SQL Server 2014, SQL Server 2016, SQL Server 2017, and SQL Server 2019 are supported. Trimble Transportation recommends using the latest service pack of whichever version you use.
-
You must be logged into the system where you want to install LTL Operations Module, and have administrator rights for that system.
Like most applications, LTL Operations Module can be installed locally on a user’s system. It is also possible to install LTL Operations Module on a network drive. To do so, you must be logged into the system where the drive is physically located, and have administrator rights for that system.
-
SQL Server System Administrator rights are necessary.
The installation of LTL Operations Module includes the manual application of an SQL script to the TMWSuite database. You must have a SQL Server administrator login and password to apply it.
Enhancements
Appian integration
Improved Distance file creation and validation (TTESUITE-200878)
When you use the Validate Distance command in the Send to Appian window, the system creates the Distance file. Before, the way it was created could cause file corruption. Now, the way the file is created no longer causes it to be corrupted.
In addition, you can specify the minimum distance for which the system recalculates miles when you use the Validate Distance command. To do this, you use the LTLAppianDistanceFileMin General Info Table setting.
Moving multiple stops from one manifest to another (TTESUITE-201424)
Now, in the Route Response window you can select multiple drops from one manifest and drag them to another. The drops will be inserted in the new manifest in the order in which they were selected. To undo all the inserted drops at once, select the Undo command.
Split/unsplit leg functionality for manifests (TTESUITE-201752)
Now, once you send routes to Appian, you can split legs from the Route Response window. Select the route, and in the Domicile Legs section, you can select the Split, Unsplit, and Sync Legs commands. If you split a route into two routes and change the start times on one of them, the Sync command will sync both start times. There is a two-split/unsplit limit for this feature.
Single Split/Unsplit functionality for Master Schedules (TTESUITE-201754)
Now, once you send routes to Appian, you can split Master Schedules from the window. Select the Master Schedule, and in the Domicile Legs section, you can select the Split, Unsplit, and Sync Legs commands. If you split a Master Schedule into two and change the start times on one of them, the Sync command will sync both start times. There is a two-split/unsplit limit for this feature.
Company profiles
Latitude/Longitude changes in company profile sync with active stops (TTESUITE-200704)
Lat/Long and address changes made in a company’s profile can be synced with active stops. The Out of Sync Fields field lists stops that have information that is different from the company profile. The field is found on the Terminal window’s Information tab.
-
Go to Terminal > Companies Information.
-
In the Out of Sync Fields field, select the row or rows that need to be updated.
-
Click the Sync Selected Rows or the Sync All Stops commands.
The information will update to match the company profile, and the Out of Sync Fields field be blank.
Domicile routes to Appian/Sync command added to Route Response (TTESUITE-201751)
You can send multi-leg Domicile routes to Appian as master schedules and manifests. We added the Sync Domiciles command to the Route Response window. Click it to:
-
Recalculate the Arrival/Departure times of each leg/manifest in a chain.
-
Synchronize arrival times for matching stops.
The Route Response window shows full details for the multi-leg routes.

Background Service
Freight order import improvements (TTESUITE-201732)
These changes were made to improve how the system handles importing freight orders.
-
To allow better diagnostics, we increased the number of characters in error messages. This makes them more descriptive.
-
The App.config file has four new settings that allow you to set rules for how the system retries importing freight orders:
-
MaxRetriesImport specifies the number retries allowed. Setting it to 0 (zero) means that once a record fails to import, it is ignored until its ImportStatus is reset to New.
-
MinIntervalImportRetry sets the number of seconds the system waits before it tries to import the order again.
-
MaxRetryResetsImport specifies the number of times the order’s status can be reset to New so that the system can try to import it again.
-
MinIntervalImportRetriesReset sets the number of seconds the system waits between resetting the order status to New and so that it can try to import it again.
-
For example, you may want to retry a failing record three times, waiting five minutes after each try. If the record is still not imported, you want to repeat the process again two hours after the last failure. You would make these entries in the App.config file:
-
MaxRetriesImport=3
-
MinIntervalImportRetry=300
-
MaxRetryResetsImport=1
-
MinIntervalImportRetriesReset=7200
Manifests
Allow drivers not assigned to shifts (TTESUITE-202067)
A new General Info Table setting, LTLDriverShiftReqd, allows flexibility in assigning drivers not assigned to shifts to manifests. The new functionality requires that the General Info Table setting LTLCheckSumShiftless must have a value of N in the String1 field.
Row Level Security
Extending Row Level Security to field options (TTESUITE-200685)
Row Level Security (RLS) lets you secure records. For example, security can be applied to records belonging to specific companies, divisions, or terminals. It limits access so that only users assigned to them retrieve their records. You do this by:
-
Identifying the tables and fields that would have security applied to them.
-
Specifying the field values associated with a user’s login.
This worked well when users retrieved records. However, when users created records such as orders or profiles, they could select any value in fields that have user-defined options. Their selections in these fields were not limited to what was defined for them when retrieving records. This meant that they could enter incorrect information accidentally. Once the record was saved, they could not access it to fix it.
Now, you can set up RLS to also use label security. Label security limits the options users can select in certain user-definable fields that have security applied to them.
Once you assign individual label options to a specified label key, only the groups or users assigned to the same label key value can see them in the user-defined field.
|
Terminal Profile
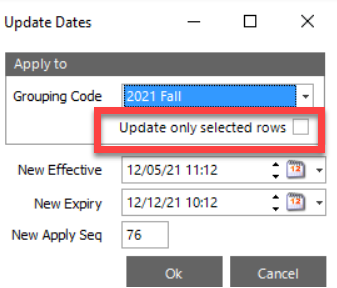
Update multiple rows at a time on the Routes window (TTESUITE-202145)
You can update the Effective/Expiry dates for a certain group of loads within a routebook revision:
-
Go to Terminal > Properties > Routes.
-
Select multiple rows.
-
Click Update Dates.
The Update Dates window opens. -
Complete the fields.
-
Select the Update only selected rows checkbox.

-
Click OK.
Terminal Routes
Editing routes within same route book (TTESUITE-201294)
A Route Book is the same batch/schedule. Now, you can modify or add routes within a Route Book rather than make a copy of the existing Route Book with all the modifications.
-
Go to Terminal Properties.
-
Go to Routes > Routes/Schedules view.
-
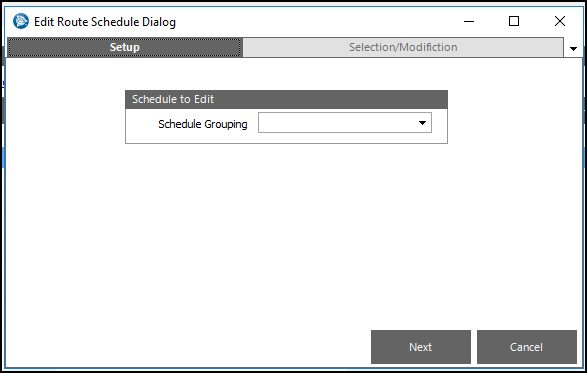
In the Routes/Schedules view, click the Edit Schedules command.

The Edit Route Schedule dialog box opens.

-
In the Schedule to Edit section, select the Schedule Grouping.
-
In the Schedule to Edit section, click Next.
The Setup and Selection/Modification sections display at the top of the window.

-
In the Additional Routes section, click Plus.
A list of additional routes opens.
-
Click OK.
-
Select at least two rows to edit.
-
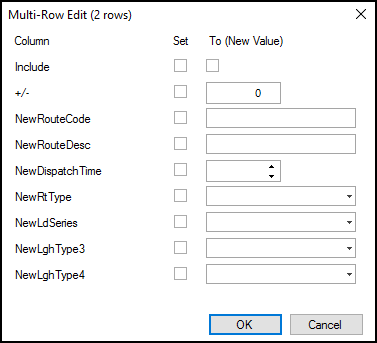
In the Selection Modification section, click Edit.
The Multi-Row Edit window opens

-
In the Multi-Row Edit window, make the necessary edits and click OK.
-
Confirm edit(s).
-
Click Accept.
-
Do one of the following:
-
If you want to export a Microsoft Excel® file, click Yes, name and save the file, and follow the remaining prompts.
-
If you do not want to export a file, click No, and follow the remaining prompts.
-
Resolved Issues
Background service
TTESUITE-201419
Before freight details we saved, deleted, and updated during a FreightOrder update. This caused occasional deletion of some freight details during updates. Now freight details are updated in place instead of deleting and then reinserting them.
Electronic Data Interchange (EDI)
TTESUITE-202181
Before, if an order in a manifest needed to be resent, no EDI 214 status was sent to inform the shipper/buyer. Now the EDI 214 status is sent.
Linehaul manifest routing
TTSUITE-202341
Adding a drop-at-dock order to a linehaul manifest corrupted the manifest. Orders were not assigned correctly. This happened if you used the Crossdock window to add the order.
LTLDockService
TTESUITE-202156
Now, default assignments are made correctly in LTLDockServices.svc.cs. Before, a character limit was missing in the web.config file.
LTL Company Hours of Operations
TTESUITE-202279
Before, when a stop was added to the master schedule, no CompanyHoursofOperation record was created. Since the record could not be found, a duplicate stop was created. The process has been changed to prevent the duplicate record.
LTL Master Schedule
-
TTESUITE-202324
Previously, if you manually edited the Master Schedules, you would get a prompt asking if you wanted to also update empty Manifests created from the edited master schedule. You didn’t get the prompt after it was sent to Appian. Now, if you edit a Master Schedule after it was sent to Appian, you now get the same prompt. -
TTSUITE-201990
When a schedule grouping is assigned to a manually created Master Schedule, the correct batch number is assigned. -
TTESUITE-201991
The GetMasterSchedule stored procedure was changed to get Effective/Expiration dates from the Terminal Trip Schedule. The new dates are more accurate.
Manifest Editor
TTESUITE-201899
Route problems caused by adding an order to a manifest with Direct to Rail status have been resolved.
Mass Status Change
TTESUITE-201810
Before, when you changed one straight truck for another on a manifest that had Loaded to go status, the change was not made in the LTL_MOBCOMM_SHIFTLESS table. Now, the table is updated.
Mileage performance
TTESUITE-201715
When a schedule grouping is assigned to a manually created Master Schedule, the correct batch number is assigned.
Paperwork query
TTESUITE-201207
The Paperwork query is being run once per order. This has reduced the time LTL takes to determine paperwork types. Before, the query was run more than 700 times a minute.
Route Response date/time correction
TTESUITE- 201490
When the Add Route command is used to create a route that requires an extra truck to complete all deliveries, the dates/times are incorrect in the created manifest. When you resend the manifest to Appian, the dates and times are corrected.
RouteSchedule view support
TTESUITE-202386
Now, in the RouteSchedule view, schedule legs are joined with the TerminalTripsSchedule in the last leg instead of the first. This change, and planned future enhancements, will help provide more useful/accurate information.
Terminal Profile
-
TTESUITE-202282
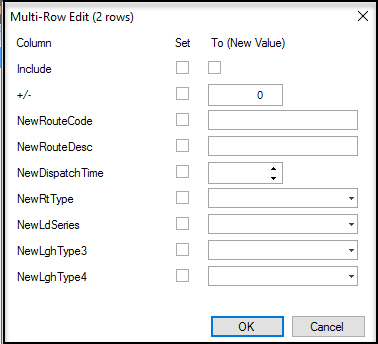
The multi-row edit process reached through the Copy Routes window quit working. The process has been repaired. Now, it is available through the Copy Route Schedule Dialog window’s Edit command. You do the editing in the Multi-Row Edit window.

-
Go to Terminal > Properties > Copy Route.
-
Select multiple rows.
-
Click Edit.
The Multi-row Edit window opens.
-
TTESUITE-201353
Before, when you opened the Terminal Profile window, memory was used but not freed up when the window was closed. This would cause the application to quickly use up the maximum amount of memory it could. That could eventually lead to computer crashes. Now, memory used is freed up when the window is closed.
-
Time Zones
TTESUITE-202566
In areas where there is no daylight savings time (DST), routes to DST areas have incorrect delivery times. This happens because the system only checks to see if the time zones are the same. Turning off the time zone calculation code will correct this problem.
TL/LTL interoperations
TTESUITE-201886
The Row Level Security feature lets you secure the records pertaining to specific groups so only users assigned to a group can access its records. If the security set up for the Truckload User was different from that of the LTL user doing the import, it triggered a bug. When a Truck Load Operations order was pushed to LTL Row Level Security left the shipper or consignee as Unknown. There was no problem when either the shipper or consignee were set to Unknown. However, there was a problem if both the shipper and the consignee were set to Unknown. Syncing logic did not work and changes made to the LTL order were not applied to the TL Ops leg automatically.
Trip Manifest
TTESUITE-202173
Before, some trips were filtered out of the drop-down field on the New Trip window.
-
Go to Pickups >Deliveries/Crossdock.
-
In the lower Trip Manifest Control, click New Trip.
The Use schedule checkbox is selected. A list of valid schedules for the Departure Date are available in the Schedule drop-down list. Now, all trips are included in the New Trip window.