Bill of Lading (BOL) Tool
The BOL Tool section contains several tabs that enable you to control exactly what TM4Web users are able to view and/or use when entering orders.
The upper portion of the Order Entry window consists of numerous tabs that group together related information.
![]()
| Bill of Lading (as with all Client Features) is configurable based on Access Group. Select the Access Code you wish to configure. |
To access the Bill of Lading window, click Client Features and then click BOL Tool.
Header tab
The Header tab contains settings that control how and what is displayed when the user first enters the TM4Web > Bill of Lading section, and contains some additional instructions concerning these fields.
Select appropriate entries to the following options:
| Options | Description |
|---|---|
Garbage Collect after # days |
|
Display Header Section |
Selecting this option displays the BOL Header section to your TM4Web users. You must choose what Header Fields to display to the screen by configuring the Header Fields Grid. |
Crystal Reports |
Click Setup to set details of your report selections using the navigation controls. Note: Ensure that the crystal reports are local to the TM4Web machine and the identified path exists on the TM4Web server. |
You can reposition items by selecting a detail line and using ![]() Move Up and
Move Up and ![]() Move Down on the navigation bar.
Move Down on the navigation bar.
Use this procedure to add fields:
-
Add a new record to the Header grid.
-
Click
 Add on the navigational bar.
 -
On the appropriate table field list window, double-click the desired field. The field is added in the header section.

-
If the default values for the header require editing, select the record and click
 Edit.
Edit.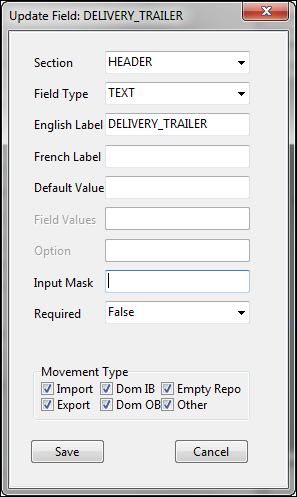
Field Definition Section
Select the option to select the section where this record should appear. Options are Header, Container, Details, and Custom.
Field Type
This field will generate a drop down list with three values when it is clicked. Options are Text, List, and Date.
-
If Text and Date are selected, the Field Values column will not be taken into account when using TM4Web.
-
If List is selected, you must complete the Field Values field in one of two ways:
-
A comma separated list - You must enter a set of two values for each item you want to appear in the list, one for the value to be stored in the database and the other for the text to appear in the list. Each of your entered values must be separated by a comma (for example: EXPEDITED,Expedited Service,INSIDE,Inside Delivery, JOB SITE,Job Site Delivery,OVERNIGHT,Overnight Delivery,REGULAR,Regular, etc.. - NO SPACES REQUIRED).
-
An SQL Select statement - with two fields in the field list (of the select statement). They must have the following aliases: OPTION and VALUE. The OPTION alias populates the text of the selected list, while the VALUE alias populates the values that will be saved to the database. This dynamically populates the selected list with the values returned from the Select statement.
For example: SELECT TRAILER_ID OPTION, TYPE VALUE FROM TRAILER (the value is saved in the Field Values field, and the Option text will be saved in the Option field).
-
English/French Label
Enter the text label you wish to display for the selected field. Use either of the provided fields (or both) depending on the languages your company supports.
Default Value
Field Values/Option
See Field Type description.
Input Mask
Required
Select either True or False depending on if the selected field must be filled out by the user.
Movement Type
Select all of the movement types that will accept the selected field. Options are: Import, Dom IB, Empty Repo, Export, Dom OB, and Other.
-
-
Click Save.
Contacts tab
The Contacts tab contains several sub-tabs under which you can setup what contact information will be displayed to users in BOL Documents > Contacts section, as well as select a location to gather contact data from your database.
General tab
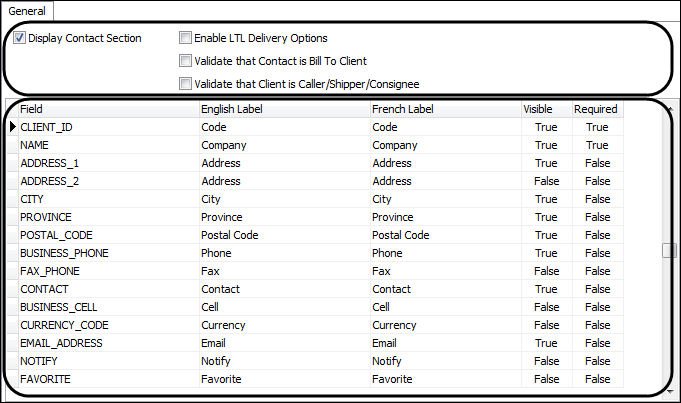
The General sub-tab displays basic configuration option under which you can setup on the BOL Documents > Contacts form. The General tab is separated into two sections: General options and the Contact fields' grid.
Enter and select appropriate entries to the following fields and options:
| General Options | Description |
|---|---|
Display Contact Section |
Selecting this option displays the BOL section to your TM4Web users. You must choose what contact fields to display to the screen by configuring the Contact Fields grid. |
Enable LTL Delivery Options |
Selecting this option enables users to see the LTL Delivery Options for a selected client. |
Validate that Contact is Bill To Client |
Selecting this option enables validation of TM4Web users as the Bill To Client. If selected, a Client’s ID must be a Bill-To Client in the Customer & Vendor Profiles program. |
Validate that Client is Caller/Shipper/Consignee |
Selecting this option enables validation of TM4Web users as Caller/Shipper/Consignee. If selected, a Client’s ID is checked against the data in the Customer & Vendor Profiles program. |
While you cannot add or remove items from the Contact Fields grid, you can reposition items by selecting a detail line and using ![]() Move Up and
Move Up and ![]() Move Down on the navigation bar.
Move Down on the navigation bar.
Select appropriate entries to the following options:
| Contact Field grid | Description |
|---|---|
Field |
This is the name of a database field as it appears in the Contacts table upon installation of TruckMate. |
English/French Label |
Enter the text that will be displayed to users concerning the selected Contact field. Users who choose to use the French Language will see the text entered under the French Label field. |
Visible |
Double-click and select either True or False, depending on if you want these fields to be viewable by users. |
Required |
Double-click and set to either True or False, depending on whether these fields are required to be displayed to the screen. |
Caller tab
The Caller sub-tab displays basic configuration options.
Select appropriate entries to the following options:
| Options | Description |
|---|---|
Enabled |
Selecting this option grants your users access to the Caller Contact fields along with any of the other enabled Contact fields. |
Input Type |
Select either List or Text. See Header Information Grid for more information. |
Read Only |
Selecting this option displays the Caller contact information, but disables editing by users. |
Bill To Clients only |
Selecting this option enables your users the option of selecting Bill-To Clients (as configured in the Customer Profiles program > Notes Tab > Client Is section) as Callers. |
Display Contact Field as select list |
Select this option to display the Contact field as a Select List for your users. |
Shipper tab
The Shipper sub-tab displays basic configuration options under which you can configure shipper contact information.
Select appropriate entries to the following options:
| Options | Description |
|---|---|
Enabled |
Selecting this option grants your users access to the Shipper Contact fields along with any of the other enabled Contact fields. |
Input Type |
Select either List or Text. See Header Information Grid for more information. |
Read Only |
Selecting this option displays the Shipper Contact information, but disables editing by users. |
Bill To Clients Only |
Selecting this option enables your users the option of selecting Bill-To Clients (as configured in the Customer Profiles program > Notes Tab >'Client Is section) as Shippers. |
Display Contact Field as select list |
Select this option to display the Contact field as a Select List for your users. |
Default Shipper to Caller |
Selecting this option automatically has the Shipper value set to the same value as that populated in the Caller field for all users. |
Display Shipper is Caller checkbox |
Selecting this option enables your users (access group) to see the Shipper is Caller checkbox, which then enables your users to automatically set the Shipper value as the same that is populated in the Caller field. |
Consignee tab
The Consignee sub-tab displays options under which you can configure consignee contact information.
Select appropriate entries to the following options:
| Options | Description |
|---|---|
Enabled |
Selecting this option grants your users access to the Consignee Contact fields along with any of the other enabled Contact fields. |
Input Type |
Select either List or Text. See Header Information Grid for more information. |
Read Only |
Selecting this option displays the Consignee Contact information, but disables editing by users. |
Bill To Clients Only |
Selecting this option enables your users the option of selecting Bill-To Clients (as configured in the Customer Profiles program > Notes Tab >'Client Is section) as Shippers. |
Display Contact Field as select list |
Select this option to display the Contact field as a Select List for your users. |
Display Consignee is Caller checkbox |
Selecting this option enables your users (access group) to see the Consignee is Caller checkbox, which then enables your users to automatically set the Consignee values as the same that is populated in the Caller field. |
Care Of tab
The Care Of sub-tab displays options under which you can configure care of contact information.
Select appropriate entries to the following options:
| Options | Description |
|---|---|
Enabled |
Selecting this option grants your users' access to the Care Of fields along with any of the other enabled Contact fields. |
Input Type |
Select either List or Text. See Header Information Grid for more information. |
Read Only |
Selecting this option displays the Care Of Contact information, but disables editing by users. |
Bill To Clients Only |
Selecting this option enables your users the option of selecting Bill-To Clients (as configured in the Customer Profiles program > Notes Tab >'Client Is section) as Shippers. |
Display Contact Field as select list |
Select this option to display the Contact field as a Select List for your users. |
Other tab
The Other sub-tab displays options under which you can configure other contact information.
Select appropriate entries to the following options:
| Options | Description |
|---|---|
Enabled |
Selecting this option grants your users access to the Other fields along with any of the other enabled Contact fields. |
Input Type |
Select either List or Text. See Header Information Grid for more information. |
Read Only |
Selecting this option displays the Other Contact information, but disables editing by users. |
Bill To Clients Only |
Selecting this option enables your users the option of selecting Bill-To Clients (as configured in the Customer Profiles program > Notes Tab >'Client Is section) as Shippers. |
Display Contact Field as select list |
Select this option to display the Contact field as a Select List for your users. |
Intermodal tab
The Intermodal tab contains settings that control how and what is displayed in the Container Fields section. The Intermodal tab is divided into two sections: Intermodal options and the Intermodal Fields grid.
Select appropriate entries to the following options:
| Options | Description |
|---|---|
Display Intermodal Section |
Selecting this option enables users to access to the Container Fields section of TM4Web. |
You can add and remove items from the Intermodal Fields grid.
You can reposition items by selecting a detail line and using ![]() Move Up and
Move Up and ![]() Move Down on the navigation bar.
Move Down on the navigation bar.
| Intermodal Fields | Description |
|---|---|
Field Name |
This is the name of a database field as it appears in the Intermodal table upon installation of TruckMate. |
Section |
Indicates the section where the record will appear. |
English/French Label |
Enter the text that will be displayed to users concerning the selected field. Users who choose to use the French Language will see the text entered under the French Label field. |
Required |
True or False values determine if the selected field must be filled out by the user. |
Use this procedure to add fields:
-
Add a new record to the Intermodal Fields grid.
-
Click
Add on the navigational bar. -
On the appropriate table field list window, double-click the desired field. The field is added in the grid.
-
If the default values for the field require editing, click the desired record and click
Edit on the navigation menu.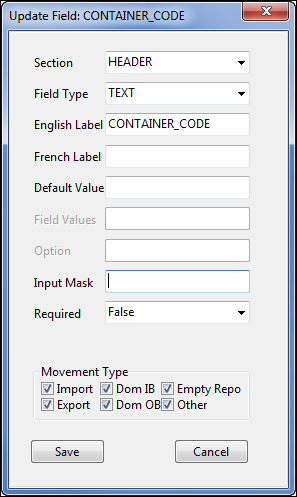
Field Definition Section
Select the option to select the section where this record should appear. Options are Header, Container, Details, and Custom.
Field Type
This field will generate a drop down list with three values when it is clicked. Options are Text, List, and Date.
-
If Text and Date are selected, the Field Values column will not be taken into account when using TM4Web.
-
If List is selected, you must complete the Field Values field in one of two ways:
-
A comma separated list - You must enter a set of two values for each item you want to appear in the list, one for the value to be stored in the database and the other for the text to appear in the list. Each of your entered values must be separated by a comma (for example: Value1, Value2, Value3, etc. - NO SPACES REQUIRED).
-
An SQL Select statement - with two fields in the field list (of the select statement). They must have the following aliases: OPTION and VALUE. The OPTION alias populates the text of the selected list, while the VALUE alias populates the values that will be saved to the database. This dynamically populates the selected list with the values returned from the Select statement.
-
Note: When the Intermodal (CONTAINER_TLORDER) fields CONTAINER_ISO, CONTAINER_CODE, and/or CONTAINER_SIZE are setup as List type fields, they will be automatically populated in dropdown lists selecting from their corresponding TruckMate tables.
For example: SELECT TRAILER_ID OPTION, TYPE VALUE FROM TRAILER (the value is saved in the Field Values field, and the Option text will be saved in the Option field).
English/French Label
Enter the text label you wish to display for the selected field. Use either of the provided fields (or both) depending on the languages your Company supports.
Default Value
Field Values/Option
See Field Type description.
Input Mask
Required
Select either True or False depending on if the selected field must be filled out by the user.
Movement Type
Select all of the movement types that will accept the selected field. Options are: Import, Dom IB, Empty Repo, Export, Dom OB, and Other.
-
-
Click Save.
Details tab
The Details tab contains settings that control how and what is displayed in the BOL Documents > Details section. The Details tab displays options under which you can configure general display and commodity options. The Details tab is divided into two sections: Display options and the Details Fields grid.
Select appropriate entries for the following options:
| Options | Description |
|---|---|
Display Detail Section |
Selecting this option displays the Bill Of Lading Details section to TM4Web users. |
Open by default |
Selecting this option expands the Details section automatically when users open the Bill Of Lading page. |
The Details grid contains Detail field records.
You can add and remove items from the Intermodal Fields grid.
You can reposition items by selecting a detail line and using ![]() Move Up and
Move Up and ![]() Move Down on the navigation bar.
Move Down on the navigation bar.
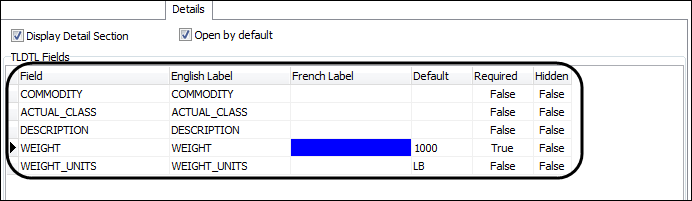
| Detail Fields | Description |
|---|---|
Field Name |
This is the name of a database field as it appears in the Intermodal table upon installation of TruckMate. |
English/French Label |
This is the text that will be displayed to users concerning the selected field. Users who choose to use the French Language will see the text entered under the French Label field. |
Default |
Enter the default value for the FB detail field. |
Required |
True or False values determine if the selected field must be filled out by the user. |
Hidden |
Use this procedure to add fields:
-
Add a new record to the Details Fields grid.
-
Click
Add on the navigational bar. -
On the appropriate table field list window, double-click the desired field. The field is added to the grid.
-
If the default values for the field require editing, click the desired record and click
Edit on the navigational bar.
Field Definition English/French Label
Enter the text label you wish to display for the selected field. Use either of the provided fields (or both) depending on the languages your company supports.
Default Value
This is where a preset value is set for the field as a default.
Required
If selected, this option will mark the field as Required, which marks the field as such in TM4Web and forces users to enter a value for the required field before the order can be fully entered or posted.
Read Only
If selected, this option will mark the field as read only.
Expedited Entry Allow Multiples
Selecting this option enables a TM4web user to enter more than one detail record for the order line when using the Expedited Entry screen.
Field Values
-
Click Save.
Dates tab
The Dates tab contains settings that control how the BOL Documents > Dates section appears to your users.
Select appropriate entries for the following options:
| Dates options | Description |
|---|---|
Display Dates Section |
Selecting this option displays the BOL Dates section to your TM4Web users. |
Open by default |
Selecting this option expands the Dates section automatically when users open the BOL page. |
Display End Dates |
Selecting this option displays the End Dates to the user. |
Display the Delivery Date fields |
Selecting this option displays the Delivery Dates to the user. |
Display Appointment Required Fields |
Selecting this option displays the Appointment Required field to the user in the TM4Web > BOL > Dates section. |
Display Appointment Made Fields |
Selecting this option displays the Appointment Made fields to the user in the TM4Web > BOL > Dates section. |
Custom tab
The Custom tab contains settings that control how the BOL Documents > Custom Defined section appears to your users. To define the Custom Fields that a TM4Web user will have access to, you must create entries in the Header tab > TLORDER Fields Grid with a Section value of CUSTOM. See Bill Of Lading>Header tabb and How to setup custom defined fields for further information.
| Custom options | Description |
|---|---|
Display Custom Section |
Selecting this option displays the Custom Fields section to your TM4Web users. |
Open Custom Fields Section by default |
This option becomes available when Display Custom Section is selected. Selecting this option expands the Custom Fields section automatically when users open the Order Entry page. |
Notes tab
The Notes tab contains settings that control how the BOL Documents > Notes section appears to your users.
| Notes options | Options |
|---|---|
Display Notes Section |
Selecting this option displays the Notes section to your TM4Web users. |
Open by default |
Selecting this option automatically expands the Notes section when users open the Bill of Lading page. |
Trace tab
The Trace tab contains settings that control how the BOL Documents > Trace section appears to your users. The Trace tab includes a Trace Types grid where the configured detail lines allow your users to trace orders in a variety of ways.
| Trace Option | Description |
|---|---|
Display Trace Section |
Selecting this option displays the Trace section to your TM4Web users. |
Open by default |
Selecting this option automatically expands the Trace section when users open the Bill of Lading page. |
You can reposition items by selecting a detail line and using ![]() Move Up and
Move Up and ![]() Move Down on the navigation bar.
Move Down on the navigation bar.
Use this procedure to add Trace Types.
-
Click
Add on the navigational bar to add a new Trace type. -
A new record is added to the Trace type grid.
-
Select the record and click
Edit. -
Click the Trace Type field on a record line to choose an alternative Trace Type Character to represent the selected Trace Type.
-
Select from the available trace types.
Character Trace Type !
Trailer Number
~
Bill Number
@
Trip Number
$
Description
#
Carrier
%
TRACE_NO
Outside of the 6 special character types, which are available only for TM4Web, you can control which Trace Types (out of A-Z and 1-9) are available via the Codes Maintenance program > Trace Number Types tab.
-
Click within the English or French label fields to change the label that will be displayed when they are used. The French Label option is included for those who use the French language option.
-
Double-click the Required field and set to either True or False, depending on whether this Trace Type is required. If Trace Types are set as Required, a user will not be able to Complete a Freight Bill entry without supplying the necessary information for that Trace Type.
-
Click
 Save.
Save. -
Repeat steps as necessary for each trace type record line.
Dangerous Goods tab
The Dangerous Goods tab contains settings that control how the BOL Documents > Dangerous Goods section appears to your users.
| Dangerous Goods Options | Description |
|---|---|
Display Dangerous Goods Section |
Selecting this option displays the Dangerous Goods section to your TM4Web users. |
Require Actual Name of Dangerous Goods items (for UN Codes with Special Provision 16) |
Selecting this option ensures mandatory user insertion of the actual dangerous goods item name when a UN code is added to the dangerous goods grid. |
Open by default |
Selecting this option automatically expands the Dangerous Goods section when users open the Bill of Lading page. |
Accessorial Charges tab
The Accessorial Charges tab contains three options that control how accessorial charges are displayed in the BOL Documents > Accessorial Charges section.
| Accessorial Charges Options | Description |
|---|---|
Display Accessorial Section |
Selecting this option displays the Accessorial Charges section to your TM4Web users. |
Open by default |
Selecting this option automatically expands the Accessorial Charges section when users open the Bill of Lading page. |