Bill Details
The Bill Details section enables you to configure the freight bill information your users will see within the TM4Web Bill Details page. Bill Details is divided into two tabs: Standard Viewing and External Viewing. Each viewing tab has several tabs where further details are configured.
| Bill Details (as with all Client Features) are configurable based on Access Group. Select the Access Code you wish to configure. |
To access the Bill Details window, click Client Features and then click Bill Details.
Standard Viewing
The Standard Viewing tab enables you to configure how each section of the TM4Web Bill Details page will be displayed to logged in users.The TM4Web Standard Bill Details page is available to logged in users, from the Trace Results.
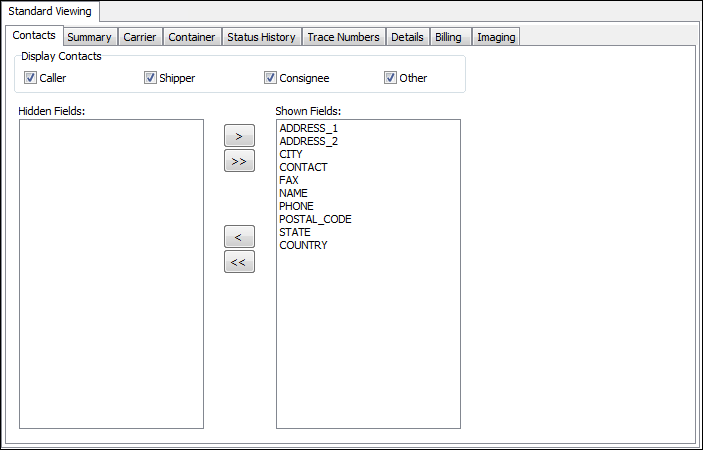
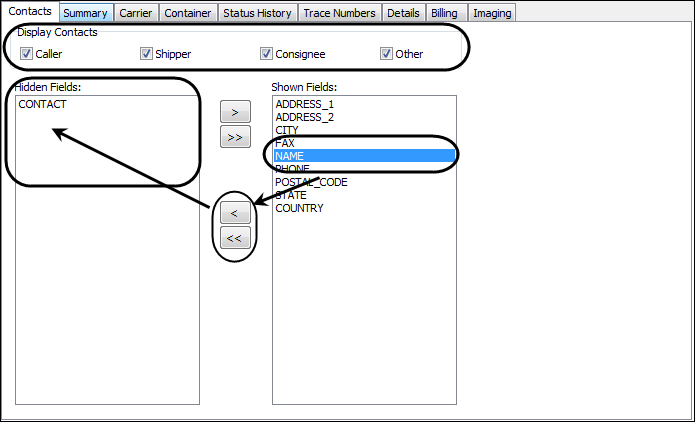
Contacts tab
The Contacts tab enables you to show / hide the fields which will be displayed in the TM4Web Bill Details Contact section.
Select the Contact Types to display.Options are: Shipper, Caller, Consignee and/or Other.The details you choose here will be displayed when you click on a Freight Bill number after performing an initial Trace.
Setup the fields that you want to display under the Shown Fields section. Move fields you do not want displayed under the Hidden Fields section.
Summary tab
The Summary tab enables you to show / hide the fields which will be displayed in the TM4Web Bill Details Summary section.
Select the Display Summary Section option to display summary information on the TM4Web Bill Details page.
Setup the fields that you want to display under the Shown Fields section. Move fields you do not want displayed under the Hidden Fields section.
Carrier tab
The Carrier tab enables you to add the Carrier section to the TM4Web Bill Details page. The Carrier section will display the Vendor Name, From Zone and To Zone.
Select the Display Carrier Section option add the Carrier Section information to the TM4Web Bill Details page.
Container tab
The Container tab enables you to show / hide the fields which will be displayed in the TM4Web Bill Details Container section.
Select the Display Container Section option to add the Container section to the TM4Web Bill Details page.
Setup the fields that you want to display under the Shown Fields section. Move fields you do not want displayed under the Hidden Fields section.
Status History tab
The Status History tab enables you to show / hide information related to the status history attached to a freight bill.
Select the Display Status History Section option to add the Status History section to the TM4Web Bill Details page.
In TruckMate, the POSITION status is generated every time a user or mobile-comm update applies the same status as the current status. To avoid displaying these status records, you can select the Mask POSITION Changes option, which if selected, will have TM4Web replace the POSITION phrase with the actual status code.
For example, if the current freight bill status is ENROUTE and the status gets updated with the same ENROUTE status, it will add POSITION as the status code in the newly added record in the status history. If you keep repeating the process by updating the status with ENROUTE, an additional POSITION record will be added for each status update, while keeping the current status as ENROUTE (CURRENT_STATUS = ENROUTE). The following table is a representation of the previous example.
| Mask POSITION Changes unselected | Mask POSITION Changes selected |
|---|---|
ENROUTE 3:20 PM |
ENROUTE 3:20 PM |
POSITION 3:30 PM |
ENROUTE 3:30 PM |
POSITION 4:00 PM |
ENROUTE 4:00 PM |
POSITION 4:30 PM |
ENROUTE 4:30 PM |
| The POSITION phrase is only used if a repetition of the current status is used in updating the status, if the new status is not a repetition of the current one, the actual new status code will be recorded. |
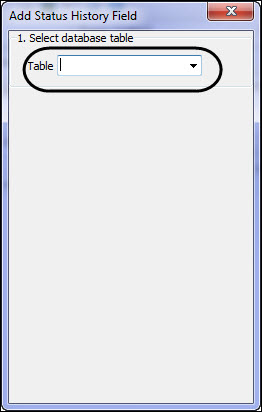
Use this procedure to add Status History fields:
-
Click
 Add on the navigational bar.
The Add Status History window is displayed. -
Select the desired database table.
-
Once a table is selected, select a field from the listed table fields.
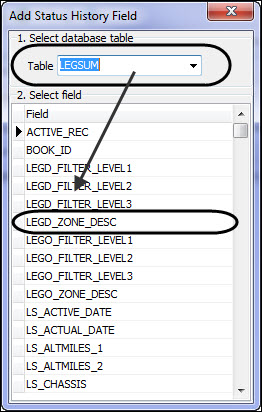
-
Once a field is selected, enter the desired labels.
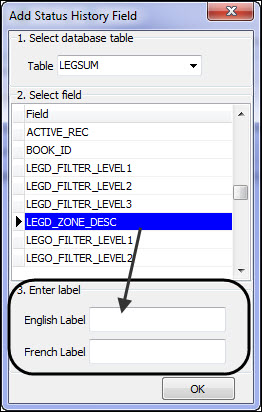
-
Click Ok.
The record is added to the status field grid. -
Repeat steps as necessary for each new status history field.
The Status Code sub-tab enables you to s setup which status code records will be shown.
Setup the status codes that you want to display under the Shown Status Codes section. Move status codes you do not want displayed under the Hidden Status Codes section.
Trace Numbers tab
The Trace Numbers tab enables you to setup which trace number types will be displayed in the TM4Web Bill Details Trace Numbers section.
Select the Display Trace Numbers Section option to add the Trace Numbers section to the TM4Web Bill Details page.
Setup the Trace Types that you want to display under the Shown Trace Numbers section.Move the Trace Types you do not want displayed under the Hidden Trace Numbers section.
| The Trace Number Types available on this tab are configured in the Codes Maintenance program > Trace Number Types tab. |
Details tab
The Details tab enables you to setup which fields will be displayed in the TM4Web Bill Details section.
Select the Display Details Section to add the Details section to the TM4Web Bill Details page.
Set up the Detail Fields that you want to display under the Shown Fields section.Move the Detail Fields you do not want displayed under the Hidden Fields section.
Select the Sort By field to setup how the Details grid will be sorted.Available columns in the Sort by menu are dependent on the fields that are selected to be shown only.
The X-Stop Detail lines options allows configuring which detail records will be displayed for parent bills with x-stops.
-
Display all detail lines - for parent bills, all the load details for the parent and all child bills are displayed.
-
Hide detail lines from child bills - for parent bills, show only information pertaining to the selected load, the detail records of child bills will not be shown.
Billing tab
The Billing tab enables you to show / hide the Billing Section on the TM4Web Bill Details page, based on the Freight Bill’s Rate To / Bill To as well as the TM4Web Feature Group.
Select the Display Billing Section option to add the Billing section to the TM4Web Bill Details page. The fields displayed in the Billing section are hardcoded to CHARGES, XCHARGES, PROTECTED_CHARGES, TAX_1, TAX_2 and TOTAL_CHARGES.
Setup the Feature Groups that you want to have access under the Enabled Feature Groups section. Move the Feature Groups that you do not want to have access under the Disabled Feature Groups section.
If a Feature Group is listed under the Disabled Feature Groups, its users will not be able to view the the Billing Section, this will also remove the fields [SUB_COST, COST, COST_UNITS] from the Bill Details Detail section if you have configured these in the Shown Fields of the Details tab. Users that are part of the Feature Groups listed in the Enabled Feature Groups list will be able to view the Bill Details Billing Section as well as whatever fields have been configured on the Details tab.
The Only Show Rates to the: option allows configuring if the Billing Section will be displayed based on whether the freight bills Bill To / Rate To is one of the clients within the users Access Group.
-
All - Display the Billing section regardless of the Bill To or Rate To on the freight bill.
-
Bill To - Display the Billing section only if one of the clients within the users Access Group is setup as the Freight Bill’s Bill To.
-
Rate To - Display the Billing section only if one of the clients within the users Access Group is setup as the Freight Bill’s Rate To.
-
Bill To or Rate To - Display the Billing section only if one of the clients within the users Access Group is setup as the Freight Bill’s Bill To or Rate To.
Imaging tab
The Imaging tab allows you configure which Imaging document types will be available to your TM4Web users. To enable the use of Imaging in TM4Web, you must first setup the Imaging features from within the Codes Maintenance program. For additional information on how to do this, see the Codes Maintenance documentation.
Select the Display Imaging Section option to add the Imaging section to the TM4Web Bill Details page.
The Document Types section enables you to add Document Types as well as setup different attributes for the document type. The document types available for you to choose from are set up in the Imaging tab of the Codes Maintenance program.
| Document Types | Description |
|---|---|
Imaging Vendor |
Displays the Imagaing Vendor as setup on the Global Configuration > Base Setup > Imaging tab. |
Label |
Allows you to change the label displayed for each document type. Note: This functionality isolates the Document Type set in TruckMate from the label used for the same document in TM4Web. Which means that if for any reason there is a need to change the label on a document type in TM4Web, it can easily be done through Web Admin, without the need to change the type name itself in TruckMate > Codes Maintenance, an action which might cause problems in other TruckMate applications using the same document type. |
Access Level |
This option allows configuring if the Document Type will be displayed based on whether the freight bills Bill To / Rate To is one of the clients within the users Access Group.
|
Add/Remove record(s) |
Use the TruckMate Navigation Bar to Add/Remove records from the Document Types grid. |
Document Types Codes |
The following fields (Document Type, TruckMate Table, TruckMate Field, Imaging Field, and Imaging View) are read-only fields and display information as setup in the Imaging tab of the Codes Maintenance program. |
External Viewing
The External Viewing tab allows you to set what information will be displayed on the TM4Web Bill Details page for external users.
| Never show billing details or other sensitive information for any externally viewable items. Be very careful when configuring what is enabled for external viewing since no security authentication is required. Billing details should only be enabled for an internal trace. |
The TM4Web External Trace feature allows users to trace for and view bills, with no need to login to TM4Web. Information under the External Viewing tab contains all of the same sections as the Standard Viewing tab, except under the Billing tab.
As the options on the Standard Billing tab are based off of the logged in user’s Access Group and external users are not connected to an Access Group, billing information cannot be filtered out in that way.
For details, see Standard Viewing.