Order entry
TM4Web enables the requested pickup process to be completed online, 24 hours a day. Your customers can enter requested pickup details like the delivery time needed; the exact type and quantity of freight; temperature requirements of the freight; and even requests for specific equipment.
The information entered by a customer is then available for your trucking company to accept directly into TruckMate and notifications can be sent to your customers.
The Pick-Up Request page allows you the opportunity to submit a pick-up request.
Creating a new order entry
The Order Entry page enables you enter details for pickup or shipment requests. Orders can be assigned a status prior to being converted into an order.
| The visible sections, available fields, and options displayed on the Order Entry page can vary, depending on how an administrator has set it up. As such, this section may not be representative of what you see on your company’s TM4Web site. |
Use this procedure to create an order entry. You can create order entries by:
-
Starting a new order
-
Creating a Pickup Request from a rate quote
-
Creating a Pickup Request from a Bill of Lading
-
Adding an Order from Order Summary.
-
On the TM4Web menu, go to Enter an Order.
The Order Entry page opens.Show me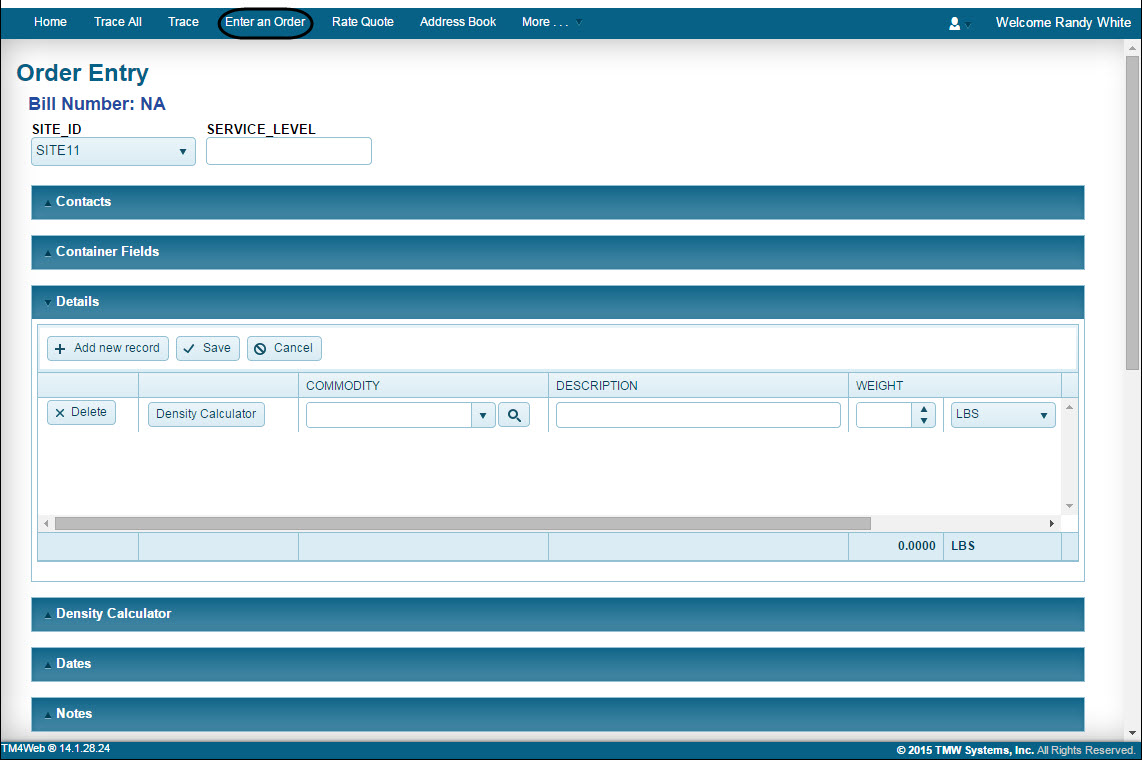
-
The Header section displays a number of high-level Freight-Bill related fields, such as the Freight Bill number (if applicable), Site ID, Service Level, etc.
-
In the Contacts section, modify relevant information for the order. For additional information on the contact section, see Using contacts in order entry.
Show me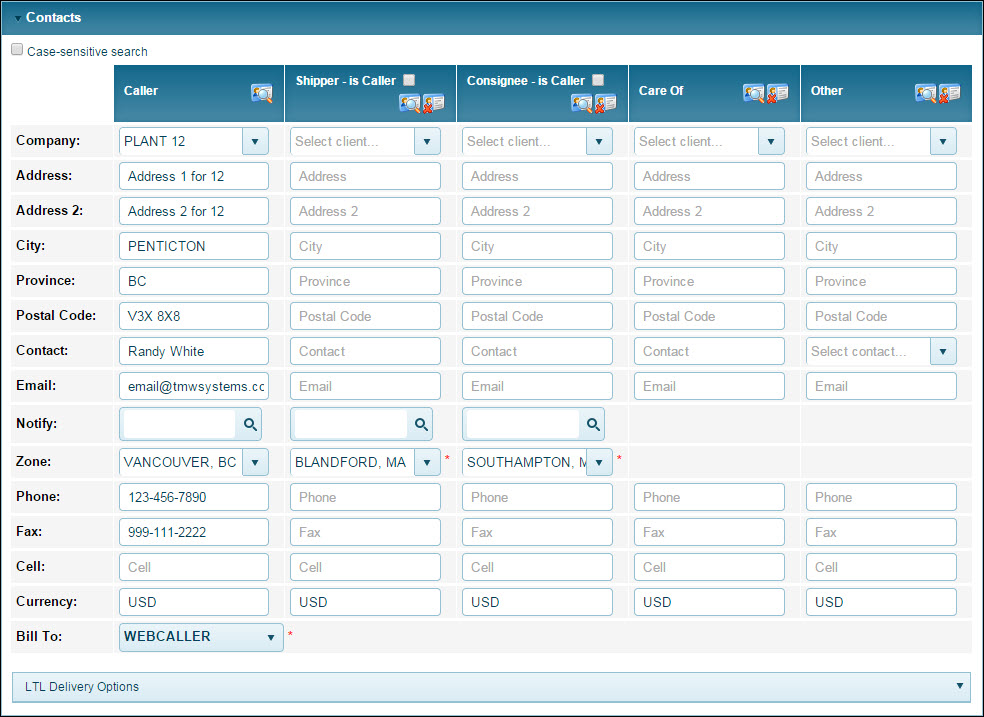
-
In the Container section, modify relevant information for the order.
Show me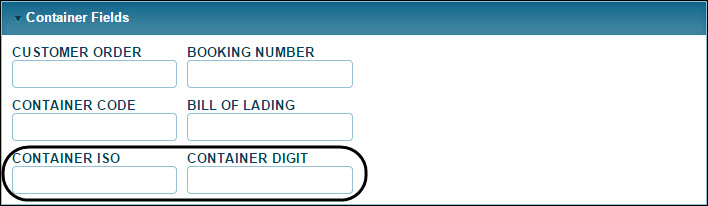
-
If your administrator has added the Container ISO field (labeled CONTAINER ISO in the above image), the Container ISO value is used to automatically determine the Container’s Size and Type, based on the container’s configuration in the Container Profiles program (and the IM_ISO_CODES Table).
-
If there are fields for Container Size and/or Container Type, then those values will be used in place of the defaults.
-
If your administrator has added the Container Digit field (labeled CONTAINER DIGIT in the above image), you should be aware that if the Enforce Container Digit option is set to Warning or Error is enabled, you may run into difficulty when entering unrecognized container digit values.
-
-
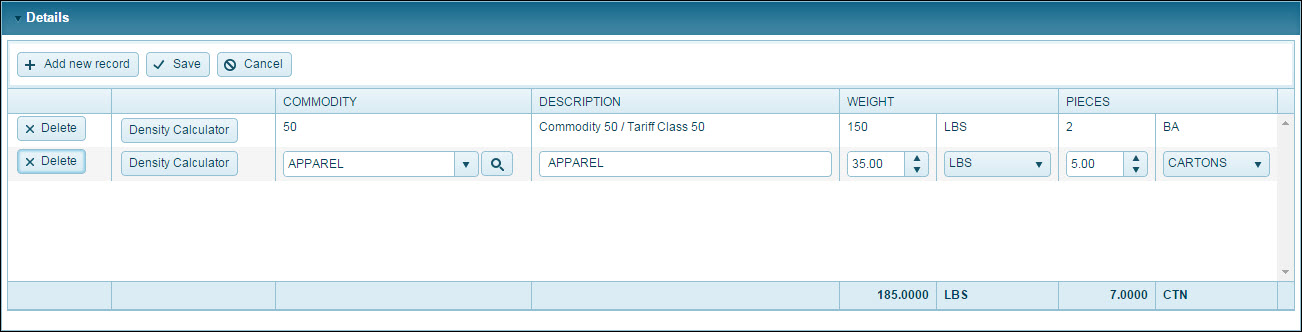
In the Details section, modify relevant commodity information for the order. For additional information on the contact section, see Adding details in order entry.
-
If available, you can calculate the shipment density to properly describe goods on a bill of lading and to determine freight rates using a Density Calculator instead of manually manipulating record fields. Click Density Calculator.
The Density Calculator opens. -
The Details section of TM4Web works in conjunction with the Rate Maintenance program in TruckMate. Use the menu controls to modify values within displayed fields.
If only client specific commodities are configured, commodities for selection are available based on:
-
Rating - The commodities of the Client selected to Rate By.
-
Order Entry - The commodities of the Shipper, if there is one, and if not default to commodities of the Caller.
-
-
-
In the Dates section, select relevant dates for Pickup and Delivery times.
Show me
-
Click
 Calendar to choose a date for either the From or To fields for both Pickup and Delivery dates. A calendar selection menu will appear, allowing you to select a date.
 -
Click
 Clock to choose a time for either the From or To fields for both Pickup and Delivery times. An item list appears allowing you to select a date.
 -
If enabled, select Appt. Rq’d if the Freight can only be delivered via an appointment. If this option is selected, you must select Appt. Made once the freight has been delivered.
-
-
If any Custom fields have been setup by your Administrator, expand the Custom Fields section and complete accordingly.
Show me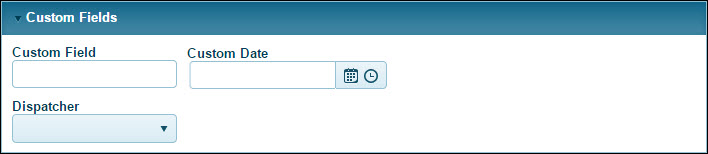
-
In the Notes section, enter relevant notes regarding the order.
-
Enter free-form textual notes regarding details of the freight shipment. TM4Web supports all standard TruckMate Note Types (Billing, Container, Driver, OSD, Other and Write-off), which can be applied to these notes when they are viewed in Order PreProcessor.
-
If Standard Shipping Instructions are enabled, this section displays the Standard Shipping Instructions currently available on the connected database, allowing you to quickly enter a routine message for the order.
-
The Changes field displays any notes entered in the Order PreProcessor program > Notes tab (PTLORDER.COMMENTS) prior to the Order PreProcessor user selecting the Change button to resubmit it to the TM4Web user for updates.
When the TM4Web user re-saves the order it will be updated to Incomplete, Hold or Complete as with any other order.
-
-
In the Trace Numbers section, select the applicable Trace Type.
Show me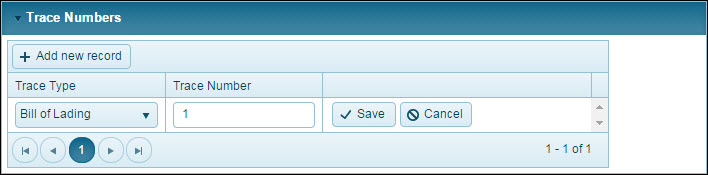
Note: If any Trace Types are set as Required = True, you will not be able to complete a Freight Bill without entering the associated Trace information for the required Trace Type.
-
Use the Trace Type list to select a Trace Type.
-
Enter the value associated with the Trace Type and click the Save.
-
-
In the X Stop section, you can add an extra stop to the currently open bill.
Note: The X Stops section is only displayed after the current order is saved.
Click New Extra Stop to add an Extra Stop to the currently open invoice.
TM4Web checks for a valid Start Zone and End Zone attached to the Pick-up Request. Once validated, the order is refreshed, allowing you to enter a new Start Zone and End Zone which will then designate the boundaries of the new Extra Stop route.
-
In the Dangerous Goods section, select applicable goods for Freight Bill.
Note: When a TM4Web user is adding a detail line to a Pick-up Request, the Dangerous Goods section will be "locked down" until the form is submitted. This is to prevent a user from manually entering a Dangerous Good record against a commodity that will have a Dangerous Good detail line automatically generated when the form is submitted. If a commodity with a UN Number attached to it in the database is entered on a TM4Web order detail line, a Dangerous Good entry will automatically be created.
Show me
-
If known, enter the UN Number associated with the dangerous good being shipped. Alternatively, you can click the UN Number Lookup to open a search form where you can search for a UN Number by a variety of criteria.
-
If known, enter the UN Group code associated with the dangerous goods being shipped. Alternatively, you can click the UN Group Lookup to open a search form where you can search for a UN Group by a variety of criteria.
-
If enabled, enter the actual name of the dangerous goods item.
-
-
In the Accessorial Charges section, select any relevant extra charge codes for the PickUp customer; Delivery customer; or CrossDock customer. Actual amounts are not displayed here, or in the Order Preprocessor program; instead, once the bill is copied over to Customer Service, the amounts will be calculated using existing standard procedures.
-
In the Pickup Request section, select applicable options.
Show me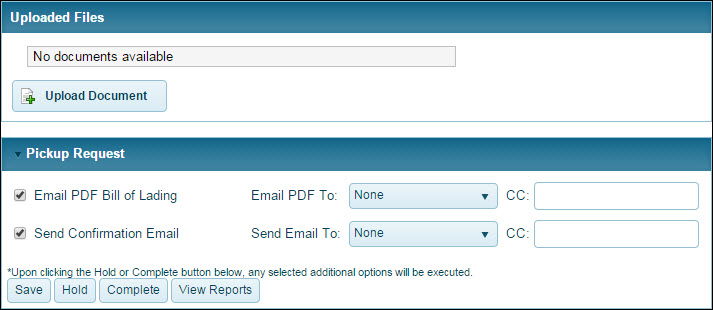
-
If enabled, selecting Upload Document allows you to upload files against this particular order. Files uploaded to an order will be renamed with the DETAIL_LINE_ID of the order as a prefix. When viewing previously submitted orders the Upload Files To directory (SYSTEM_VALUES.UPLOAD_LOCATION) will be searched for existing documents for the order. If any existing documents are found, they are displayed. For additional information, see Uploading Documents.
-
Select the Email PDF Bill of Lading option to email the Freight Bill as a .PDF file. Use the Email PDF To item list to select which clients involved in the order should receive the Bill of Lading. You can add an additional email recipient by entering their email address in the CC field.
-
Select the Send Confirmation Email option to email a confirmation when the Freight Bill is processed. Use the Send Email To item list to select which clients involved in the order should receive the confirmation. You can add an additional email recipient by entering their email address in the CC field.
The confirmation email consists of the HTML of the order itself, as entered by the user. -
Click Save|Hold|Complete to save or complete the details of the order. Once a bill is saved, you can view saved bills in Order Summary.
-
Clicking Save sets the Freight Bill status to Incomplete.
-
Clicking Hold sets the Freight Bill status to Hold.
-
Clicking Complete sets the Freight Bill status to Complete.
-
-
-
In the Shipment section, select applicable options.
Show me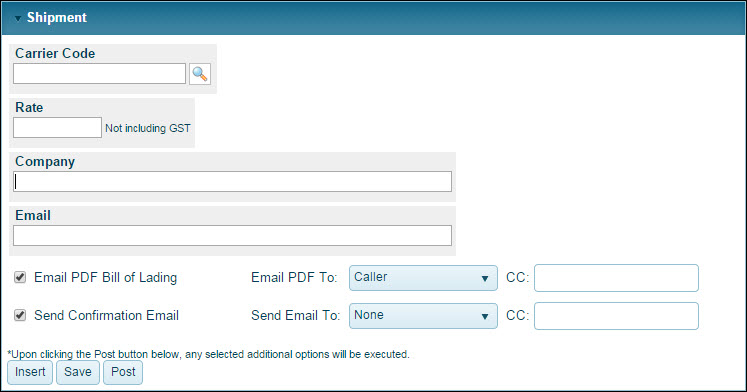
-
If enabled, click Search and attach a Vendor to the order to complete the shipment.
-
If enabled, enter the Vendor’s rate for hauling the shipment.
-
Once a Vendor is attached, the Company field automatically populates with the Vendor’s company name.
-
The Email field automatically populate with the Vendor Contact’s email address, as configured in the Customer and Vendor Profiles program > Vendor tab.
-
Select the Email PDF Bill of Lading option to email the Freight Bill as a .PDF file. Use the Email PDF To item list to select which clients involved in the order should receive the Bill of Lading. You can add an additional email recipient by entering their email address in the CC field.
-
Select the Send Confirmation Email option to email a confirmation when the Freight Bill is processed. Use the Send Email To item list to select which clients involved in the order should receive the confirmation. You can add an additional email recipient by entering their email address in the CC field.
-
Click Insert|Save|Post to save or complete the details of the order. Once a bill is saved, you can view saved bills in Order Summary.
-
Clicking Insert sets the order status to Incomplete.
-
Clicking Save sets the order status to Hold.
-
Clicking Post sets the Freight Bill status to Complete.
-
-
Using contacts in order entry
The Contacts section enables you enter contact details for pickup or shipment requests.
| The visible sections, available fields, and options displayed in the Contacts section can vary, depending on how an administrator has set it up. As such, this section may not be representative of what you see on your company’s TM4Web site. |
Use this section to complete the relevant contact information for an order. This section is more informational than process driven:
General Contact Information
-
On the Order Entry page, click the Contacts link. The Contacts section expands.
Show me -
Selecting the Case-sensitive search option enables context-sensitive searching when using the Address Book window’s search functionality.
-
Clicking the
 Address Book icon opens the Address Book, which enables you to populate the details of your Contact in either of the Caller, Shipper, Consignee, Care Of or Other areas.
-
The Shipper fields might automatically populate with the details of the Caller fields if the Default Shipper to Caller option is enabled.
-
All three of the Caller, Shipper and Consignee areas could be set to read only (making them uneditable).
-
You can enter Clients that do not exist in the Address Book directly into these fields. Just simply fill out all the information for the Client(s) you wish to add and then submit the order. When a TruckMate user finds this order in the Order PreProcessor program, they will have the option to add this newly entered client into the TruckMate CLIENT Table.
-
If the Application Configurator program > RATES.EXE > Use Rate Precedence option is set to True, TM4Web will be able to employ some of it’s features when rating for specific Customers (i.e. those customers whose Rate Sheets are defined with Precedence values).
Note: If you wish to be able to use the Other Contact and Care Of Contact groups, your administrator may enable them.
Field definitionsField Definition Is Caller
This same option is used for Shipper and Consignee. If this option is enabled for either, the Shipper/Consignee fields will automatically populate with the details of the client chosen for the Caller.
Company
The Company drop-down menu will allow you to quickly select from the available Caller/Shipper cilents configured in your system.
If you enter a name of a client, and if not found, TM4Web will prompt to add the new client.
Contact
If the Display Contact Field as Select List option is enabled, then the Contact field will be a drop-down list containing all of the client’s default contacts, as configured in the Customer and Vendor Profiles program > Customer > Contacts tab. The contact’s email address will automatically populate, as defined in Customer Profiles.
If the Display Contact Field as Select List option is not enabled, the Contact field will be a text entry field, where you can specify the contact by typing in his/her name and providing the email address.
Zone
Click the drop-down list to select a Zone Code for the contact.
Bill To
Use this drop down menu to select which of the available contacts will be billed.
Currency
If enabled, this field displays the Default Currency used in the Freight Bill.
COD Amount
If enabled, displays the applicable COD amount to be collected by the driver.
-
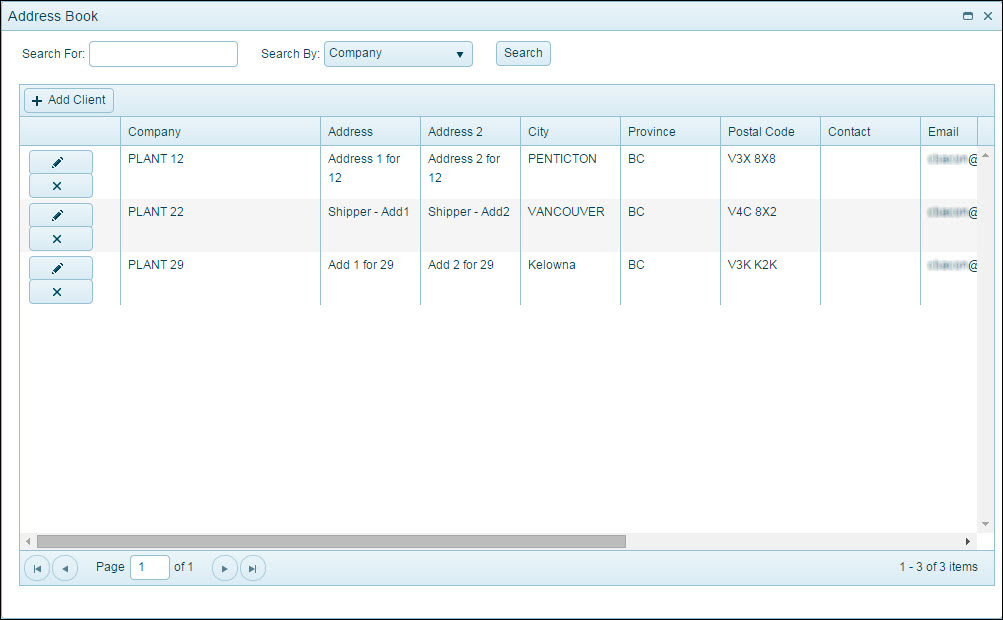
Address Book
The Address Book enables you to populate the details of your contact in either of the Caller, Shipper, Consignee, Care Of or Other areas.
| Field | Definition |
|---|---|
Search for |
Enter a search string in this field when you are searching for a Contact. You can enter the wild-card value (%) to view all available Caller, Shipper and/or Consignee clients setup in your system. |
Search by |
Use the item list to select which kind of value your Search for value will be checked against in the database. |
Search |
Click Search to begin the search. |
Add Client |
If enabled, clicking Add Client opens a window where you can enter new contact details, and subsequently add them into the system Address Book. You can then select them as contacts in the main contact section. Note: If selected, the Favorite option on the form will move the entered Contact to the top of any Contact selection lists or lookup fields. Favorite clients are based on the Access Group of the logged in user, and can only be used when selecting clients from the Web Address Book. |
Edit/Delete |
If enabled, users may be able to edit and delete contacts in TM4Web. Click Click Note: You can only delete contacts that do not already exist in TruckMate’s Web Address Book. |
Adding details in order entry
The Details section functions exactly like the Customer Service program > Details tab. You enter all of the information regarding what is being shipped between the contacts you have designated. The available fields in the details grid are configured by your administrator.
Commodity definitions
Select the commodity item list to choose a commodity from those setup in your system. Depending on the settings, the following may occur:
| Option | Description |
|---|---|
Manual Entry |
If enabled, you can use the keyboard to enter the Commodity Code (as long as the Code exists in the TruckMate database). |
Automatic Population |
If the commodity you are selecting has been configured to automatically populate certain fields that information automatically displays here. |
New Commodity Codes |
If Adding New Commodity Codes are enabled, you have the ability to enter new Commodity Codes into the database using the Commodity field. Click |
Commodity Search By Tabbing |
If Enable Commodity Search by Tabbing field is enabled, you can simply enter the first (or first few) characters of a Commodity Code and select the <Tab> key. The system will search the Commodity Codes and enter the matching Commodity automatically. |
Order Summary
Information entered by a customer is available for viewing on the Order Summary page.
The Order Summary page allows you to view both Pick Requests and Shipment.
You can view Pick Requests and Shipment by tab and status.
On the TM4Web menu, click More and then click Order Summary.
The Order Summary page opens. The Order Summary page has two tabs:
-
Pickup Request Summary
-
Shipment Summary
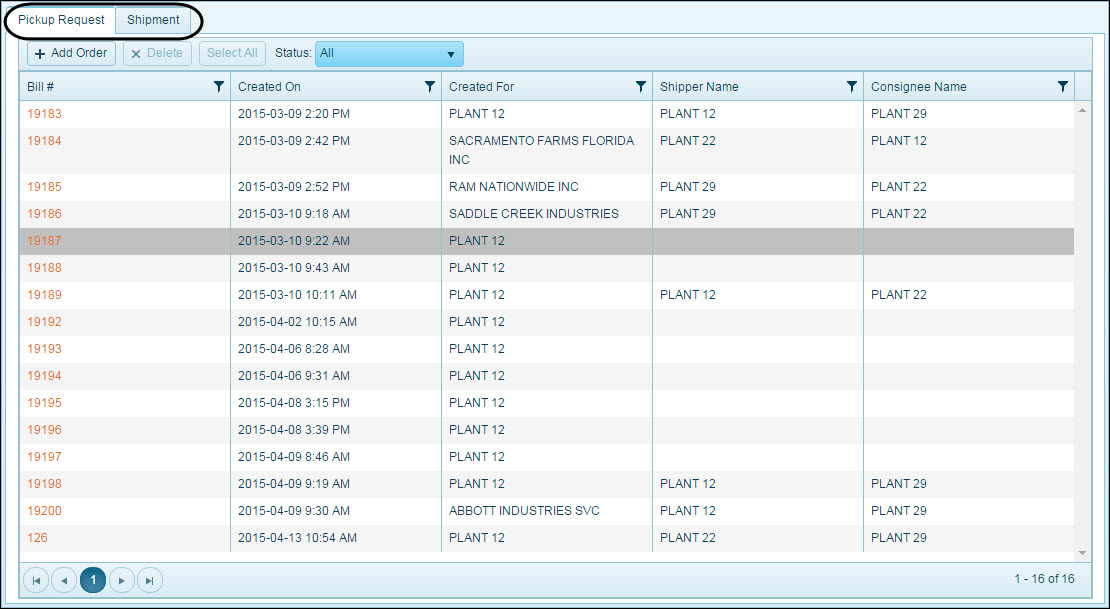
Pickup Request Summary
-
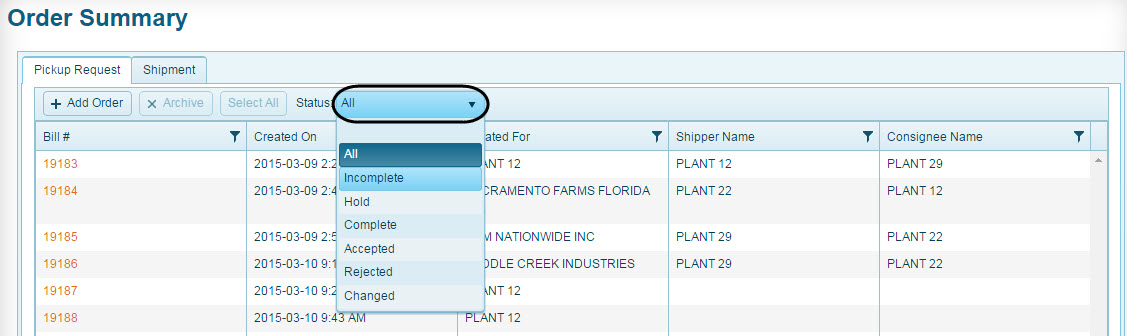
On the PickUp Request tab, click the Status item list to determine the status of the orders you wish to view. Statuses include Incomplete, Hold, Complete, Accepted, Rejected or Changed order entries.
-
If multiple orders are found matching your search criteria, a list orders appears. Select the order you want to view, and then click Bill Number.
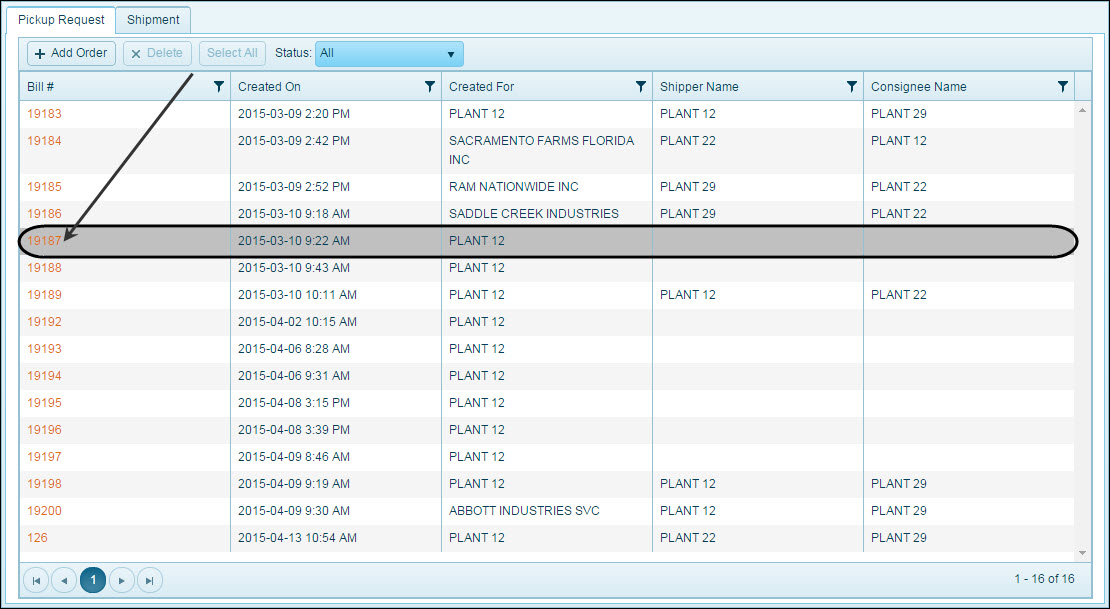
The Order Entry page is loaded with applicable order information for you to complete.
-
Click Add Order
 to launch Order Entry where new orders can be added.
 -
Click Delete
 to delete orders with a status of Incomplete and Hold.
| Once an order has been Completed, Accepted, Rejected, and Changed, it can only be achived. Archiving prevents it from displaying in the TM4Web Order Summary Screen. |
Shipment Summary
-
On the Shipment tab, click the Status item list to determine the status of the orders you wish to view. Statuses include Entry, and Available.
-
Click Add Order
to launch Order Entry where new shipment can be added. -
Click Delete
to delete a shipment with a status of Entry. -
Click Cancel
 to cancel a shipment with a status of Available.