Base Setup
The Web Admin Base Setup section is used to configure TM4Web URLs, setup user logon options, setup third party imaging vendor options, and configure mapping information with APIs. To access Web Admin, click Start, point to All Programs. Point to TruckMate, TruckMate for Web, and then click Web Admin.
To access the Base Setup window, click Global Configuration and point to Base Setup.
General tab
The General tab contains 4 sub-tabs under which you can set general settings for TM4Web, such as TM4Web URLs, language preferences, and e-mail settings.
Basic tab
The Basic tab displays universal configuration options used to control the initial TM4Web website.
Enter and select appropriate entries to the following fields and options:
| TM4Web URLS | Description |
|---|---|
Base |
Select either the http or https protocol. Use https if you are setting up a secure site and already have a security certificate installed on the web server.
The base URL is the address users will use to navigate to your TM4Web site. All URLs entered must be without the http:// or https:// marker as this has already been slected from the dropdown |
Image |
The address where images used on this site are stored.
|
Logo Filename |
Enter the filename of the banner or other identifying image you wish to use with TM4Web. The logo is displayed in or above the menubar and is shown with every page. Using a corporate image encourages branding and familiarity of your site. The logo image can be whatever size and types that look appropriate. If the size is different than the default 22px this needs to be adjusted in the custom style sheet. Note: The logo filename image is the global default image that TM4Web users will see prior to login. Once logged in, the logo filename that is displayed in the top-left corner of a user’s browser is defined in the Global Configuration>Base Setup>Access Group Options section. See Access Group Options tab for information. |
Logo URL |
When a TM4Web user clicks the logo image, they are taken to a particular web address. Enter this address in the field. In order to work correctly, all URLs must be fully qualified (For example, http://www.mycompany.com). Leave blank to have image non-clickable. |
Sidebar Image |
DEPRECATED in version 14.1. A banner or other identifying image to encourage branding and familiarity of your site. |
Sidebar URL |
DEPRECATED in version 14.1. When a TM4Web user selects the banner image, they are taken to a particular web address. Enter this address in the field. In order to work correctly, all URLs must be fully qualified (For example, http://www.mycompany.com). |
Multi-Schema |
|
Common Schema |
DEPRECATED in version 14.1. If your company database is a multi-schema database, enter the name of the common schema (normally TMCOMMON). DEPRECATED. |
Localization tab
The Localization tab displays basic configuration options under which you can configure language preferences for TM4Web.
Enter and select appropriate entries to the following fields and options:
| Localization | Description |
|---|---|
Default Country |
Select Canada (CA) or United States (US). This option is the default setting in the Country item lists in areas such as the User Registration page. |
Default Language |
Select either English or French as the default TM4Web language. This is used to defaul the language preference on the User Registration page. |
Allow language selection |
Select the Allow language selection to enable language selection for your users. An option is displayed on TM4Web’s menubar enabling users to switch languages. |
Page Title |
Sets the title displayed in the browser toolbar. Also provides a title for the page when it is added to users browser favorites. |
Miscellaneous tab
The Miscellaneous tab displays various universal setup options.
Make the appropriate selections to the following options:
| Miscellaneous | Description |
|---|---|
Mapping Site |
Use the drop-down menu to choose which Third Party mapping site you wish to use with TM4Web. You have the choice of MapQuest or Google Maps. The Mapping Site is displayed from both the Client and Vendor Bill Details Address sections, and will display to users a link which they can click to display a dialog displaying a plotted point of the address on the chosen Third Party Map. |
Lookup records per page |
The entered number determines the number of returned records to display per page on the various TM4Web lookup dialogs. |
Max lookup records |
The entered number determines the maximum number of returned records during a search. This is used for performance purposes when exporting results. |
Max Web Users per access Group |
Set the number of unique user names allowed for each Access Group. For example, a value of 1 indicates that only one web user would be allowed to register per Access Group. |
Upload Files To |
Enter the directory location on the TM4Web server machine where you would like to store uploaded files from TM4Web users. For users to be able to upload files, this option is used on:
Important: For security, this location should be outside of the TM4Web document root. In order to allow TM4Web access to this location it must be setup in the include_path directive in the php.ini file. |
SLM Transit Times Start Date |
This will be the date used to determine the Service Level Transit Times. The date must be a Monday. Transit Times can be setup as a standalone feature or be displayed from the Rate Results. The Transit Times will display as a grid showing the Transit Time and Actual Days from Monday through Friday. |
Commodity Description field |
This option is used on the Client feature pages, Order Entry, Rate Quote, and BOL. When a user selects a Commodity Code and Commodity Defaults are populated, this option determines which Description field to use.
|
Group Display of Accessorial Charges based on Applies To setting |
This option is used on the Client feature pages, Order Entry, Rate Quote, and BOL. This option displays the Accessorial Charges so that they are grouped based on the Codes Maintenance Applies To setting, under the headings:
|
Group Display of Shipping Instructions based on Applies To setting |
This option is used on the Client feature pages, Order Entry, Rate Quote, and BOL. This option displays the Shipping Instructions so that they are grouped based on the Codes Maintenance Applies To setting, under the headings:
|
Shipping Instruction label field |
This option is used on the Client feature pages, Order Entry, Rate Quote, and BOL. Display the Shipping Instructions as either the Instruction or Short Description as setup in Codes Maintenance. |
Detail Line Default Source |
This option is used on the Client feature pages, Order Entry, Rate Quote, and BOL. This option is used along with the options used for selecting the Commodity defaults from the Client Commodity setup in Profiles. This option is used to determine the default source as the Caller, Shipper or Consignee. |
Display DESCRIPTION as list of CMODTY Descs, Display COMMODITY as list of Codes |
This option is used on the Client feature pages, Order Entry, Rate Quote, and BOL. This option is used to display the DESCRIPTION field in the Detail Section as a dropdown list containing Commodity Descriptions. When this option is set, this also forces the COMMODITY field to list Commodity Codes. Auto-population works when changing either dropdown. |
Email tab
The Email tab enables you to configure the settings used for sending emails from TM4Web..
Enter and select appropriate entries to the following fields and options:
| Description | |
|---|---|
SMTP Server(s) |
Enter the address of your email SMTP Server. |
SMTP Username |
Enter the SMTP username if required by your mail server. Used in conjunction with SMTP Password. Leave blank if no username/password is required. |
SMTP Password |
Enter the SMTP password if required by your mail server. Used in conjunction with SMTP Username. Leave blank if no username/password is required. |
Auth method |
(Optional) This field, used in conjunction with Port, is used to enable email relaying. If relaying is required, select an authentication method: None, SSL, or TLS. |
Port |
(Optional) Provide a port number for the email server if email relaying is enabled. |
| Sent from Properties | Description |
|---|---|
Name |
Enter the name that will be displayed in the emails from TM4Web. |
Enter the email address that will be used and displayed as where TM4Web emails originate from. This must be a valid working email address. |
| Reply To Properties | Description |
|---|---|
Name |
Enter the name that will be displayed if users reply to emails sent from TM4Web. |
Enter the email address that will be displayed if users reply to emails sent from TM4Web. |
Login tab
The Login tab enables you to specify login and password constraints for your TM4Web users.
Make the appropriate selections to the following options:
| Login Options | Description |
|---|---|
Max. login attempts |
Enter the maximum number of login attempts allowed before the system generates an error message and redirects the user. |
Inactive Days before Auto Disable |
Enter the number of days to pass prior to removing login access of an inactive user’s account. |
Cookie duration (days) |
To eliminate the need for repeated user logins, enter the number of days that a cookie remains active. |
Disable accounts where client(s) are on credit hold |
This option disables client user accounts that are on credit hold. Credit Hold is an option in Profiles>Credit Info tab. |
Enable new users by default |
Select this option to ensure that new users have access to TM4Web. When clear after TM4Web users register their account, users must be enabled in Web Admin > Users > TM4Web Users. |
Allow users to save their login information |
Select this option to enable users to save their login information. This is the Keep me Logged in option on the Login form. This uses cookies to identify the user the next time they visit the site. |
Display unsupported browser popup |
This option will display a warning message when a user attempts to use TM4Web with an unsupported internet browser. |
| Password Constraints | Description |
|---|---|
Allow user to retrieve lost passwords |
If a user forgets their password this option allows them to receive a newly generated password to be emailed to the email address they registered with. |
Password must contain a lowercase character |
Self-explanatory option. |
Password must contain an uppercase character |
Self-explanatory option. |
Password must contain at least one numeric character |
Self-explanatory option. |
First character cannot be a numeric character |
Select this to option to prevent the first password character from being a numeric value. |
Password can contain only one set of repeating characters |
Select this option to prevent the use of the repeated characters more than two times. For example, abbbc would be prevented due to the 'b' repeating three times. |
Minimum password length |
Set the minimum password length. |
Maximum password length |
Set the maximum password length. |
Password Expires after # day, 0 if never |
The number entered in this field represents the number of days that a TM4Web’s user’s current password is valid. The number of days is calculated from the date/time of user registration, not from first login. |
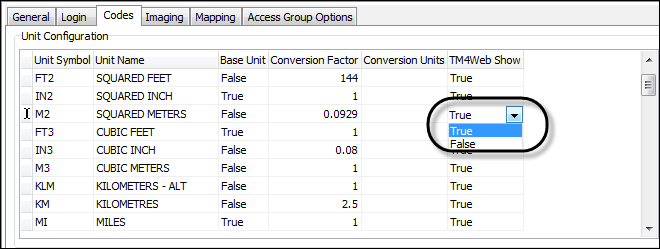
Codes tab
The information on the Codes tab comes from the Codes Maintenance program.
Make the appropriate selection to the following field:
| Unit Configuration | Description |
|---|---|
TM4Web Show |
Double-click this field to ensure the values within the current detail line visible (True) or hidden (False). Note: This option applies to both the Unit Configuration and Commodity Configuration sections. |
Imaging tab
The Imaging tab enables you to set up a third-party imaging vendor that is used by TM4Web to access imaging documents.
Select the imaging vendor you use as configured in Codes Maintenance. Each available supplier has different sets of options as described.
Acordex
| Acordex Options | Description |
|---|---|
Site URL |
Enter the Acordex server’s public URL in this field. The URL must be in the format of http://example.com/. TM4Web will append "viewimage.html…" to the end of it so if the Acordex scripts are in a subdirectory then the URL should include it. |
EBE-Ships
| EBE-Ships Options | Description |
|---|---|
Image Directory |
This field allows you to change the hard-coded value for the EBE-Ships Imaging Server. If this field is left blank, the default C: /Inetpub/wwwroot/ShipsImages is used. You can enter a new value, which will be appended to the end of the path, replacing the ShipsImages text. |
Image URL |
Set this to the EBE image lookup URL. The default setting is AcordeWeb\display.php. If using a custom lookup to perform the EBE lookups, enter the link to the custom script here. |
Allow imaging from the Trace table |
Selecting this option enables TM4WEB to look for trace numbers in the TRACE table for the order, no matter what table value was chosen in the Codes Maintenance program for the selected Document Type. |
Trace Type |
Select the Trace Type used to get the search value which will be passed to EBE. |
Microdea
| Microdea Options | Descriptions |
|---|---|
Directory |
This is only used when NOT using Microdea’s web services with TM4Web. Set this to the directory that Microdea’s comm application will place the PDF images in. |
Allow imaging from the Trace table |
Selecting this option enables TM4WEB to look for trace numbers in the TRACE table for the order, no matter what table value was chosen in the Codes Maintenance program for the selected Document Type. |
Trace Type |
Select the Trace Type used to get the search value which will be passed to Microdea. |
Pegasus
| Pegasus Options | Descriptions |
|---|---|
Site URL |
Enter your Pegasus Host’s website URL in the space provided. |
Pegasus |
Enter values for the various configuration options that appear to the right of the Imaging section. You must provide information for the following that will allow you to access the Imaging data on the Pegasus server: The following fields and values are provided by Pegasus.
|
Real Vision
| Real Vision Option | Description |
|---|---|
Site URL |
Enter your Real Vision Host’s website URL in the space provided. |
Ricoh
| Ricoh Vision Options | Description |
|---|---|
Site URL |
Enter your Ricoh Host’s website URL in the space provided. |
Allow imaging from the Trace table |
Selecting this option enables TM4WEB to look for trace numbers in the TRACE table for the order, no matter what table value was chosen in the Codes Maintenance program for the selected Document Type. |
Trace Type |
Select the Trace Type used to get the search value which will be passed to Ricoh. |
WebWise
| WebWise Options | Description |
|---|---|
Site URL |
Enter your WebWise Host’s WebSite URL in the space provided. |
WebWise |
Enter values for the various configuration options that appear to the right of the Imaging section. You must provide information for the following that will allow you to access the Imaging data on the Pegasus server:
|
Other
| Other Options | Description |
|---|---|
Site URL |
This field allows you to define an alternate imaging viewer to be used instead of the default one defined in Codes Maintenance Program. To use the default, just leave this field blank; otherwise, use a format similar to the URL defined in Codes Maintenance Program > Imaging tab, the URL can contain the following variable place holders:
Example: http://<root>/custom/custom_ImageViewer.msw?probill=%b&imagetype=%t |
Allow Imaging from the Trace table |
Selecting this option enables TM4WEB to look for trace numbers in the TRACE table for the order, no matter what table value was chosen in the Codes Maintenance program for the selected Document Type. |
Trace Type |
Select the Trace Type used to get the search value which will be passed to the imaging vendor. |
Mapping tab
The Mapping tab is for the setup of the Mapping application programming interface (API Integration.
The Mapping API is used to display, plotted onto a map, the Current Location as determined through TruckMate’s Mobile Comm, as well as Origin and Destination locations.
The displays on the map are 3 plots:
-
Current Location - selected from Mobile Comm.
-
Origin - selected from Freight Bill and associated record from: CLIENT (Client-based) or ZONE (Zone-based).
-
Destination - selected from Freight Bill and associated record from: CLIENT (Client-based) or ZONE (Zone-based).
If latitude/longitude coordinates are not found for the Origin/Destination, TM4Web uses the Mapping API settings to attempt to geocode the address as stored on the freight bill.
| As a courtesy, this document provides basic instructions on setting up the Google Maps API. The information included here is relevant to Google Maps API v3 only. Currently, Google is the only API supported by TM4Web. |
V3 of the Google Maps API does not require an API key; however, it is there as Google recently introduced the following usage limits: See https://developers.google.com/maps/faq?csw=1#usagelimits for more information.
Google Maps API documentation is located at: https://developers.google.com/maps/documentation/.
Make the appropriate selections to the following options:
| Option | Description |
|---|---|
Enable mapping of current location |
Selecting this option enables the Current Location link on the Bill Details page of TM4Web. When a user clicks that link, the Google API returns the mapped position. |
Mapping API |
Select the Third-Party Mapping Vendor. |
API Key |
Enter the API key. The procedure required to generate a Google Maps API key is located at: https://developers.google.com/maps/documentation/javascript/tutorial#api_key. Note: If you encounter an error while loading the Google Maps JavaScript v3 API, visit https://developers.google.com/maps/documentation/javascript/error-messages to find explanations for the error codes. For instance if you missed step 2 in creating your API key, you will receive the error InvalidKeyOrNotAuthorizedMapError, which explains "You may need to enable the Google Maps JavaScript API v3 under APIs in the Google APIs Console." |
Geocoding API |
Select the Third-Party Geocoding Vendor. |
Log geocode requests |
Selecting this option enables Web Admin to keep a count of the number of Geocode requests performed per day. This option may aid in maintaining compliance with a Geocoding Vendor’s Terms of Use, but increases the amount of time per Geocode request. |
API Key |
Enter the required API key. |
Show origin and destination |
When selected, a user will be able to view the origins and destination of the freight bill on the map, based on whether Zone or Client-based is selected.
|
Attempt Mobile Comm poll… |
When selected, TM4Web will attempt to poll the device for its location through Mobile Comm if the last known position is older than the number of minutes you specify. TM4Web will wait for the specified number seconds and will time-out if no response is received. |
Access Group Options tab
The Access Group Options tab enables you to define distinct Base Setup options for each Access Group.
Enter and select appropriate entries to the following fields and options:
| TM4Web URLs | Description |
|---|---|
Logo Filename |
Enter a unique logo image to display for the selected Access Group. Note: The logo image must reside in the htdocs/img folder of the TM4Web machine. |
Logo URL |
Used in conjunction with Logo Filename field, this field defines the logo URL (the URL that opens upon the user clicking the logo image) used in TM4Web. Note: If this field is left blank, no action is performed when a user clicks on the specified Logo Filename. |
Home URL |
Enter a URL to set and direct users if they click on the Home link on the TM4Web menu bar. Leave this field blank to exclude a Home link for TM4Web Users within the selected Access Group. |
After Login URL |
Enter a URL or TM4Web page name, (such as iorder entry/order.msw) to redirect TM4Web users to upon successful login. For example, you can default the Load Offer page for certain Access Groups and the Pickup Request page for others. |
After Logout URL |
Enter a URL or TM4Web page name to redirect TM4Web users to upon successful logout. For example you may choose to redirect users to your corporate site upon logout of TM4Web. |
| Registering | Description |
|---|---|
Allow users to register with an existing email address from the same access group |
You can enable users to register with an existing email address from the same Access Group. New TM4Web users in the displayed Access Group will be allowed to enter an existing email address when registering or updating their profile information on the Registration page. If unselected, new users will be prompted to enter a unique email address when registering. Note: If a TM4Web user attempts to retrieve a new password for an email address associated with more than one user, an error is generated. New passwords can be set through WebAdmin > Users > TM4Web Users. |
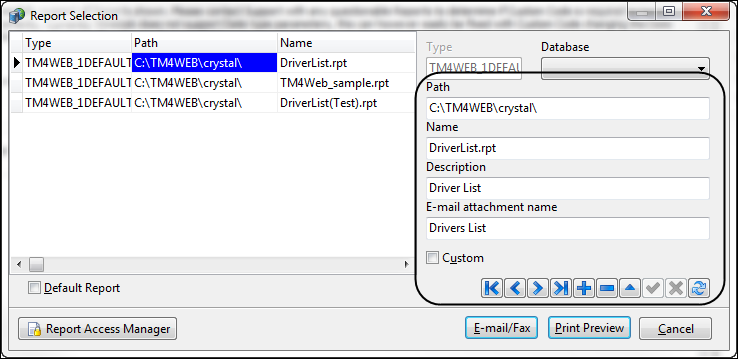
Access can be granted to TM4Web users to access selected pre-designed crystal reports in PDF format.
| Crystal Reports | Description |
|---|---|
PDF Path |
Set the path to where the generated PDF reports will reside. Groups of reports can be put in different paths so different levels of access can be defined for each Access Group.
Important: Ensure that the identified path exists on the TM4Web server. For security, this location should be outside of the TM4Web document root. In order to allow TM4Web access to this location it must be setup in the include_path directive in the php.ini file. |
Setup |
Click Setup to set the details of your report selections using the navigation controls.
Note: Ensure that the crystal reports are local to the TM4Web machine and the identified path exists on the TM4Web server. |
Allow exporting reports to Excel |
This option allows the user to download an Excel version of the generated report. |

| Density Calculator | Description |
|---|---|
Display Warning When Cube Exceeds Threshold |
This option displays a warning message to the user, as setup in the language file: Warning: Cube Exceeds %s Cubic Feet. Additional Charges May Apply. |