Setting User Access
WebAdmin Users is the configuration section in which you can setup Client and Vendor access to TM4Web, as well as view and update all registered TM4Web users. You can seamlessly access:
Clients
The Clients section enables you to setup your TruckMate Clients with access to TM4Web.
Clients are given access to TM4Web through Access Groups. Access Groups are created with one or more TruckMate Clients and assigned a specific Feature Group which specifies exactly which TM4Web features the users within the Access Group will have access to. Once an Access Group is created the Access Code can be given to the desired users. The users must then register on the TM4Web Registration page.
To access the Clients window, click Users and point to Clients.
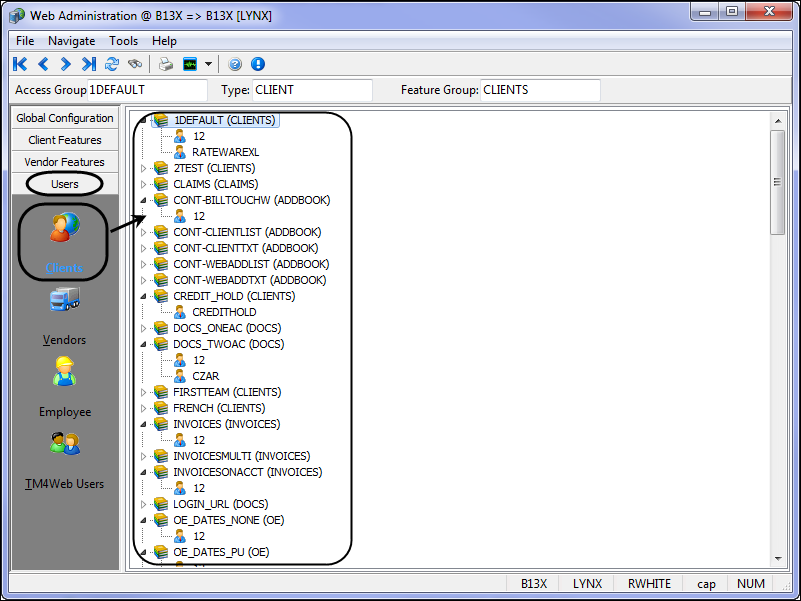
Shortcut Menu
Using a right mouse button, click the Client Access Group tree view to display the shortcut menu with the following options:
| Shortcut Menu | Descriptions |
|---|---|
Collapse All Access Groups |
Selecting this option collapses all access groups shown in the Client Access Group tree, hiding the client codes within each group. |
Expand All Access Groups |
Select this option if you wish to expand access groups shown in the Client Access Group tree, revealing all client codes within each group. |
Create New Access Group |
Select this option to create a new TM4Web Client Access Group. You will need to choose a Client Code, provide a unique code for the Access Group and select which Feature Group the new Access Group will be given access to. Clients are setup in the Customer & Vendor Profiles program and must be set to Web Enabled. Feature Groups are setup in WebAdmin > Global Config > Features. See Creating a New Client Access Group for further information. |
Add Client |
Select this option to add a client to an existing Client Access Group. Selecting this option will bring up a dialog box allowing you to search for and choose a client from Customer Profiles. |
Rename Access Group |
Selecting this option allows you to rename an existing Client Access Group code. |
Remove Access Group |
Selecting this option allows you to remove an existing Client Access Group. Note: Upon deletion, all web users within the selected Access Group will be deleted. |
Select Feature Group |
This option allows you to change the Feature Group that an existing Access Group is associated with. Feature Groups are setup in WebAdmin > Global Config > Features. |
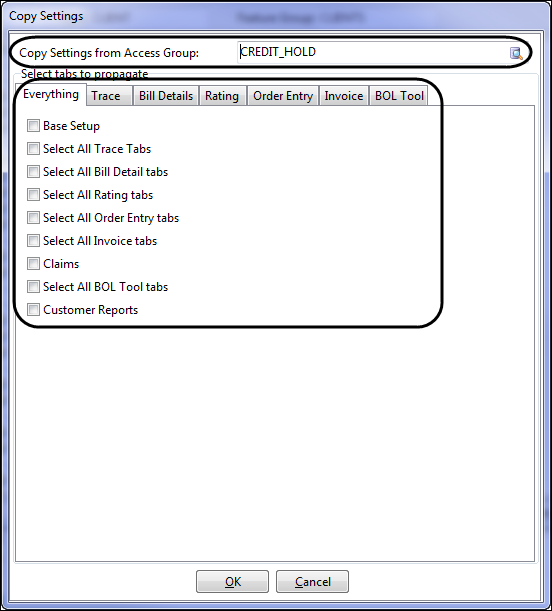
Propagate all settings to Access Group |
This option allows you to easily propagate all settings from one Access Group to another. When selected, this option opens the Copy Settings window to select which Access Group to copy settings from, along with which TM4Web features to propagate and which tabs from each feature to copy.
|
Refresh Tree |
Selecting this option refreshes the Client Access Group tree view information. |
Creating a New Client Access Group
Use this procedure to create a new Access Group.
-
From the Start menu, navigate to the Customer and Vendor Profiles program (PROFILES.EXE). Click Start, and then point to All Programs. Point to TruckMate, Profiles, and then click Customer and Vendor Profiles.
-
Select the
 Customer toolbar button.
The Customer page opens. -
On the Customer page, use the navigation bar to browse to the desired Customer to use in TM4Web. Once the Customer record is located, select the Web Enabled option. The Customer is now visible in WebAdmin to enable configuring a TM4Web Access Group, which your customers can then use to register within TM4Web.
Show me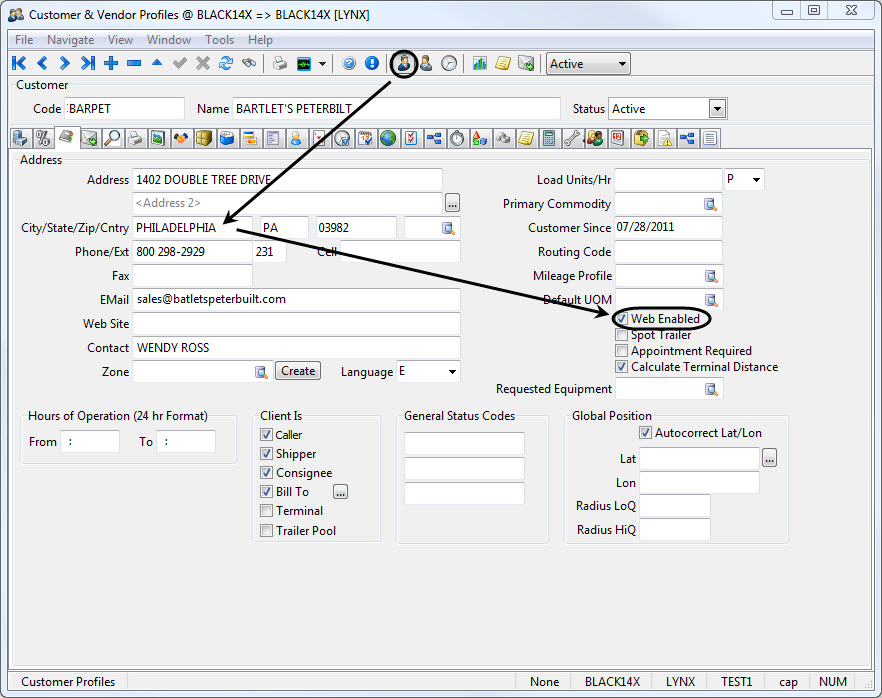
-
Navigate back to TM4Web Administration. Click Users and point to Clients.
-
Using the right mouse button, click the shortcut menu within the Client Access Group tree and click Create New Access Group.
The Select Client window opens. -
If necessary, search by Client or Name and select the client record.
-
Click OK.
The Create Client Access window opens. -
Enter a new unique Access Code for the new group.
-
Click OK.
The Select Feature Group window opens. -
Search by Code or Description and select the Feature Group to associate with the Access Group into. For details on Feature Groups, see Section: Managing TM4Web Features.
-
Click OK.
The Copy Settings window opens. -
If desired, you can copy setting from an existing Access Group to the new Access Group. Select which Access Group to copy settings from, along with which features to propagate and which tabs from each feature to copy. Click Cancel to have all features setup with the default settings.
-
Click OK to copy settings or click Cancel.
-
Provide your client with the newly created Access Code, which they will use to register on the TM4Web Registration page.
Show me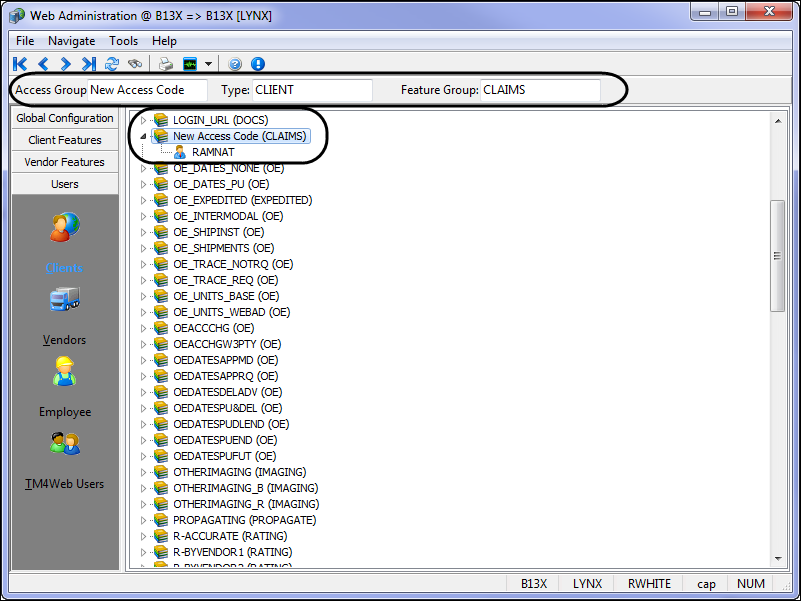
Adding Clients
Use this procedure to add a client to an existing access group.
| Customers must first be setup as Web Enabled within the Customer and Vendors Profiles application > TM4Web tab in order to be visible in Web Admin. |
-
Right-click the shortcut menu within the Client Access Group tree and click Add Client.
The Select Client window opens. -
If necessary, search by Client or Name and select the client record.
-
Click OK.
The client has been added to Access Group. -
(Optional) Repeat steps 1 through 3 as needed for additional clients.
Show me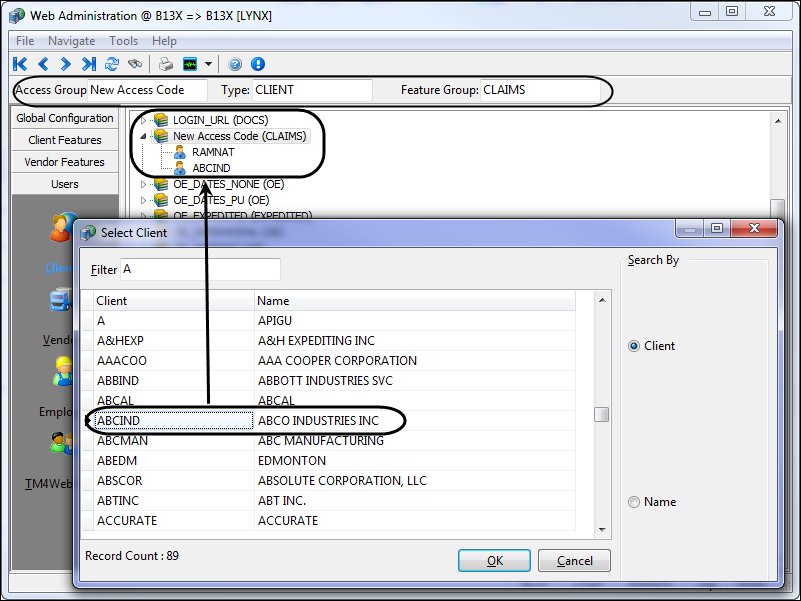
Vendors
Vendors are given access to TM4Web through an Access Code and assigned a specific Feature Group which specifies exactly which TM4Web features the TM4Web user will have access to. The Vendors section (which contains 4 sub-tabs) enables you to configure your Vendors for access to TM4Web. Once you setup an Access Code for a specific Vendor, you must provide the Vendor with the Code so that they can register online and then access TM4Web’s functionality.
The Vendors section is divided into two sections: Vendor Access Grid and Vendor sub-tab options.
To access Web Admin, click Start, point to All Programs. Point to TruckMate, TruckMate for Web, and then click Web Admin. To access the Vendors window, click Users and point to Vendors.

Vendor Access
The Filter Section allows you to choose which Vendor records will be displayed in the Vendor Access Grid, and how they are ordered.
| Customers must first be setup as Web Enabled within the Customer and Vendors Profiles > TM4Web tab in application in order to be visible in Web Admin. |
![]()
| Options | Descriptions |
|---|---|
Filter |
You can reduce the number of records that are displayed by entering partial match data in the Filter field. |
Order By |
The two available options are used to order the displayed records in the grid.
|
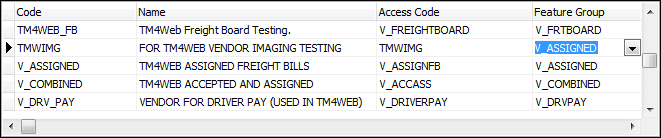
The Access Code records in the Vendor Access Grid are pre-populated based on information from the Customer & Vendor Profiles program. All Vendors that have the Web Enabled option selected appears in this grid.
| Field | Descriptions |
|---|---|
Code |
Displays the Code of the Vendor as configured in Vendor Profiles. |
Name |
Displays the Name of the Vendor as configured in the Customer & Vendor Profiles program. |
Access Code |
Displays the Access Code for the Vendor, if blank this is where you can create an Access Code for the Vendor. Click within this field and enter a text string value. This value becomes the Access Code that your Vendors will use when registering for TM4Web. |
Feature Group |
Displays the Feature Group associated with the Vendor, if blank this is where you can set the Feature Group for the Vendor. Click this field to display a list of the existing TM4Web Feature Groups. From this list you can select a Feature Group to attach to this Vendor Access Code. Feature Groups are configured on the Features tab of Web Admin, and control exactly which TM4Web pages are accessible to any given User. |
Vendor Sub-tab Options
The Vendor sub-tabs allow you to configure some Vendor feature options specifically based on Vendor. There are 4 sub-tabs within the Vendor Access Code section, all other Vendor Feature options are in the Web Admin Vendor Features section and are globally setup for all Vendors.
First select the Vendor in the Vendor Access Grid that you wish to make changes for.
Setting Vendor Access Group Options
The Vendor Access Group Options tab enables you to set 2 different options for the selected Vendor.
Select desired options:
| Vendor Access Group Options | Description |
|---|---|
Display Load Details on Load Offers and Load History |
If selected, this option displays both the Freight Bill Pick/Drop Details and the Bill Details sections on Load Offers and Load History pages in TM4Web. |
Allow OSD entry for any Freight Bill (vendor not required to be assigned to bill) |
Specific to the TM4Web feature, Vendor Agent OSD Status Manager. If selected this option allows the vendor to add OS&D records for any Freight Bill in the system. If not selected the vendor will only be allowed to add OS&D records to freight bills that there are assigned to. |
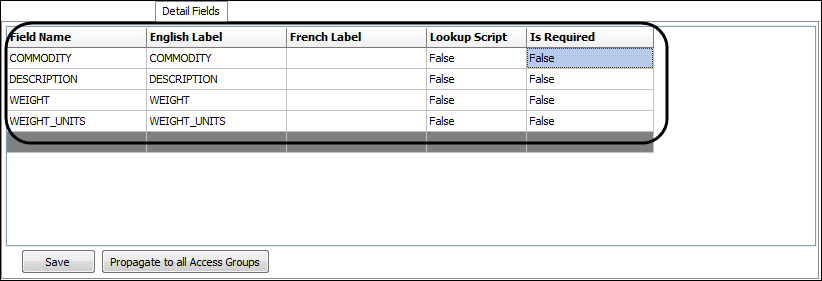
Detail Fields tab
The Details Fields tab displays a grid containing the fields setup to display within the Vendor dialogs Detail section and allows you to add additional fields (or remove fields) from the TLDTL table. Use the right mouse button (right-click) to display a shortcut menu and choose options to edit the data within the Details Fields tab.
| Field | Definition |
|---|---|
Field Name |
Read-Only field name for reference purposes. |
English/French Label |
This is the text label that will display for the corresponding field. This is the text that will be displayed to users concerning the selected field. Users who choose to use the French Language will see the text entered under the French Label field. |
The Save option saves all changes to the Details Fields grid. Propagate to all Access Groups option will copy the displayed Detail Fields grid data and apply it to all Vendor Access Groups. You will be prompted to confirm prior to the system completing the task.
Using a right button (right-click) displays a shortcut menu with the following options:
| Shortcut Menu | Descriptions |
|---|---|
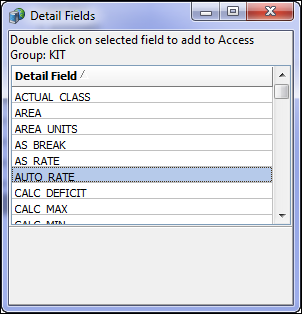
Add |
Click this option to add a new detail field to your selected Vendor’s Detail Fields setup. The Detail Fields window will display with a listing of the available Detail Fields. Double-click the desired field.
|
Delete |
Deletes the selected detail field from the grid. You will be prompted to confirm deletion. |
Refresh |
Refreshes the Detail Grid. |
Move Up / Move Down |
These options are used to reposition the Detail Fields into the order that they will appear within TM4Web. |
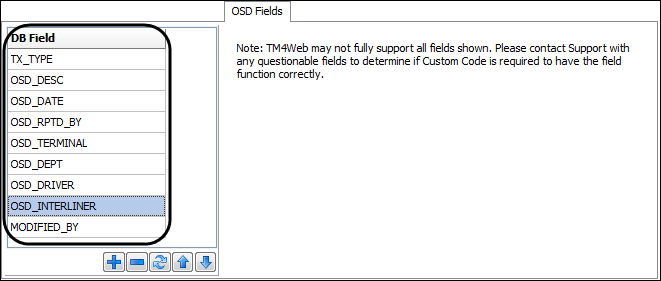
Determining OSD Fields
The OSD Fields tab is used to configure which OSD Fields which will be displayed in the TM4Web Vendor OSD dialog. See the Claims program for more details.
| TM4Web may not fully support all fields shown. Contact Support with questionable field to determine if custom code is required to have the field function correctly. |
Setting up Terminal Zones
The Terminals tab allows you to setup the Terminal Zones an agent is permitted to see. The TM4Web agent pages will use this setup to display to the agent only the orders relevant to the agent’s terminal.
Use this procedure to add Terminal Zones for Agents.
-
Click
 Add on the navigational bar.
The Select Terminal window opens.Show me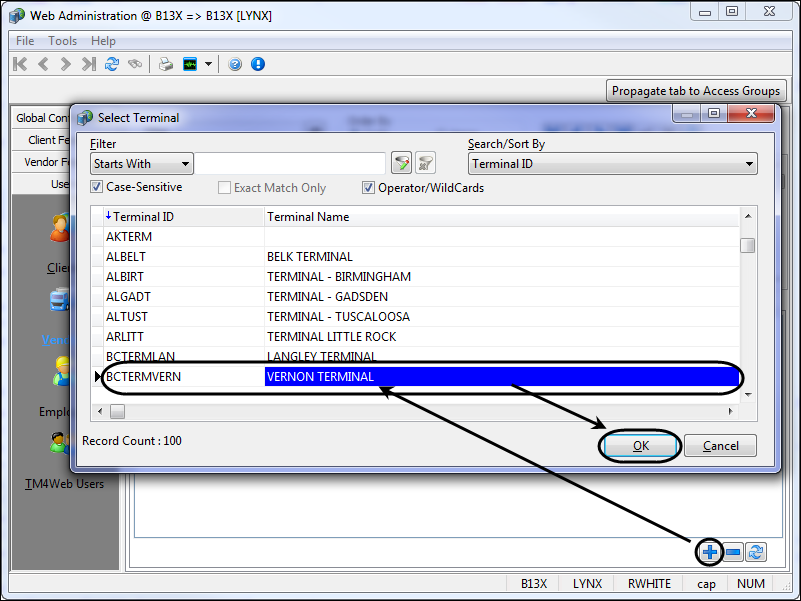
-
Select from the available Terminals and click OK.
-
(Optional) Repeat steps 1 and 2 as needed for additional Terminal Zones.
Creating a New Vendor Access Code
The following process enables you to configure TruckMate Vendors with TM4Web access.
Use this procedure to add a TruckMate Vendor to the Web Admin program.
-
From the Start menu, navigate to the Customer and Vendor Profiles program (PROFILES.EXE). Click Start, and then point to All Programs. Point to TruckMate, Profiles, and then click Customer and Vendor Profiles.
-
Select the
 Vendor toolbar button.
The Vendor page opens. -
On the Vendor page, use the navigation bar to browse to the desired Vendor to use in TM4Web. Once the Vendor record is located, select Web Enabled option. The Vendor is now visible in WebAdmin to allow configuring a TM4Web Access Code, which a user can then use to register in TM4Web.
Show me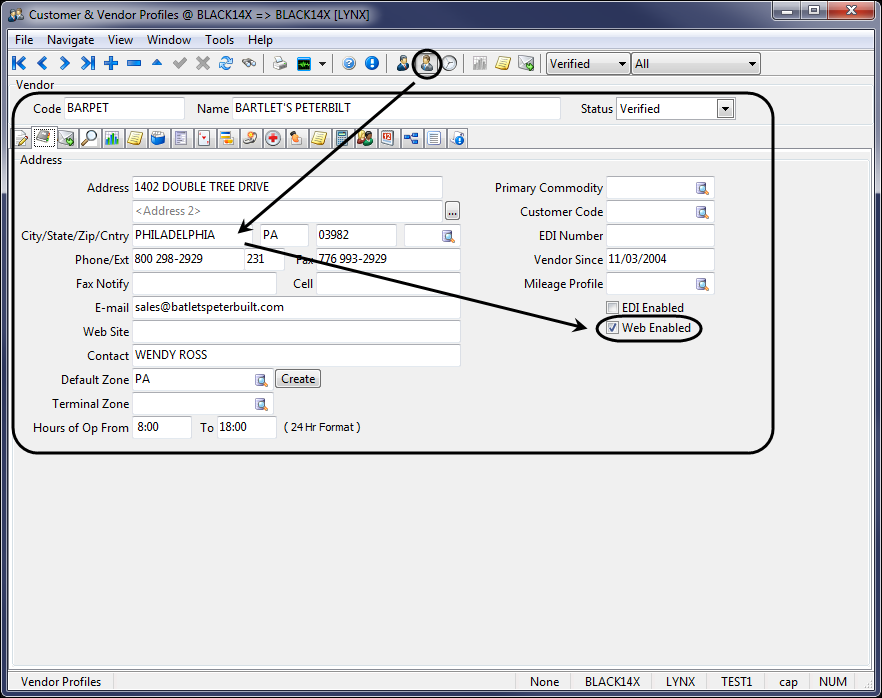
-
From the Start menu, navigate to the Web Admin program (WEBADMIN.EXE). Click Start, and then point to All Programs. Point to TruckMate, TruckMate for Web, and then click Web Admin. To access the Vendors window, click Users and point to Vendors. All Vendors that have the Web Enabled option selected appears in the Vendor Access grid.
-
Enter the following details in two of the grid fields for your selected vendor:
-
Access Code: Enter a unique Access Code that the Vendor user will enter when registering.
-
Feature Group: Select a Feature Group from the list of configured Feature Groups as configured on the Global Configuration > Features section. The Vendor user will have access to these features.
-
-
Configure Vendor Access Group Options, Detail Fields, OSD Fields, and Terminal Zones as you see fit for the selected Vendor.
-
Provide your vendor with the newly created Access Code, which they will use to register on the TM4Web Registration page.
| Each Vendor must be setup with its own Access Code. |
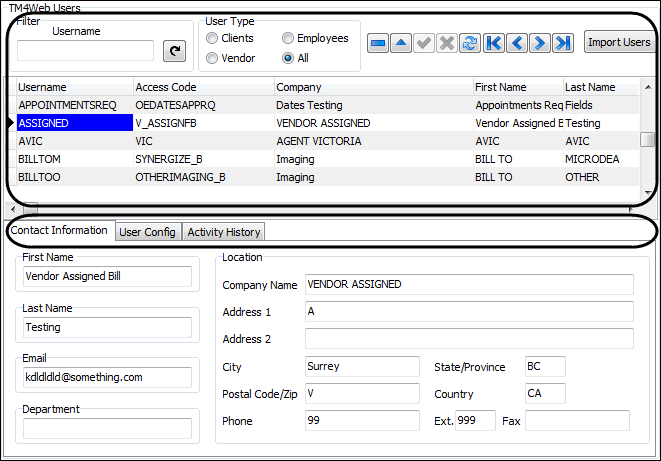
TM4Web Users
The TM4Web Users tab is a registry of all users on your system. The information is gathered when from users when they register online. You have the ability to update user contact information, as well as remove or restrict access to TM4Web.
If a user has forgotten their password, you can use the shortcut menu option Change Password to set a new password, as there is no way of recovering the actual password character string. Users can also reset their own password from the TM4Web Login page using the email address that they registered with.
The TM4Web section is divided into two sections: TM4Web User Access Grid and TM4Web User sub-tab options.
To access Web Admin, click Start, point to All Programs. Point to TruckMate, TruckMate for Web, and then click Web Admin. To access the TM4Web Users window, click Users and point to TM4Web Users.
TM4Web User Access
The Filter Section allows you to choose which records are displayed on the TM4Web User Access Grid.

| Options | Descriptions |
|---|---|
Filter |
You can reduce the number of records that are displayed by entering partial match data in the Username filter field. |
User Type |
Select the appropriate option to limit the records displayed by User Type. This option works in conjunction with the Filter feature.
|
Import Users |
Import Users opens the FMImport Window which allows you to create new users from a CSV file. The file must be saved as CSV to be suitable for importing using this feature. If an existing Access Code is provided the user will be added to the Access Group. If the Access Code does not yet exist a new Client Access Group will be created. |
The TM4Web User Access Grid displays all of the user records.
All users entered registered in TM4Web appear in this grid.
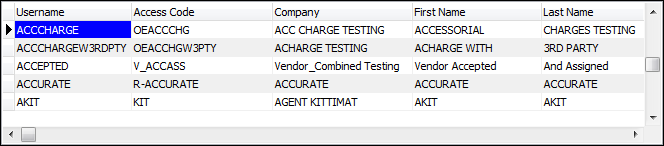
| Column | Definition |
|---|---|
Username |
This is the username determined by a user when registering. |
Access Code |
The Access Code is setup in the Clients and Vendors section. |
Company |
A user’s company name. |
First Name |
A user’s first name. |
Last Name |
A user’s last name. |
Shortcut Menu
Using a right button (right-click) displays a shortcut menu with the following options:
| Shortcut Menu | Descriptions |
|---|---|
Change Password |
Opens a Change Password window where you can enter a new password for the selected user. |
Show/Hide Details |
This menu option toggles the display of the TM4Web User sub-tabs (Contact Information, User Config, and User Activity History) on/off. |
English/French |
Select the appropriate language for each user. Language is identified in the User Config tab. |
Contact Information tab
Additional information for each user can be modified using the Contact Information tab.

| Fields | Description |
|---|---|
First/Last Name |
Details the user’s first and last name. |
Details the user’s email address. |
|
Department |
Details the user’s department information. |
Location |
Displays company name and associated address details. |
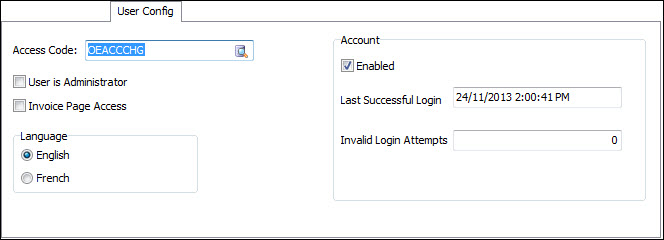
User Configuration tab
The User Configuration tab displays and enables alterations details regarding TM4Web users.
| Options | Description |
|---|---|
Access Code |
This field displays the Access Code (tied to a Client/Vendor Access Group) that this user entered when they registered in the TM4Web system. You can use the edit pick button to change the selected User’s Access Group, if necessary. |
User is Administrator |
To set the currently selected user as an Administrator, select this option. Currently this option is only used within specific cutomized code. |
Invoice Page Access |
This option allows configuring access to the TM4Web Invoices page beyond the Feature Group setup. The Access group must first include the Invoice page, and then only the users setup here with Invoice Page Access will be able to view the page. |
Language |
Select the language of preference (French or English) for this specific TM4Web User. All TM4Web labels will default to display in the users selected Language. See configuring a second language for further details. |
Enabled |
To enable the account, select this option, and to disable the account, clear the option. Note: If the Enable new users by default option is selected in the Base Setup Login options, this option is automatically enabled. If not, the Web Administrator must manually enable each user to access TM4Web after they have registered. |
Last Successful Login |
Displays the date of a user’s last successful login attempt. |
Invalid Login Attempts |
Enter the number of invalid login attempts allowed before the system will disable this account. For example, you may allow the user to attempt to login three times before disabling the account. |
Activity History tab
The User Activity tab displays information relevant to the selected user. Logging must first be enabled within the Logs / Debug tab of the Web Administration program’s Global Configuration section.
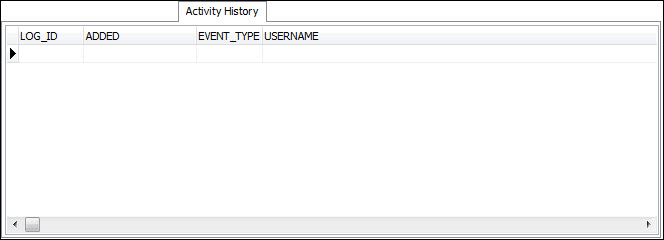
See the Global Configuration documentation for more information.