Rating
The Rating tab enables you to configure the ways in which your users will use the TM4Web Rate Quote. Rating is divided into two tabs: Rate Quote Input and Rate Quote Result. Each viewing tab has several tabs where further details are configured.
| Rating (as with all Client Features) are configurable based on Access Group. Select the Access Code you wish to configure. |
To access the Rating window, click Client Features and then click Rating.
Rate Quote Input tab
The Rate Quote Input tab enables you to configure the ways in which TM4Web users will be able to request quotes. The Rate Quote Input tab contains 5 sub-tabs under which you can configure rate quote input options.
Options tab
The Options tab allows you to display (or remove) additional options to the Rate Quote Input page. The Options tab is divided into three sections: Rate Quote Input Interface Options, Vendor Rating, and Crystal Reports.
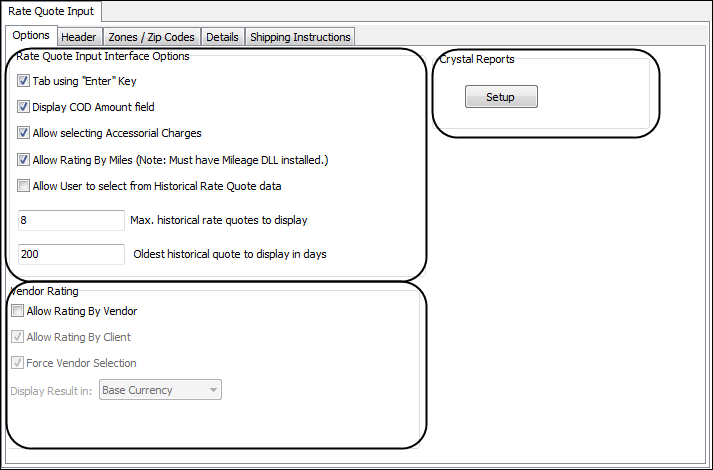
| Rate Quote Input Interface Options | Description |
|---|---|
Tab using "Enter" key |
Select this option to enable tab functionality when using the Enter key for your users. |
Display COD Amount field |
If selected, this will display the COD Amount input field on the Rate Input page and the COD Amount on the Rate Results page. |
Allow Selecting Accessorial Charges |
When selected, this option allows users to include accessorial charges in the Rate Quotes. Accessorial Charges must be Active and Web Enabled to appear in TM4Web. Also only the Manually Assigned (where Auto-assigned by Default is not selected) will be offered to the user to select from. Once a Rate Quote is submitted or an Order completed, the user will see the manually assigned and auto assigned accessorial charges. |
Allow Rating by Miles |
Select this option to enable Mileage Rating in TM4Web.
|
Allow User to select from Historical Rate Quote data |
Select this option to enable users use historical rate quote data as a template for a new rate quote. The Rate Quote Result Keep Rate Quotes must also be selected. |
Max. historical rate quotes to display |
Set the maximum limit of historical rate quotes to display. |
Oldest historical quote to display in days |
Set the value of the oldest historical quote to display in days. |
| Vendor Rating | Description |
|---|---|
Allow Rating By Vendor |
Select this option to enable Vendor Rating for TM4Web users. Once enabled, the following three options become available: |
Allow Rating By Client |
Select this option to also enable Client based Rating in TM4Web. |
Force Vendor By Selection |
Select this option to enable Vendor Selection for TM4Web users. Note: When this option is not selected, TM4Web users can leave the Vendor field empty to obtain a quote for all possible vendors. |
Display Result in |
Select either Base Currency or Vendor Currency for your Rating totals.
|
| Crystal Reports | Description |
|---|---|
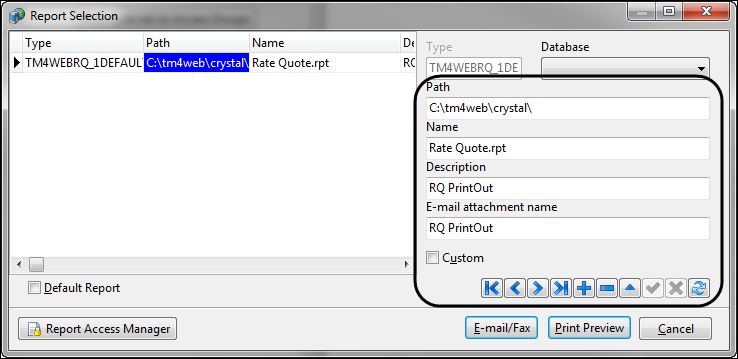
Setup |
Click Setup to set details of your report selections using the navigation controls.
Note: Ensure that the crystal reports are local to the TM4Web machine and the identified path exists on the TM4Web server. |
Header tab
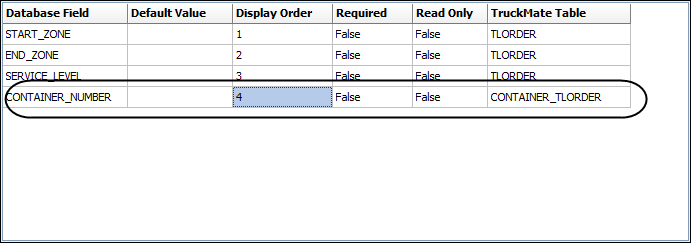
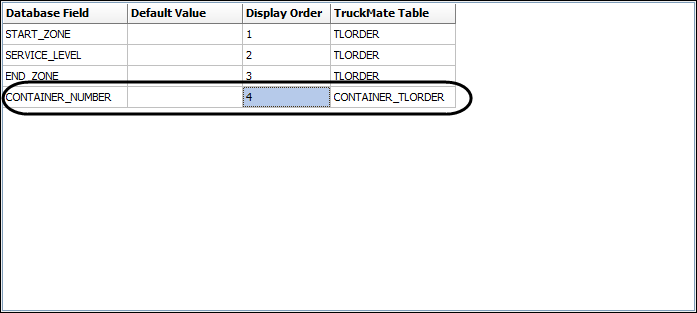
The Header tab allows you to add additional fields (or remove fields) to the Header section of the Rate Quote Input page. Fields can be added from the TLORDER table and CONTAINER_TLORDER table.
Use this procedure to add fields:
-
Select to add a new field from either the TLORDER or CONTAINER_TLORDER table.

-
Click
 Add on the navigational bar.
 -
On the appropriate table field list window, double-click the desired field. The field is added in the header section.
-
If the default settings for the new field require editing, click
 Edit to display the Edit Rating Header window.
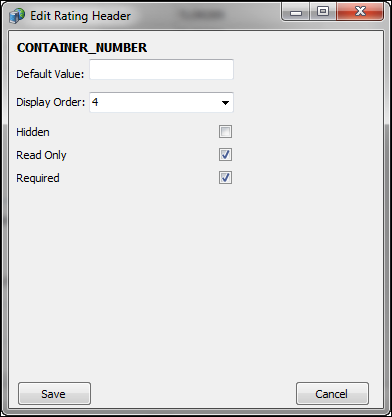
Field Definition Default value
This is where a preset value is set for the field as a default.
Display Order
This is where the order of appearance is set for the field compared to the other fields. A value of 0 indicates a hidden field or you can select the Hidden option.
Hidden
If selected, the field will be hidden from the TM4Web user. These hidden values are submitted along with the web form but are hidden to the TM4Web user. This may be required for some rate sheets which require input data not necessary for the TM4Web user to see.
Read Only
If selected, the field will not be editable by the TM4Web user.
Required
If selected, the TM4Web user will be required to enter a value before submitting the form. Required fields are indicated with an asterisk (*).
-
Select Client options that determine caller information:
-
Default Shipper is Caller - if selected this will display a button to the TM4Web user, which will allow setting the Shipper fields to the already populated Caller information.
-
Default Consignee is Caller - if selected this will display a button to the TM4Web user, which will allow setting the Consignee fields to the already populated Caller information.
-
Default Shipper to Caller info - if selected this will default the Shipper fields to the already populated Caller information.
-
Default Consignee to Caller info - if selected this will default the Consignee fields to the already populated Caller information.
-
-
Click Save.
Zones / Zip Codes tab
The Rating Zone / Zip Codes tab allows you to configure what Zones / Zip Codes will be available for TM4Web users to select and obtain Rate Quotes based off of.
The Zones / Zip Codes tab contains two sub-tabs: Zone Code Setup and Intermodal Zones Setup.
Zone Code Setup
| Option | Definition |
|---|---|
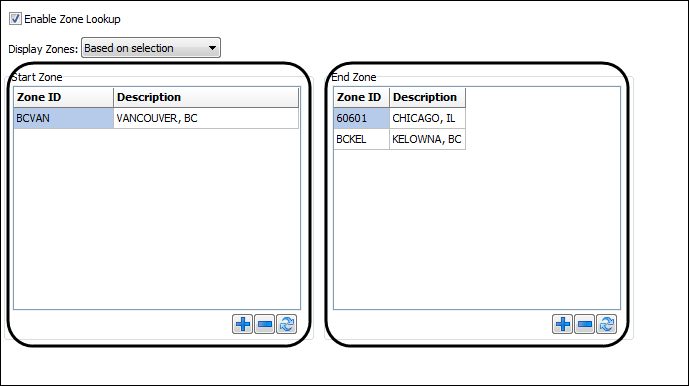
Enable Zone Lookup |
When selected a lookup button will be displayed beside the Zone input elements, allowing TM4Web users to select a zone from a lookup dialog. |
Display Zones |
From the Display Zones menu, select one of the following options to control the zones retrieved for a TM4Web user during Zone Lookup.
|
Start / End Zone |
The Start/End Zone sections enable you to control which zones will be available for Start Zone and End Zone selection. Use Add and Remove on the navigation bar to formulate the list of allowed zones for Start Zone and End Zone.
|
Intermodal Zones Setup
When Movement Type is selected as Import or DOM IB the following filtering will be applied to the corresponding Zone Lookup dialog:
Note: The Client Intermodal options (Ports or Rail Yards or Steamship Lines) are setup in Profiles - Intermodal tab.
-
Shipper/Pickup zone is only a: Select to offer only the zones where the Shipper is a Steamship Line/Port/Rail Yard.
-
Consignee/Deliver zone is NOT a: Select to filter out the zones where the Consignee is NOT a Steamship Line/Port/Rail Yard.
-
Empty Disposition zone is only a: Select to offer only the zones where the Empty Disposition is a Steamship Line/Port/Rail Yard.
When Movement Type is selected as Export or DOM OB the following filtering will be applied to the Zone Lookup dialog:
-
Empty Origin Zone is only a: Select to offer only the zones where Empty Origin is a Steamship Line / Port / Rail Yard.
-
Shipper/Pickup zone is NOT a: Select to filter out the zones where the Shipper is NOT a Steamship Line/Port/Rail Yard.
-
Consignee/Deliver zone is a: Select to offer only the zones where the Consignee is a Steamship Line/Port/Rail Yard.
Details tab
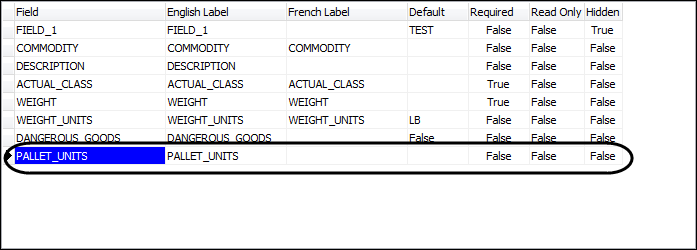
The Details tab enables you to add additional (or remove) fields to the Rate Quote Input page Detail section from the TLDTL table. In addition, it offers additional detail options.
| If you want to have an accessorial charge apply automatically to the quote and the accessorial is based on corresponding options such as temp controlled or dangerous goods, you need to ensure these fields are in your detail line as this information is used when obtaining rates. |
Use this procedure to add fields:
-
Click
Add on the navigational bar. -
On table field list window, double-click the desired field. The field is added to the Details section.
-
If the default settings for the new field require editing, click
Edit to display the Client Detail Field window.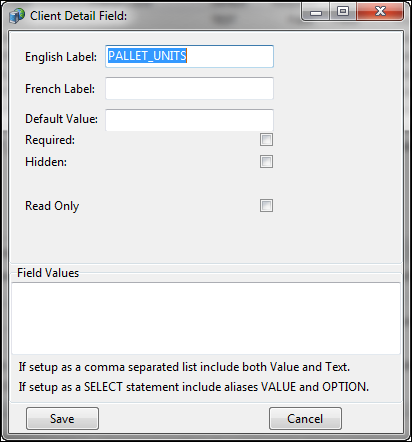
Field Definition English Label
Enter the English label to display as the column header.
French Label
If you have setup to allow TM4Web users to switch languages enter the second language label to display as the column header.
Default Value
This is where a preset value is set for the field as a default.
Required
If selected, the TM4Web user will be required to enter a value before submitting the form. Required fields are indicated with an asterisk (*).
Hidden
If selected, the field will be hidden from the TM4Web user. These hidden values are submitted along with the web form but are hidden to the TM4Web user. This may be required for some rate sheets which require input data not necessary for the TM4Web user to see.
Read Only
If selected, the field will not be editable by the TM4Web user.
Field Values
If setup, the field will display as a dropdown list of options for the TM4Web user to choose a value from. Field Values can be setup in one of two ways:
-
A Comma Separated List, containing both the Value and Text of each option in the List. The text will be displayed to the TM4Web user, and the value of the selected option will be saved to the database.
Example:
SITE2,My Site 2,SITE3,The Site 3,SITE4,A Site 4 - NO SPACES REQUIRED -
An SQL Select statement with two fields in the field list of the SELECT statement. The SELECT fields must have the following aliases: 'OPTION' and 'VALUE'.
The 'OPTION' alias will populate the text of the dropdown list displayed to the TM4Web user.
The 'VALUE' alias will populate the values of the dropdown list. The value of the selected option will be saved to the database.
Example:
SELECT SITE_NAME AS OPTION, SITE_ID AS VALUE FROM SITE
-
-
Click Save.
Select the relevant options in the Details section of the Details tab.
Details Description Maximum number of detail rows
This option defines the maximum number of detail lines that the TM4Web user can add to obtain a Rate Quote.
Maximum aggregate weight
This option defines the maximum total calculated weight that the TM4Web user can enter within the detail lines to obtain a Rate Quote. Set to zero for no maximum
Default to Client’s Primary Commodity
If selected the commodity field will default to the client’s primary commodity as defined in Client Profiles.
Offer only Client Specific Commodity Codes
If selected the commodity lookup dialog will only display the commodities setup within the client’s profile.
Use client’s default unit of measure
If selected, all applicable detail unit field values will initially display the default unit of measure as configured on the Customer & Vendor Profiles program > Customer > Address Tab > Default UOM field.
Use Density Calculator
If selected will display a calculator button on each detail line of the Rate Input page, allowing the TM4Web user to quickly calculate the density of an individual row item which will determine the corresponding Class (based on the legend), and can then be used to rate the order. This feature can be configured to warn the user if the density is over a certain threshold whereupon extra charges may apply.
Enable Standalone Density Calculator
If selected will display the Density Calculator section on the Rate Input page, giving the TM4Web user the ability to determine the overall density of the order (with a maximum of 6 detail lines in the form), calculating the Total Density and providing the appropriate Class. This feature can be configured to warn the user if the density is over a certain threshold whereupon extra charges may apply.
Rate Quote Result tab
The Rate Quote Result tab enables you to configure the ways in which TM4Web users will be able to view and interact with generated rate quotes. The Rate Quote Results tab contains 3 sub-tabs under which you can configure rate quote result options.
Options tab
The Options tab allows you to display (or remove) additional options within the TM4Web Rate Quote Results page. The Options tab is divided into several sections where you can configure various options regarding Rate Quote Result functionality including Service Levels; Accessorial Charges Fields and other options.
| Rate Quote Results Options | Description |
|---|---|
Keep Rate Quotes |
If selected generated TM4Web Rate Quotes will be saved and can be viewed within Customer Service as WQ bills. |
Mark-up Result By |
Set a value here to automatically increase the Rate Quote Cost by multiplying by this amount. For example, a value of 2 here will double the Cost displayed to the TM4Web user in the Rate Quote Result. |
Accessorial Charges Fields |
Select the following fields to display in the TM4Web Rate Quote Result Accessorial Charges section:
|
Allow Creating Pickup Request from Rate Quote |
If selected, this option enables users to make a pickup request after creating a rate quote. The information entered to obtain the Rate Quote will be used to create a Pickup Request. |
Display button 'Get Another Rate' |
Select this option to display a Get Another Rate button in your TM4Web software which resets the values of the previous rate quote and allows for rate re-quoting. |
Display SLM Transit Times |
If selected, a table of Service Level Matrix Transit Times will be added to the Rate Quote Results page. |
Allow selecting from Multi-Service Levels |
If selected, a dialog will display on the Rate Results, showing different Service Levels and Charges, allowing the user to select a different Service Level. The Service Level Multi Quote setup is in Codes Maintenance > Service Levels. |
Display Density Calculator Results |
If selected will display the "Density Calculator Results" section on the Rate Results page, displaying the results of what was entered into the standalone Density Calculator on the Rate Input page. Requires the Rate Input Standalone Density Calculator to also be enabled. |
Header tab
The Header tab allows the administrator to add additional fields (or remove fields) to the Header section of the Rate Quote Result page in TM4Web. Fields can be added from the TLORDER table and CONTAINER_TLORDER table.
Use this procedure to add fields:
-
Select to add a new field from either the TLORDER or CONTAINER_TLORDER table.
-
Click
Add on the navigational bar. -
On the appropriate table field list window, double-click the desired field. The field is added in the Header section.
-
If the default settings for the new field require editing, click
Edit to display the Edit Rating Header window.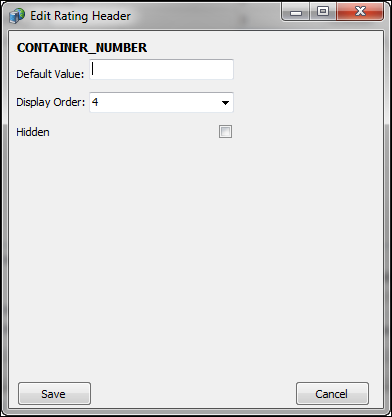
Field Definition Display Order
This is where the order of appearance is set for the field compared to the other fields. A value of 0 would indicate a hidden field or you can select the Hidden option.
Hidden
If selected, the field will be hidden from the TM4Web user. These hidden fields/values may be required by some forms to be populated with either a default value or backend procedure, which are not necessary for the TM4Web user to see.
-
Click Save.
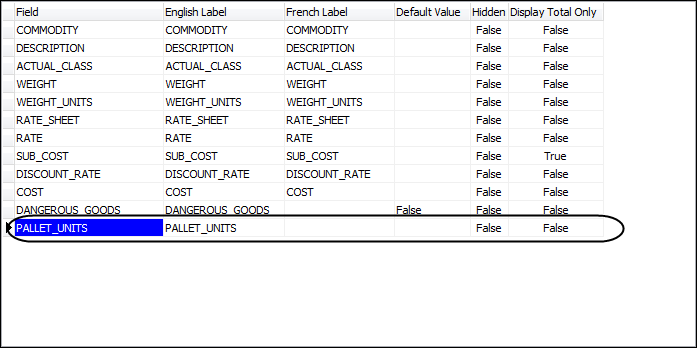
Details tab
The Details tab enables you to add additional (or remove) to the Rate Quote Result page Detail section from the TLDTL table.
-
Click
Add on the navigational bar. -
On the table field list window, double-click the desired field. The field is added to the details section.
-
If the default settings for the new field require editing, click
Edit to display the Client Detail Field window.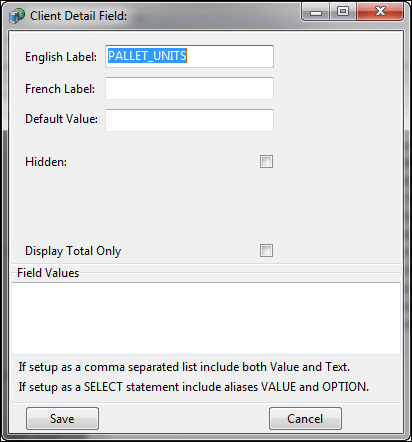
Field Definition English Label
Enter the English label to display as the column header.
French Label
If you have setup to allow TM4Web users to switch languages enter the second language label to display as the column header.
Hidden
If selected, the field will be hidden from the TM4Web user. These hidden fields/values may be required by some forms to be populated with either a default value or backend procedure, which are not necessary for the TM4Web user to see.
Display Total Only
If selected, the value of this field will only be displayed within the total column, the individual detail line value will not display.
-
Click Save.