Setting Vendor Features
The WebAdmin Vendor Features is the section under which you can configure options related to the TM4Web pages specific to the Vendor type Access Groups.
You can access:
| Vendor features are not configurable based on Access Code. |
Config
The WebAdmin Config section is used to configure base Vendor features such as Vendor Load History, Load Details, and Freight Board information. To access Web Admin, click Start, point to All Programs. Point to TruckMate, TruckMate for Web, and then click Web Admin.
To access the Config window, click Vendor Features and point to Config.
The upper portion of the Config window consists of several tabs that group together related information.
![]()
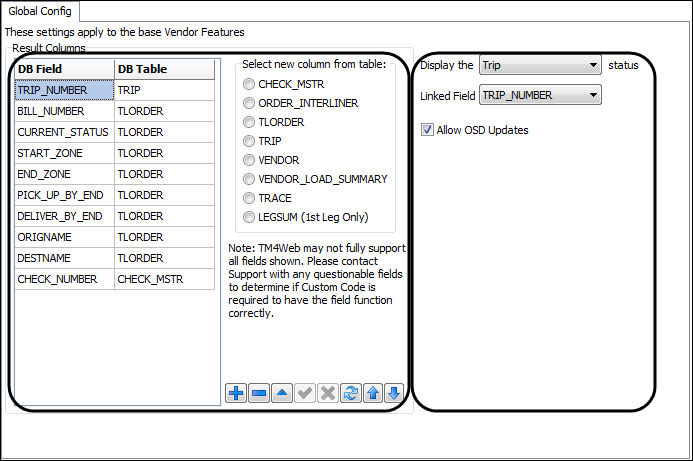
Global Config tab
The Global Config tab contains settings that apply to Vendor Load Histories, Load Offers, and Status updates. The Global Config tab includes two sections: Results columns and Configuration options.
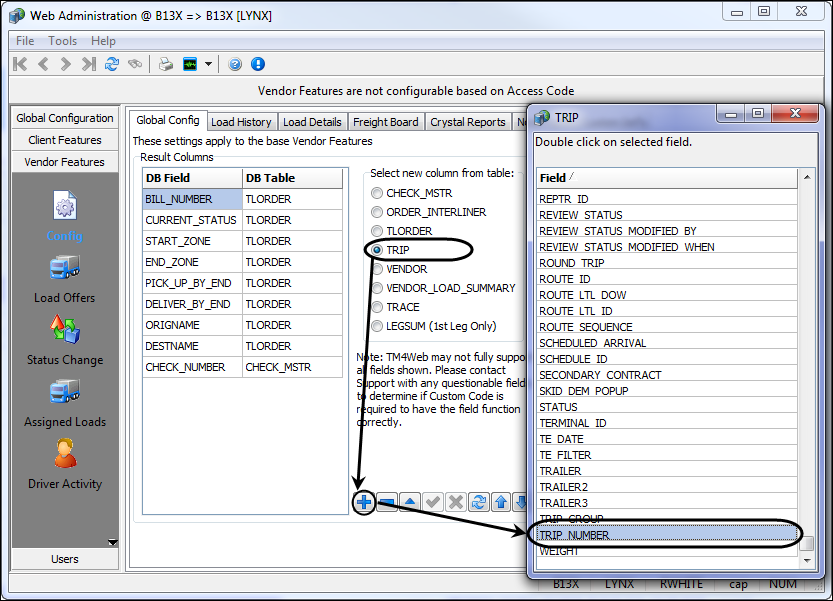
Adding Database Fields
Use this procedure to add database fields to the Results column.
-
Click a table option to select the table that a new field is associated with.
-
Click
 Add on the navigational bar.
Note: Depending on the selected table, the available fields to choose from are different.
-
Double-click a record line to choose database field value to apply to base vendor features.
-
Repeat steps as necessary for each database field to be applied to base vendor features.
-
Each database field can be re-ordered using Move up
 and Move down
  on the navigation bar.
Removing Database Fields
Use this procedure to remove database fields from the Results column.
-
Click the record (DB Field and associated Table) to be deleted.
-
Click
 Delete on the navigational bar.
| Only one database field can be selected and removed at one time. |
Configuration Options
Use the following options to further configure vendor features.
| Config Options | Descriptions |
|---|---|
Display the <FB/Trip> Status |
Select either Freight Bill or Trip to configure the default status displayed to the vendor logging into TM4Web. |
Linked Field |
Once you have added fields to the Results Column, use this menu to configure one of those fields as the field used to access more details regarding the invoice. The Linked Field applies to the fields in the grids on the following TM4Web > Vendor pages:
|
Allow OSD Updates |
If selected, this option enables OSD updates. |
Load History tab
The Load History tab contains settings that apply to Vendor Load Histories. The Load History tab includes two configuration options: Additional Search Fields and Assigned Loads.
| Options | Descriptions |
|---|---|
Load History Additional Search Fields |
The following options allow some additional search options on the Load History page. You can select any combination of the following values Probill Number, Check Number and/or Bill Date fields to allow your TM4Web vendor’s to search by these values. |
Display All orders Assigned to the Vendor |
If selected, this option displays all orders assigned to the vendor in TM4Web (except the cancelled ones of status code 'X'). If not selected, only accepted offers are displayed. |
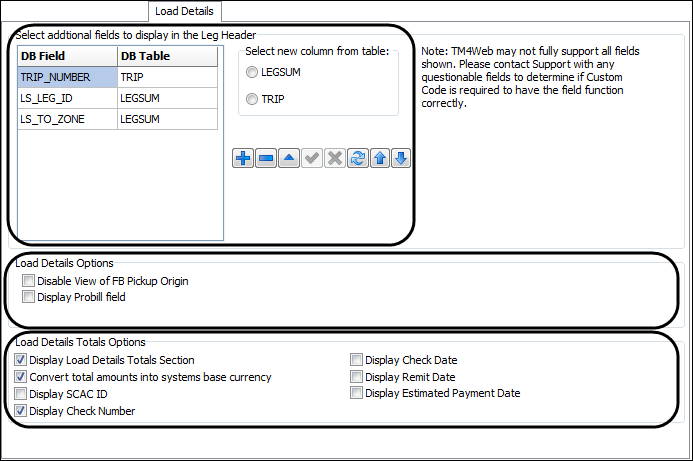
Load Details tab
The Load Details tab contains settings that apply to ??? The Load Details tab includes three sections: Leg Header Field Display Option, Load Details options, and Load Details Totals Options.
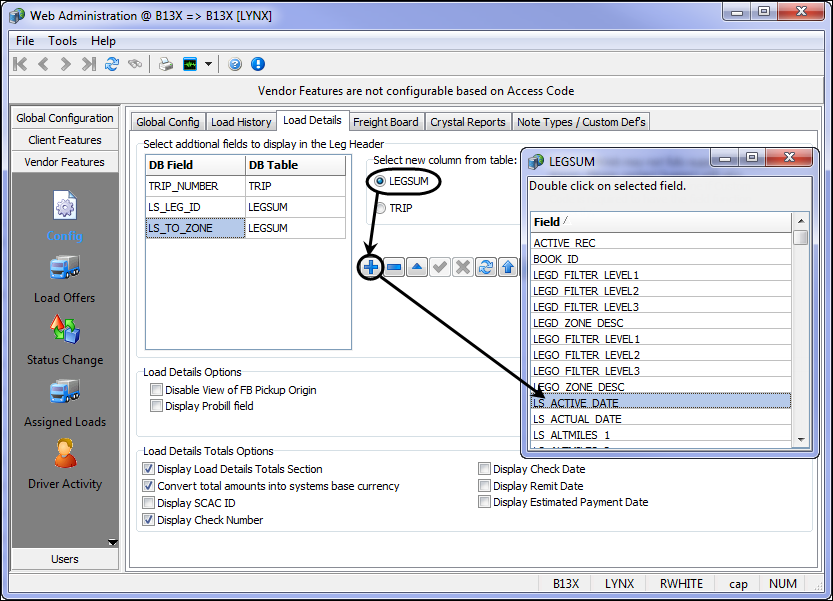
Adding Database Fields
Additional fields can be selected to display with the Leg Header information presented in the Load Details section.
Use this procedure to add database fields to the Leg Header information.
-
Select either a LEGSUM or TRIP table before adding the field.
-
Click
Add on the navigational bar.Note: Depending on the selected table, the available fields to choose from are different.
-
Double-click a record line to database field value to apply to base vendor features.
-
Repeat steps as necessary for each database field to be added.
-
Each database field can be re-ordered using Move up
and Move down on the navigation bar.
Removing Database Fields
Use this procedure to remove database fields from the Leg Header information.
-
Click the record to be deleted.
-
Click
Delete on the navigational bar.
| Only one field can be selected and removed at one time. |
Load Details Options
Use the following options to further configure Load Details.
| Load Details Options | Description |
|---|---|
Disable View of FB Pickup Origin |
Selecting this option disables Freight Bill origin from viewers. |
Display Probill field |
If this option is selected, and the FB has a Vendor Probill number entered against it, your TM4Web users will be able to see that Probill number in the FB details screen. |
| Load Details Totals | Description |
|---|---|
Display Load Details Totals Section |
Selecting this option displays the Vendor Load Details form in TM4Web. |
Convert total amounts into systems base currency |
Select this option to have the TM4Web system convert load offer amounts into the system’s base currency (as defined in the Codes Maintenance program > Units tab). |
Display SCAC ID |
Selecting this option displays the Vendor’s SCAC ID. |
Display Check Number |
Selecting this option displays the Vendor check number in the Vendor Load Details form of TMW4Web. |
Display Check Date |
Selecting this option displays the Vendor check date in the Vendor Load Details form of TMW4Web. |
Display Remit Data |
Selecting this option displays the Remit Date for the Vendor. |
Display Estimated Payment Date |
Selecting this option displays the estimated payment date for the Vendor. |
Freight Board tab
The Freight Board feature enables users to view basic trip information. Trips are displayed on TM4Web’s Freight Board by assigning a trip status of OPENBOARD in the Dispatch program. (Users must first use Codes Maintenance to create a new Status Code OPENBOARD, setting the type to TRIP and the category to OTHER.)
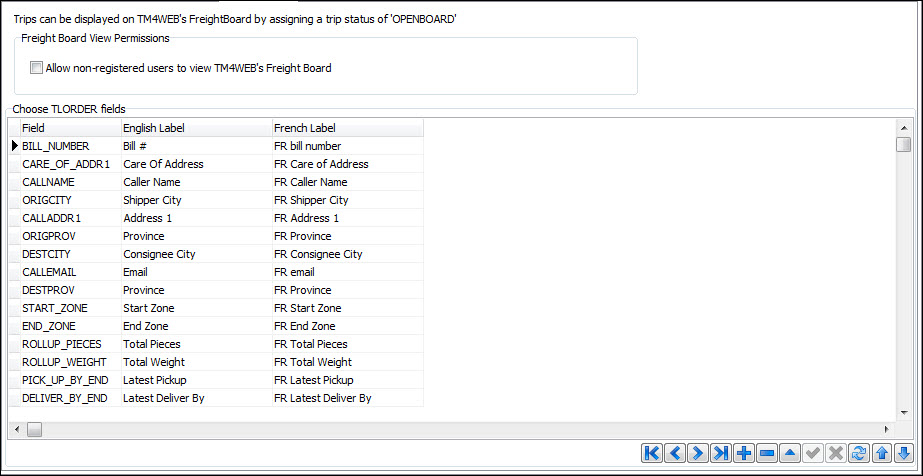
| Freight Board View permissions can be set to enable both registered and non-registered users to view the Freight Board. Select the Allow non-registered users to view TM4Web’s Freight Board option. |
The Choose TLORDER fields grid enables you to select TLORDER fields to display for TM4Web users in the Freight Board grid. You can add fields by clicking Add at the bottom of the grid; double-click any available field to add. Once added in the list of added fields you can enter a label for the newly added field.
Crystal Reports tab
The Crystal Reports tab allows you to name a report to be used with some of the available vendor features. In TM4Web, when a user accesses a vendor feature, a Print link is available. If selected, the report named in this tab for that feature is run.
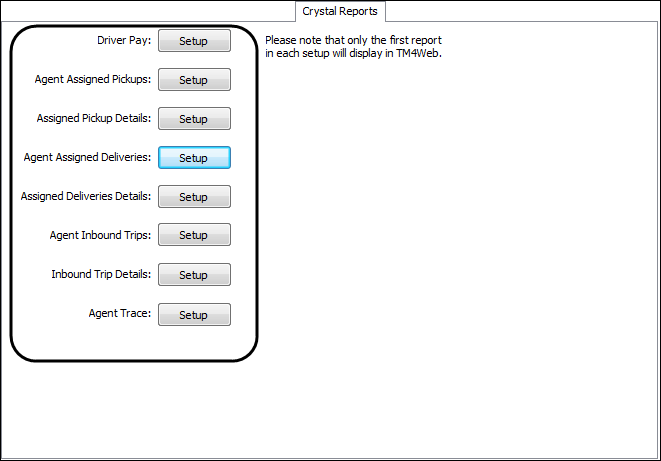
Assigning Reports to Vendor Features
For each of the listed vendor features, one report can be named. The named report will be generated when the Print link is selected from within the Vendor Feature’s page in TM4Web. Following is a list of the vendor features that a Crystal Report can be assigned to.
| Only the first report in each setup will display in TM4Web. |
-
Driver Pay
-
Agent Assigned Pickups
-
Assigned Pickup Details
-
Agent Assigned Deliveries
-
Assigned Deliveries Details
-
Agent Inbound Trips
-
Inbound Trip Details
-
Agent Trace
Click Setup to set the details of your report selections using the navigation controls.
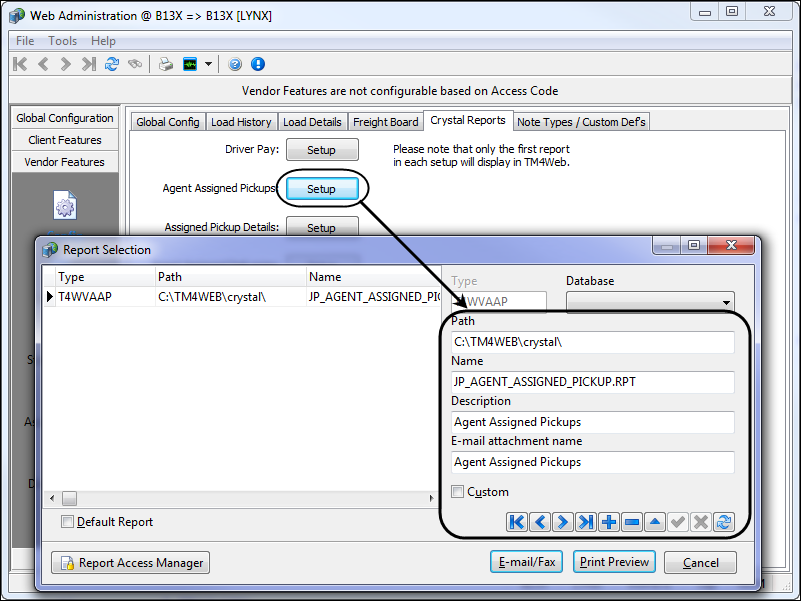
| Ensure that the crystal reports are local to the TM4Web machine and the identified path exists on the TM4Web server. |
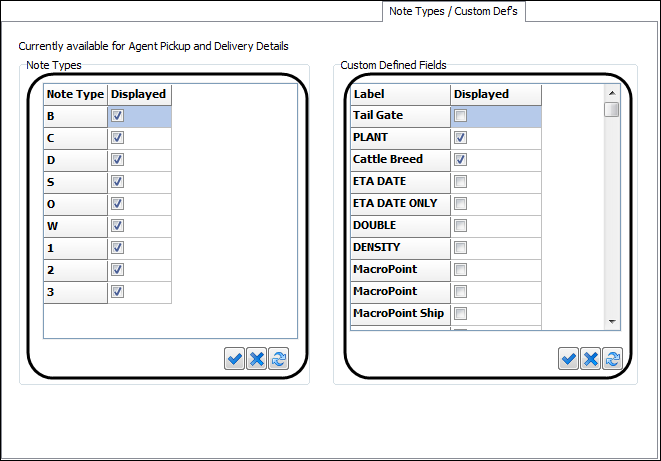
Note Types / Custom Def’s tab
The Note Types / Custom Def’s tab allows you to configure available note types abd custome difned fields for vendors.
| Options | Descriptions |
|---|---|
Note Types |
The administrator decides which note types are displayed for vendors. Select the note type you want to be visible for vendors. |
Custom Defined Fields |
The administrator decides which Custom Defined fields are displayed for vendors. Select the custom defined field you want to be visible for vendors. |
Load Offers
The WebAdmin Load Offers section is used to configure how Load Offers are viewed. Load Offers is divided into two tabs: Vendor Load Offer Fields and Vendor Load Offer Options.
To access the Load Offers window, click Vendor Features and point to Load Offers.
Vendor Load Offer Fields
The Vendor Load Offer Fields tab enables you to configure how and what is displayed in which vendors/carriers are able to view load offers. The Vendor Load Offer Fields tab is divided into two sections: Grid Fields and Detail Header.
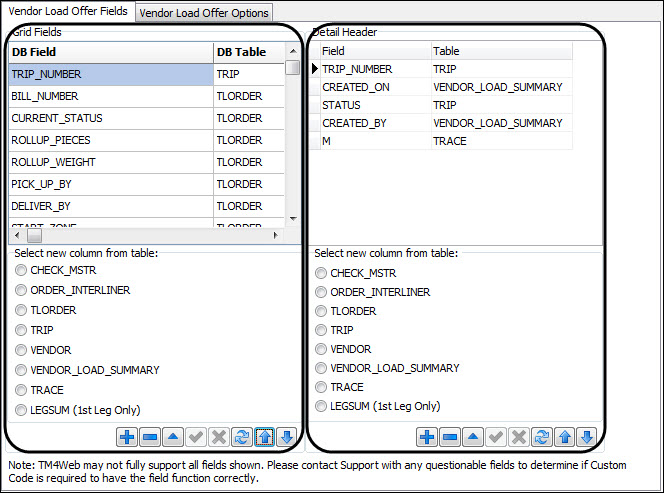
Grid Fields
You can add, delete or modify selected fields by using the standard TruckMate navigation bar. You can then prioritize the order in which these fields will appear to TM4Web users by using ![]() Up and
Up and ![]() Down.
Down.
Use this procedure to add fields to the Load Offer page.
-
Select a new column from relevant tables.
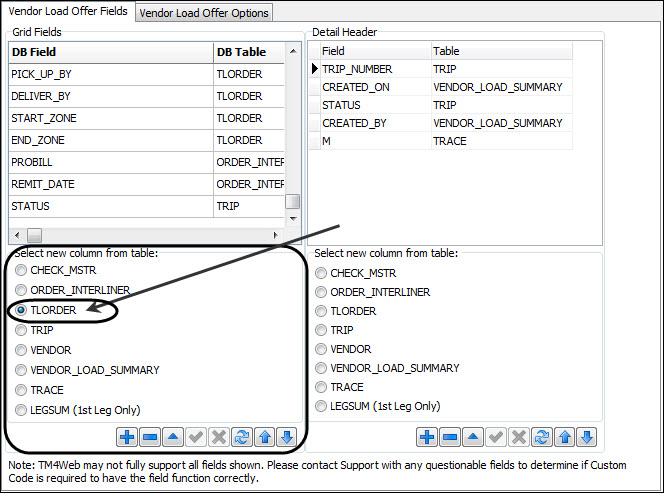
-
Click
Add on the navigational bar to add a new field.
The DB field screen is displayed. -
Select from the available fields and double- click.
The field is added to the DB field grid. -
Click
 Save.
Save. -
Repeat steps as necessary for each record line.
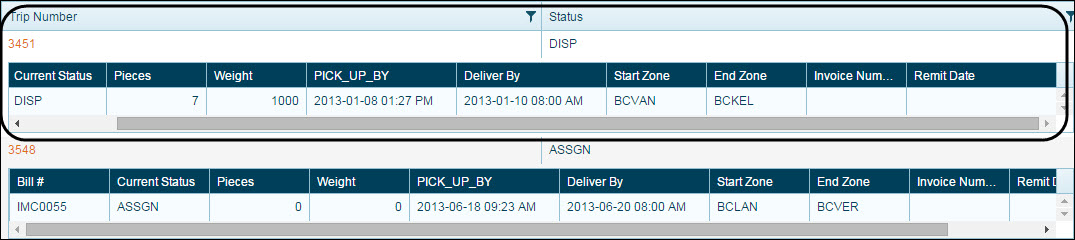
The options chosen here are displayed in the TM4Web>Load Offers screen.
Detail Header
You can add, delete or modify selected fields by using the standard TruckMate navigation bar. You can then prioritize the order in which these fields will appear to TM4Web users by using ![]() Up and
Up and ![]() Down.
Down.
Use this procedure to add fields to the Load Offer page.
-
Select a new column from relevant tables.
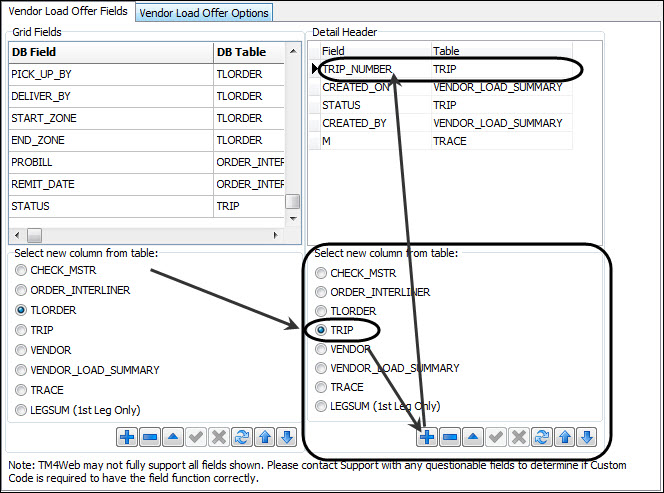
-
Click
Add on the navigational bar to add a new field.
The DB field screen is displayed. -
Select from the available fields and double- click.
The field is added to the Detail Header grid. -
Click
Save. -
Repeat steps as necessary for each record line.
The options chosen here are displayed in the TM4Web>Load Details screen.

Vendor Load Offer Options
The Vendor Load Offer Options tab enables you to configure additional load offer options.
| Options | Description |
|---|---|
Automatically update the trip status when accepting / rejecting Load Offers |
Select this option if you need to automatically update the trip status on accepting or rejecting the load offer by the vendor |
Vendor Auto Picked |
Select this option to allow the system to automatically select the Vendor. |
Include Trips with no Freight Bills |
Select this option to enable Load Offers and Status Update pages to display trips that do not have freight bills on them. |
Allow Invoice Number Entry |
Select this option to allow manual Invoice Number Entry for your Vendors. |
Allow Trailer Number Entry |
Select this option to allow manual Trailer Number Entry for your Vendors. |
Email when Vendor rejects Load Offer |
Enter a valid email address in this field (preferably the Web Administrator’s email). If a Vendor rejects a Load Offer, a message will be generated and sent to this email address automatically, notifying the recipient of the Vendor’s actions. |
Require Vendor Booking Number |
If this option is selected, the vendor will be required to enter a Booking Number when accepting a load offer. |
Restrict to Status Codes |
Status Change
The WebAdmin Status Change section is used to configure Status Change Rules and Status Change User Fields. Status Change is divided into two sections: Vendor Status Change Rules and Status Change User Fields.
To access the Status Change window, click Vendor Features and point to Status Change.
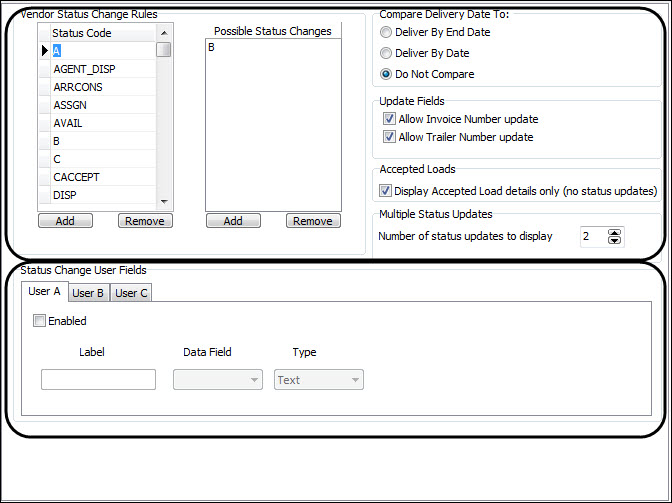
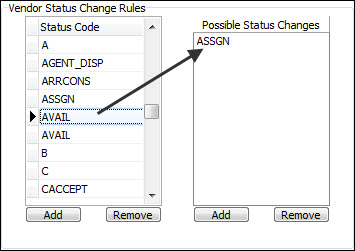
Vendor Status Change Rules
The Vendor Status Change Rules section allows you to set which Status Change values will be available from within TM4Web.
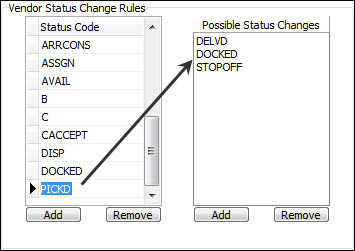
Use the following procedure to add status code and possible status changes.
-
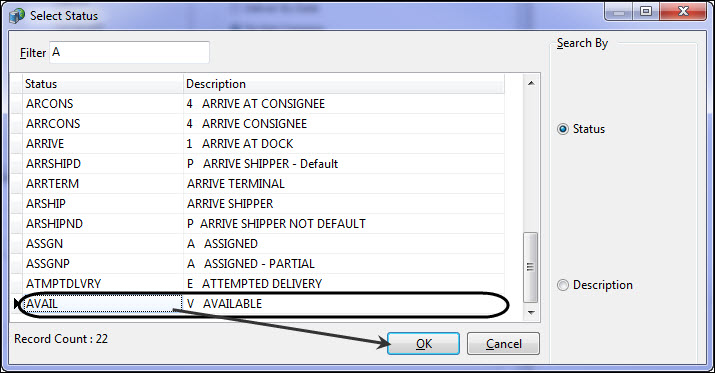
Under the Status Code column, click Add.
The Select Status window is displayed. -
Find the desired Status Code and click Ok.
-
You are prompted to add a status change rule for the selected status.
-
Click Ok.
-
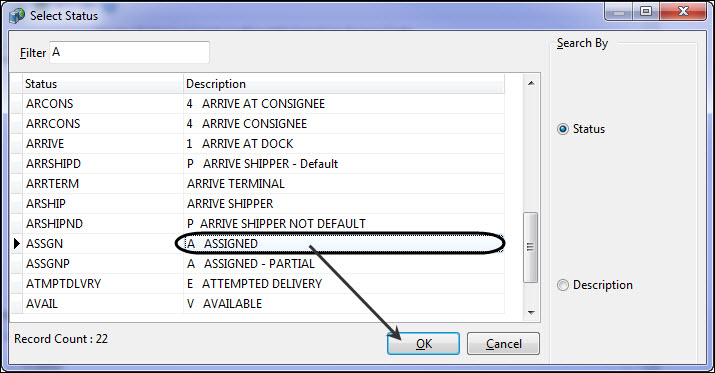
The select Status window is displayed.
-
Find the desired Status Change and click Ok.
-
The status is added to Possible Status Changes grid.
|
The options in the following section determine how TM4Web handles Status Changes for Freight Bills. The TM4Web user changes the Status of any given Freight Bill to Delivered (DELVD), TM4Web will determine if the delivery is late by comparing the Status Change date/time with the Freight Bill value tied to these options:
| Compare Delivery Date To: | Description |
|---|---|
Delivery By End Date: |
If the Status Change date/time comes after the Freight Bill’s 'Delivery By End Date' value, the TM4Web User will be asked to provide a Reason Code for the Late Delivery. |
Delivery By Date: |
If the Status Change date/time comes after the Freight Bill’s 'Delivery By End Date' value, the TM4Web User will be asked to provide a Reason Code for the Late Delivery. |
Do Not Compare: |
The Status Change date/time will not be compared against the Freight Bill’s expected Delivery, and no Reason Code will be ever requested from the TM4Web User. |
| Update Fields | Options |
|---|---|
Allow Invoice Number update |
Select this option to allow TM4Web Vendors the ability to update the Invoice number of a Freight Bill in the TM4Web system. |
Allow Trailer Number update |
Select this option to allow TM4Web Vendors the ability to update Trailer Numbers on their Trailers when doing a Status Change on a Freight Bill. |
-
Display Accepted Load details (status updates) -
-
Number of status to display - This option users to display multiple status update fields on the T4Web Vendor > Status Updates page. The default is set to 1.
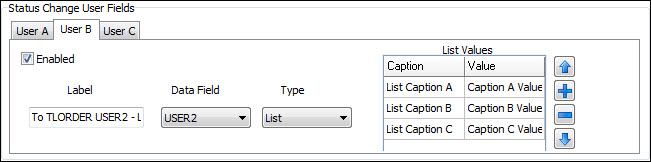
Status Change User Fields
The Status Change User Fields section allows you to define what the user fields within the Status Change pages will look like. Select the check boxes within the User A - User C tabs to modify their appearance.
| Options | Description |
|---|---|
Enabled |
Select this option to enable the use of Status Change Custom Fields. You have the option of adding up to three unique Custom Fields (each field is represented by tab A, B and C). |
Label |
Enter the text label you wish the User Fields to display. |
Data Field |
Choose the Data Field that these modifications will apply to from the item list. There are 10 user fields available for use with TM4Web, but as other aspects of the software may be already using some of these fields, not all of them may be selectable here. |
Type |
Select the Type value of the User field form the pull down menu options. Depending on the Type you select, you may have further configuration options, as follows:
|
Assigned Loads
This section is used to configure the results page for Vendor Assigned Loads. Assigned Loads is divided into two tabs: Vendor Assigned Loads and Imaging.
To access the Assigned Loads window, click Vendor Features and point to Assigned Loads.
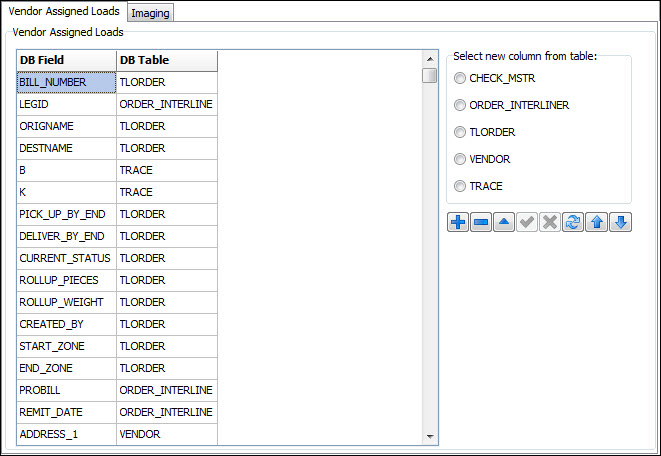
Vendor Assigned Loads tab
You can add, delete or modify selected fields by using the standard TruckMate navigation bar. You can then prioritize the order in which these fields will appear to TM4Web users by using ![]() Up and
Up and ![]() Down.
Down.
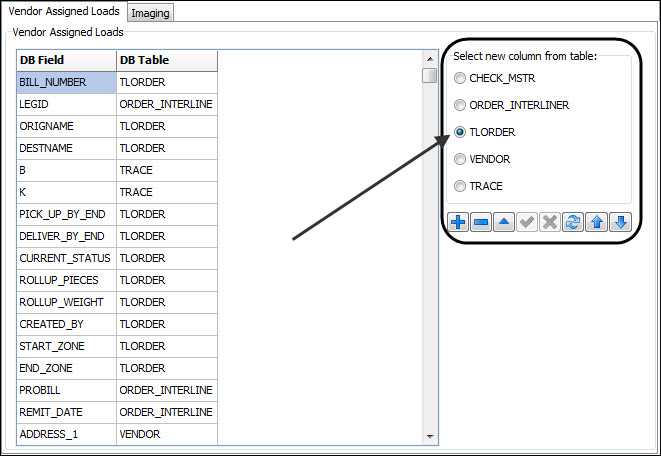
Use this procedure to add fields to the Vendor Assigned Loads page.
-
Select a new column from relevant tables.
-
Click
Add on the navigational bar to add a new field.
The DB field screen is displayed. -
Select from the available fields and double- click.
The field is added to the Vendor Assigned Loads grid. -
Click
Save. -
Repeat steps as necessary for each record line.
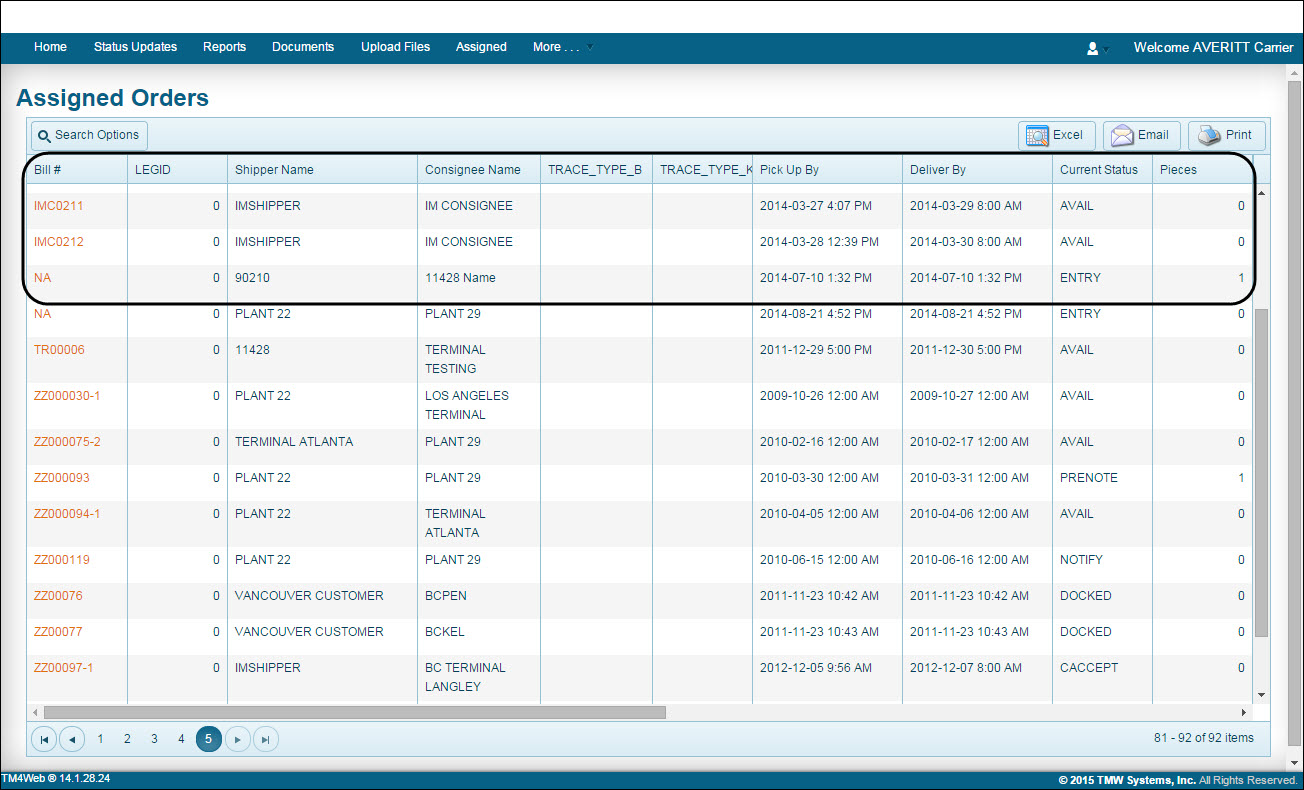
The selected fields are displayed in the TM4Web>Assigned Orders screen.
Driver Activity
This section is used to configure the appearance of TM4Web’s Driver Activity.
To access the Driver Activity window, click Vendor Features and point to Driver Activity.
| Field | Description |
|---|---|
DB Field |
This field displays the column name of the selected column to be available in the driver activity page. |
DB Table |
This column displays the table from which the column was selected. |
Grid Visible |
This field enables you to control whether the selected column is displayed in the driver activity grid. |
Search Visible |
This field enables you to control whether this field is used in search criteria or not. |
Search Default |
This field is used to set the default value of the row when used in a search. |
| Options | Description |
|---|---|
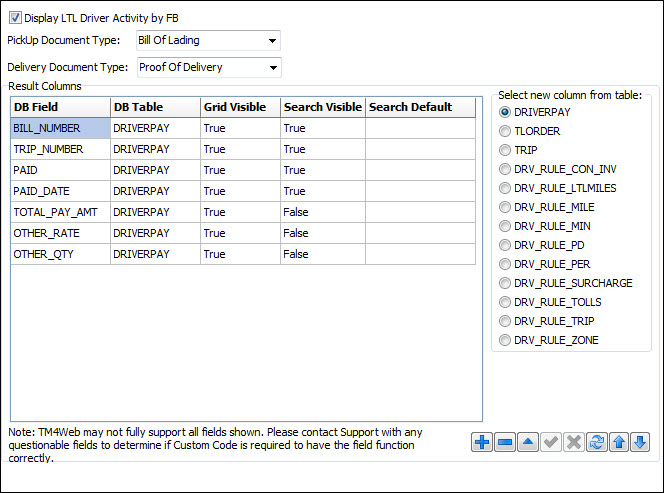
Display LTL Driver Activity |
Selecting this option adds fields to show LTL driver activity (P/D, Actual Date, Client, Zone) based on the freight bill’s driver pay record. This option also enables search by Activity Date, which is:
or
|
PickUp Document Type |
This item list enables you to select the type of document to be used for a pickup activily. |
Delivery Document Type |
This item list enables you to select the type of document to be used for a delivery activily. |
You can add, delete or modify selected fields by using the standard TruckMate navigation bar. You can then prioritize the order in which these fields will appear to TM4Web users by using ![]() Up and
Up and ![]() Down.
Down.
Use this procedure to add fields to the Vendor Assigned Loads page.
-
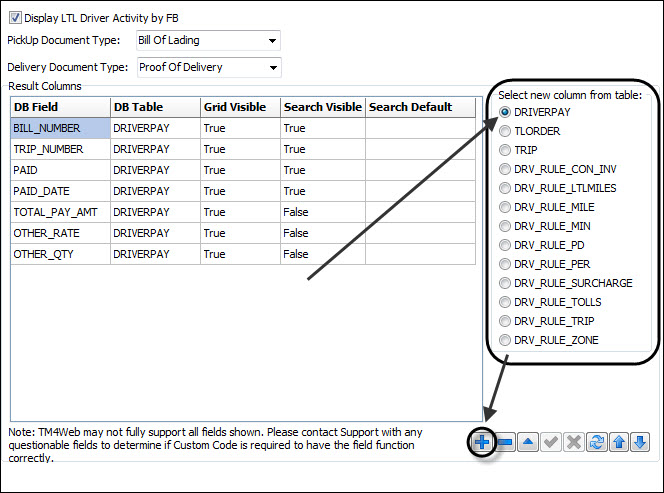
Select a new column from available tables.
-
Click
Add on the navigational bar to add a new field.
The DB field screen is displayed. -
Select from the available fields and double- click.
The field is added to the Results Column grid. -
Click
Save. -
Repeat steps as necessary for each record line.
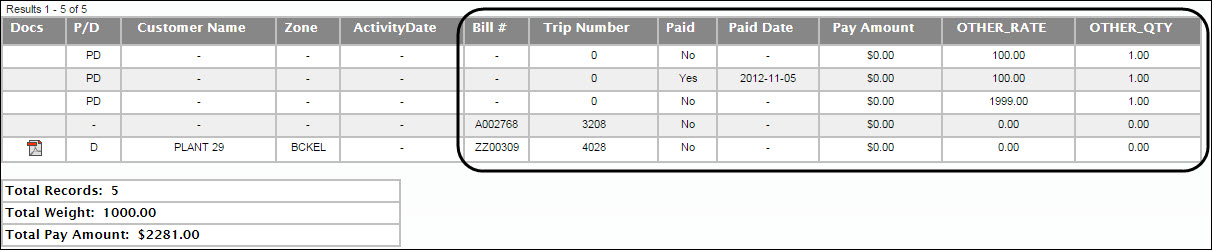
The results are displayed in the TM4Web>Driver Pay screen.
Agent Inbound
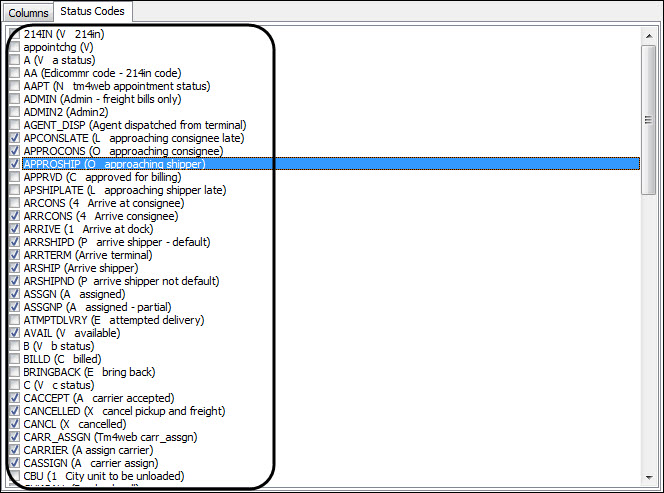
This section is used to configure the results page for the Agent Inbound Trips in TM4Web. Agent Inbound is divided into two tabs: Columns and Status Codes.
To access the Agent Inbound window, click Vendor Features and point to Agent Inbound.
| Field | Definition |
|---|---|
DB Field |
This field displays the column name of the selected column to be available in the Agent Inbound Trips page. |
DB Table |
This column displays the table from which the column was selected. |
Grid Visible |
This field enables you to control whether the selected column is displayed in the Agent Inbound Results grid. |
Search Visible |
This field enables you to control whether this field is used in search criteria or not. |
Search Default |
This field is used to set the default value of the row when used in a search. |
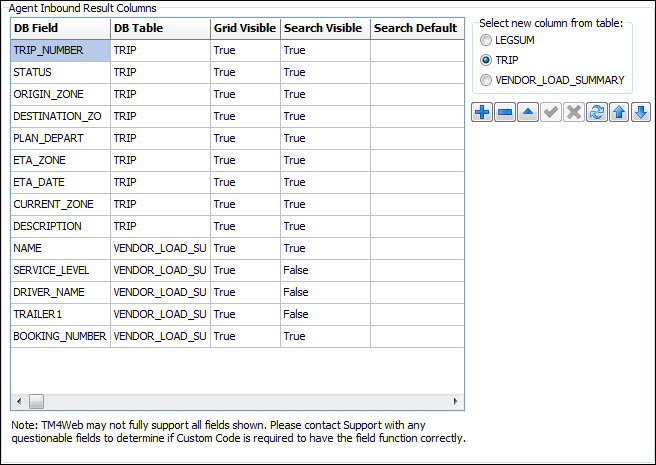
Columns tab
You can add, delete or modify selected fields by using the standard TruckMate navigation bar. You can then prioritize the order in which these fields will appear to TM4Web users by using ![]() Up and
Up and ![]() Down.
Down.
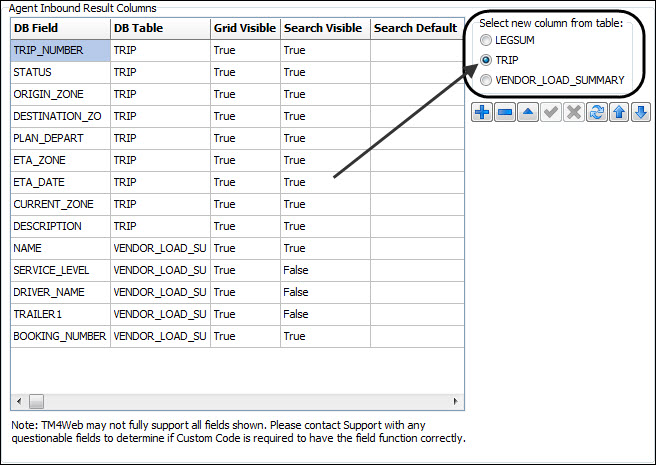
Use this procedure to add fields to the Agent Inbound page.
-
Select a new column from available tables. You can select columns from three available tables, LEGSUM, TRIP and VENDOR_LOAD_SUMMARY.
-
Click
Add on the navigational bar to add a new field.
The DB field screen is displayed. -
Select from the available fields and double- click.
The field is added to the Results Column grid. -
Click
Save. -
Repeat steps as necessary for each record line.
The results are displayed in the TM4Web>Agent Inbound Trips screen.
![]()
Agent Pickups
This section is used to configure the results page for the Agent Pickups in TM4Web.
To access the Agent Pickups window, click Vendor Features and point to Agent Pickups.
+

| Field | Description |
|---|---|
DB Field |
This field displays the column name of the selected column to be available in the Agent Assigned Pickups page. |
DB Table |
This column displays the table from which the column was selected. |
Grid Visible |
This field enables you to control whether the selected column is displayed in the Agent Pickups Results grid. |
Search Visible |
This field enables you to control whether this field is used in search criteria or not. |
Search Default |
This field is used to set the default value of the row when used in a search. |
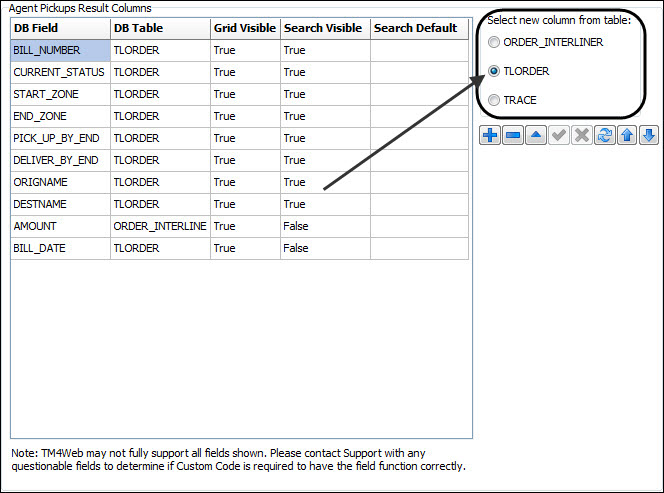
You can add, delete or modify selected fields by using the standard TruckMate navigation bar. You can then prioritize the order in which these fields will appear to TM4Web users by using ![]() Up and
Up and ![]() Down.
Down.
Use this procedure to add fields to the Agent Inbound page.
-
Select a new column from available tables. You can select columns from three available tables, ORDER_INTERLINER, TLORDER and TRACE.
-
Click
Add on the navigational bar to add a new field.
The DB field screen is displayed. -
Select from the available fields and double- click.
The field is added to the Results Column grid. -
Click
Save. -
Repeat steps as necessary for each record line.
The results are displayed in the TM4Web>Agent Assigned Pickups screen.
![]()
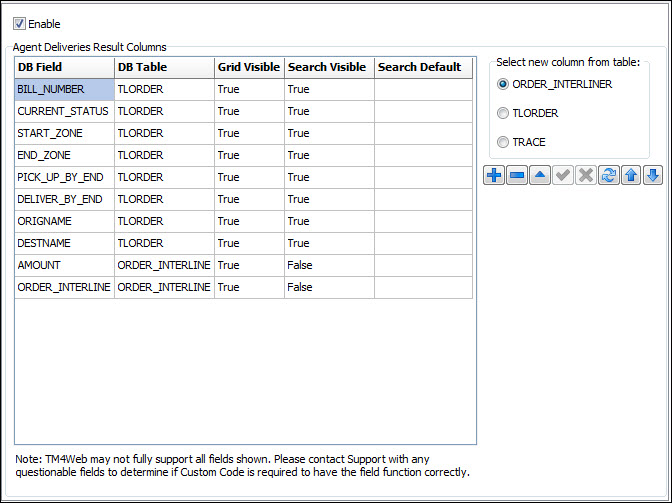
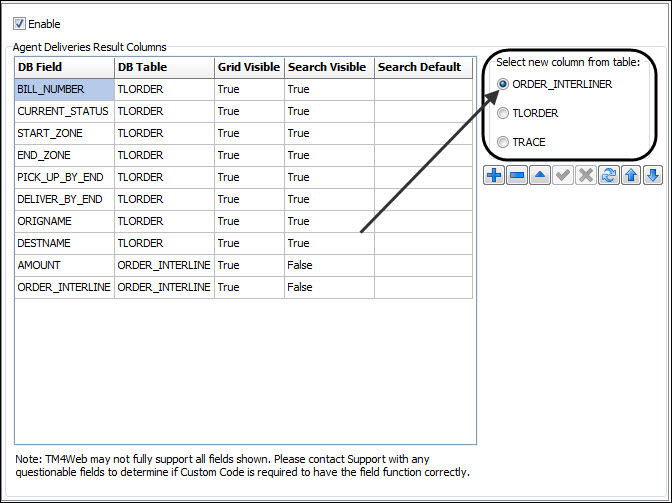
Agent Deliveries
This section is used to configure the results page for the Agent Deliveries in TM4Web.
To access the Agent Deliveries window, click Vendor Features and point to Agent Deliveries.
| You must select Enable for first-time configuration of Agent Deliveries after a new or upgrade installation. |
| Field | Definition |
|---|---|
DB Field |
This field displays the column name of the selected column to be available in the Agent Assigned Deliveries page. |
DB Table |
This column displays the table from which the column was selected. |
Grid Visible |
This field enables you to control whether the selected column is displayed in the Agent Deliveries Results grid. |
Search Visible |
This field enables you to control whether this field is used in search criteria or not. |
Search Default |
This field is used to set the default value of the row when used in a search. |
You can add, delete or modify selected fields by using the standard TruckMate navigation bar. You can then prioritize the order in which these fields will appear to TM4Web users by using ![]() Up and
Up and ![]() Down.
Down.
Use this procedure to add fields to the Agent Deliveries page.
-
Select a new column from available tables. You can select columns from three available tables, ORDER_INTERLINER, TLORDER and TRACE.
-
Click
Add on the navigational bar to add a new field.
The DB field screen is displayed. -
Select from the available fields and double- click.
The field is added to the Results Column grid. -
Click
Save. -
Repeat steps as necessary for each record line.
The results are displayed in the TM4Web>Agent Assigned Deliveries screen.
![]()
OS & D
This section is used to configure the results page for the OS&D Status Manager in TM4Web.
To access the OS & D window, click Vendor Features and point to OS & D.
| Options | Description |
|---|---|
Prevent Users from Deleting OSD Records |
Selecting this option prevents users from deleting OSD records. |
Show Custom Defined Fields in OSD Entry |
Selecting this option displays custom defined fields in OSD entry. |
Highlight Dangerous Goods in OSD Entry |
Selecting this option highlights dangerous goods in OSD entry. |
X Show Items Completed Within Last # Days |
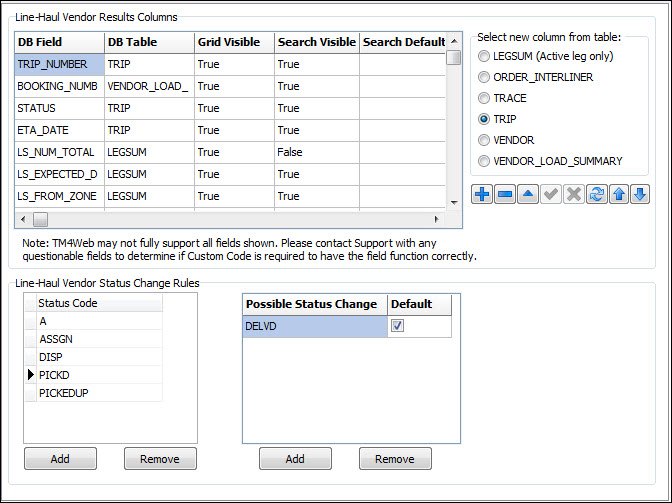
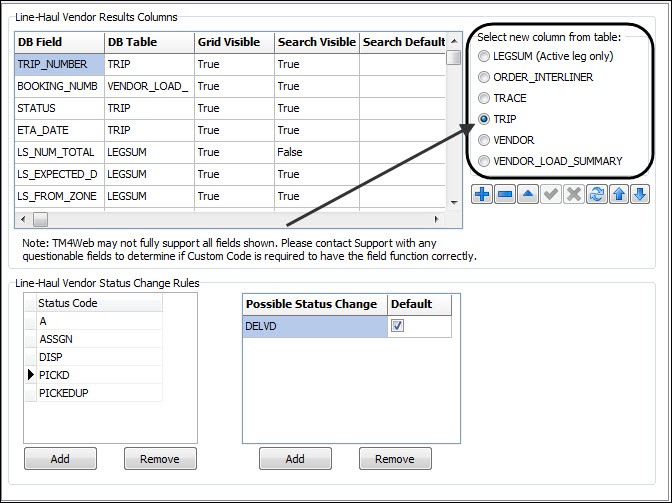
Line-Haul
This section is used to configure the results page for the Line-Haul Status Updates in TM4Web.
To access the Line-Haul Status Updates window, click Vendor Features and point to Line-Haul.
| Field | Description |
|---|---|
DB Field |
This field displays the column name of the selected column to be available in the Line-Haul Status Updates page. |
DB Table |
This column displays the table from which the column was selected. |
Grid Visible |
This field enables you to control whether the selected column is displayed in the Line-Haul Status Updates grid. |
Search Visible |
This field enables you to control whether this field is used in search criteria or not. |
Search Default |
This field is used to set the default value of the row when used in a search. |
You can add, delete or modify selected fields by using the standard TruckMate navigation bar. You can then prioritize the order in which these fields will appear to TM4Web users by using ![]() Up and
Up and ![]() Down.
Down.
Use this procedure to add fields to the Agent Inbound page.
-
Select a new column from available tables. You can select columns from, LEGSUM (Active leg only), ORDER_INTERLINER, TRACE, TRIP, VENDOR, and VENDOR_LOAD_SUMMARY.
-
Click
Add on the navigational bar to add a new field.
The DB field screen is displayed. -
Select from the available fields and double- click.
The field is added to the Results Column grid. -
Click
Save. -
Repeat steps as necessary for each record line.
The results are displayed in the TM4Web>Line-Haul Status Updates screen.
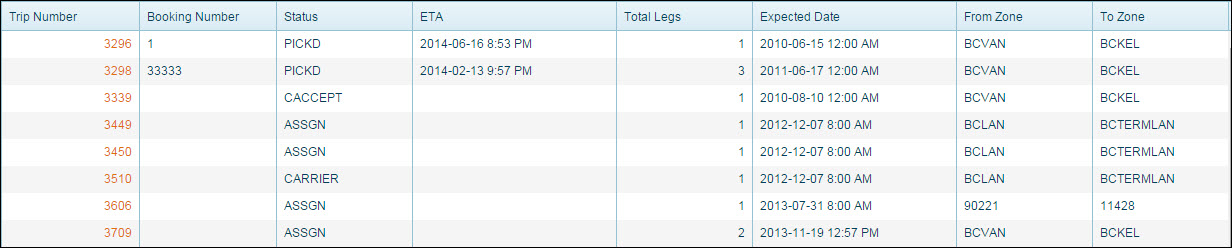
Line-Haul Status Change Rules
The Line-Haul Status Change Rules section allows you to set which Status Change values will be available from within Line-Haul Status Updates screen.
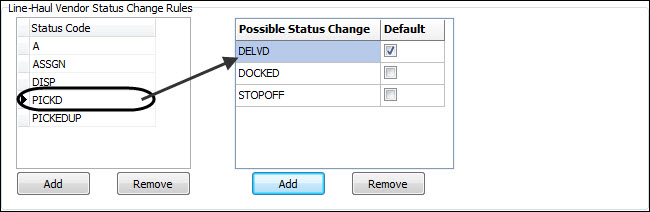
Use the following procedure to add status code and possible status changes.
-
Under the Status Code column, click Add.
The Select Status window is displayed. -
Find the desired Status Code and click Ok.
-
You are prompted to add a status change rule for the selected status.
-
Click Ok.
-
The select Status window is displayed.
-
Find the desired Status Change and click Ok.
-
The status is added to Possible Status Changes grid.
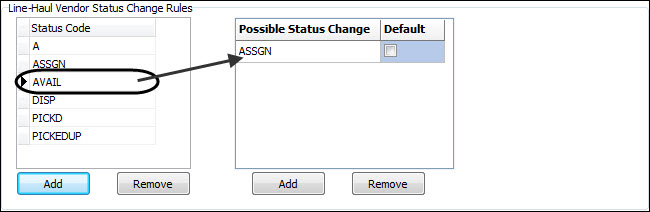
| You can add multiple Possible Status Changes for every Status Code. In the above example, whenever a Vendor is trying to update the Line-Haul Status with the AVAIL Status, they have the option to update the Status to ASSGN. |