Order Entry
The Order Entry section contains several tabs that enable you to control exactly what TM4Web users are able to view and/or use when entering orders. The upper portion of the Order Entry window consists of numerous tabs that represent each section of the TM4Web Order Entry.
![]()
| Order Entry (as with all Client Features) is configurable based on Access Group. Select the Access Code you wish to configure. |
To access the Order Entry window, click Client Features and then click Order Entry.
Summary tab
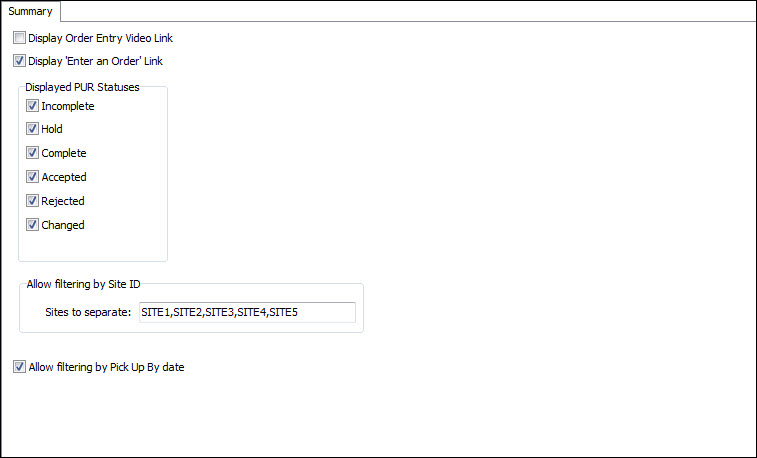
The Summary tab contains settings specific to the Order Summary page in TM4Web.
| Options | Description |
|---|---|
Display Order Entry Video Link |
Selecting this option displays a link on the Oder Summary page that enables your users to view a training video focusing on Order Entry. Note: TMW does not supply training videos. These must be created by your company or system Administrator using Webex software or another third party solution. Videos should be placed in the \htdocs\videos folder. |
Display PUR Statuses |
Select the Statuses you wish to display on the Order Summary page. Statuses include: Incomplete, Hold, Complete, Accepted, Rejected, and Changed.
|
Allow Filtering by Site ID |
Enter a comma separated list of Site ID’s to allow the TM4Web user to filter the Order Summary results by Site ID. |
Allow Filtering by Pick Up By Date |
Selecting this option enables TM4Web users to filter the Order Summary Results by Pick Up By date. |
Header tab
The Header tab contains settings that control how and what is displayed within the top portion of the TM4Web Order Entry page.
Select appropriate entries to the following options:
| Options | Description |
|---|---|
Display Header section |
Selecting this option displays the Order Entry Header section to your TM4Web users. You must choose what Header Fields to display to the screen by configuring the Header Fields Grid. |
Display Header Video Link |
Selecting this option displays a link at the top of the Order Entry page that enables your users to view a training video concerning the use of the Header information. |
Header Fields Grid |
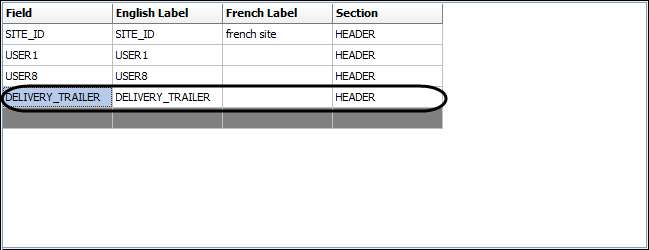
The Header Fields grid allows you to add additional fields (or remove fields) from the TLORDER table to the Order Entry page in TM4Web. Fields can be setup here to be displayed in the Header, Container, Details or Custom sections of the Order Entry page. |
Use this procedure to add/edit fields:
-
Right-click the Header Fields grid and click Add on the shortcut menu.
-
On the Header Field list window, double-click the desired field. The field is added in the header section.
-
If the default values for the field require editing, right-click the desired record and click Edit on the shortcut menu.
Field Definition Section
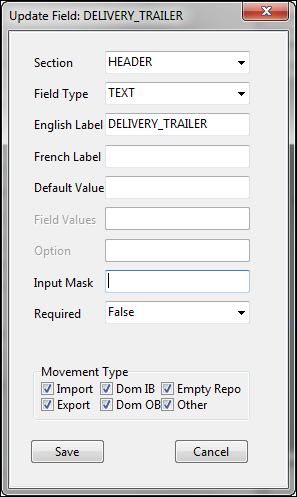
Select the option to set the section where this field should appear. Options are Header, Container, Details, and Custom.
Field Type
From the Field Type menu, select one of the following options Text, List, and Date. This defines how the field will display in TM4Web.
-
Text will display as a simple input text field.
-
Date will display as an input field along with a calendar selection.
-
If List is selected, you must complete the Field Values.
English/French Label
Enter the text label you wish to display for the selected field. Use either of the provided fields (or both) depending on the languages your Company supports. Leaving both label fields blank will define the field as a hidden field, the field will not be displayed to the TM4Web user and requires that a Default Value is set.
Default Value
The value entered here will appear in the field when the Order Entry page is first rendered.
Field Values
If setup to display the field as a List of options, you must complete the Field Values field in one of two ways:
-
A comma separated list - You must enter a set of two values for each item you want to appear in the list, one for the value to be stored in the database and the other for the text to appear in the list. Each of your entered values must be separated by a comma (for example: EXPEDITED,Expedited Service,INSIDE,Inside Delivery, JOB SITE,Job Site Delivery,OVERNIGHT,Overnight Delivery,REGULAR,Regular, etc. - NO SPACES REQUIRED).
-
An SQL Select statement - with two fields in the field list (of the select statement). They must have the following aliases: OPTION and VALUE. The OPTION alias populates the text of the selected list, while the VALUE alias populates the values that will be saved to the database. This dynamically populates the selected list with the values returned from the Select statement.
For example: SELECT TRAILER_ID OPTION, TYPE VALUE FROM TRAILER (the value is saved in the Field Values field, and the Option text will be saved in the Option field).
Option
Can be set to a TLORDER field, and will store the text of the List option. In an HTML dropdown list it is possible to setup separately both the text and value of each option.
In the example SQL SELECT SITE_NAME AS OPTION, SITE_ID AS VALUE FROM SITE the SITE_NAME will be displayed to the user, but the SITE_ID is what will be saved to TLORDER.SITE_ID. The Option configuration setting was added to allow also saving the text displayed into a separate TLORDER field. For example, setting the Option configuration to USER8, SITE_ID will be saved to TLORDER.SITE_ID and SITE_NAME will be saved to TLORDER.USER8.
Input Mask
This allows you to define an input mask for text fields as follows:
-
Character '-': will add a '-'.
-
Character ''*: will allow letters only.
-
Character '#': will allow numbers only.
-
Character '?': will allow alphanumeric only.
Required
Select either True or False depending on if the selected field must be filled out by the user.
Movement Type
When selected, the field will only display based on the Movement Type selected. Options are: Import, Dom IB, Empty Repo, Export, Dom OB, and Other. This requires setting up the Intermodal Movement Type field.
-
-
Click Save.
Contacts tab
The Contacts tab contains several sub-tabs under which you can setup what contact fields are displayed and how the information is validated.
General tab
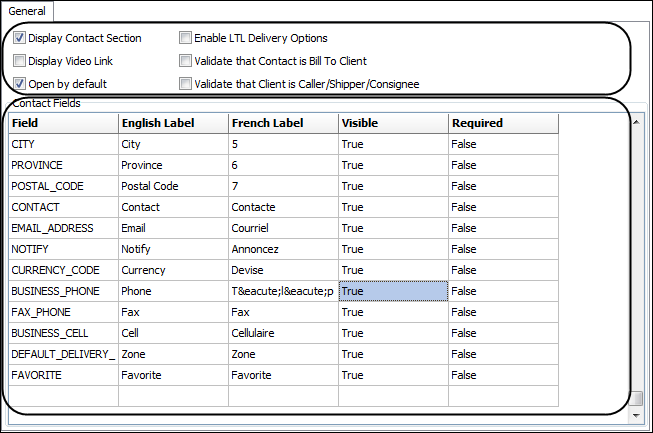
The General sub-tab displays basic options separated into two sections: General options and the Contact Fields grid.
Enter and select appropriate entries to the following fields and options:
| General Options | Description |
|---|---|
Display Contact Section |
Selecting this displays the Order Entry Contact section to your TM4Web users. You can choose what Contact Fields to display to the screen by configuring the Contact Fields Grid. |
Display Video Link |
If you would like to display a link to a Training Video concerning the use of the Contact Information on the Order Entry page, select this option. The video must be created with the file name contacts_video.htm, and placed in the \htdocs\videos\ folder. |
Open by default |
Selecting this option automatically expands the Contacts section when users first navigate to the Order Entry page. |
Enable LTL Delivery Options |
Selecting this option adds the LTL Delivery Options section to the Order Entry Contact section. Enabling users to enter the LTL Delivery Options for each client. |
Validate that Contact is Bill To Client |
If selected, when the user submits the order the selected Bill To client will be validated as setup as a Bill-To Client in the Customer & Vendor Profiles program. |
Validate that Client is Caller/Shipper/Consignee |
If selected, when the user submits the order the Caller, Shipper and Consignee will all be validated as setup as a Caller/Shipper/Consignee respectively in the Customer & Vendor Profiles program. |
While you cannot add or remove items from the Contact Fields grid, you may reposition items by selecting a detail line and using Move Up and Move Down on the shortcut menu.
From the Contacts Fields grid shortcut menu, Propagate copies the displayed Contact Fields grid data and apply it to all Access Groups in the TM4Web system. You will be prompted to confirm this process before it is applied.
Select appropriate entries to the following options:
| Contact Field grid | Description |
|---|---|
Field |
Read-Only field name for reference purposes. |
English/French Label |
Enter the text label you wish to display for the corresponding field. Use either of the provided fields (or both) depending on the languages your company supports. |
Visible |
Double-click and select either True or False, depending on if you want the field to be viewable by users. |
Required |
Double-click and set to either True or False. If set to True, then the user must enter a value into the required field prior to submitting the order. If the user forgets to enter in a value for a required field, the order won’t be submitted and the user will be warned that a required field is missing a value. |
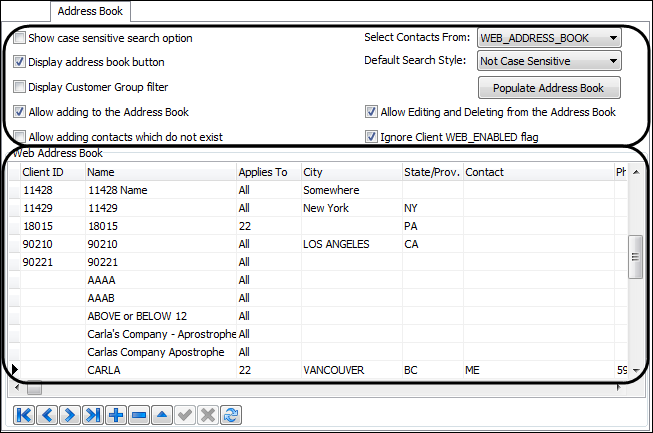
Address Book tab
The Address Book sub-tab displays configuration options under which you can configure how users will be able to interact with the TM4Web Address Book. The Address Book sub-tab is separated into two sections: Options and the Web Address Book grid.
Enter and select appropriate entries to the following fields and options:
| Options | Description |
|---|---|
Show case sensitive search option |
Selecting this option will display a checkbox within the Contacts section, allowing the user to select whether or not their searches within the Address Book will be case sensitive or not. |
Display address book button |
Selecting this option displays an Address Book button for TM4Web users to open the Address Book dialog to search, and if setup add, edit and delete Address Book entries. |
Display Customer Group filter |
Selecting this option enables TM4Web users to filter through the Address Book by their Customer Groups (as setup in the Customer & Vendor Profiles program). |
Allow adding to the Address Book/Client Table |
Selecting this option grants your TM4Web users the ability to add new contact records to the Address Book. |
Allow adding contacts which do not exist |
Selecting this option enables your TM4Web users to add contacts that do not currently exist in their Address Book to an order. With this option selected, your users can enter free form text in the Company, Shipper, and Consignee fields on the Order Entry > Contacts screen. These non-existent contacts should be reviewed in the Order Preprocessor program and the employee can decide if the contact already exists in Customer Profiles and change it to this, or if this is a new contact and needs to be added. Important: The Input Type for each of the tab sections (Company, Shipper, Consignee) you choose to enable must be set to Text to allow free form entry of contacts which do not exist. If this option is not selected and a non-existent contact is added, a message appears stating valid Shipper/Consignee codes are required. A user is required to enter valid codes from their Address Book to proceed. |
Select Contacts From |
This option enables you to specify where TM4Web gathers your users' contacts from. Select either WEB_ADDRESS_BOOK table or the CLIENT table.
|
Default Search Style |
Allow you to setup whether the default searches through the Address Book will be case sensitive or not. |
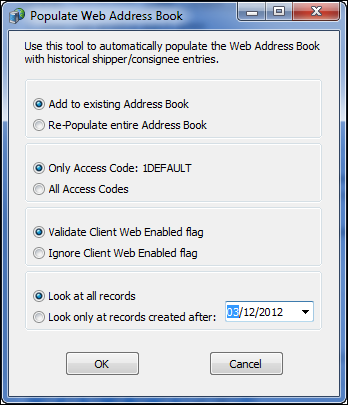
Populate Address Book |
Selecting this button will open the Populate Web Address Book window, which enables you to automatically generate historical Shipper / Consignee entries into your address book.
Use these settings to control what data will be automatically generated into the Address Book.
|
Allow Editing and Deleting from the Address Book |
Selecting this option enables users to edit and delete from the address book in TM4Web. |
Ignore Client WEB_ENABLED flag |
When using WEB_ADDRESS_BOOK from the Select Contacts From menu, you can select this option to ignore the status of the Web Enabled flag on client records in the Customer & Vendor Profiles program when using the web address book. This ensures that every client added into the WEB_ADDRESS_BOOK table is available for use as contacts by TM4Web users. |
Use this procedure to add to the Address Book.
-
Click
 Add on the navigational bar to add a client address to the Web Address Book.
 -
Choose Yes to create an entry from an existing client from the Customer & Vendor Profiles program or No to create a new, unique web address book entry.
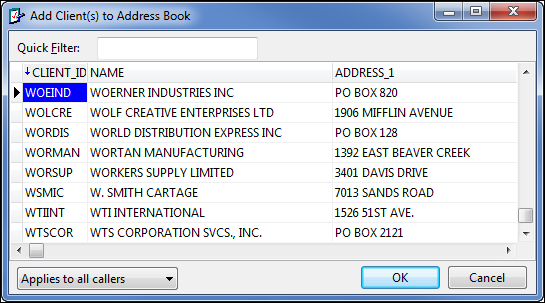
-
If creating an entry from an existing client, select the existing client from the Add Client(s) to Address Book window and click Ok.
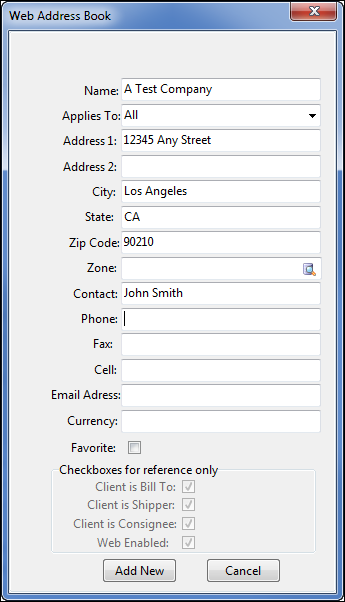
-
If creating a new entry, enter required information in the Web Address Book window.
-
Click Add New.
-
Repeat process for every new record to be added.
| Use the Applies To setting, when adding either an existing client or a new entry, to setup whether this addressbook entry will be available for All Clients within the Access Group or only one specified client within the Access Group._ |
Caller tab
The Caller sub-tab displays options under which you can configure how the user will interact with the caller contact.
Select appropriate entries to the following options:
| Options | Description |
|---|---|
Enabled |
Selecting this option grants your users access to the Caller Contact fields along with any of the other enabled Contact fields. When not selected, the Caller fields will not be displayed to the TM4Web user. |
Input Type |
Select either List or Text to display the primary field (either Client ID or Name) as either a dropdown list of available clients or simply a free form input text field. |
Read Only |
Selecting this option still allows the user to enter the client but disables editing of any of the fields. |
Bill To Clients Only |
Selecting this option limits the available callers to only Bill-To Clients (as configured in the Customer Profiles program > Address tab >'Client Is section) as Callers. |
Display Contact Field as select list |
Select this option to display the Contact field as a dropdown list of contacts for the selected client. Contacts are configured in the Customer Profiles program > Contacts tab. |
Shipper tab
The Shipper sub-tab displays options under which you can configure how the user will interact with the shipper contact.
Select appropriate entries to the following options:
| Options | Description |
|---|---|
Enabled |
Selecting this option grants your users access to the Shipper Contact fields along with any of the other enabled Contact fields. When not selected, the Shipper fields will not be displayed to the TM4Web user. |
Input Type |
Select either List or Text to display the primary field (either Client ID or Name) as either a dropdown list of available clients or simply a free form input text field. |
Read Only |
Selecting this option still allows the user to enter the client but disables editing of any of the fields. |
Bill To Clients Only |
Selecting this option limits the available shippers to only Bill-To Clients (as configured in the Customer Profiles program > Address tab >'Client Is section) as Shippers. |
Display Contact Field as select list |
Select this option to display the Contact field as a dropdown list of contacts for the selected client. Contacts are configured in the Customer Profiles program > Contacts tab. |
Default Shipper to Caller |
Selecting this option automatically sets all has the Shipper fields to the same values as those of the Caller. |
Display Shipper is Caller checkbox |
Selecting this option enables your users to see the Shipper is Caller checkbox, which then enables your users to automatically set the Shipper values as the same that is populated in the Caller fields. |
Consignee tab
The Consignee sub-tab displays options under which you can configure how the user will interact with the consignee contact.
Select appropriate entries to the following options:
| Options | Description |
|---|---|
Enabled |
Selecting this option grants your users access to the Consignee Contact fields along with any of the other enabled Contact fields. When not selected, the Consignee fields will not be displayed to the TM4Web user. |
Input Type |
Select either List or Text to display the primary field (either Client ID or Name) as either a dropdown list of available clients or simply a free form input text field.. |
Read Only |
Selecting this option still allows the user to enter the client but disables editing of any of the fields. |
Bill To Clients Only |
Selecting this option limits the available consignees to only Bill-To Clients (as configured in the Customer Profiles program > Address tab >'Client Is section) as Shippers. |
Display Contact Field as select list |
Select this option to display the Contact field as a dropdown list of contacts for the selected client. Contacts are configured in the Customer Profiles program > Contacts tab. |
Display Consignee is Caller checkbox |
Selecting this option enables your users to see the Consignee is Caller checkbox, which then enables your users to automatically set the Consignee values as the same that is populated in the Caller fields. |
Care Of tab
The Care Of sub-tab displays options under which you can configure how the user will interact with the care of contact.
Select appropriate entries to the following options:
| Options | Description |
|---|---|
Enabled |
Selecting this option grants your users access to the Care Of fields along with any of the other enabled Contact fields. When not selected, the Care Of fields will not be displayed to the TM4Web user. |
Input Type |
Select either List or Text to display the primary field (either Client ID or Name) as either a dropdown list of available clients or simply a free form input text field. |
Read Only |
Selecting this option still allows the user to enter the client but disables editing of any of the fields. |
Bill To Clients Only |
Selecting this option limits the available Care Of clients to only Bill-To Clients (as configured in the Customer Profiles program > Address tab >'Client Is section) as Shippers. |
Display Contact Field as select list |
Select this option to display the Contact field as a dropdown list of contacts for the selected client. Contacts are configured in the Customer Profiles program > Contacts tab. |
Other tab
The Other sub-tab displays options under which you can configure how the user will interact with the other contact information.
Select appropriate entries to the following options:
| Options | Description |
|---|---|
Enabled |
Selecting this option grants your users access to the Other Contact fields along with any of the other enabled Contact fields. When not selected, the Other Contact fields will not be displayed to the TM4Web user. |
Input Type |
Select either List or Text to display the primary field (either Client ID or Name) as either a dropdown list of available clients or simply a free form input text field. |
Read Only |
Selecting this option still allows the user to enter the client but disables editing of any of the fields. |
Bill To Clients Only |
Selecting this option limits the available Other clients to only Bill-To Clients (as configured in the Customer Profiles program > Address tab >'Client Is section) as Shippers. |
Display Contact Field as select list |
Select this option to display the Contact field as a dropdown list of contacts for the selected client. Contacts are configured in the Customer Profiles program > Contacts tab. |
Billing tab
The Billing sub-tab displays options under which you can configure options specific to how the billing related fields will display on the Order Entry page.
Enter and select appropriate entries to the following options:
| Options | Description |
|---|---|
Suppress Bill To Information |
Selecting this option hides the entire Bill To information dropdown list from users. If hidden the Bill To will be set to Caller. If shown, the Bill To field will be required to be set by the user in order to save the Pickup Request. |
Bill to Caller Label |
Enter the text that you would like to display that will represent the Caller in the Bill To dropdown list. The default value is Caller. |
Bill to Shipper Label |
Enter the text that you would like to display that will represent the Shipper in the Bill To dropdown list.. The default value is Shipper. |
Bill to Consignee Label |
Enter the text that you would like to display that will represent the Consignee in the Bill To dropdown list. The default value is Consignee. |
Bill to Other Label |
Enter the text that you would like to display that will represent the Other Contact in the Bill To dropdown list. The default value is Other. |
Display Currency Field |
Selecting this option displays the currency field within the Contact section. |
Display COD Amount field |
Selecting this option displays the COD Amount field at the end of the Contact section. |
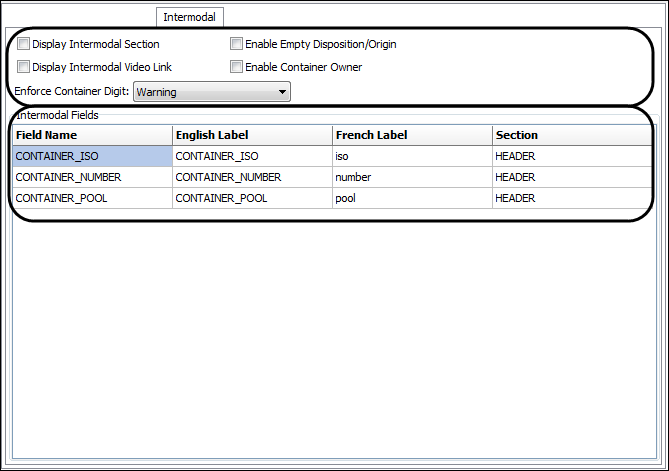
Intermodal tab
The Intermodal tab contains settings that control how and what is displayed in the TM4Web > Order Entry > Containers section. The Intermodal tab is divided into two sections: Intermodal options and the Intermodal Fields grid.
Select appropriate entries to the following options:
| Options | Description |
|---|---|
Display Intermodal Section |
Selecting this option adds the Container section with the configured Container fields to the Order Entry page. |
Display Intermodal Video Link |
If you would like to display a link to a training video concerning the use of the Intermodal Information on the Order Entry page, select this option. The video must be created with the file name intermodal_video.htm, and placed in the \htdocs\videos folder. |
Enable Empty Disposition/Origin |
Selecting this option adds the Intermodal Contacts section to the Order Entry page and allows users to add the Empty Disposition/Origin contact. |
Enable Container Owner |
Selecting this option adds the Intermodal Contacts section to the Order Entry page and allows users to add the Container Owner contact |
Enforce Container Digit: |
If selected upon users completing an order TM4Web will verify that the Container Number entered by the user satisfies TruckMates Check Digit algorithm. Select from three levels of available security:
|
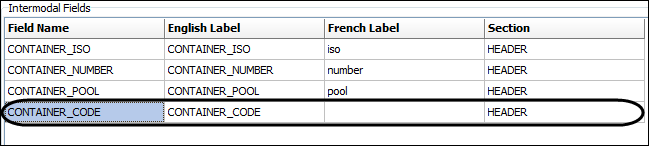
The Intermodal Fields grid allows you to add additional fields (or remove fields) from the CONTAINER_TLORDER table to the Order Entry page in TM4Web. Fields can be setup here to be displayed in the Header, Container, Details or Custom sections of the Order Entry page.
From the Intermodal Fields grid shortcut menu, Propagate will copy the displayed grid data and apply it to all Access Groups in the TM4Web system. You will be prompted to confirm this process before it is applied.
| Intermodal Fields | Description |
|---|---|
Field Name |
This is the name of a database field as it appears in the Intermodal (CONTAINER_TLORDER) table upon installation of TruckMate. |
English/French Label |
This is the text label that will display for the corresponding field. Enter the text that will be displayed to users concerning the selected field. Users who choose to use the French Language will see the text entered under the French Label field. |
Section |
Indicates the section where the record will appear. |
Use this procedure to add /edit fields:
-
Right-click the Intermodal Fields grid and click Add on the shortcut menu to add to the Intermodal Fields grid.
-
On the Intermodal Fields list window, double-click the desired field. The field is added in the grid.
-
If the default values for the field require editing, right-click the desired record and click Edit on the shortcut menu.
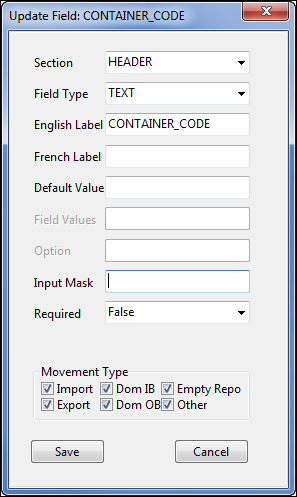
Field Definition Section
Select the option to set the section where this field should appear. Options are Header, Container, Details, and Custom.
Field Type
From the Field Type menu, select one of the following options Text, List, and Date. This defines how the field will display in TM4Web.
-
Text will display as a simple input text field.
-
Date will display as an input field along with a calendar selection.
-
If Text or Date is selected, the Field Values column will not be taken into account when using TM4Web.
-
If List is selected, you must complete the Field Values field.
Note: When the Intermodal (CONTAINER_TLORDER) fields CONTAINER_ISO, CONTAINER_CODE, and/or CONTAINER_SIZE are setup as List type fields, they will be automatically populated in dropdown lists selecting from their corresponding TruckMate tables.
For example: SELECT TRAILER_ID OPTION, TYPE VALUE FROM TRAILER (the value is saved in the Field Values field, and the Option text will be saved in the Option field).
English/French Label
Enter the text label you wish to display for the selected field. Use either of the provided fields (or both) depending on the languages your Company supports. Leaving both label fields blank will define the field as a hidden field, the field will not be displayed to the TM4Web user and requires that a Default Value is set.
Default Value
The value entered here will appear in the field when the Order Entry page is first rendered.
Field Values/Option
If setup to display the field as a List of options, you must complete the Field Values field in one of two ways:
-
A comma separated list - You must enter a set of two values for each item you want to appear in the list, one for the value to be stored in the database and the other for the text to appear in the list. Each of your entered values must be separated by a comma (for example: Value1, Value2, Value3, etc. - NO SPACES REQUIRED).
-
An SQL Select statement - with two fields in the field list (of the select statement). They must have the following aliases: OPTION and VALUE. The OPTION alias populates the text of the selected list, while the VALUE alias populates the values that will be saved to the database. This dynamically populates the selected list with the values returned from the Select statement.
Input Mask
This allows you to define an input mask for text fields as follows:
-
Character '-': will add a '-'.
-
Character ''*: will allow letters only.
-
Character '#': will allow numbers only.
-
Character '?': will allow alphanumeric only.
Required
Select either True or False depending on if the selected field must be filled out by the user.
Movement Type
When selected, the field will only display based on the Movement Type selected. Options are: Import, Dom IB, Empty Repo, Export, Dom OB, and Other.
-
-
Click Save.
Details tab
The Details tab contains settings that control how and what is displayed in the TM4Web > Order Entry > Details section.
The Details tab displays options under which you can configure general display, density calculator and commodity options. The Details tab is separated into two sub-tabs: Options and Details Fields.
Pickup Request detail line fields default values are determined by:
-
The base units will be chosen according to the Base Unit settings in Codes Maintenance > Unit Codes. If setup to use the Client Default Unit of Measure this will be chosen, and overwrite any of the appropriate base units.
-
Any WebAdmin defaults, where not null, will be chosen. If set this will overwrite the previously selected values where applicable.
-
Only if Disable Autopopulation is not selected, the Codes Maintenance > Commodity > Commodity Default settings will take precedence over the WebAdmin settings.
-
If setup to use Client Specific Commodity Codes, the Customer & Vendor Profiles > Commodity > Alternate Detail settings will overwrite all of the previously selected default values.
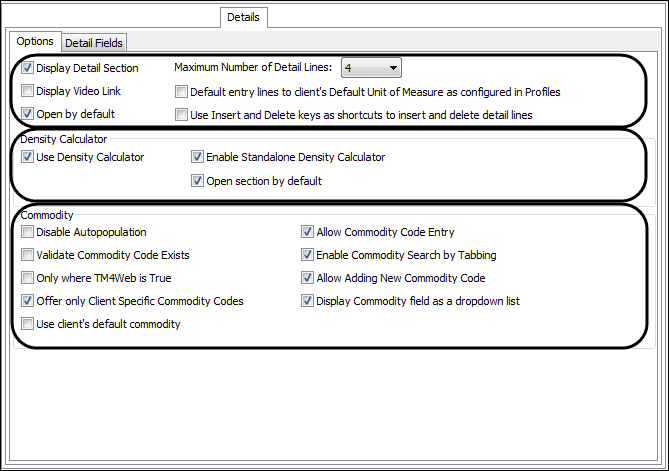
Options tab
The Options tab is separated into 3 identifiable sections: Display Options, Density Calculator, and Commodity.
Select appropriate entries for the following options:
| Options | Description |
|---|---|
Display Detail Section |
Selecting this option displays the Order Entry Detail section to TM4Web users. |
Display Video Link |
If you would like to display a link to a Training Video concerning the use of the Detail Information on the Order Entry page, select this option. The video must be created with the file name details_video.htm, and placed in the \htdocs\videos folder. |
Open by default |
Selecting this option expands the Details section automatically when users first navigate to the Order Entry page. |
Maximum Number of Detail Lines |
Configure the maximum number of detail lines users will be able to enter when creating orders. |
Default Entry Lines to Client’s Default Unit of Measure as configured in Profiles |
This option is used to initially default the detail line unit fields (where applicable) to the Client’s default Unit of Measure (as configured on the Customer & Vendor Profiles program > Customer > Address Tab > Default UOM field). The detail line default source client is determined as configured in WebAdmin > Base Setup > Miscellaneous > Detail Line Default Source. |
Use Insert and Delete Keys as Shortcuts to Insert and Delete Detail Lines |
Selecting this option enables users to use the Insert key to insert a new Detail Line and the Delete key to delete a Detail Line. |
Density Calculator |
|
Use Density Calculator |
If selected, will display a calculator button on each detail line of the Order Entry page, allowing the TM4Web user to quickly calculate the density of an individual row item which will determine the corresponding Class (based on the legend), and can then be used to rate the order. This feature can be configured to warn the user if the density is over a certain threshold whereupon extra charges may apply. |
Enable Standalone Density Calculator |
If selected, will display the Density Calculator section on the Order Entry page, giving the TM4Web user the ability to determine the overall density of the order (with a maximum of 6 detail lines in the form), calculating the Total Density and providing the appropriate Class. This feature can be configured to warn the user if the density is over a certain threshold whereupon extra charges may apply. |
Open section by default |
Selecting this option expands the Density Calculator section automatically when users open the Order Entry page. |
Commodity |
|
Disable Auto population |
If this option is not selected, this means that autopopulation is on:
|
Validate Commodity Code Exists |
Checking this option will check the validity of any Commodities entered in TM4Web against those in the TruckMate system. If the user enters a commodity that does not exist, the order won’t be submitted and the user will be warned that the commodity is not valid. |
Only where TM4Web is True |
Selecting this option validates the TM4Web_show option in the Codes Maintenance program. |
Offer only Client Specific Commodity Codes |
If selected, the user will only be able to select a commodity from the Client Specific Commodities as configured in the Customer & Vendor Profiles program > Commodities tab. The commodities available will be determined by the detail line source client. The detail line default source client is determined as configured in WebAdmin > Base Setup > Miscellaneous > Detail Line Default Source. Further to this, if selected, the Customer & Vendor Profiles > Commodity > Alternate Detail settings will be used to set default values for all of the applicable fields. |
Use client’s default commodity |
This option is used to initially default the detail line commodity field to the Client’s default commodity (as configured on the Customer & Vendor Profiles program > Customer > Address tab > Primary Commodity field). The detail line default source client is determined as configured in WebAdmin > Base Setup > Miscellaneous > Detail Line Default Source. |
Allow Commodity Code Entry |
When selected, the detail line commodity field will display as a combobox allowing the user to pick a value from a predefined list or enter a custom value. When not selected, the detail line commodity field will display as a dropdown list only allowing the user to pick a value from the predefined list. |
Enable Commodity Search by Tabbing |
Selecting this option enables users to quickly search through available Commodity Codes using the Tab function key. |
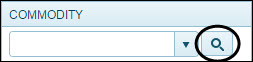
Allow Adding New Commodity Code |
Selecting this displays an Add New button within the Commodity Lookup dialog, allowing users to create new Commodities which will be added to TruckMate. As well, if the commodity field is setup for inputting text and the user enters a commodity that does not exist they will be prompted to add the new commodity. When creating the new commodity users can enter the same detail fields which are setup as visible within the detail section. Users can then use this new commodity when creating the Pick Up Request. |
Display Commodity field as a dropdown list |
When selected, the detail line commodity field will display as a combobox allowing the user to pick a value from a predefined list or enter a custom value. When not selected, the detail line commodity field will display as a dropdown list only allowing the user to pick a value from the predefined list. |
Detail Fields tab
The Detail Fields tab allows you to add additional fields (or remove fields) from the TLDTL table to the Order Entry page in TM4Web.
From the Detail Fields grid context menu, Propagate will copy the displayed grid data and apply it to all Access Groups in the TM4Web system. You will be prompted to confirm this process before it is applied.
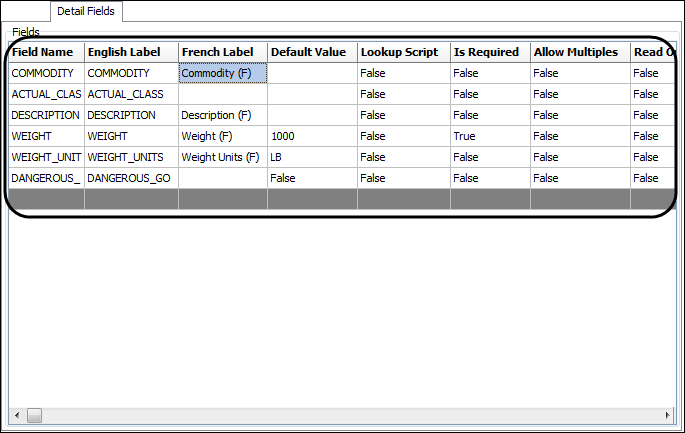
| Detail Fields | Description |
|---|---|
Field Name |
Read-Only field name for reference purposes. |
English/French Label |
This is the text label that will display for the corresponding field. This is the text that will be displayed to users concerning the selected field. Users who choose to use the French Language will see the text entered under the French Label field. |
Default |
Displays the value which will appear in the corresponding field when the Order Entry page is first rendered. |
Lookup Script |
This field indicates whether the field includes a search option. True indicates a Lookup Script is enabled and False indicates no search option. Only the fields COMMODITY, REQUESTED_EQUIPMEN and EXPORT_COM can be setup with a standard lookup script. Any of the user fields setup with a lookup script will require custom code.
|
Is Required |
This field indicates whether the field is required before the order can be fully entered or posted. True is required and False is not required. |
Allow Multiples |
Indicates that the TM4Web user is allowed to enter more than one detail record for the order line when using the Expedited Entry screen. |
Read Only |
This field indicates whether a field is Read Only or Editable. True indicates Read Only and False is Editable. |
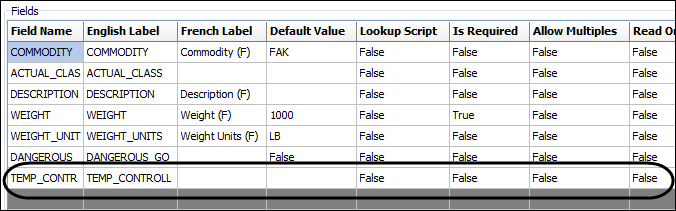
Use this procedure to add/edit fields:
-
Right-click the Detail Fields grid and click Add on the shortcut menu to add records to the grid.
-
On the appropriate table field list window, double-click the desired field. The field is added to the grid.
-
If the default values for the field require editing, right-click the desired record and click Edit on the shortcut menu.
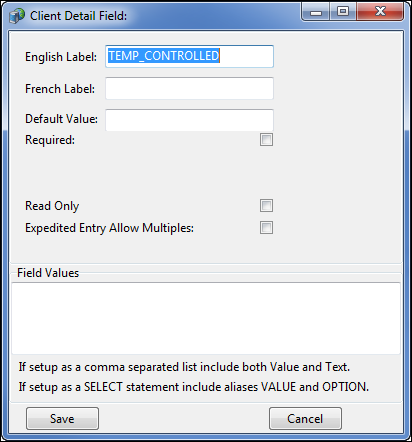
| Field | Definition |
|---|---|
English/French Label |
Enter the text label you wish to display for the selected field. Use either of the provided fields (or both) depending on the languages your company supports. |
Default Value |
The value entered here will appear in the field when the Order Entry page is first rendered. |
Required |
If selected, then the user must enter a value into the required field prior to submitting the order. If the user forgets to enter in a value for a required field, the order won’t be submitted and the user will be warned that a required field is missing a value. |
Read Only |
If selected, the field will not be editable by the TM4Web user. |
Expedited Entry Allow Multiples |
Selecting this option enables a TM4web user to enter more than one detail record for the order line when using the Expedited Entry screen. |
Field Values |
If setup to display the field as a List of options, you must complete the Field Values field in one of two ways:
|
-
Click Save.
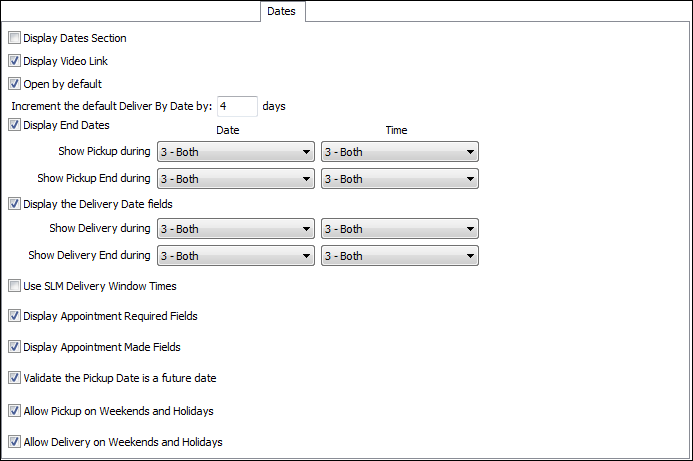
Dates tab
The Dates tab contains settings that control how the TM4Web > Order Entry > Dates section appears to your users.
+
Select appropriate entries for the following options:
| Dates options | Description |
|---|---|
Display Dates Section |
Selecting this option displays the Order Entry Dates section to your TM4Web users. |
Display Video Link |
If you would like to display a link to a Training Video concerning the use of the Date Information on the Order Entry page, select this option. The video must be created with the file name dates_video.htm, and placed in the \htdocs\videos folder. |
Open by default |
Selecting this option expands the Dates section automatically when users first navigate to the Order Entry page. |
Increment the default Deliver By Date by # days |
Enter an integer value to indicate the number of days to increase the default Deliver By Date. The initial Deliver By Date will be the same date the Order Entry page is rendered and is also dependent on the Allow Delivery on Weekends and Holidays option. |
Display End Dates |
When selected, the Pickup By End and Delivery By End Date fields will display and allow the user to enter the date. If selected, the Show Pickup End during and Show Delivery End during options can be used for fine-tuning exactly when the end dates are shown. When not selected, the End Dates will not display. |
Show Pickup during |
This option allows you to configure when the Pickup Date and also Time fields will display. Your options are:
|
Show Pickup End during |
This option allows you to configure when the Pickup End Date and also Time fields will display. Your options are:
|
Display the Delivery Date fields |
When selected, the Deliver By and Delivery By End Date fields will display and allow the user to enter the date. When not selected, the Deliver By Dates will not display. This option works in conjunction with the Show Delivery during options. |
Show Delivery during |
This option allows you to configure when the Delivery Date and also Time fields will display. Your options are:
|
Show Delivery End during |
This option allows you to configure when the Delivery End Date and also Time fields will display. Your options are:
|
Use SLM Delivery Window times |
Selecting this option will set the Delivery Date after posting the order, as determined using the Service Level entered and TruckMate’s Service Level Matrix. This option should only be used when not displaying the Delivery Date on the entry page, as any value the user entered would be overwritten. |
Display Appointment Required Fields |
Selecting this option displays the Appointment Required checkbox, allowing the user to select if a Pickup/Delivery Appointment is required. |
Display Appointment Made Fields |
Selecting this option displays the Appointment Made checkbox, allowing the user to flag if the Pickup/Delivery appointment has been made. |
Validate the Pickup Date is a future date |
Selecting this option checks to make sure that the entered pickup date is a future date. If not selected, the user can enter a Pickup Request with the pickup dates set in the past. |
Allow Pickup on Weekends and Holidays |
When selected, no additional validation is made on the Pickup dates entered by the user. When clear, weekend and holiday Pickup dates will not be allowed and the user will be shown a message to change the date. Weekends and Holidays are determined as defined in the Holiday Setup in Codes Maintenance. This will be verified using the Order Entry Caller’s Zone. In addition, if the default Pickup date happens to be a weekend or holiday, then the default date will be changed to the next non-weekend/holiday day as defined in the Holiday Setup in Codes Maintenance. |
Allow Delivery on Weekends and Holidays |
When selected, no additional validation is made on the Delivery dates entered by the user. When clear, weekend and holiday Delivery dates will not be allowed and the user will be shown a message to change the date. Weekends and Holidays are determined as defined in the Holiday Setup in Codes Maintenance. This will be verified using the Order Entry Caller’s Zone. In addition if the default Delivery date happens to be a weekend or holiday, then the default date will be changed to the next non-weekend/holiday day as defined in the Holiday Setup in Codes Maintenance. |
Custom tab
The Custom tab allows you to define a unique section to display within the TM4Web Order Entry page. The Custom section will appear between the Date and Notes sections. To define the TLORDER fields that a TM4Web user will have access to within the Custom section, you must create entries in the Header tab > TLORDER Fields Grid with a Section value of CUSTOM. See Order Entry>Header tab for further information.
| Custom options | Description |
|---|---|
Display Custom Section |
Selecting this option displays the Custom section to your TM4Web users. |
Open Custom Fields Section by default |
This option becomes available when Display Custom Section is selected. Selecting this option expands the Custom Fields section automatically when users open the Order Entry page. |
Custom Fields Section Video Link |
If you would like to display a link to a Training Video concerning the use of the Custom Information on the Order Entry page, select this option. The video must be created with the file name custom_fields_video.htm, and placed in the \htdocs\videos folder. |
Notes tab
The Notes tab allows you to add the Notes section to the TM4Web Order Entry page.
To grant access to the various standard Note Types, you must alter two configuration options in the Application Configurator program > ORDERPREPRO.EXE section:
-
Note Style - select either Single (for use of only one Note Type at a time) or Multiple (to use a variety of different Note Types).
-
Note Type - select the Note Types you want to make available to the user.
| Notes options | Options |
|---|---|
Display Notes Section |
Selecting this option displays the Notes section to your TM4Web users. |
Display Video Link |
If you would like to display a link to a Training Video concerning the use of the Notes Information on the Order Entry page, select this option. The video must be created with the file name notes_video.htm, and placed in the \htdocs\videos folder. |
Open by default |
Selecting this option automatically expands the Notes section when users first navigate to the Order Entry page. |
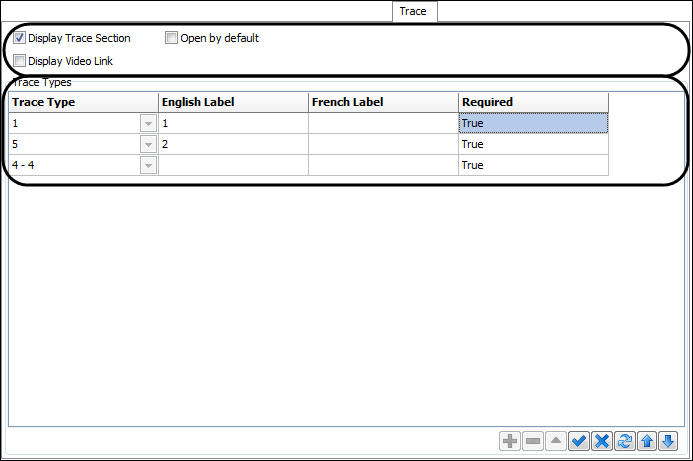
Trace tab
The Trace tab allows you to add the Trace section to the Order Entry page and setup the Trace Types available for the TM4Web user to add to the Pickup Request.
The Trace tab is separated into two sections: Options and the Trace Types grid.
| Trace Option | Description |
|---|---|
Display Trace Section |
Selecting this option displays the Trace section to your TM4Web users. |
Display Video Link |
If you would like to display a link to a Training Video concerning the use of the Trace Information on the Order Entry page, select this option. The video must be created with the file name trace_video.htm, and placed in the \htdocs\videos folder. |
Open by default |
Selecting this option automatically expands the Trace section when users first navigate to the Order Entry page. |
The Trace Types grid allows you to configure which trace types are available and required for the TM4Web user when submitting a Pickup Request.
You can reposition items by selecting a detail line and using ![]() Move Up and
Move Up and ![]() Move Down on the navigation bar.
Move Down on the navigation bar.
Use this procedure to add Trace Types.
-
Click
Add on the navigational bar to add a new Trace type. -
Click the Trace Type field on the newly added record line to choose the Trace Type Character.
Character Trace Type !
Trailer Number
~
Bill Number
@
Trip Number
$
Description
#
Carrier
%
TRACE_NO
Outside of the 6 special character types, which are available only for TM4Web, you can control which Trace Types (out of A-Z and 1-9) are available via the Codes Maintenance program > Trace Number Types tab.
-
Click within the English or French label fields to change the label that will be displayed when they are used. The French Label option is included for those who use the French language option.
-
Double-click the Required field and set to either True or False, depending on whether this Trace Type is required. If Trace Types are set as Required, a user will not be able to complete the Pickup Request entry without supplying the necessary information for that Trace Type.
-
Click
 Save.
Save. -
Repeat steps as necessary for each trace type record line.
Extra Stops tab
The Extra Stops tab allows you to add the Extra Stops section to the Order Entry page.
Once an order has been saved, but not complete, the Extra Stop section will display, allowing users to add an Extra Stop to the order.
| Extra Stops Options | Description |
|---|---|
Display Extra Stops |
Selecting this option displays the Display Extra Stops section to your TM4Web users. Note: The Extra Stops section will only display after the order has been saved by users. |
Display Video Link |
If you would like to display a link to a Training Video concerning the use of the Extra Stop Information on the Order Entry page, select this option. The video must be created with the file name xstop_video.htm, and placed in the \htdocs\videos folder which is in the 'htdocs' folder. |
Open by default |
Selecting this option automatically expands the Display Extra Stops section when users first navigate to the Order Entry page. |
Dangerous Goods tab
The Dangerous Goods tab contains settings that control how the TM4Web > Order Entry > Dangerous Goods section appears to your users.
| Dangerous Goods Options | Description |
|---|---|
Display Dangerous Goods Section |
Selecting this option displays the Dangerous Goods section to your TM4Web users. |
Require Actual Name of Dangerous Goods items (for UN Codes with Special Provision 16) |
Selecting this option ensures mandatory user insertion of the actual dangerous goods item name when a UN code is added to the dangerous goods grid. |
Display Video Link |
If you would like to display a link to a Training Video concerning the use of the Dangerous Goods Information on the Order Entry page, select this option. The video must be created with the file name dang_goods_video.htm, and placed in the \htdocs\videos folder. |
Open by default |
Selecting this option automatically expands the Dangerous Goods section when users first navigate to the Order Entry page. |
Accessorial Charges tab
The Accessorial Charges tab allows you to add the Accessorial Charges section to the Order Entry page.
The available accessorial charges are setup in Codes Maintenance > Accessorial Charges, and must be set to Active and Web Enabled.
| Accessorial Charges Options | Description |
|---|---|
Display Accessorial Section |
Selecting this option displays the Accessorial Charges section to your TM4Web users. |
Display video link |
If you would like to display a link to a Training Video concerning the use of the Accessorial Charges Information on the Order Entry page, select this option. The video must be created with the file name acc_charges_video.htm, and placed in the \htdocs\videos folder. |
Open by default |
Selecting this option automatically expands the Accessorial Charges section when users first navigate to the Order Entry page. |
PUR tab
The Pickup Request tab contains settings that control how the TM4Web > Order Entry > Pickup Requests section appears to your users. The PUR tab is divided into three sections: PUR Options, Crystal Reports, and Email Notification.

| PUR Options | Description |
|---|---|
Allow Pickup Request |
Selecting this option displays the Pickup Requests section to your TM4Web users. |
Display Video Link |
If you would like to display a link to a Training Video concerning the use of the Pickup Request section on the Order Entry page, select this option. The video must be created with the file name pur_video.htm, and placed in the \htdocs\videos folder. |
Open by default |
Selecting this option automatically expands the Pickup Request section when users first navigate to the Order Entry page. |
Allow Email Confirmation |
Selecting this option displays to users options for sending an email confirmation to the Caller, Shipper, and/or Consignee upon completing a Pickup Request. The email confirmation is a complete summary of the Pickup Request including all fields visible to the user. |
Allow uploading documents |
If selected, an Upload Files link is available for TM4Web users on the Order Entry page. Uploaded files will be stored in the directory location specified by the Global Configuration > Base Setup > General tab > Misc tab > Upload Files To field. See Global Configuration > Base Setup > General Tab > Miscellaneous tab for information. Uploaded documents can be re-opened from the completed orders page. |
Allow Status Updates |
These options allow TM4Web users to save an entered order as Incomplete, Hold and/or Complete status. When selected, users will see corresponding buttons at the bottom of the Order Entry page.
|
Allow Copying from |
These options enable TM4Web users to copy from previously Accepted or Rejected orders. When selected, users will see a button at the bottom of the completed order page that enables them to copy the existing order. All details remain the same on the copied order. |
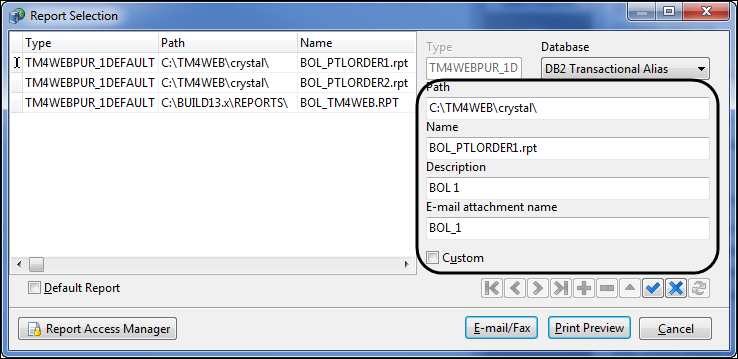
The Crystal Reports section enables you to grant access to available Crystal Reports type reports. There is one standard report (BOL_TM4WEB.rpt) available for the Pickup Request page and any other reports must be custom built.The reports configured within the Order Entry section must be setup with a string type myDETAIL_LINE_ID parameter.
-
Crystal Reports Runtime must be installed on the webserver.
-
An ODBC connection must be created with the same name as the database.
-
Setup the PDF Path where Crystal will create the PDF version of the report.
-
WebAdmin → Global Config → Access Group Options → Crystal Reports
-
The PDF path should be located outside the document root, but setup in the php.ini to be accessible.
-
| Crystal Reports | Description |
|---|---|
Setup |
Click Setup to set details of your report selections using the navigation controls.
Note: Ensure that the crystal reports are local to the TM4Web machine and the identified paths exist on the server. |
Allow Emailing PDF on Completing order |
Selecting this option displays to users options for emailing a PDF version of the selected Crystal report to the Caller, Shipper, and/or Consignee upon order completion. Example
|
Always open PDF after Completing order |
Selecting this option opens a PDF of the selected Crystal report upon order completion. Example
|
Only Display PDF Buttons when Status |
The following options are dependent on the Pickup Request’s current status. You can select as many (or little) of these Status variables in order to limit users to when they can view the configured Crystal Reports.
|
| Description | |
|---|---|
Email Notification |
In the Email Notification field, enter a valid email address in the space provided. When a Pickup Request is completed, an Email is generated automatically and sent to the address in this field. The Pickup Request Email Notification allows you to configure an email address to send a notification email of all pickup requests entered, without the TM4Web user knowing or having to do anything. This is meant for an employee to be alerted to the new pickup request, so that they can go to the Order Preprocessor to review and process the order. |
The body of the email message is determined by code in the en.inc language file (located in the C:\TM4Web\Apache2.2.x\htdocs\inc\language\ directory). You can edit the formatting by using the existing custom language file and altering its code. See How to modify the Pickup Request Notification e-mail format for information.
|
How to modify the Pickup Request Notification e-mail format
Use this procedure to modify the Pickup Request Notification e-mail format, which is not defined within the Web Admin application.
-
In the directory C:\TM4Web\Apache2.2.x\htdocs\inc\language, open the en.inc file with a text editor.
-
Scroll through the file and find the setting you want to modify and copy the entire entry.
In this case you are looking for $lang["body_pur_complete"].Warning: Do not change the contents of the en.inc file. Close the file without saving immediately after copying the text.
-
In the directory C:\TM4Web\Apache2.2.x\htdocs\custom\en, open custom_en.inc with a text editor.
-
Paste the copied entry string to the end of custom_en.inc.
-
Edit the display text as desired.
For example:
$lang["body_pur_complete"] = "Pickup Request Summary:<br />". "The call was issued by %e_contact of %e_callname.<br />". "Pickup By Date: %e_pickup_by <br />". "Deliver By Date: %e_deliver_by <br />". "Site ID: %e_site_id <br />". "Service Level: %e_service_level <br />". "Use the Truckmate Order Pre Processor to view and Accept or Reject the request.<br />". "<br />Do not reply to this message.<br />". "This message was automatically generated by TM4Web."; -
Close and save changes to custom_en.inc.
| Any of the existing place holders can be used, or removed. The entire text portion can be reworded. This will take some knowledge of PHP to ensure no syntax errors occur. |