Managing TM4Web features and appearance
Managing TM4Web Features
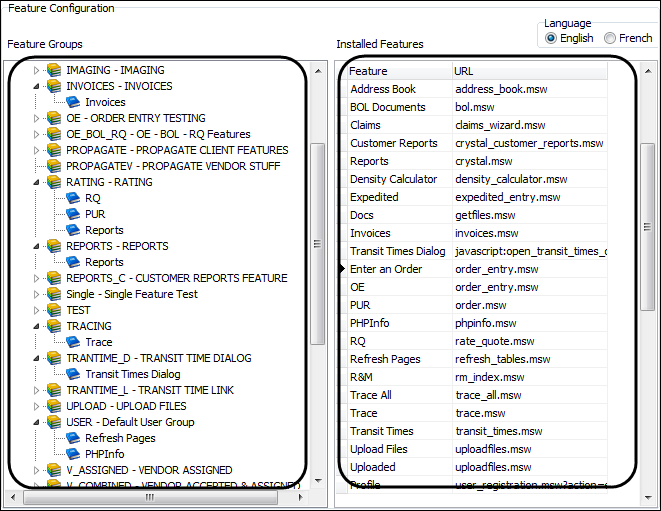
The Web Admin Features section is used to create and configure Feature Groups and to manage installed features. To access Web Admin, click Start, point to All Programs. Point to TruckMate, TruckMate for Web, and then click Web Admin.
To access the Features window, click Global Configuration and point to Features. The Feature configuration screen is divided into two sections: Feature Groups and Installed Features. Using a right mouse button (right-click), you can do the following:
-
Add new Features and Feature Groups
-
Edit existing Features and Feature Group properties
-
Remove Features and Feature Groups
-
Move Features up or down to determine the order that they will appear on the TM4Web menu bar
Feature Groups
Each Access Group is assigned a specific Feature Group, which defines the TM4Web features that users have access to. Primarily, the Feature Groups are the definitions of what will make up TM4Web users main menu links. For instance, TM4Web is setup with 3 standard Feature Groups by default:
| Feature Groups | Description |
|---|---|
USER - Default User Group |
All Access Groups setup with the USER Feature Group will have access to the features within this group. |
CARRIER - Default Carrier Group |
All Access Groups setup with the CARRIER Feature Group will have access to the features within this group. |
ADMIN - Default Admin Group |
All Access Groups setup with the CARRIER Feature Group will have access to the features within this group. |
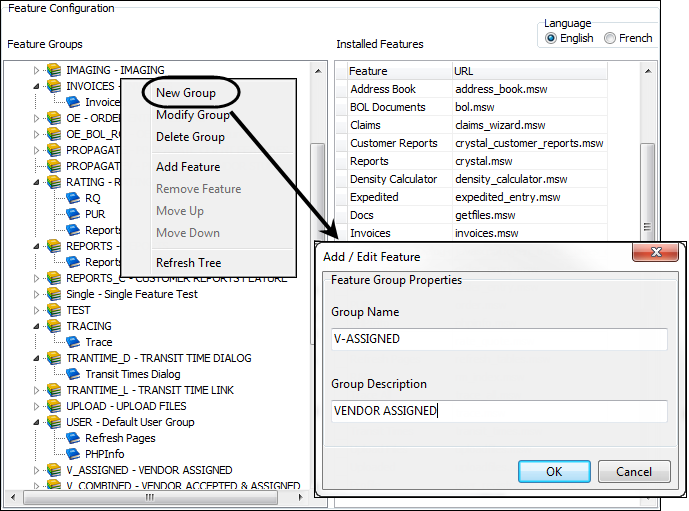
Adding Feature Groups
Use this procedure to add a feature group.
-
Right-click within the Feature Groups section and click New Group.
The Add/Edit Feature window opens. -
Enter the desired group name in the Group Name field.
-
Enter a description of the group in the Group Description field.
-
Click Ok.
Adding a Feature to a Feature Group
Use this procedure to to add a feature to a Feature Group.
-
Right-click on the Feature Group you are using and click Add Feature.
The Select Feature window opens. -
Select the desired feature in the details grid and click Ok. For additional information, see Adding Features to TM4Web.
Installed Features
All TM4Web .msw files are maintained in various folders found under the C:\TM4Web\Apache2.2.x\htdocs\ folder. The following is a list of .msw files that are used for TM4Web pages. For additional details, see Adding Features to TM4Web.
| Feature Name | Feature URL | Applicable to | Feature Description |
|---|---|---|---|
Address Book |
address_book.msw |
CLIENT |
Provides access to the Web Address Book where users can add, edit, and remove contacts. |
Bill of Lading (BOL) Documents |
bol.msw |
CLIENT |
Enables users to enter details separate from Order Entry yet is able to print a Crystal Report showing a Bill of Lading. |
Claims |
claims_wizard.msw |
CLIENT |
Enables users to enter online claims. |
Customer Reports |
crystal_customer_reports.msw |
CLIENT |
Allows viewing Client specific Crystal Reports. |
Reports |
crystal.msw |
NON-SPECIFIC |
Enables access to Crystal Reports based on Access Group. |
Density Calculator |
density_calculator.msw |
NON-SPECIFIC |
Enables users to calculate the shipment density to properly describe goods on a bill of lading and to determine freight rates. |
Expedited |
expedited_entry.msw |
CLIENT |
Order Entry page for entering multiple orders at one time. |
Docs |
getfiles.msw |
CLIENT |
Displays links to documents located on the web server based on the related ids of the Access Group. |
Invoices |
invoices.msw |
CLIENT |
Lists the outstanding AR details summary for a given customer. |
Transit Time Dialog |
javascript:open_transit_times_dialog() |
NON-SPECIFIC |
Used to display the Transit Time feature within a dialog. |
Order Entry |
order_entry.msw |
CLIENT |
Used for entering Pickup Requests or live Shipments. |
Order Summary |
order.msw |
CLIENT |
Displays a list of the users Pickup Requests and live Shipments. |
PHPInfo |
phpinfo.msw |
Web Administrator |
Displays the webserver’s PHP configuration information, useful when debugging server configuration issues. |
Rate Quote |
rate_quote.msw |
CLIENT |
Allows user to obtain a Rate Quote pulling from TruckMate rate sheet definitions. |
Refresh Pages |
refresh_tables.msw |
To be deprecated. |
To be deprecated. |
R&M |
rm-index.msw |
NON-SPECIFIC |
Displays access to the R&M TM4Web features Workorder and Inventory Adjustment. |
Trace All |
trace_all.msw |
CLIENT |
Allows users to trace orders without any restriction on the assigned clients. |
Trace |
trace.msw |
CLIENT |
Allows users to trace orders using a variety of criteria. From here users can view the Bill Details page for the orders returned. |
Transit Times |
transit_times.msw |
NON-SPECIFIC |
Displays Transit Times using Service Level, Start Zone and End Zone input. Shows Pickup Days Monday - Friday and the Transit Time as calculated from within TruckMate. |
Upload Files |
uploadfiles.msw |
NON-SPECIFIC |
Enables users to upload files to a specified location on the web server. |
Profile |
user_registration.msw?action=edit |
NON-SPECIFIC |
User Profile page which enables users to modify their existing TM4Web profile. |
Agent Assigned Deliveries |
vendor_agent_assigned_deliveries.msw |
AGENT |
Displays all freight bills that have been assigned to the Agent as the Beyond Carrier on the Freight Bill IP tab in Customer Service where the Current Status is Docked and the Current Zone is one of the Vendors terminals as defined in Web Admin. |
Agent Assigned Pickups |
vendor_agent_assigned_pickups.msw |
AGENT |
Displays all freight bills that have been assigned to the Agent as the Advance Carrier on the Freight Bill IP tab in Customer Service where the Current Status is Availability and the Pickup Terminal is one of the Vendors terminals as defined in Web Admin. |
Agent Inbound Trips |
vendor_agent_inbound_trips.msw |
CARRIER |
Displays all Inbound Trips, where the Trip Status is Dispatched, that have been assigned to the Vendor as the Beyond Carrier on the Freight Bill IP tab in Customer Service. The Agents Terminal, as specified in Web Admin, must be in the Leg To Zone on one of the legs of the trip. |
OS&D Status Manager |
vendor_agent_osd_status_manager.msw |
CARRIERS |
Allows Vendors to enter and view OS&D items. |
Agent Trace |
vendor_agent_trace.msw |
AGENT |
Allows the agent to trace any shipment (Pickup OR Delivery) where the agent is assigned as an Interliner on the I/P tab of Customer Service. |
Assigned |
vendor_assigned.msw |
CARRIER |
Displays all freight bills that have active IP records and are assigned to the vendor through the IP tab in Customer Service. Note: these freight bills will not have trips associated with them. |
Accepted & Assigned |
vendor_combined.msw |
CARRIER |
Displays all loads which have been assigned to the vendor through the I/P tab of Customer Service or through the Carrier Assignment screen in Dispatch. |
Driver Pay |
vendor_driverpay.msw |
CARRIER |
Displays Driver Pay records for all drivers attached to the vendor. |
Freight Board-OPENBOAD STATUS |
vendor_freightboard.msw |
CARRIER |
Displays load information for Trips that have been flagged to display on the Freight Board. |
Load History |
vendor_history.msw |
CARRIER |
Lists completed loads which had been assigned to the vendor through the Carrier Assignment screen in Dispatch and had previously been Accepted by the Vendor. |
Line-Haul Trip Updates |
vendor_lh_status_updates.msw |
CARRIER |
Allows Line-Haul Vendors to make Trip based status updates. |
Load Requests |
vendor_load_request.msw |
CARRIER |
Enables vendors to enter a load request that can be viewed in Dispatch’s Load Request tab. |
Load Offers |
vendor_loads.msw |
CARRIER |
Displays new Load Offers which have been assigned to the Vendor through the Carrier Assignment screen in Dispatch. |
Quick Change |
vendor_status_bypronum.msw |
CARRIER |
Allows a Vendor to update the status of a specific Freight Bill. |
Status Updates |
vendor_status.msw |
CARRIER |
Allows a Vendor to update the status of a Trip which has been assigned to the Vendor through the Carrier Assignment screen in Dispatch and have previously been Accepted by the Vendor. |
Videos |
videos.msw |
NON-SPECIFIC |
Enables a user to view instructional videos on various aspects of TM4Web. TMW Systems Inc. does not supply the Training videos; these must be created by your company. |
Adding Features to TM4Web
Use this procedure to add a feature to a Feature Group.
-
Right-click within the Installed Features section and click Add.
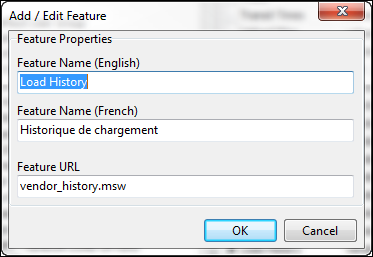
The Add/Edit Feature window opens. -
In the Feature Name (English) field, enter the name of the hyperlink to be added to the TM4Web menu.
-
(Optional) In the Feature Name (French) field, enter the name of the hyperlink to be added to the TM4Web menu or leave blank.
-
Add the file name of the new page.
-
Click Ok.
-
Right-click on the Feature Group you are using and click Add Feature.
The Select Feature window opens. -
Select the desired Feature in the details grid and click Ok.
Modifying a Feature
Use this procedure to modify features properties.
-
Right-click on an installed feature and click Edit.
The Add/Edit Feature window opens. -
Edit the feature properties.
-
Click Ok.
Creating Group Specific Page Access
Use this procedure to enable group specific page access to TM4Web.
This process requires that you first enable the Employee User page within Web Admin, create a feature group for your Employees, and then grant your Employees access. Your TM4Web website must also be accessible and working.
| Although this scenario focuses on Employees, this process also applies to clients and vendors. For clarity, employee specific steps are identified. |
One Time Employee Setup
-
(Employee Only) From the Start menu, navigate to the Application Configurator program (CONFIGEXPLORER.EXE). To access Application Configurator, click Start, point to All Programs. Point to TruckMate, Utilities, and then click Application Configurator.
-
(Employee Only) If not already done, click Configuration Options to expand the program tree and click WEBADMIN.EXE.
-
(Employee Only) Double-click Show Employee Btn.
The Edit Config window opens. -
(Employee Only) Set the value to True and click OK.
-
From the Start menu, navigate to the TM4Web Web Administration program (WEBADMIN.EXE). To access Web Admin, click Start, point to All Programs. Point to TruckMate, TruckMate for Web, and then click Web Admin.
-
To access the Employee window, click Users and point to Employee.
-
Right-click in the Employee window and click Add Access Code from the context menu.
The Create New Employee Access window opens. -
Enter a value (a suggested code is EMPLOYEE) for an Access Code- this is a simple text string that can be any value. This is the code used to register your users on the TM4Web Registration page.
-
Click OK.
The access code EMPLOYEE appears on the Employee window. -
Open a web browser and enter the base URL where users will access TM4Web on your server.
The TM4Web Welcome page opens.Note: The TM4Web URL must be entered exactly as specified in the Base URL in Web Admin Global Configuration Base Setup.
-
Click Register.
The Registration Information page opens. -
Enter all applicable information in the required registration fields.
-
In the Login Information section, enter the Access Code you defined in step 4.
-
Click Submit.
You are notified of a successful registration. -
Click OK.
The login page opens.Note: User accounts need be activated prior to any login attempts.
-
Repeat steps 7 through 10 as needed for additional employees.
-
If not already open, navigate to the TM4Web Web Administration program TM4Web Users window. To access the TM4Web Users window, click Users and point to TM4Web Users.
-
In the TM4Web user’s grid, select a user to activate.
-
Click the User Config tab.
-
In the Account section, select Enabled and click
 Save.
Save.
Repeat for additional users to activate. -
Click Employee to open the Employee window.
-
Expand the Access Code (indicated that a Feature Group is not set) you have created to view all employee names that have been activated. The Access Code indicates that a Feature Group is not set. A Feature Group must be added to this Access Code using Feature Groups.
-
To access the Feature Configuration window, click Global Configuration and point to Features.
-
Right-click within the Feature Groups section and click New Group.
The Add/Edit Feature window opens. -
Enter the desired group name in the Group Name field. For example purposes only, a suggested code is EMPLOYEE.
-
Enter a description of the group in the Group Description field.
-
Click OK.
The new Feature Group appears on the tree menu. -
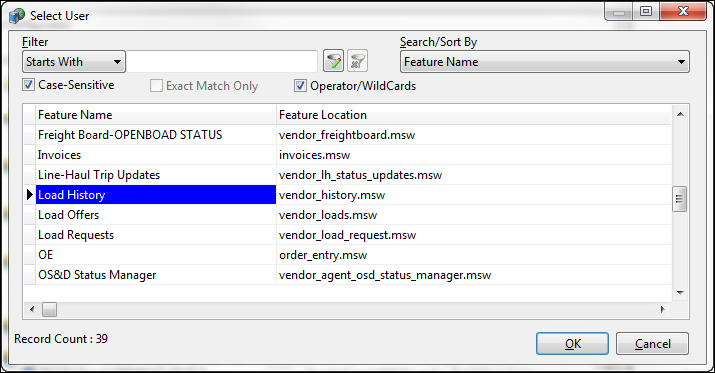
Within the Feature Groups section, select the new Feature Group, right-click and click Add Feature.
The Select User window opens. -
Select the desired feature(s) in the details grid and click Ok.
-
Click Users and point to Employees to open the Employee window.
-
Select the Access Code, right-click and click Change Access.
The Select Feature Group window opens. -
Select the Feature Group (in this scenario, EMPLOYEE) created in steps 20 through 23 and click OK.
The process is complete. Employees have access to the specific pages that you have enabled.
Managing TM4Web Appearance
The Web Admin Appearance section enables you to set visual settings for TM4Web. To access Web Admin, click Start, point to All Programs. Point to TruckMate, TruckMate for Web, and then click Web Admin.
To access the Appearance window, click Global Configuration and point to Appearance.
Changing appearance of TM4Web pages
The Appearance configuration screen contains several options under which you can set visual settings for TM4Web.
Enter and select appropriate entries to the following option and fields:
| Options | Description |
|---|---|
Allow TM4Web to use a CDN for serving libraries, uncheck to use local files |
CDN is an acronym for "Content Delivery Network". This loads the JQuery files from a common domain likely used by other sites that users have visited, allowing users' browsers to make use of cached copies of the files, and not have to load them again from the TM4Web site. This option is for improved browsing speed. If setup to use https, this option should be clear. |
JQuery Theme |
This option is being depreciated in favor of the Kendo Theme. |
Kendo Theme |
This option defines the style and color schema used within the TM4Web user interface. There are several pre-built themes available. Select a different pre-built theme to view the color scheme. Note: The chosen theme can be modified using the Kendo Theme Builder: See http://docs.telerik.com/kendo-ui/getting-started/themebuilder for information. The general process to modify a Kendo Theme is:
|
Menu Style |
This option determines whether the TM4Web menu style is horizontal or vertical. Further instructions to apply further chan ges to the stylesheet are located in the /htdocs/custom/custome_style.css file. |
Logo Position |
This option determines whether the logo is placed above the TM4Web menu bar or within the menu bar. Further instructions to apply further chan ges to the stylesheet are located in the /htdocs/custom/custome_style.css file. |
| It is possible to make some style changes to TM4Web through the custom style sheet. Contact Support for specific questions to find out if your request is already possible or if additional custom code is required. |
Customizing TM4Web to match a corporate website
TM4Web and WebAdmin provide a great deal of customization that can allow you to match your corporate website’s appearance. The following is a general outline on customizing TM4Web’s layout and appearance. For further assistance, contact Support to book consultation time with one of our developers.
-
TruckMate Database - updated using the Web Administration program.
-
TM4Web Language files folder - updated using the custom language files located at \..\Apache2.2.x\htdocs\custom\en\ folder. For details, see Changing field label text.
-
TM4Web Custom files - updated using custom .msw files located at \..\Apache2.2.x\htdocs\custom\en\ folder.
Use this general procedure to customize a TM4Web installation to match a corporate website.
-
Set or modify the required general settings for TM4Web, such as language preferences, and custom logo preferences. For details, see General tab and Access Groups Options.
-
Modify the general appearance of TM4Web pages. For details, see Changing appearance of TM4Web pages.
-
In the \..\Apache2.2.x\htdocs\custom\en\ folder, there are several .msw files that can be opened in any text editor to customize the test displayed. These files are:
-
client_index.msw - this contains the default home page text, displayed to Client Type users after logging in.
-
custom_employee_index_en.msw - this contains the default home page text, displayed to Client Type users after logging in.
-
custom_index_en.msw - this contains the default home page text, displayed to Client Type users after logging in.
-
vendor_index.msw - defaulted to display counts for the various vendor loads after logging in. This file can be customized to display text to Vendor Type users.
-
| Any modifications to these files without first contacting the TMW Systems Support may result in unforeseen errors in TM4Web. Modifications should only be made by someone with knowledge of PHP. Please contact the TMW Systems Support department at [email protected] regarding any concerns you may have. |
Changing field label text
Each company has its own language that is used to categorize different areas of a business. TM4Web allows some flexibility in fulfilling requirements for the look and feel of a corporate website.
Use this procedure to customize text labels for fields in TM4Web, which are not defined within the Web Admin application.
-
In the directory C:\TM4Web\Apache2.2.x\htdocs\inc\language, open the en.inc file with a text editor.
-
Scroll through the file and locate the text label you wish to change.
-
Copy the label string to be modified. For example, $lang["trailer_number"] = "Trailer Number";.
Warning: Do not change the contents of the en.inc file. Close the file without saving immediately after copying the text label.
-
In the directory C:\TM4Web\Apache2.2.x\htdocs\custom\en, open custom_en.inc with a text editor.
-
Paste the copied text label string to the end of custom_en.inc.
-
Change label string as desired.
For example, change $lang["trailer_number"] = "Trailer Number"; to $lang["trailer_number"] = "Container Number";.
-
Close and save changes to custom_en.inc.
The next time TM4Web is launched, the new label Container Number will appear for the field trailer_number.