Rate quotes
TM4Web is able to provide online quotes, 24 hours a day. Your customers can enter information such as pickup location, destination, the weight and rate class of the freight, and receive an automated quote from your TruckMate rating rules. With sufficient information, this can be converted into an order entry for pickup.
Creating a new rate quote
The Rate Quote page enables you to obtain rate quotes for pickup or shipment requests. Approved quotes can then be converted into orders.
| The visible sections, available fields, and options displayed on the Rate Quote page can vary, depending on how an administrator has set it up. As such, this section may not be representative of what you see on your company’s TM4Web site. |
Use this procedure to create a rate quote. You can create a rate quote by:
-
Starting new
-
Using previous rate quote history
-
On the TM4Web menu, go to Rate Quote.
The Rate Quote page opens.Show me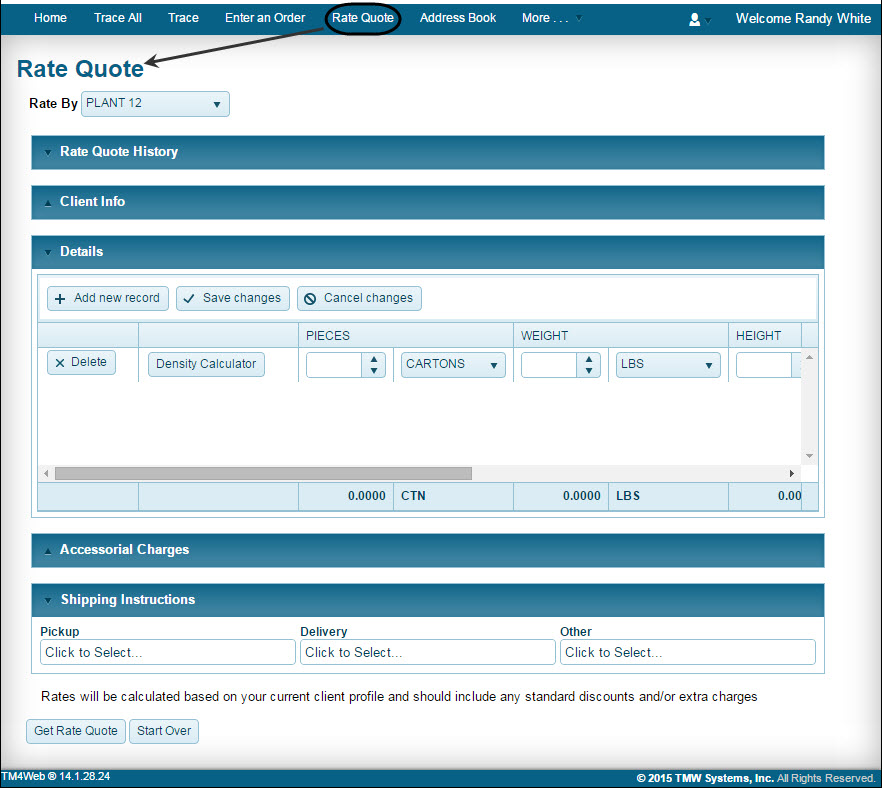
-
In the Rate By menu, select between Client and Vendor rates.
Note: If the Vendor field is left blank, you can obtain a quote for all possible vendors.
-
In the Rate Quote History section, view and select from a list of previous rate quotes. If you want to create a quote using previous rate quotes, see Using rate quote history.
Show me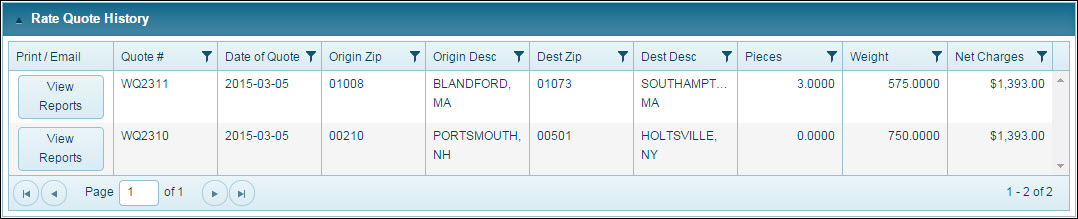
-
In the Client Info section, modify relevant trip information for the Rate Quote.
-
In the Client Info section, select Start/End Zone codes for the Rate Quote.
Show me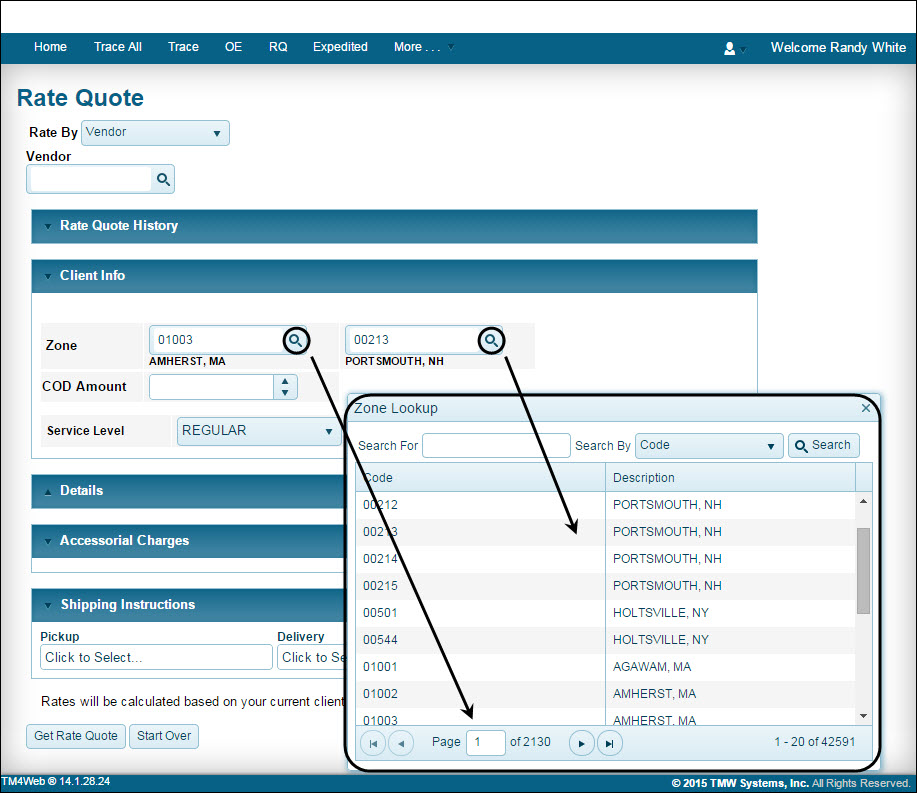
Note: If the Mileage Server is running and rating by miles is configured, then TM4Web automatically calculates the mileage for a quote based on the Start and End Zones when you click Get Rate Quote.
-
Enter a COD value in the COD Amount field.
-
Select the expected Service Level code for the Rate Quote. If more than one service level is available based on the information you enter; one quote per each service level is generated.
-
-
In the Details section, modify relevant commodity information for the Rate Quote.
-
If available, you can calculate the shipment density to properly describe goods on a bill of lading and to determine freight rates using a Density Calculator instead of manually manipulating record fields. Click Density Calculator.
The Density Calculator opens.Show me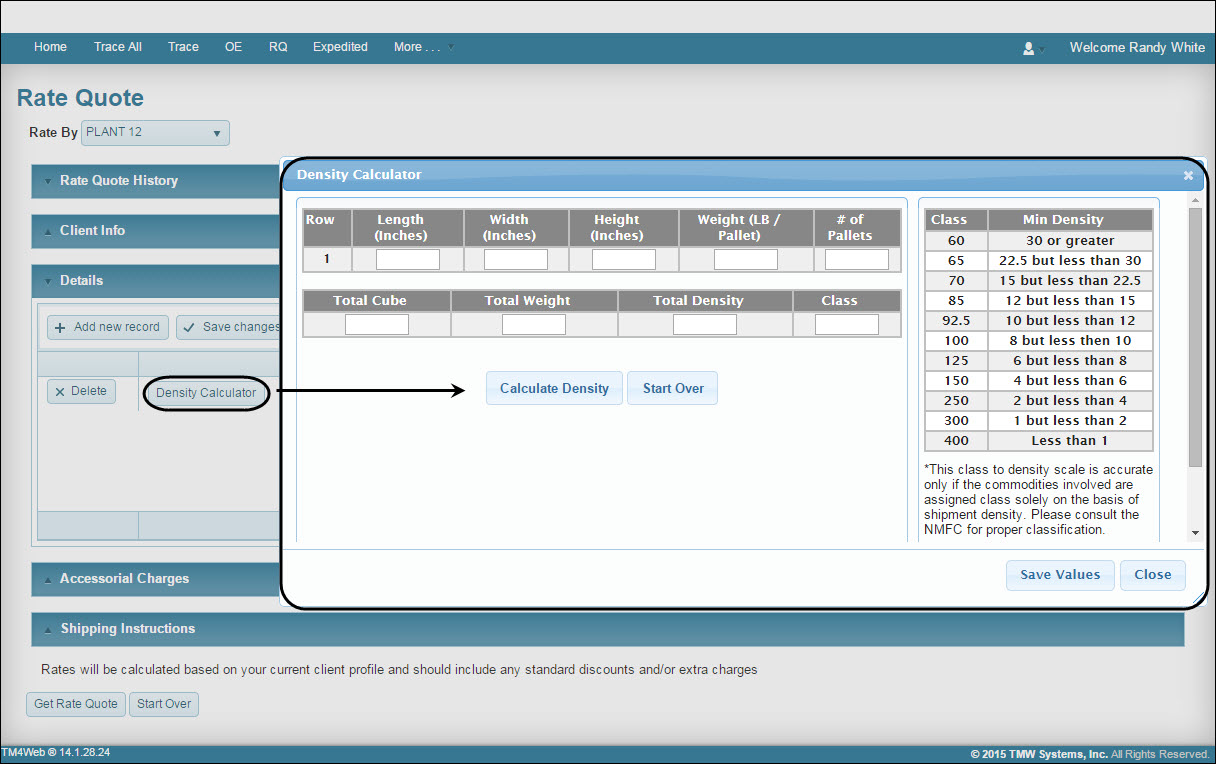
-
The Details section of TM4Web works in conjunction with the Rate Maintenance program in TruckMate. Use the menu controls to modify values within displayed fields. You may leave all but one of these fields blank to obtain a desired quote.
If only client specific commodities are configured, commodities for selection are available based on:
-
Rating - The commodities of the Client selected to Rate By.
-
Order Entry - The commodities of the Shipper, if there is one, and if not default to commodities of the Caller.
-
-
-
In the Accessorial Charges section, select any relevant extra charge codes for the PickUp customer; Delivery customer; or CrossDock customer.
Show me
-
In the Shipping Instructions section, select each applicable shipping instruction.
Each selected shipping instruction might be associated with an accessorial charge, and thus, selecting a shipping instruction might add an accessorial charge to the calculated quote.
Show me
-
Click Get Rate Quote to view rate quote. For details, see Viewing rate quotes.
The Rate Quote Results appear. -
To start another rate quote, click Start Over.
Using a density calculator
You can calculate the shipment density to properly describe goods on a bill of lading and to determine freight rates using a Density Calculator instead of manually manipulating record fields.
-
In the Details section, add relevant commodity information for the Rate Quote.
-
The Density Calculator is available when the desired record is selected.
Show me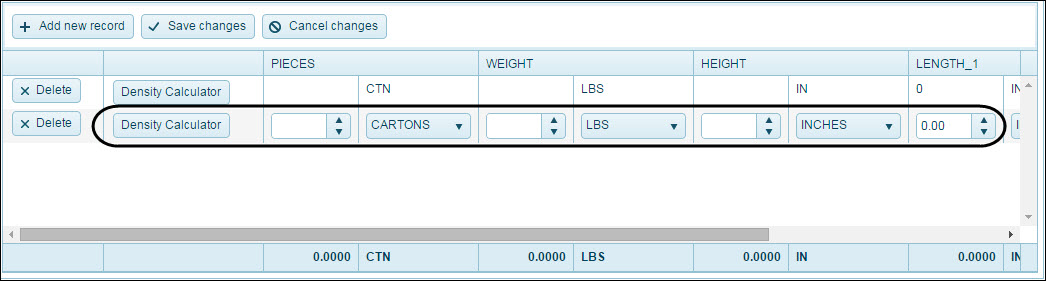
-
Click Density Calculator.
The Density Calculator opens.Show meAll fields are required.
Field Definition Row
Indicates calculation for one row only.
Length (Inches)
Enter length of pallet (in inches).
Width (Inches)
Enter width of pallet (in inches).
Height (Inches)
Enter height of pallet (in inches).
Weight (LB/Pallet)
Enter weight of loaded pallet (in pounds).
# of Pallets
Number of pallets for commodity.
-
Enter required values in the Density Calculator and click Calculate Density.
The totals are calculated.Show me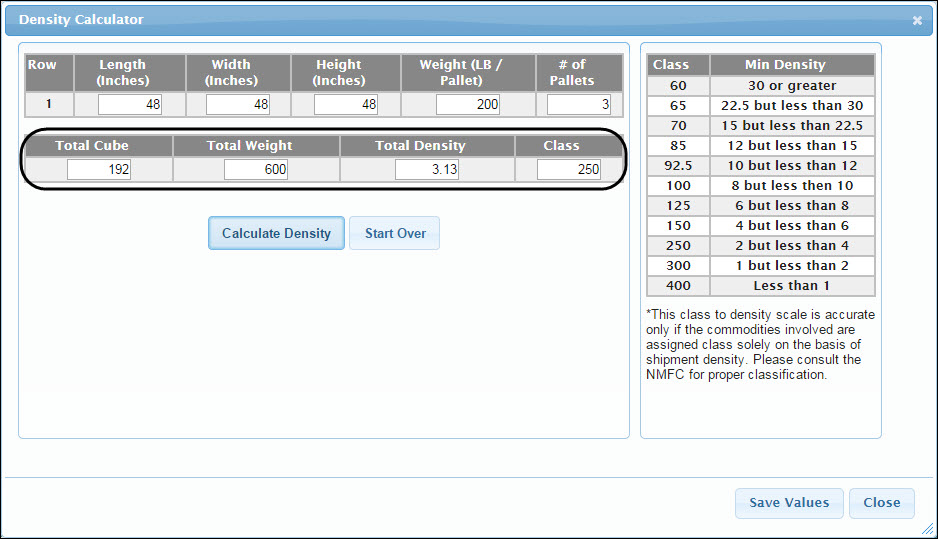
Field Definition Total Cube
Total cubic feet
Total Weight
Total weight of # of pallets
Total Density
Total volume of pallets
Class
Calculated rate class
-
Click Save Values.
The Density Calculator closes and the calculated values are entered into the record.Show me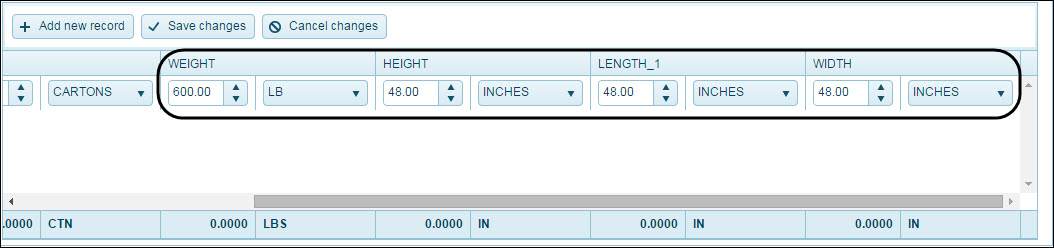
Note: Values in each record can be edited manually in each column or you can use the Density Calculator to recalculate all values.
-
Click Save Changes.
The values for each record are saved.
Using rate quote history
The Status History section displays relevant information related to the status history attached to a freight bill.
| The visible sections, available fields, and options displayed on the Rate Quote page can vary, depending on how an administrator has set it up. As such, this section may not be representative of what you see on your company’s TM4Web site. |
Use this procedure to create a rate quote using previous rate quote history.
-
On the TM4Web menu, go to Rate Quote.
The Rate Quote page opens.Show me -
In the Rate By menu, select between Client and Vendor rates.
Note: If the Vendor field is left blank, you can obtain a quote for all possible vendors.
-
In the Rate Quote History section, view and select from a list of previous rate quotes. If you want to create a quote without using previous rate quotes, see Creating a new rate quote.
Show meColumn definitionsField Definition Print / Email
Quote #
Assigned number to generated quote.
Date of Quote
Date the quote was generated.
Origin Zip
Zip code of the quotes origin location.
Origin Desc
City and state of origin location.
Dest Zip
Zip code of the quotes destination location.
Dest Desc
City and state of destination location.
Pieces
Total number of pieces in quote.
Weight
Total weight in quote.
Net Charges
Total net charges applied in quote.
-
In the Rate Quote History section, select a previous quote to uses as a template.
All previous information in the selected quote is loaded into a new rate quote form. Modify all relevant information for a new Rate Quote. -
In the Client Info section, modify existing Start/End Zone codes for the Rate Quote.
-
In the Details section, modify relevant commodity information for the Rate Quote.
-
In the Accessorial Charges section, add or delete extra charge codes for the PickUp customer; Delivery customer; or CrossDock customer.
Show me -
In the Shipping Instructions section, add or remove applicable shipping instructions.
Each selected shipping instruction might be associated with an accessorial charge, and thus, selecting a shipping instruction might add an accessorial charge to the calculated quote.
Show me -
Click Get Rate Quote to generate and view a new rate quote.
The Rate Quote Results appear. -
To start another rate quote, click Start Over.
Viewing rate quotes
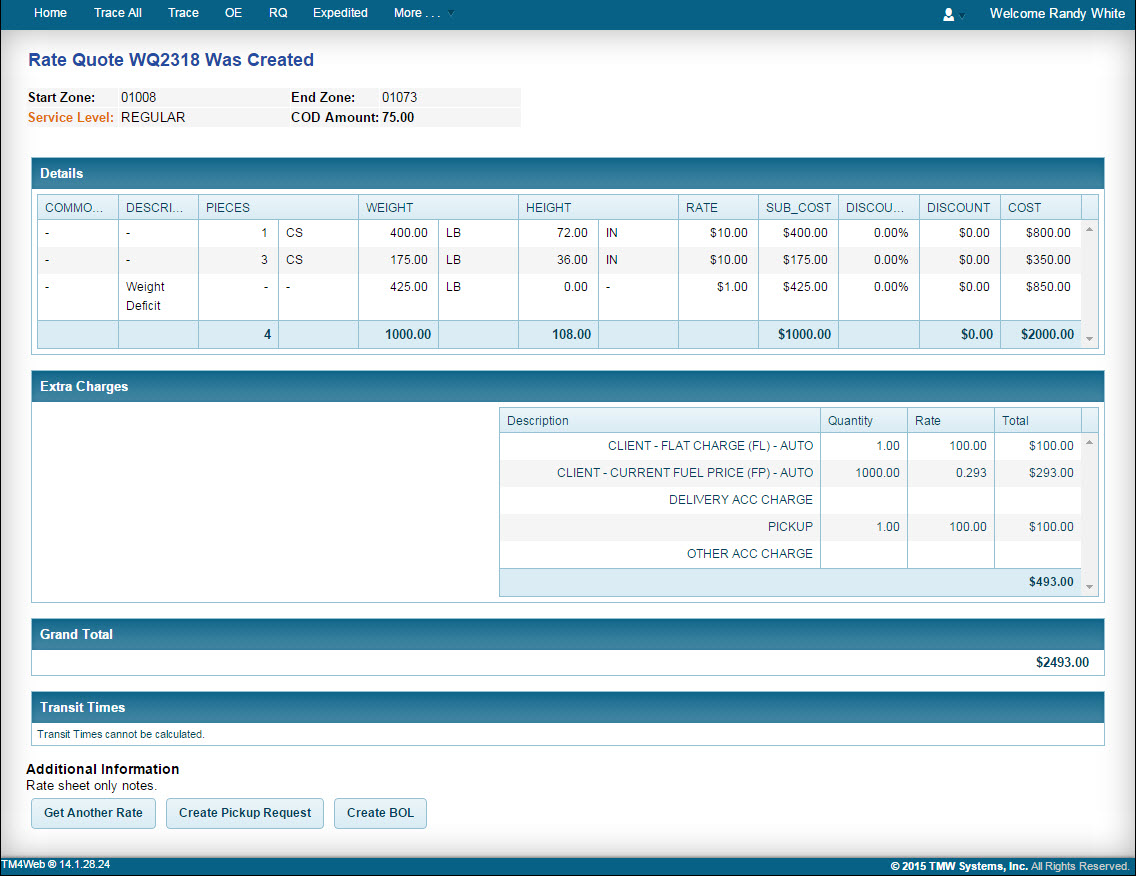
From the Rate Quote page, once Get Rate Quote is clicked, the Rate Quote is generated. Use this procedure to view information about a rate quote and creating a pickup request or a Bill of Lading.
| The visible information displayed on the Rate Quote page can vary, depending on how an administrator has set it up. |
This example illustrates a rate quote page.
| Field | Definition |
|---|---|
Rate Quote Header |
The Rate Quote can display minimal information such as Start / End Zones or can display contact information related to your contacts. |
Details |
The Details section displays relevant commodity information such as rate class, item pallets, item pieces, weight, discount, etc. |
Extra Charges |
Manually assigned and auto assigned accessorial charges are displayed in the Extra Charges section. |
Grand Total |
|
Transit Times |
From an agreed upon rate quote, click Create Pickup Request to create a pickup or click Create BOL to create a Bill of Lading.