Assigning invoice and master bill formats
TMW Back Office uses SSRS reports for invoices and master bills. You use the Output Maintenance window to assign an invoice format to orders that meet criteria you specify.
This illustration shows the layout of the Output Maintenance window for invoice and master bill formats.

| You can create custom invoices using the Microsoft SQL Server Report Designer, or you can modify the SSRS reports supplied by TMW. If you have questions, contact TMW Support. |
To specify SSRS report formats for invoices and master bills, follow these steps:
-
Go to Tools > Setup > Output Maintenance.
The Output Maintenance window opens. -
In the Output Type section, select Billing.
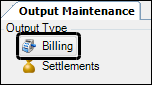
The window displays billing information.
-
In the Output section, click Add.
The system adds a blank row to the Output grid.Note: To delete a row, select the row and click Delete.
-
In the Output Type field, do one of the following:
-
If you are assigning an invoice format, select Invoice.
-
If you are assigning a master bill format, select Master Bill.
The Master Bill Dates tab appears next to the Setup tab. On this tab, you will specify the schedule used to print master bills. For more information, see [AssignMBFormats].
-
-
In the Report Information section, enter the following information:
-
Server location
In the Server Location field, enter the location of your SSRS report server.
-
Report name
In the Report Name field, enter the name of the SSRS report you want to use.
Note: If you do not know the SSRS report server location or report name, contact your SSRS system administrator.
-
-
Set the default printer.
-
Next to the Default Printer Name field, click
 Open.
Open.
The Print window opens. -
In the Name field, select the default printer used to print the SSRS report.
-
Click OK.
-
-
Assign the invoice or master bill format to Bill To companies and/or revenue types as needed.
Note: Leaving the revenue types and Bill To fields as UNKNOWN applies the invoice format to all Bill To companies and revenue types. For master bills, only one format can have all fields set to UNKNOWN.
-
In the Remit To Company section, enter Remit To company information as needed.
-
In the Terms Information field, enter your company’s remittance terms as needed.
-
Click
 Save.
Save.
Format information appears in the Output grid. -
Repeat Steps 3-10 for each SSRS report format you want to assign.
Assign a format to a Bill To company or companies
-
Enter a Bill To company in the Bill To field.
-
Click
 Add.
Add.
The system moves the Bill To company to the Bill To List.To remove a Bill To from the Bill To List, select the company and click Remove Selected.To clear the entire Bill To List, click Clear All.
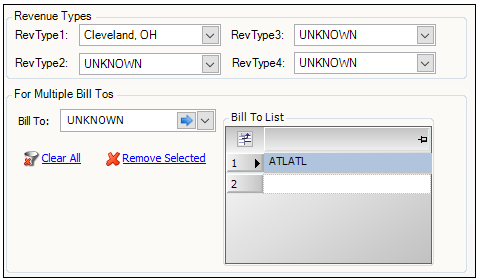
In this illustration, the system applies the format to orders that are billed to the company with ID ATLATL.Note that the UNKNOWN option has been removed.This ensures that the format is used only for the specified company.
Assign a format to a revenue type
Use the Revenue Types fields to select the revenue type or types.
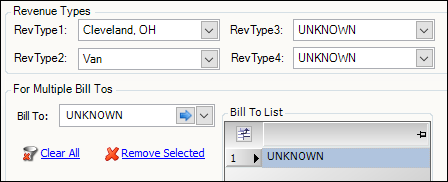
In this illustration, the system applies the format to orders that have RevType 1 set to Cleveland, OH and RevType 2 set to Van.
Assign a format to a Bill To and one or more revenue types
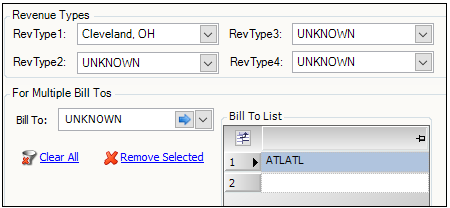
In this illustration, the system applies the format to orders that are billed to the company with ID ATLATL and that have RevType 1 set to Cleveland, OH.
Editing invoice and master bill formats
To edit an existing invoice or master bill format, select it in the Output grid and edit the fields in the Details section and, if applicable, the Master Bill Dates section.Click ![]() Save to save your changes.
Save to save your changes.
Copying an invoice or master bill format
To copy an existing invoice or master bill format, select it in the Output grid and click Copy. A new entry appears in the Output grid.
Before you can save this copy, you must edit fields as needed in the Details section and, if applicable, the Master Bill Dates section.
Click ![]() Save to save your changes.
Save to save your changes.