Processing hourly pay for a resource
The Time Settlement Folder allows you to process a driver’s pay based on hours of service. Use the folder to add, compute, or delete pay. After processing, use the Final Settlements Folder to finalize pay.
To process pay in the Time Settlement Folder you must:
-
Complete the required setup
-
Approve the driver’s logged hours of service
-
Compute pay for approved time details
Setting up the system to process hourly pay
The system uses a driver’s logged hours of service to process time details in the Time Settlement Folder. You must set up a driver to use a Time Log Source to log time.
The system uses an hourly pay type and rate schedule to calculate pay for time details automatically. You must set up time-based pay types and rate schedules prior to processing time details.
Specifying the driver’s time log source
A driver can use an E-Log or Shift Schedules Log to log hours of service. You can set a global default time log source for all drivers in the General Info Table in System Administration. In addition, you can specify a time log source in a driver’s profile in TMW Operations. If you specify a time log source in a driver’s profile, the system will use that source instead of the global default.
Specifying a time log source in a driver’s profile
-
In TMW Operations, go to Tools > Profiles > Driver Profiles.
The Driver Profile window opens. -
Enter the driver’s ID in the Driver ID field and press ENTER.
The driver’s information displays in the window. -
Select the User Definables tab.
-
In the TimeLog pane, select an option in the Time Log Source field.
Options are:
-
UNKNOWN (default)
The system uses the source specified in the String1 field for theTimeLogSourcekey in System Administration’s General Info Table. -
ELOG
The driver logs hours of service electronically from a device or manually in the Driver Hours of Service window in TMW Operations. -
SHIFT
The driver logs hours of service by reporting Login/Logout hours for a shift.
-
-
Click Save and then close the window.
Specifying a time log source in the General Info Table
-
In System Administration, go to Edit > GeneralInfo Table.
The General Info Table window opens. -
Scroll to the
TimeLogSourcekey.
-
In the String1 field, select a time log source.
Options are:
-
UNKNOWN (default)
There is no time log source specified. -
ELOG
The driver logs hours of service electronically from a device or manually in the Driver Hours of Service window in TMW Operations. -
SHIFT
The driver logs hours of service by reporting Login/Logout hours for a shift.In TMW Operations, a driver can enter shift hours in the Trip Planner’s Edit Shift Information window. To open the window, right-click in the driver’s Shift pane and click Shift Information.
-
-
Click Save and then close the window.
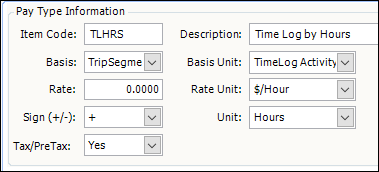
Creating a pay type to calculate hourly pay
You must create an hourly pay type to calculate time-based pay automatically. This illustration shows an example of a pay type used for calculating hourly pay.
To create a pay type for time-based pay:
-
Go to Tools > Setup > Pay Type Maintenance.
-
Click Add.
The system adds a new pay type item in the Main tab. -
Make entries in all fields.
Field Definition Item Code
Assign a unique ID to the pay type.
Description
Enter a description for the pay type.
Basis
SelectTrip Segment.
Basis Unit
Select TimeLog Activity.
Rate Unit
Select $/Hour.
Unit
Select Hours.
-
Click Save.
The system adds the pay type to the Pay Type Maintenance window.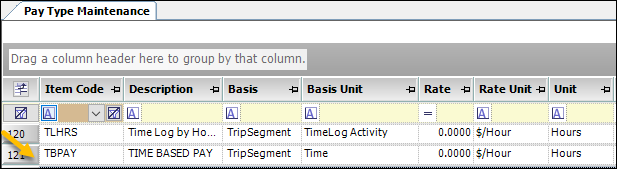
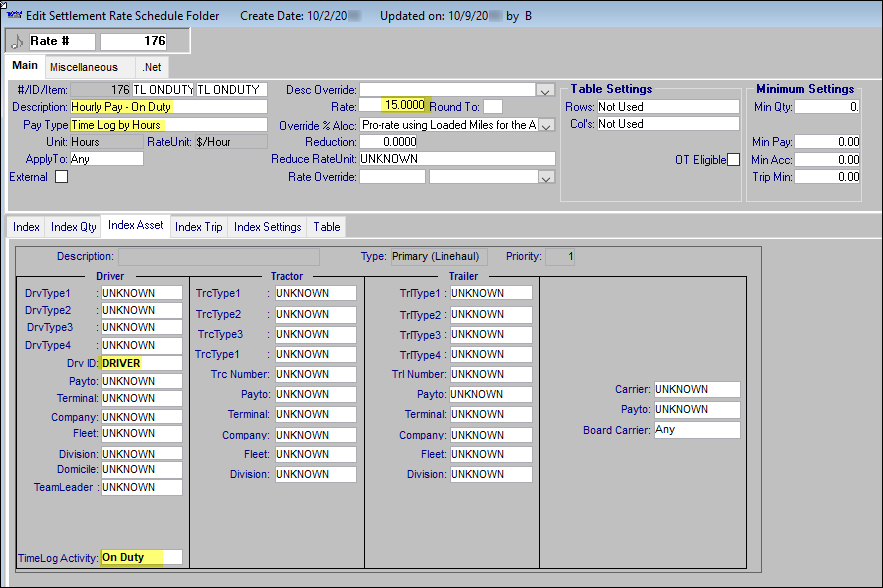
Creating a pay rate to calculate hourly pay
You must create a rate schedule to calculate time-based pay automatically. This illustration shows an example of a rate created for a specific driver’s hourly pay.
Click image to enlarge
To create a rate to calculate hourly pay:
-
Set
[Tariff]ShowDotNetTab=Yin your TTS50. -
Open the TMW Rate Schedules application.
-
Click
 Settlement.
 -
Click
 New.
New.
The Edit Settlement Rate Schedule Folder window opens. -
In the rate header, enter information in the following fields:
Field Definition ID/Item
Enter the rate’s identification information
Description
Enter the rate’s description
Rate
Enter the hourly pay rate
Pay Type
Select the pay type you created for TimeLog Activity.
-
Select the Index Asset tab and enter information in the following fields:
Field Definition Drv ID
Enter the driver’s ID
TimeLog Activity
Make a selection that specifies the activity for which pay is calculated.
Your company defines the options available in this field from the TimeLogActivity label in the Edit User Definable Fields window.
For example, options may include:
-
Drive
-
Meal
-
On Call
-
On Duty
Note: In TMWSuite’s Rate Schedules application, the TimeLog Activity field is available only when you have:
-
[Tariff]ShowDotNetTab=Yset in your TTS50 -
A pay type selected that has a Basis Unit of TimeLog Activity
-
Approving time log details
Use the Approve Time Log Details window in TMW Operations to approve a driver’s logged time. You can also add a time log detail manually.
To approve time:
-
In TMW Operations, go to Operations > Approve Time Log Details.
The Approve Time Log Details window opens. -
Enter the ID of the driver in the Driver ID field.
-
Enter a date range in the pay Period Start Date and Period End Date fields.
-
Click Open.
The Time Log Details grid shows the driver’s logged hours of service.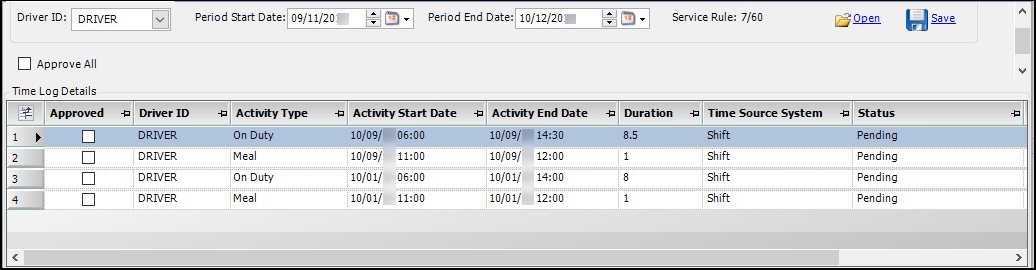
-
To approve logged time, do one of the following:
-
Approve an individual time log detail by selecting the Approved check box for the row.
-
Approve all time log details by selecting the Approve All check box.
-
-
Click Save.
Looking up a resource’s hourly pay information
-
Go to Settlements > Time Settlements Folder.
The Time Settlement Folder opens. -
In the header area, enter the resource and pay period information.
Field Definition Resource
In the second field, enter the driver’s ID.

Pay Period
The system automatically displays the next open pay period that is set up for this resource.
To choose a different pay period, click
 Down Arrow to display a list of pay periods. Then select the one you want.
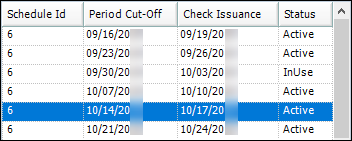
If you do not find the pay period you want, use the Filter Pay Periods window to pull additional pay periods:
-
Click the
 Calendar icon to access the Filter Pay Periods window.
 -
In the From and To fields, enter a date range that represents the pay period you want.
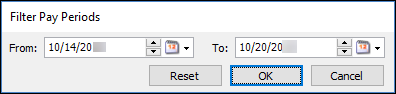
-
Click OK.
-
Select a pay period from the expanded list.
-
-
Click Open.
-
The Time Details tab shows the driver’s Approved and Pending approval time.
Notes:
Time Log Details must be approved in order to be processed.
You can only approve Pending time in the Approve Time Log Details window.
-
The Trips Ready To Settle tab shows trips that are ready to settle and for which there are matching time log details with the same trip start dates.

-
Calculating pay automatically
The Time Settlement Folder allows you to process Only Time Pay for hours of service or Time and Trip Pay for both hours of service and trips.
Calculate Only Time Pay
-
In the Compute Pay pane, select Only Time Pay.
-
Click Compute Pay.
The system applies a rate that was previously set up for time pay.
Note: If duplicate rates apply, the system calculates pay based on the first rate found.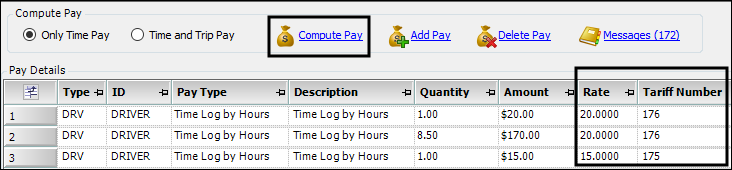
-
Click Save.
Calculate Time and Trip Pay
-
In the Compute Pay pane, select Time and Trip Pay.
-
Click Compute Pay.
The system applies rates that were previously set up for time and trip pay.
Note: If duplicate rates apply, the system calculates pay based on the first rate found.
-
Click Save.
Managing exceptions
Some exclusions may apply when processing a trip in the Time Settlement Folder. For example, if a trip pay detail has a status of On Hold, you must use the Trip Settlements Folder to complete requirements that set the trip’s pay detail status to Released.
To process pay in the Trip Settlements Folder:
-
In the Pay Details grid, double-click the trip’s pay detail to open the trip in the Trip Settlements Folder.
-
Complete trip requirements. For example, check in paperwork if needed.
-
Click Prepare Settlements to set the trip’s pay detail status to Released.
Note: You can also set the status manually. -
Click Save.
-
When finished, return to the Time Settlement Folder and click Open.
The trip pay detail has a status of Released.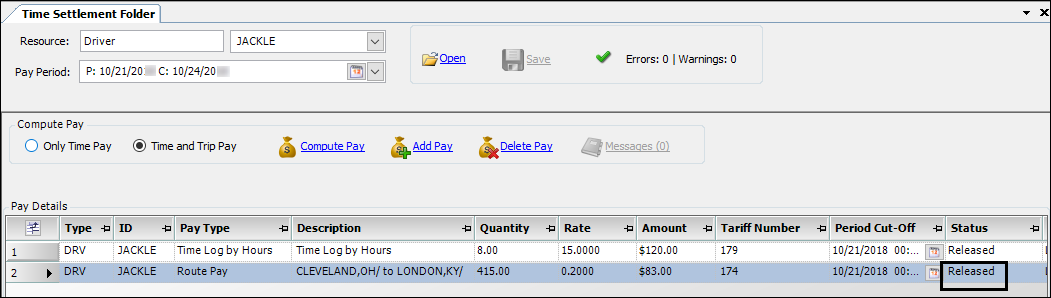
Adding a pay detail manually
To add a pay detail manually:
-
Go to Settlements > Time Settlements Folder.
The Time Settlement Folder opens. -
In the Compute Pay pane, click Add Pay.
The system adds a blank pay detail. -
Select the pay type in the Pay Type column.
-
Record the quantity in the Quantity column.
-
Record the rate in the Rate column.
-
Click Save.