Creating a split bill
The Split Bill feature allows you to divide an order’s charges onto two or more invoices.
Typically, you use this feature when you do not want to bill a single company for all of the charges associated with an order. Examples of this include:
-
You may want to invoice detention charges directly to the company that caused the detention, rather than to the Bill To company.
-
A company’s contract may stipulate that the shipper and/or consignee is always responsible for paying certain accessorials, such as tarping.
With the Split Bill feature, you can create one or more separate supplemental invoices for these charges and assign a different company as the Bill To.
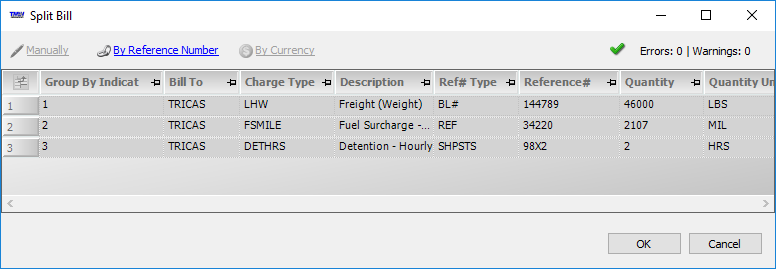
You can also divide charges according to reference number or currency. The system automatically creates supplemental invoices based on the information available for each charge.
|
You can set up the system to split charges automatically based on the accessorial rate applied. The system will create separate invoices for those charges when you set the invoice status to Ready to Print. For more information on setting up autosplit billing, see: Guide: Billing Rate Basics | Chapter: Autosplitting accessorial charges on supplemental invoices |
-
In the Invoice Headers section, go to Create Invoice > Split Bill.
Note: The Split Bill feature is available if both of the following are true:-
The invoice contains two or more charges.
-
The invoice has a status of On Hold or Ready to Print. If you want to split an invoice with a status of Printed, you must reset the status to Ready to Print. If you want to split an invoice with a status of Transferred, you must first create a credit memo.
The Split Bill window opens.
-
-
Choose the method with which you want to split the charges.
Note: You can only choose one method. If you want to use a different method, click Cancel to close the Split Bill window and repeat Step 2. -
Click OK.
The Edit Invoice Folder redisplays the original invoice. For each invoice created, a supplemental invoice tab appears below the Invoices tab, next to the original invoice tab. It has the same number as the original invoice, but a different suffix.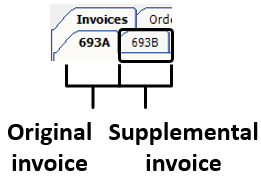
Note: Clicking OK on the Split Bill window saves the invoices automatically. If you want to split the charges using a different method, you must delete the supplemental invoice(s), reenter the charge(s) on the original invoice, and repeat Steps 2-4.
Split charges manually
-
Click Manually.
-
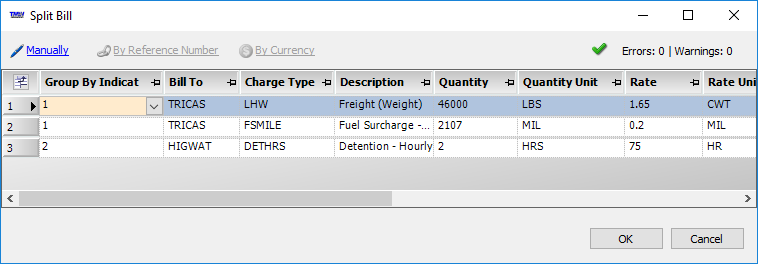
Edit the Group By Indicator and Bill To fields for each charge you want to move to a supplemental invoice.
The Group By Indicator value represents the invoice on which the system will put the charge.All charges with the same value will reside on the same invoice.
When the Split Bill window opens, the Group By Indicator field value is 1 for all charges.This value represents the original invoice.Line haul charges must remain on this invoice.To put an accessorial charge on a supplemental invoice, select a different value in the Group By Indicator field.
If desired, you can enter a different Bill To company in the Bill To field.
In this illustration, the line haul charge and fuel surcharge remain on the primary invoice (1).The detention charge is billed to a different company, and will go on a supplemental invoice (2).