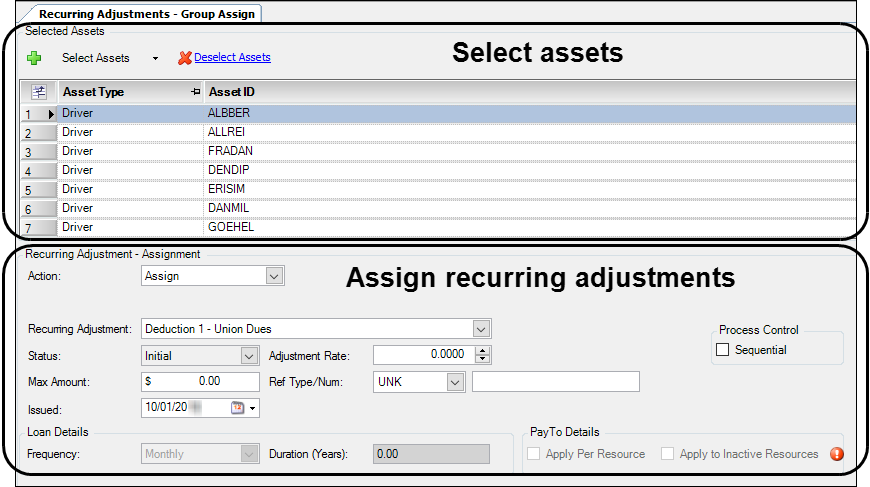
Assigning recurring adjustments to a group of resources
After you create a recurring adjustment, you must assign the adjustment to the applicable resources. The group assignment feature is useful when you want to assign a recurring adjustment to multiple resources at the same time.
You assign recurring adjustments for a group of resources in the Recurring Adjustments - Group Assign window. To access the window, go to Tools > Setup > Recurring Adjustments > Recurring Adjustment Group Assignment.
-
You select assets in the Selected Assets section at the top of the window.
-
You assign recurring adjustments in the Recurring Adjustment - Assignment section at the bottom of the window.
Selecting a group of resources and assigning adjustments
To assign a recurring adjustment to a group of resources, follow these steps.
-
Go to Tools > Setup > Recurring Adjustments > Recurring Adjustment Group Assignment.
-
In the Selected Assets section at the top of the window, click Select Assets.
A list of asset types appears with the following options:-
Drivers
-
Tractors
-
Trailers
-
Carriers
-
Pay Tos
-
-
Select an asset type.
A scroll window opens for the asset you selected. -
Use the scroll window to select a group of resources to which you want to assign the recurring adjustment.
-
Use the restriction fields on the various tabs to narrow your retrieval results.
Note: The options on the User Defined, Qualifications and Classifications tabs are defined in the label file. To access the label file, go to Tools > Setup > Edit User Definable Fields. -
Click Retrieve.
The system retrieves resources that match the restrictions entered on all tabs. -
Click OK to select the assets listed in the Results grid.
-
-
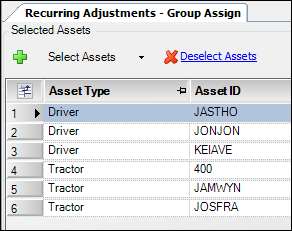
To select resources from different asset types, repeat Steps 2-4.
This illustration shows resources selected for both drivers and tractors.
-
To remove one or more assets from the list, select the asset(s) and click Deselect Assets.
-
In the Recurring Adjustment - Assignment section, select the appropriate information in each field.
Note: Your entries are used for all resources in the group. However, after you assign an adjustment to the group, you can modify the amounts for individual resources in the Assign Assets window. To access the window, go to Tools > Setup > Recurring Adjustments > Recurring Adjustment Assign Asset.
-
When you are finished entering information, click
 Save.
Save.
The Batch Process Results window opens and displays the results grid.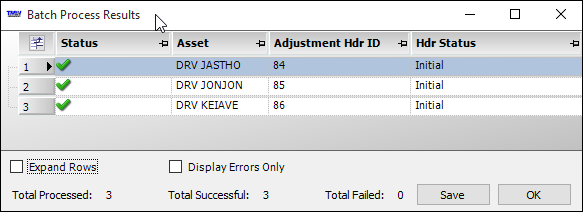
The
 icon indicates that the process completed successfully for each resource.
Note: The system does not verify if duplicate assignments exist for a resource. However, you can view a list of all recurring adjustments assigned to a resource in the Assign Assets window. For details, see Viewing a list of assigned recurring adjustments.
-
To save a text file of the process results, click Save.
-
To close the window, click OK.
-
The system removes the resources from the Selected Assets section.
-
The system applies the recurring adjustment to the resources' settlements during the Collect process for a selected pay period.
-
-
Recurring Adjustment Assignment
| Field | Definition |
|---|---|
Action |
Select Assign. Notes:
|
Recurring Adjustment |
Select the type of recurring adjustment you want to assign. |
Status |
Initial displays for new adjustments or ones that have not been applied yet. Note: For an adjustment applied to a resource’s pay, the system displays one of the following statuses:
|
Adjustment Rate |
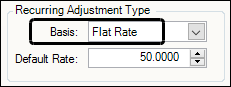
Specifies the dollar amount or percentage that will be applied each time the recurring adjustment is processed. Do one of the following:
Note: The Basis field entry for an adjustment appears in the Recurring Adjustment Type section in these windows:
To access the windows, go to Tools > Setup > Recurring Adjustments. |
Max Amount |
If the recurring adjustment is capped by a maximum amount, the maximum is recorded here. |
RefType/Num |
If applicable, select a reference number type and enter the corresponding reference number. |
Issued |
Date the recurring adjustment is assigned to the resource. Defaults to the current date. If necessary, enter another issue date. |
Loan Details
These fields are active when you create the recurring adjustment in the Loan Maintenance window.
| Field | Definition |
|---|---|
Frequency |
Select the payment frequency, for example monthly, weekly, etc. |
Duration(Years) |
Select the number of years that the loan is in effect. For example, if Frequency is Monthly and Duration is 5.0, the system applies the deduction every month for 5 years, resulting in 60 payments. 12 deductions per year x 5 years = 60 payments |
Pay To Details
Assigning a deduction to a PayTo activates the Apply Per Resource and Apply to Inactive Resources check boxes.You must select the Settle by PayTo check box on the PayTo’s profile to apply the recurring adjustment for these options.
| Field | Definition |
|---|---|
Apply Per Resource |
Select the check box to apply the recurring adjustment to all resources showing trip pay on their PayTo’s settlement. |
Apply to Inactive Resources |
Select the check box to apply the recurring adjustment to resources showing no trip pay on their PayTo’s settlement. For example, you could use this option to collect vehicle insurance on a per-pay basis even when the vehicle is not used to complete a trip for a specific pay period. Notes:
|
Process Control
| Field | Definition |
|---|---|
Sequential |
Select the check box to set up the system to repay multiple recurring deductions sequentially (one after the other). The system completes the deduction having the earliest issue date before starting the next deduction. Sequential deductions require both of the following. The deductions must:
Note: You record a maximum amount when you assign the recurring adjustment to a resource. |
Changing an adjustment assignment for a group of resources
After assigning a recurring adjustment to a group of resources, it may become necessary to change the assignment. Use the options in the Action field to Unassign, Cancel, Hold, or Reopen an adjustment assignment.
To change a recurring adjustment assignment for a group of resources, follow these steps.
-
Go to Tools > Setup > Recurring Adjustments > Recurring Adjustment Group Assignment.
-
In the Selected Assets section at the top of the window, click Select Assets.
A list of asset types appears with the following options:-
Drivers
-
Tractors
-
Trailers
-
Carriers
-
Pay Tos
-
-
Select an asset type.
A scroll window opens for the asset you selected. -
Use the scroll window to select the group of resources you want to edit.
-
Use the restriction fields on the various tabs to narrow your retrieval results.
Note: The options on the User Defined, Qualifications and Classifications tabs are defined in the label file. To access the label file, go to Tools > Setup > Edit User Definable Fields. -
Click Retrieve.
The system retrieves resources that match the restrictions entered on all tabs. -
Click OK to select the assets listed in the Results grid.
-
-
To select resources from different asset types, repeat Steps 2-4.
This illustration shows resources selected for both drivers and tractors.
-
To remove one or more assets from the list, select the asset(s) and click Deselect Assets.
-
In the Recurring Adjustment - Assignment section, enter the appropriate information in each field.
Field Definition Action
Use this option for an adjustment that is not applied to resources' pay.
-
Unassign
Remove the recurring adjustment assignment
Use these options for an adjustment that is applied to resources' pay.
-
Cancel
Stop processing the recurring adjustment.Set status to Cancelled
-
Hold
Suspend processing the recurring adjustment, temporarily.Set status to On Hold.
It will not process again until you manually set its Action field value back to ReOpen.
-
ReOpen
Resume processing a recurring adjustment that has an Action field value of Hold.Set status to Drawn.
Recurring Adjustment
Select the recurring adjustment that requires the assignment change.
-
-
Click Save.
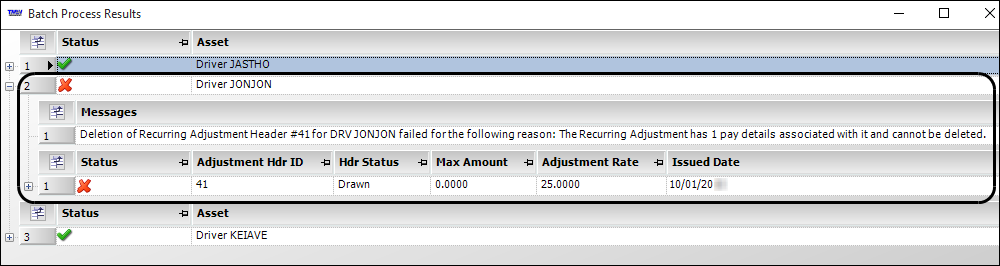
The Batch Process Results window opens and displays a results grid.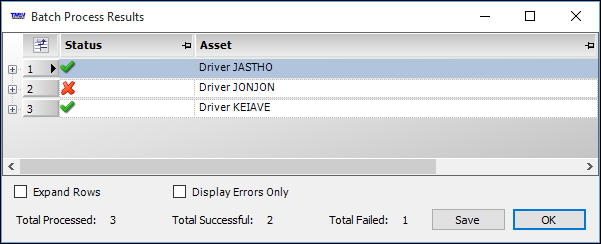
The Status icons indicate whether processing of the adjustment passed or failed for each asset.
-
The
icon indicates that the process completed successfully. -
The
 icon indicates that the process failed.
To view a message regarding a process failure, click
 Expand.
The reason for the failure appears in the Messages section of the grid. In this illustration, the reason indicates that the adjustment was already applied to the resource’s pay.
-
To expand all rows in the grid, select the Expand Rows check box.
When you expand the row, you can view the adjustment status, rate and issued date.
-
To display rows with errors only, select the Display Errors Only check box.
-
-
-
To save a text file of the process results, click Save.
-
To close the window, click OK.
The system removes the resources from the Selected Assets section.Note: You can view a list of all recurring adjustments assigned to a resource in the Assign Assets window. For details, see Viewing a list of assigned recurring adjustments.