Working with rate tables
A rate table is a list of per unit rates. Each rate is applicable for a specific constraint you set. For example, you could set up a distance-based rate table with several tiers, each tier with its own rate.
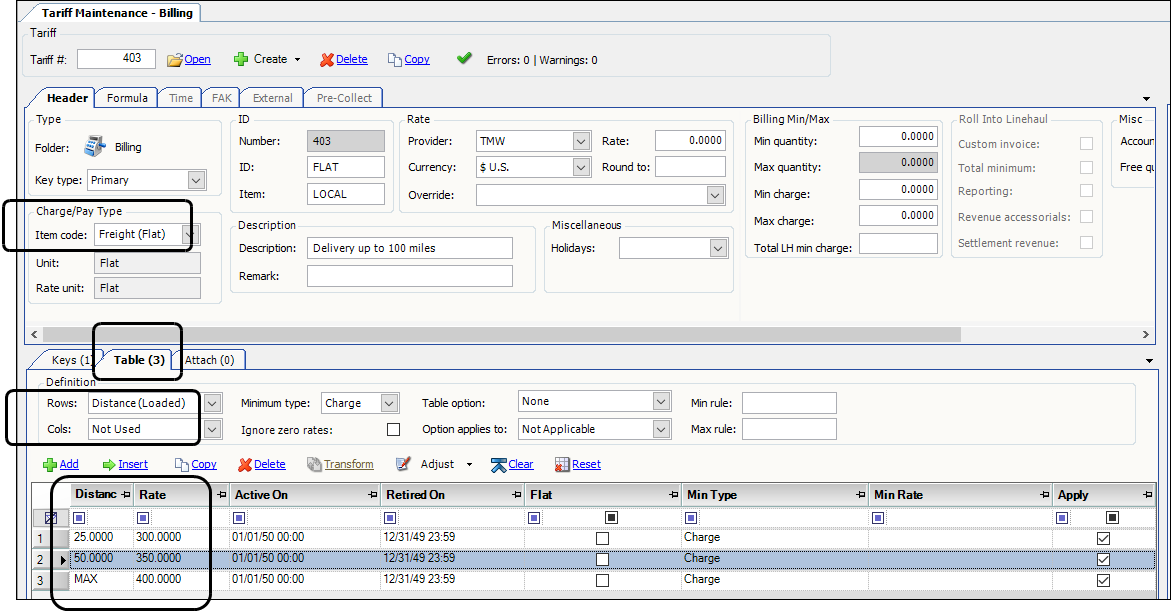
You set up rate tables on the Tables tab. This illustration shows such a rate with three tiers. In this example, each tier is associated with a flat rate.
Click image to enlarge
When setting up rate tables, your selection in the Rows field and the Col’s field define what the rows and/or columns in the table mean.
-
The table can consist of rows only, columns only, or both rows and columns.
-
You can define only one table per tariff.
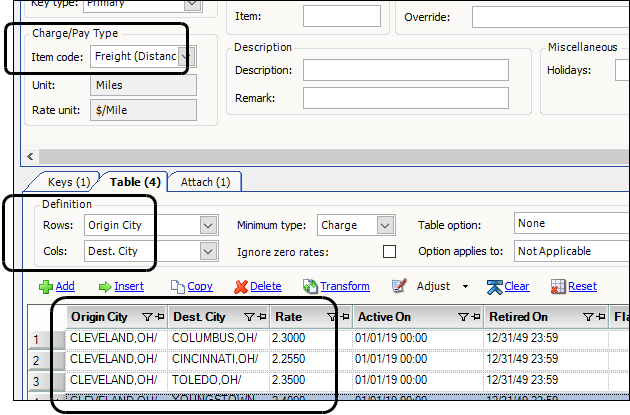
For example, you could set up a flat rate table based on origin to destination. You could define rows by origin city and columns by destination city.
The charge type or pay type selected in the rate header determines billing or pay units. This example is using a mileage-based charge type, Freight (Distance).
Creating a rate table
-
Retrieve the tariff to which you want to add a table.
-
Click the Table tab.
-
Define your table’s rows and/or columns by selecting an option in the Rows and/or Col’s fields.
Field Definition Avg Fuel Price
Set up a fuel surcharge rate based on an Average Fuel Price table. An Average Fuel Price table consists of a list of effective dates and the corresponding average fuel prices in effect for those dates. These tables are set up in Average Fuel Price window.
Axle Count
Bill based on the combined number of axles recorded for the assigned resources (tractor, trailer 1, and trailer 2)
Bill To
The Bill To company being billed for the charge
Billto Othertypes1-2
Classifications recorded in the OtherType 1 and OtherType 2 fields in the profile of the Bill To company recorded on the order
Note: You define the options for these fields in the OtherTypes1 and OtherTypes2 labels in the Edit User Definable Fields window.
Charge Quantity
(Billing rates only)
The quantity being invoiced
Commodity
Commodity recorded on the order
Note: If there are multiple commodities on the order, the system looks at only the first commodity.
Commodity Class
Freight classification code of the commodity recorded on the order
Note: If there are multiple commodities on the order, the system looks at only the first commodity.
Company
(Billing rates only)
Company classification specified on the order
Note: You define options for this field in the Company label in the Edit User Definable Fields window.
Count
Freight count of the order
Day Of Week
The day-of-the-week of the Arrival date of the first billable stop
DayOfWeek(Early Arv)
The day-of-the-week of the Earliest date of the first billable stop
Dest Co. (Order)
(Pay rates only)
The last drop stop on the order or trip
Dest. City
City where the last stop took place
Dest. Company
Company site where the last stop took place
Dest. State
State/province where the last stop took place
Dest. Zip (3-digit)
(Pay rates only)
First three characters of the ZIP/postal code of the location where the last stop took place
Dest. Zip (Full)
The complete ZIP/postal code of the location where the last stop took place.
The rating engine applies the rate only when the ZIP Code used to define the rate is an exact match to the ZIP Code recorded in the company profile.
-
If the company’s ZIP Code has five digits, any full ZIP Code rate tables for the company must also have five digits.
-
If the company’s ZIP Code has nine digits, any full ZIP Code rate tables for the company must also have nine digits.
Note: To set up rate tables for nine-digit ZIP Codes, you must use the same format used in the company’s profile. For example, if the nine-digit ZIP Code is hyphenated in the company’s profile, it must also be hyphenated in the rate table. If the profile has 44060-1234, you cannot enter 440601234 or 44060 1234.
Destination County
(Billing rates only)
County where the last delivery stop took place
Note: You must record the complete county name in the City profile.
Destination Region
(Billing rates only)
Geographic region where the last stop took place
Notes:
-
Regions that are used as rating restrictions are defined in the Trips and Regions Edit window. The window is found in TMWSuite’s Rate Schedule application.
-
For information about creating region-based rates that will be applied to orders, see:
Guide: Billing Rates Basics | Chapter: Setting up trip definitions and regions | Section: Setting up rates based on regions
Dist (closestpoint)
(Billing rates only)
The closest distance between a pickup stop and a drop stop on the order
This option selects a rate based on the shortest distance between a drop stop and any pickup stop on the order. When you use the Compute function to rate an order, the system calculates the distance between pickup stops and drop stops.
Dist. (Hub)
Set up rates for mile ranges based on the tractor’s odometer readings
Dist (Round Trip *Adj)
Round trip mileage for the order is determined by adding route miles and origin/destination miles, then multiplying the sum by the adjustment factor specified in the
[Invoice]AdjustedMileBillingFactorsetting in your TTS50.Note: Route miles are the total point-to-point miles for all stops on an order. Origin/destination (O/D) miles are the miles from just the origin point to the destination point.
For example, the trip has three stops.
-
The mileage from point A to point B is 40 miles
-
The mileage from point B to point C is 80 miles
-
The mileage from point C to point A (the O/D miles) is 60 miles.
Your TTS50 file specifies that
AdjustedMileBillingFactor=.5The system calculates the round trip mileage as:
(40 + 80 + 60) X .5 = 90 round trip milesNote: When you use this option, the system ignores miles between interim stops.
Distance (Actual)
(Pay rates only)
Use this option to specify mileage ranges just for loaded miles or just for empty miles. To determine whether mileage should be limited to loaded or empty miles, the system looks at how the Load Status field is set on the Key (index).
-
If the Load Status field is set to LOADED, the distance ranges in the table apply only to loaded miles.
-
If the Load Status field is set to EMPTY, the distance ranges apply only to the empty miles on the trip.
Distance (Empty)
(Billing rates only)
Total empty miles on an order
This option applies only to mileage between billable stops on an order.
Distance (Furthest)
(Billing rates only)
This rating method allows you to rate an order based on the greatest distance between a pickup stop and any drop stop on the order. When you use the Compute function to rate an order, the system calculates the distance between each pickup stop and each drop stop. The number of miles for the stop with the greatest distance determines which rate is used.
In addition, the system calculates separate mileages for each commodity when multiple commodities are being hauled.
Distance (Loaded)
(Billing rates only)
Total loaded miles on an order
This option applies only to mileage between billable stops on an order
Distance (O-D)
Origin-to-destination miles on the order
Note: When this option is used, the systems does not include miles between interim stops.
Distance (Route)
Total miles on the order
Distance (Empty) Total
(Pay rates only)
The trip’s empty mileage
This option applies only to mileage between payable stops on a trip
Distance (Loaded) Total
(Pay rates only)
The trip’s loaded mileage
This option applies only to mileage between payable stops on a trip
Divis. of/Parent
(Billing rates only)
Parent company for the Bill To company on the order
Driver Company
(Pay rates only)
Company classification specified in the driver profile
Note: Your company defineses the options in the Company label in the Edit User Definable Fields window.
DriverDivision
(Pay rates only)
Division classification specified in the driver profile
Note: Your company defines the options in the Division label in the Edit User Definable Fields window.
Driver Domicile
(Pay rates only)
Domicile classification specified in the driver profile
Note: Your company defines the options in the Domicile label in the Edit User Definable Fields window.
Driver Fleet
(Pay rates only)
Fleet classification specified in the driver profile
Note: Your company defines the options in the Fleet label in the Edit User Definable Fields window.
Driver TeamLeader
(Pay rates only)
TeamLeader classification specified in the driver profile
Note: Your company defines the options in the TeamLeader label in the Edit User Definable Fields window.
Driver Terminal
(Pay rates only)
Terminal classification specified in the driver profile
Note: Your company defines the options in the Terminal label in the Edit User Definable Fields window.
Drop Stops
Defines secondary rate tables that calculate charges/pay based on the number of drop stops recorded on an order. You can specify whether to charge/pay for all stops, or only for stops that are more than a user-specified number.
Note: This option (along with the Pickup Stops option) allows you to create a rate for drop stops and a separate rate for pickup stops. You can use the incremental rating feature to specify a different number of free stops for each rate.
DrvType1-4
Driver classifications to which the lead driver on the order is assigned
Note: Your company defines the options for these fields in the DrvType1 - DrvType4 labels in the Edit User Definable Fields window.
Event
(Pay rates only)
Use this option to set up event-based pay for a single event type, such as Live Load. In this field, record the amount paid per instance of a specified event occurring on the trip.
For example, you could specify that one instance of the specified event pays $50 and that two instances pays $85. Then, use the Max option to specify that anything over two instances pays $120.
You specify the event type in the Stop Event field in the rate’s Key (index).
Event-based pay requires a pay type with these options set:
-
Event in the Basis Unit field
-
Event in the Unit field
-
$/Event in the Rate Unit field
Event Type
(Pay rates only)
Use this option to set up event-based pay for multiple event types, such as Live Load and Live Unload. Create a table of events, each with its own rate. When the system computes pay, it multiplies the rate you specify by the number of the specified events on the trip.
Event-based pay requires a pay type with these options set:
-
Event in the Basis Unit field
-
Event in the Unit field
-
$/Event in the Rate Unit field
Height
Freight height (in inches) on the order
Holiday Group
(Pay rates only)
The holiday group calendar this rate uses to create holiday pay
Holiday groups are set up in the Holiday Calendar window. To access it, go to Tools > Setup > Holiday Calendar.
Length
Freight length (in inches) on the order
Master Order#
(Billing rates only)
ID of the master order from which the order was copied
Orig Co. (Order)
(Pay rates only)
The origin company set on the order
Note: On consolidated orders, the system uses the first order.
Origin City
City where the first stop occurred
Origin Company
Company site where the first stop occurred
Origin County
(Billing rates only)
County where the first stop occurred
Note: You must record the full county name in the City profile.
Origin Region
(Billing rates only)
Geographic region where the first stop took place
Notes:
-
Regions that are used as rating restrictions are defined in the Trips and Regions Edit window. The window is found in TMWSuite’s Rate Schedule application.
-
For information about creating region-based rates that will be applied to orders, see:
Guide: Billing Rates Basics | Chapter: Setting up trip definitions and regions | Section: Setting up rates based on regions
Origin State
State/province where the first stop took place
Origin Zip (3-digit)
(Pay rates only)
First three characters of the ZIP/postal code of the location where the first stop took place
Origin Zip (Full)
Complete ZIP/postal code of the location where the first stop took place
The rating engine applies the rate only when the ZIP Code used to define the rate is an exact match to the ZIP Code recorded in the company profile.
-
If the company’s ZIP Code has five digits, any full ZIP Code rate tables for the company must also have five digits.
-
If the company’s ZIP Code has nine digits, any full ZIP Code rate tables for the company must also have nine digits.
Note: To set up rate tables for nine-digit ZIP Codes, you must use the same format used in the company’s profile. For example, if the nine-digit ZIP Code is hyphenated in the company’s profile, it must also be hyphenated in the rate table. If the profile has 44060-1234, you cannot enter 440601234 or 44060 1234.
OtherType1-2
Classifications recorded in the Other Type 1 and Other Type 2 fields in the profile of the Order By company recorded on the order
Note: Your company defines options for these fields in the OtherTypes1 and OtherTypes2 labels in the Edit User Definable Fields window.
Out of Route
Mileage that is determined by subtracting the origin-to-destination miles from the total miles traveled
Pay Quantity
(Pay rates only)
The quantity being paid
Pallet Count
(Billing rates only)
Pallet count on order
Pallet Type
(Billing rates only)
Pallet type on order
Pickup Stops
Defines secondary rate tables that calculate charges/pay based on the number of pickup stops recorded on a trip
You can specify whether to charge/pay for all stops, or only for stops that are more than a user-specified number.
Note: This option (along with the Drop Stops option) allows you to create a rate for pickup stops and a separate rate for drop stops. You can use the incremental rating feature to specify a different number of free stops for each rate.
Premium Day PUP/DRP
(Billing rates only)
Set up accessorial rates for pickups or drops that fall on premium days, such as weekends and holidays
Premium Day
(Pay rates only)
The day(s) of the week or holidays eligible for premium pay.
You can set up primary or secondary rate tables based on the Premium Day option that creates pay in the Trip Settlements Folder. You can base these rates on distance, flat amount, etc.
The Holiday option is linked to holiday group calendar. Holiday groups are set up in the Holiday Calendar window. To access it, go to Tools > Setup > Holiday Calendar.
RevType1-4
Revenue classifications specified on the order header
Note: Your company defines the options in the RevType1- RevType4 labels in the Edit User Definable Fields window.
Route (Lookup)
(Billing rates only)
Route restriction, also referred to as rating routes
You set up routes in the Tariff Maintenance Route window. To access it, go to Tools > Setup > Tariff > Route Maintenance.
Each route is defined by a sequence of billable stops. A route can be defined by any of the following:
-
Company locations
-
City/state locations
-
ZIP/postal codes
Route (Order)
The route assigned on the order
Notes:
-
You assign Route (Order) designations in the Route field in Order Maintenance.
-
By default, the Route field is not visible in Order Maintenance. Set these options in QuickDesigner to add it:
-
Control Type = Textbox
-
Field Group = _BindingSource
-
Field = Route
-
Seniority(months)
(Pay rates only)
Primary pay rate tables based on the number of months a driver has been employed
When the system applies the rate to a trip, it checks the entry in the Seniority field in the driver’s profile to determine the number of months the driver has been employed. If there is no entry in this field, the system uses the entry in the Hire field.
Stop City
(Billing rates only)
City where a pickup or delivery stop occurs after the initial pickup
Stop Company
(Billing rates only)
Company where a pickup or delivery stop occurs after the initial pickup
Stops
Number of loaded stops on a trip being billed/payed
TERMS
(Billing rates only)
Billing terms recorded for the order
Time (tariff)
(Billing rates only)
The quantity being invoiced
Time of Day
(Pay rates only)
Allows you to create pay based on the time a trip starts. You can use this option to set up a list of pay amounts that can accommodate different rates for shift pay.
The rate pulled by the system is based on the trip segment start date, that is the date/time recorded in the Dispatch application for the trip’s start.
TimeLog Activity
(Pay rates only)
Specifies the activity for which hourly pay is calculated
Notes:
-
The Time Settlements Folder uses this option for hourly pay.
-
For details, see:
Setting up the system to process hourly pay
TimeLog Duration
(Pay rates only)
Defines a list of pay rates based on the number of hours worked.
Notes:
-
The Time Settlements Folder uses this option for hourly pay.
-
For details, see:
Setting up the system to process hourly pay
Tractor Company
(Pay rates only)
Company classification specified in the tractor profile
Note: Your company defines the options in the Company label in the Edit User Definable Fields window.
Tractor Division
(Pay rates only)
Division classification specified in the tractor profile
Note: Your company defines the options in the Division label in the Edit User Definable Fields window.
Tractor Fleet
(Pay rates only)
Fleet classification specified in the tractor profile
Note: Your company defines the options in the Fleet label in the Edit User Definable Fields window.
Tractor Terminal
(Pay rates only)
Terminal classification specified in the tractor profile
Note: Your company defines the options in the Terminal label in the Edit User Definable Fields window.
Trailer Company
(Pay rates only)
Company classification specified in the trailer profile
Note: Your company defines the options in the Company label in the Edit User Definable Fields window.
Trailer Division
(Pay rates only)
Division classification specified in the trailer profile
Note: Your company defines the options in the Division label in the Edit User Definable Fields window.
Trailer Fleet
(Pay rates only)
Fleet classification specified in the trailer profile
Note: Your company defines the options in the Fleet label in the Edit User Definable Fields window.
Trailer Terminal
(Pay rates only)
Terminal classification specified in the trailer profile
Note: Your company defines the options in the Terminal label in the Edit User Definable Fields window.
TrcType1-4
Tractor classifications to which the tractor on the order is assigned
Note: Your company defines the field names and options in the TrcType1 - TrcType4 labels in the Edit User Definable Fields window.
Trip Type
(Pay rates only)
Used to set up a rate table based on the LghType1 classifications assigned to the trip segment associated with the order.
Notes:
-
For consolidated orders, the system retains only the LghType1 value for the order with the lowest ID.
-
You assign LghType1 classifications in the Assign Driver/Equipment window.
-
You define LghType1 options in the Edit User Definable Fields window.
TrlType1-4
Trailer classifications specified in the trailer profile of the trailer assigned to the order
Note: Your company defines the field names and options in the TrlType1 - TrlType4 labels in the Edit User Definable Fields window.
Volume
Freight volume recorded on the order
Weight
Freight weight recorded on the order
Width
Width recorded on the order
-
-
If you plan to set minimums on the rate table, set the default type of minimum in the Minimum type field. Your selection affects the entire table.
-
Charge
The system calculates minimum charges for this table. -
Quantity
The system calculates minimum quantities for this table.
Note: The system does not support the use of cell-based minimums for both quantities and dollar amounts in the same rate table.
-
-
If you don’t want the system to apply zero dollar rates, select the Ignore zero rates check box.
Note: The system reads 0.0000 entries as placeholders, not valid rates. It does not apply them.
-
Do one of the following to add new rows to the table.
-
Use the Add command to add a row at the bot
-
Use the Insert command to add a row above the selected row.
-
Use the Copy command to duplicate the highlighted row and insert it below it.
-
-
Make entries in these fields in the grid.
Field Definition row
(the option selected in the Rows field is shown)
The row option
Options may be selected from a list or typed, depending on the option selected in the Rows field.
You can enter multiple values for some row options. For more information, see Assigning multiple row or column options to a rate.
column
(the option selected in the Cols field is shown)
The column option
Options may be selected from a list or typed, depending on the option selected in the Cols field.
You can enter multiple values for some row options. For more information, see Assigning multiple row or column options to a rate.
Rate
The rate applicable for this row
Active On
and
Retired On
Use the Active On and Retired On fields to indicate the dates during which the rate is in effect. If the order’s date is within this date range, the system will consider the rate eligible for use.
Flat
The system applies the value in the Rate field as a flat rate.
Min Type
Not functional
Use the Minimum type field to set the minimum type for the entire table.
Min Rate
The minimum charge or quantity value
Apply
Determines whether this rate option is available
-
When selected
The rate is available -
When cleared
The rate is not available
-
-
Click
 Save.
Save.
Assigning multiple row or column options to a rate
In some rate tables, the same rate amount may apply for multiple row entries or column entries. When this occurs, the system allows you to enter multiple values in a row or column, so that you can enter the rate just once.
The following is a list of row/column options that allow you to enter multiple values:
Axle Count |
Destination Region |
Origin Company |
TimeLog Activity |
Bill To |
Divis of Parent |
Origin County |
Tractor Company |
Billto Othertypes 1-2 |
Driver Company |
Origin Region |
Tractor Division |
Commodity |
Driver Division |
Origin State |
Tractor Fleet |
Commodity Class |
Driver Domicile |
Origin Zip (3-digit) |
Tractor Terminal |
Day of Week |
Driver Fleet |
Origin Zip (Full) |
Trailer Company |
DayOfWeek(EarlyArv) |
Driver TeamLeader |
Other Type 1-2 |
Trailer Division |
Dest Co. (Order) |
Driver Terminal |
Premium Day |
Trailer Fleet |
Dest. Company |
Driver Type 1-4 |
Premium Day PUP/DRP |
Trailer Terminal |
Dest. State |
Event Type |
RevType 1-4 |
TrcType 1-4 |
Dest. Zip (3-digit) |
Holiday Group |
Stop Company |
Trip Type |
Dest. Zip (Full) |
Master Order# |
TERMS |
TrlType 1-4 |
Destination County |
Orig Co (Order) |
Origin Company |
To assign multiple row or column options, follow these steps:
-
Retrieve the tariff.
-
Click the Table tab.
-
Click in the row or column option field of the rate to which you want to add multiple options.
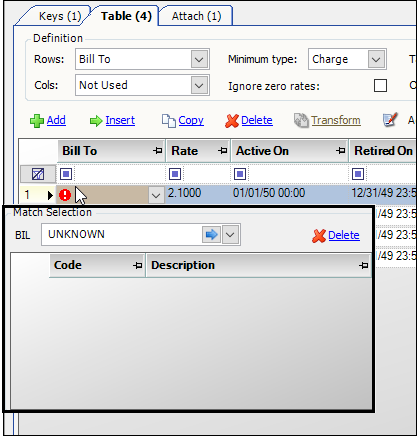
The Match Selection pop-up window opens.In this example, we are using Rows to set up a table of rates based on the Bill To company. In the first row, we will add multiple Bill To options.
-
Click in the field at the top of the Match Selection pop-up window.
-
Begin to type the option you want to add.
The system shows a list of values. -
Select the value you want to add.
-
Click the blue arrow
 to the right of the option.
The system adds the option to the list. -
Click
 Save.
Save.
The Match Selection pop-up window closes. In the grid, your multiple entries appear as a list separated by semicolons.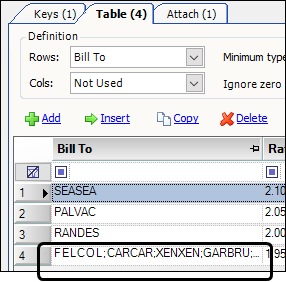
-
Repeat Steps 3-8 as needed.
Removing multiple row or column options from a rate
To remove multiple row or column options from a rate:
-
Retrieve the tariff.
-
Click the Table tab.
-
Click in the row or column option field of the rate from which you want to remove multiple options.
The Match Selection pop-up window opens showing the list of options.
-
Select the value you want to remove.
-
Click Delete in the Match Selection pop-up window
-
Click
Save.
Setting up alternate calculation methods for quantity-based table rates
By default, when the system applies a rate from a table defined by a quantity, such as pieces, it applies the exact quantity recorded on the trip. For example, if 1,000 pieces were delivered, the system would create a single invoice or pay detail for 1,000 pieces.
However, you can use the Table option field and the Option applies to field in the table’s Definition area to set up an alternate calculation method for quantity-based table rates.
When you select an option other than None in the Table option field, you must select either Row or Column in the Option applies to field. This determines whether the Table option selection applies to the table’s rows or columns.

These are the options available in the Table option field:
-
None (default)
The system applies the quantity exactly as it is recorded on the trip.Note: You must use this option for mileage-based rates.
-
Use Next (use range Qty)
When the trip’s quantity falls between the quantities recorded for two rows, the system rounds up the invoice or pay detail’s quantity to the amount recorded in the next row of the table. -
Incremental Rating
The system treats the quantity recorded in each row as a tier. If the trip’s quantity spans multiple tiers, the system creates a separate invoice or pay detail (with a separate rate) for each tier. -
Best Charge (Method A)
This rating feature determines the minimum charge that can be computed by a rate table for the charge quantity or mileage recorded for an order. When the system applies the rate to an order, it compares the table rates and applies the one that results in a lower charge. -
Hi Rate All Combos
When rating a multi stop trip, the system charges the highest rate between the trip’s origin and any stop on the trip. -
Trip Max
Not supported for .NET rating -
Weighted Midpoint
Not supported for .NET rating -
Best Charge (LTL)
Not supported for .NET rating
Transforming a table
Tariff tables are defined by rows and/or columns. When you use both rows and columns to define your table:
-
The Rows options are listed in the first column in the grid.
-
The Cols options are listed in the second column in the grid.
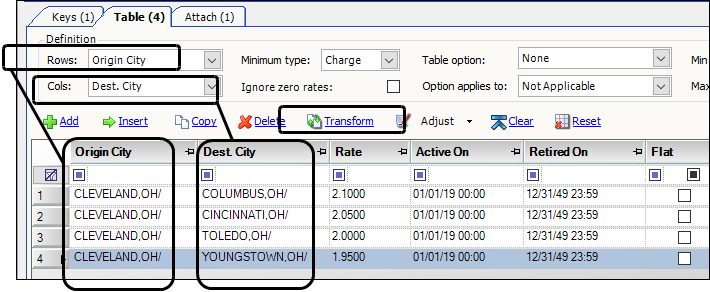
This illustration shows a table defined by both Rows (Origin City) and Cols (Des. City).
After you set up the rows and columns for a table, you may decide that it would be better to list your rows as columns and your columns as rows.
To automatically switch the rows and columns:
-
Retrieve the tariff.
-
Click the Table tab.
-
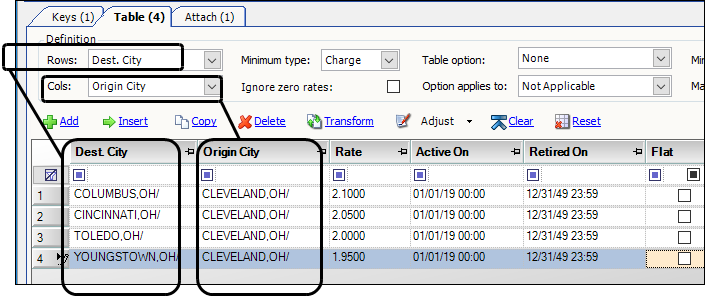
Click Transform below the table Definitions section.
In this example, the system transformed the table so that now the Rows (first column) are defined by Des City and the Cols (second column) are defined by Origin City.
Adjusting table rates
You can manually adjust individual rates in a rate table. You can also adjust all the rates in a table automatically by either a percentage or by a flat amount.
-
Retrieve the rate table you want to adjust.
-
Click the Table tab.
-
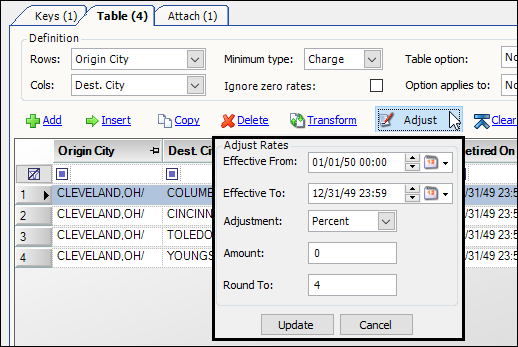
Click Adjust.
The Adjust Rates pop-up window opens. -
Make entries in these fields:
Field Definition Effective From
Date when the rate becomes effective
The date entered is written to the Active On field.
Effective To
Date the rate expires
The date entered is written to the Retired On field.
Adjustment
Select the type of adjustment:
-
Percentage
-
Flat Amount
Amount
Enter the amount by which the rate is to be adjusted.
Notes:
-
Enter a percentage as a whole number. For example, enter 5 to adjust by five percent.
-
If you are decreasing the rate by a negative amount, enter a minus sign (-) before the amount. For example, a reduction of five percent is entered as -5.
Round To
Enter the number of decimal places the system is to use when rounding new amounts. For example, if you want to limit new amounts to two decimal places, enter 2. The default is 4.
-
-
Click Update.
-
Click
 Save.
Save.
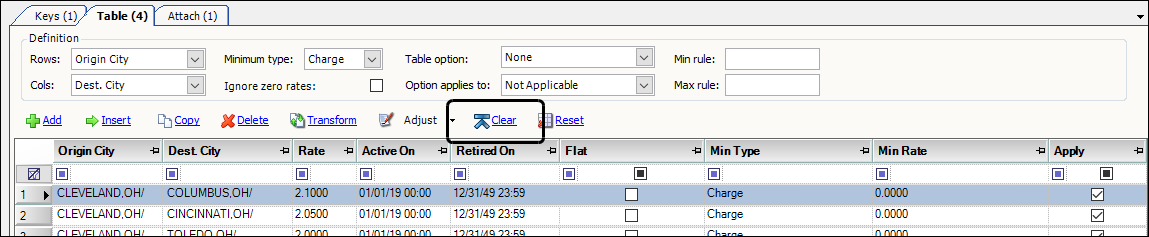
Clearing table values
To clear the row and column values from an entire table:
-
Retrieve the tariff.
-
Click the Table tab.
-
Click Clear below the table Definitions section.
The system:-
Deletes all rows
-
Deletes all columns
-
Retains the options selected in the Definition section, including the Rows and Col’s options

-
-
Click
 Save.
Save.
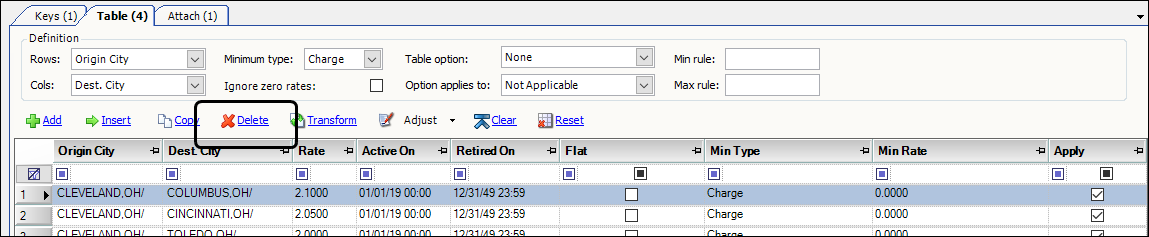
Deleting a table row
To delete a row in a table:
-
Retrieve the tariff.
-
Click the Table tab.
-
Position the cursor in one of the fields in the row you want to delete.
-
Click Delete below the Definition section.
-
Click
Save.
Deleting a table
To delete an entire table:
-
Retrieve the tariff.
-
Click the Table tab.

-
Click Reset below the Definition section.
The system:-
Deletes all rows
-
Deletes all columns
-
Resets the options selected in the Definition section back to the default values, including the Rows and Col’s options

-
-
Click
Save.