Setting up pay schedules
In TMW Back Office, you can use pay schedules to issue pay on a set schedule, such as once a week or once every two weeks.
The system automatically releases a resource’s pay details to a pay period based on the predefined schedules you set up for your resources. For example, you can create a Pay Schedule that pays your company drivers every other Wednesday and another schedule that pays your carriers every Friday.
Each pay period includes a pay period, a cut-off date, and a check issuance date. The cut-off date specifies the last day for trips to be included in a pay period. The trip must be completed before the pay period’s cut-off date.
Creating pay schedules
You can create two types of pay schedules: the global pay schedule and the resource-specific schedule.
A global pay schedule is a generic schedule that you can use to pay multiple types of resources. You could even use the global schedule to pay all your resources. However, most companies prefer to set up more specific pay schedules.
You must create a global pay schedule before creating resource-specific schedules.
Note: The process of creating a global schedule and a resource-specific schedule is very similar. The main difference is that the global schedule does not allow you to set resource type restrictions. The following instructions show how to create both types of schedules. The differences will be noted in the instructions.
To set up a pay schedule, follow these steps.
-
Go to Tools > Setup > Pay Schedule Maintenance.
The Pay Schedule Maintenance window opens. -
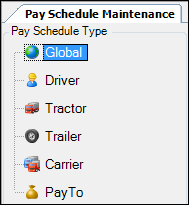
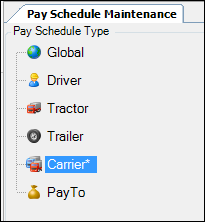
In the Pay Schedule Type section, do one of the following:
-
Select Global to create a global pay schedule.
-
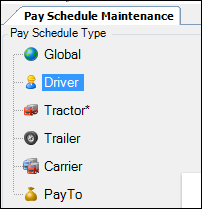
Select a resource type to create a resource-specific pay schedule, such as Driver.
-
-
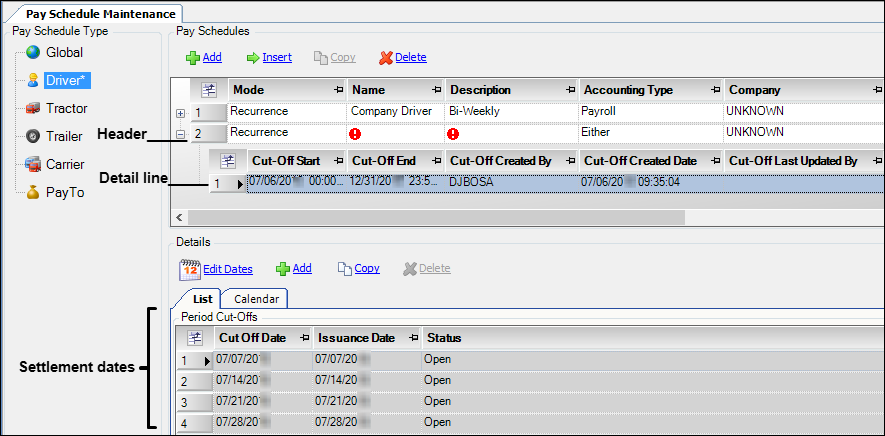
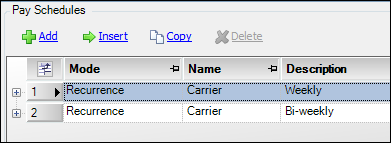
In the Pay Schedules section, click Add.
The system adds the following items:-
A pay schedule header
-
A pay schedule detail line
-
A list of settlement dates
-
-
In the Pay Schedule header, enter field values and label file classifications as needed to set up the pay schedule:
Field Definition Mode
Keep the default option of Recurrence.
Note: Manual is used only with the Express Trip Pay feature.Name
User-defined name for the schedule
Description
Free-form description
Accounting Type
Specifies the accounting type(s) with which the schedule can be used
Options include:
-
Payroll
-
Accounts Payable
-
Either
The schedule is available for both payroll and accounts payable resources.
Label file classifications
If you are setting up a resource-specific schedule, you can restrict the schedule by certain label file classifications, such as:
-
Company
-
Division
-
Terminal
-
Fleet
-
Resource Types 1-4
Notes:
-
These options are not available for global pay schedules.
-
The more restrictions you set, the more likely the schedule will pull as expected.
-
-
If you want to make changes to the schedule dates, do the following:
-
Activate the Edit Dates command by clicking on the pay schedule detail line that appears below the header line.

-
Click Edit Dates.
The Pay Schedule Maintenance - Edit Dates window opens.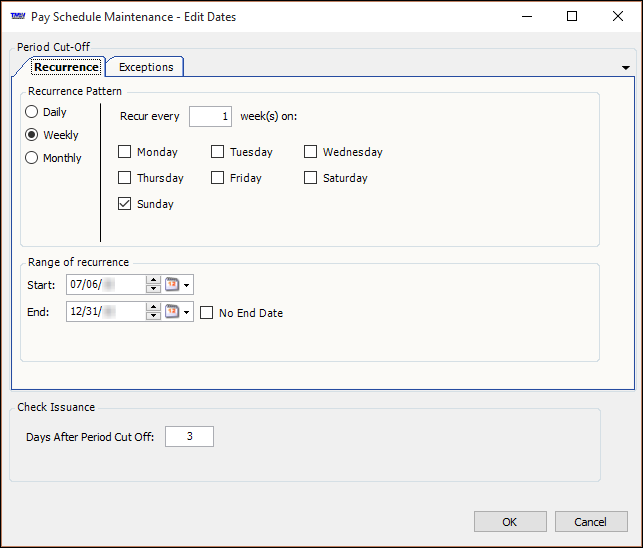
-
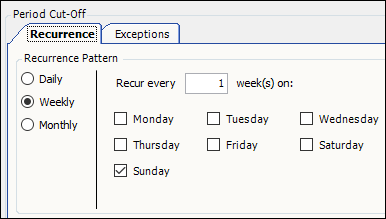
In the Recurrence Pattern section, specify how the schedule will recur. Options include:
-
Daily
-
Weekly
-
Monthly
-
-
-
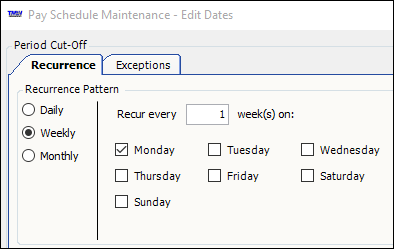
This illustration shows that the schedule recurs every week on Sunday.
-
In the Range of recurrence section, specify a start date and end date for the schedule.
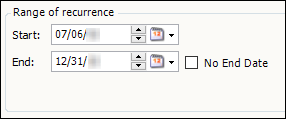
By default, the schedule’s start date is based on today’s date, and its end date is the last day of the current year.
-
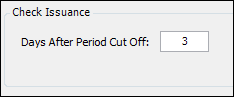
In the Check Issuance section, specify the number of days after the pay period ends that checks will be issued.
For example, if a pay period ends on Sunday and you enter 3 in the Days after the period cut-off field, you will issue checks on the following Wednesday.
-
Click OK to have the system generate the schedule based on your input.
In this illustration, the system created a pay period cut-off date for every Sunday between today and the end of this year. It also set the check issuance date for three days after each cut-off date.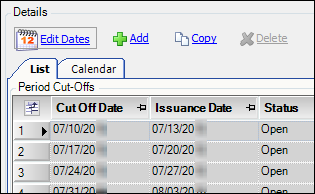
-
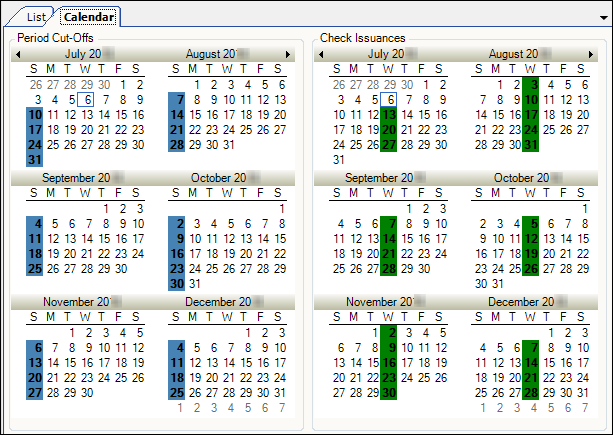
To see a graphic representation of the pay schedule, click the Calendar tab.
-
Click
 Save to save the schedule.
Setting pay schedule exceptions
Sometimes, you may need to modify a pay schedule to pay resources on a day other than a predefined scheduled date. You use the Exceptions tab to change the pay period’s cut-off date.
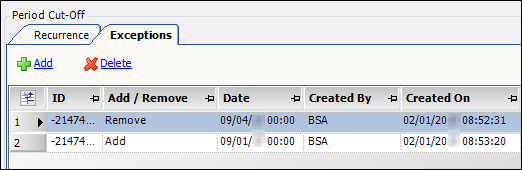
For example, suppose your company’s pay schedule recurs every week on Monday. Since Monday, September 4, is a holiday and the office is closed, you need to remove it from the schedule and add the preceding Friday, September 1, as the new cut-off date. In this case, you must create two exceptions to adjust the schedule: one to remove the Monday cut-off date and the other to add the Friday cut-off date.
To change the cut-off date for a pay schedule, follow these steps:
-
Go to Tools > Setup > Pay Schedule Maintenance.
The Pay Schedule Maintenance window opens. -
In the Pay Schedule Type section, select a resource type.
The Pay Schedules section displays existing pay schedules for the resource type you selected. Each row is known as a pay schedule header.
-
Click
 Expand next to the pay schedule header of the schedule you want to change.
 -
Select the detail line of the schedule you want to change.

The system:
-
Activates the Edit Dates command
-
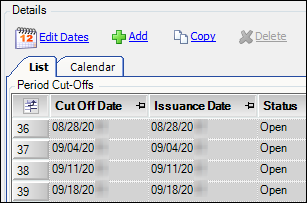
Displays the pay period cut-off dates in the List tab in the Details section
-
-
To edit the schedule, click Edit Dates. The Pay Schedule Maintenance - Edit Dates window opens.
The Recurrence Pattern section specifies when the pay schedule cut-off dates will recur. In this illustration, the schedule recurs every week on Monday.
-
To make a change to the recurrence pattern, click the Exceptions tab.
-
Click Add to add a new exception.
A new row appears in the grid. -
In the Add/Remove field, do one of the following:
-
Select Add to add a cut-off date to the pay schedule.
-
Select Remove to delete a cut-off date from the pay schedule.
This illustration shows a pay schedule with two exceptions: one to remove a cut-off date and the other to replace it.
-
-
In the Date field, enter the cut-off date that you want to add or remove.
-
Click OK to generate the schedule change based on your input.
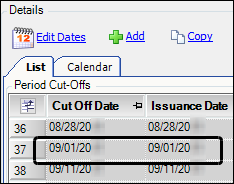
The List and Calendar tabs display the adjusted schedule.These illustrations show how exceptions to remove a September 4 cut-off date and add a September 1 cut-off date display in the List and Calendar tabs.
The List tab displays the list of cut-off dates for the pay schedule, which includes Friday, September 1.
The Calendar tab shows a graphical representation of the pay schedule. The highlighting identifies cut-off dates. The schedule includes Friday, September 1, but not Monday, September 4.

-
Click
Save to save the schedule.