Branch File Maintenance
What is a branch profile?
Typically, a profile defines a single type of entity, such as a driver or company. Users of TMWSuite cannot change the definition of what such profiles represent, or how they are used in the system. However, branch profiles are profoundly different from other profile because they are the only ones that are optional. If you choose to use them, your setup determines what they represent, as well as how they influence your use of the system. At an elementary level, TMW designed them to represent cost centers. Branch-related functionality has been coded to allow you to extend the meaning of what a branch is.
Branch functionality is enabled by means of the TrackBranch General Info Table key. Settings for this key allow you to define branches as either of the following:
-
Cost centers
When branches are defined as cost centers, they are considered to be booking terminals. When an order is created, it is stamped with the terminal (branch) that booked the load. You can use branches in this manner without purchasing any additional modules. This usage of branches is the focus of this chapter. -
Booking and executing entities
A booking entity can represent a booking terminal. It also can represent a customer service representative who works for a booking terminal.Note: If customer service representatives will enter orders for the companies they monitor, they will need TMWSuite user profiles.
The word executing refers to a site or person that is responsible for managing the activities of third party carriers, which may include dispatching carriers on trips. An executing entity can represent an executing terminal. It also can represent a carrier service representative who works for an executing terminal.
Note: If carrier service representatives will be assigning the carriers they monitor on trips, they will need TMWSuite user profiles.
To use branches as booking and executing entities, you must purchase one or both of the following:
-
The Enhanced Brokerage module, which includes the Status Based Loads Grid feature. That feature allows company and carrier service representatives to create, track, and dispatch loads. It is also used to track commissions for those representatives.
-
The CRM (Company/Carrier Relations Management) Right application, which allows company and carrier service representatives to track customer and carrier calls, appointments, and other activities.
-
Tracking orders without using branches
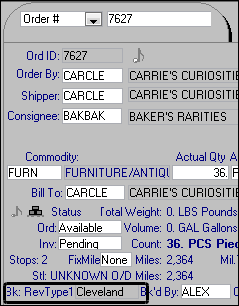
By default, the TrackBranch key is not active. If you want, you can use entries in the RevType1 label to identify terminals. The Bk: RevType1 field on the order header is designed to identify the terminal that booked the order. When tracking loads in this manner, typically you would:
-
Associate users with a RevType1 (terminal) value in their profiles.
-
Set up the system to copy users' RevType1 value to the Bk: RevType1 (ord_booked_revtype1) field for orders they create in Order Entry.
Once the order is saved, the Bk: RevType1 field becomes read-only. You cannot reassign an order to a different terminal.
| For details on setting up the system to automatically copy a users' RevType1 value to the Bk: RevType1 field when they create orders, see Performing Order Entry setup procedures in the Order Entry guide. |
Using RevType1 values is a simple way to track orders booked by specific terminals. However, because a terminal is represented by a label entry, there is no way to track other details about it. When you enable the branch tracking feature, you can use branch profiles to capture much more detail and, if you have purchased Enhanced Brokerage and/or CRM Right, branch profiles become the springboard for additional features.
When the TrackBranch key is enabled, it has two significant effects on the ord_booked_revtype1 field, wherever it is displayed in all applications:
-
The drop-down for the field no longer displays RevType1 values. Instead, it displays a list of branches.
-
Its name changes to reflect the name specified in String2 of the
TrackBranchkey.Note: There are some exceptions. In some windows, the field name is Branch, regardless of what is in String2. For more information, see Understanding where branches replace booking revenue types.
Using branches as cost centers
Typically, asset-based companies use the cost center setup. If you have not purchased Enhanced Brokerage or CRM Right, there is no need to differentiate between booking and executing terminals. Terminals are simply considered cost centers. Using branch profiles to represent them enables you to record details about terminals that would not be possible if you used RevType1 entries to represent them.
When you use branches as cost centers, you can identify each cost center’s orders, based on user profiles. You assign cost centers (branches) to users in their profiles, just as you would a RevType1 value. When users create orders, those orders are flagged with their cost centers in the Branch field, instead of a RevType1 value in the Bk: RevType1 field.
Branch field on user profile
Branch field on order header
If needed, the cost center associated with an order can be changed.
|
Using branches as booking and executing entities
TMW’s Status Based Loads Grid and CRM Right modules require that you use branches to:
-
Represent your customer service structure as booking terminals and identify the customer service representatives who handle the customers associated with those terminals.
-
Represent your carrier service structure as executing terminals and link the carrier service representatives who handle the carriers associated with those terminals.
The Status Based Loads Grid feature is designed for freight brokers, and is available to clients as part of the Enhanced Brokerage module. It allows you to track trip segments that have been assigned to customer service and carrier representatives, and the commissions your representatives earn.
CRM (Customer/Carrier Relations Management) Right is a calendar-based add-on application that allows customer service representatives and carrier service representatives to create and update customer and carrier profiles, respectively, as well as schedule and log calls and activities, create rate quotes, and book orders. It is purchased separately from Enhanced Brokerage. You can use CRM Right without Enhanced Brokerage, or in combination with it.
For both products, your company’s booking and executing terminal structure is graphically depicted in an organizational tree, as shown here:
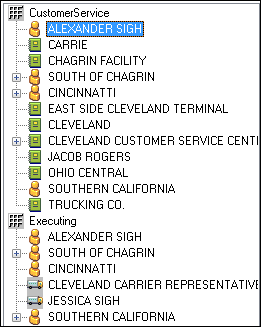
Status Based Loads Grid’s Branch Tree
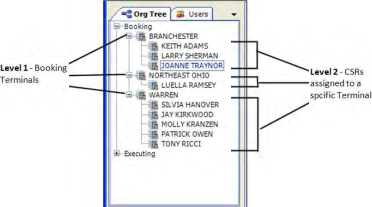
CRM Right Org Tree
|
The focus of this chapter is the use of branches as cost centers. For complete details on setting up branches for the add-on modules, see:
|
Using the Branch Maintenance window
You record branch profile information in the Branch Maintenance window. To access it, go to Edit > Branch Maintenance, or click ![]() Branch in the sheet toolbar.
Branch in the sheet toolbar.
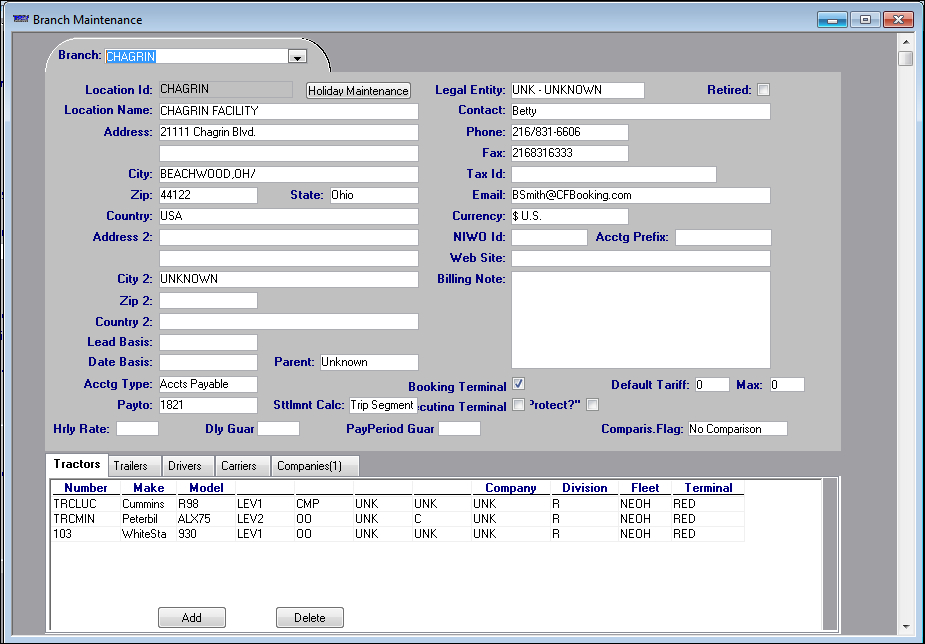
Field definitions
The top section of the Branch Maintenance window contains the following fields:
Location Id |
Unique, user-defined code that identifies the branch record.
A maximum of eight alphanumeric characters is allowed. |
Location Name |
|
Address |
Two address lines are provided, each accepts up to 40 characters. |
City |
|
Zip |
Five-digit or nine-digit ZIP Code or postal code. |
State |
State/province in which the terminal or representative is located. If a city has been entered, the State field automatically displays the associated state/province. If no city has been entered, you can select the state/province from the drop-down list. |
Country |
This field is display only. The system automatically displays the country for the city/state you entered. |
Address 2 |
Street address for a secondary branch location. Two address lines are provided, each consisting of up to 40 characters. |
City 2 |
City/state for the secondary branch location. |
Zip 2 |
Five- or nine-digit ZIP Code or postal code for the secondary branch location. |
Country 2 |
This field is display only. The system automatically displays the country for the city/state you entered for the secondary branch location. |
Acctg Type |
This field applies if you use the Status Based Loads Grid feature. When you select the Acct Payable option, the system displays the Default Tariff and Max fields. You use these additional fields when setting up the Status Based Loads Grid add-on module’s commission tracking. For details, see: Guide: Status Based Loads Grid | Chapter: Setting up the system to use the Status Based Loads grid | Section: Creating branch profiles for brokerage representatives |
Contact |
Applies to terminals. Name of the person who is the primary contact at the terminal. |
Phone |
Area code and phone number. |
Fax |
Area code and fax number. |
Tax ID |
|
|
|
Currency |
Currency used by the terminal or representative. Select the appropriate option from the drop-down list. The options are defined in the Currencies label file, accessed in System Administration. Note: Entries in this field are informational only. |
Web Site |
Applies to terminals. The URL address for the company website. |
Parent |
This field applies when you use branches to identify both:
Both the Status Based Loads Grid and CRM Right add-on modules use this organization of branches and sub branches. In the branch profile for a booking or executing representative, your selection in this field identifies the branch that is that entity’s supervisor. Note: Status Based Loads Grid and CRM Right are licensed add-on modules that must be purchased separately from the base TMWSuite system. For more information, contact TMW Sales. |
Booking Terminal |
This check box is available only when you are set up to use booking and executing terminals. It is selected by default. Leave it selected it if the branch represents either of the following:
Notes:
|
Executing Terminal |
This check box is available only when you are set up to use booking and executing terminals. Select it if the branch represents either:
Notes:
|
Protect? |
This check box applies only to branches identified as Executing Terminals. It allows you to specify that the branch recorded on an order as the Executing Terminal cannot be changed once the order is saved. |
The window contains a number of custom fields. Do not make entries in them unless you are advised to do so by your TMWSuite Support representative.
|
|
|
|
|
|
|
|
|
|
|
|
|
|
Five tabs are shown at the bottom of the Branch Maintenance window. These tabs provide a quick way to link a branch with companies and resources. Doing so makes order entry and dispatch easier because you can use scroll windows to look up records associated with a specific branch.

If you are using branches as cost centers, see Associating cost centers with companies and resources.
If you are using branches as booking and executing entities for the Status Based Loads Grid or CRM Right add-on modules, you must associate:
-
Companies with their customer service reps
-
Carriers with their carrier service reps
For details on associating branches with carriers, see:
-
Setting up the system to use the Status Based Loads grid in the Status Based Loads Grids guide
-
Terminal and CSR setup topic in the CRM Right guide
Adding a branch record
Branch profiles are created in File Maintenance.
-
To open the Branch Maintenance window, do one of the following:
-
Click
 Branch.
 -
Select Edit > Branch Maintenance.
A blank Branch Maintenance window opens.
-
-
Enter data in all appropriate fields. Leave those fields that do not apply blank.
-
Click
 Save. The system copies the unique ID you entered in the Location ID field to the Branch field.
Note: To access this profile in the future, you will need to know this ID.
Opening an existing branch record
To view the profile of a branch already entered into the system, do the following:
-
Select Edit > Branch Maintenance, or click
 Branch. A blank Branch Maintenance window is displayed.
 -
In the Branch field, enter the branch ID.
-
Do one of the following to display the branch profile:
-
Press ENTER.
-
Select File > Open.
-
Click
 Open.
Open.
-
Making a branch inactive
You cannot delete a branch that has been used on an order. If you have a branch profile that is no longer needed, you can make it inactive.
| The Show Retired Items check box selected in the Set List Box Property window does not override inactive branches. The window is accessed from the Tools menu in all base applications. |
Before retiring a branch, you must disassociate it from users and resources that are linked to it.
-
Changing branches linked to resources
Use the tabs in the bottom of the Branch Maintenance window to view lists of companies, tractors, trailers, and drivers that are linked to the branch you want to make inactive. For details on using the tabs, see Associating cost centers with companies and resources. -
Changing branches in user profiles
Review the profiles of users in your database to determine which users are linked to the branch you want to inactivate. Make a new assignment for each user linked to the branch you are making inactive. For details on linking users with branches, see Assigning cost centers to users.
After you have severed associations, you are ready to retire the branch. Select the Retired check box in the branch profile. This will prevent the branch ID from appearing in drop-down lists.
| If you are set up to use branches as booking and executing entities, you must sever a branch’s associations with companies and carriers before retiring it. For more information on linking branches to companies and carriers, see the: |
-
Setting up the system to use the Status Based Loads grid in the Status Based Loads Grids guide
-
Terminal and CSR setup topic in the CRM Right guide
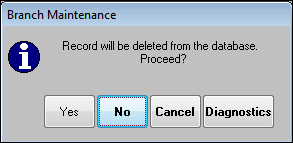
Deleting a branch
If you have not yet used a branch on an order, you can delete it by following these steps:
With the branch that you want to delete displayed in the Branch Maintenance window, do one of the following:
-
Click
 Delete.
 -
Select File > Delete.
In the Branch Maintenance confirmation message, click Yes to confirm the deletion.
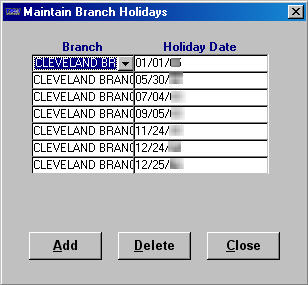
Recording a branch’s holidays
When a branch is linked to a specific client contract or operation, it may have contractual days that relate to downtime. For example, if a branch represents an entity that works with your Canadian customers, they will have different holidays than your U.S. customers. Or, a branch may represent a customer that has shutdown periods during the year, during which your employees may be forced to take their time off.
The Maintain Branch Holidays window allows you to organize and assign holiday hours to a branch.
| Branch-related holidays are informational only. They are not used elsewhere in the system. |
To add branch holidays, complete the following steps.
-
In the Branch Maintenance window, click the Holiday Maintenance button.

-
In the Maintain Branch Holidays window, click Add to create a new row.
-
Select the appropriate branch from the Branch field drop-down list.
Note: If you have a branch profile displayed, the Branch field defaults to that branch.
-
In the Holiday Date field, enter the date.
Note: To delete a branch holiday, select its row and click Delete.
-
To save your entries and exit the window, click Close.
Setting up branches as cost centers
When you set up the system to use cost centers, you associate users with the cost centers. This association is recorded on all orders a user creates, and controls which orders a user can retrieve for editing or dispatching. It also controls the orders a user can retrieve for billing and settlements. You use the TrackBranch General Info Table setting to accomplish this.
The entries described below set up the system to:
-
Allow you to associate a user with a cost center in the user’s profile.
-
Automatically default each user’s cost center on the orders they create.
-
Automatically use a user’s cost center as a restriction in order lookup windows.
TrackBranch setting |
Description |
String 1 |
Activates branch configuration functionality in TMWSuite.
|
String2 |
Identifies the source of the branch field name used throughout the system.
|
String 3, Int 4 |
These fields are not applicable for using branches to identify cost centers. |
Specifying the name to be used for Branch fields
The name used for most branch fields is controlled by:
-
Entering Branch in the
TrackBranchGeneral Info Table setting’s String2 field. -
Your entry in the Branch label’s Name field.
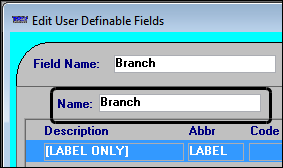
The name entered in the Branch label will be displayed in branch fields throughout the system. For more information, see Viewing the Branch field in TMWSuite.
|
In the windows listed below, the names of the Branch fields are hard-coded as Branch. As a result, they do not show the display name entered in the Branch label.
|
Assigning cost centers to users
You can link a user to a cost center by recording it in the user’s profile.
When you assign a cost center to a user, the system automatically records it on any orders the user creates. It also records it on any company, tractor, trailer, or carrier profiles the user creates.
Users are linked to cost centers in the Edit User Profiles window, accessed in the System Administration application.
-
Click
 Users in the frame toolbar to open the Edit User Profiles window.
Note: If this is the first time you selected this option during your current session, the login window will display. Enter your server’s system administrator login and password and then click OK.
-
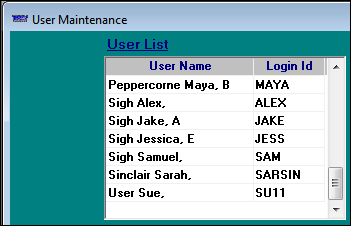
In the User Maintenance window, double-click a user’s name in the User List section.
-
The profile opens in the Edit User Profiles window:
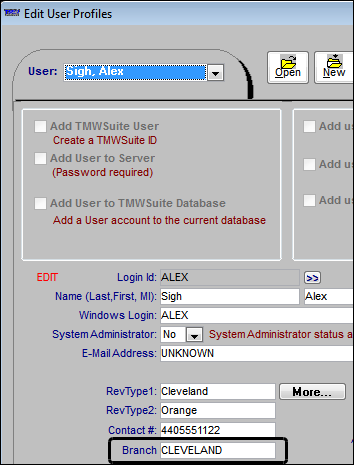
-
In the Branch field, select the user’s cost center.
Notes:
-
The field name is user-defined in the Branch label in System Administration.
-
The system will use this value on any orders the user creates.
-
The field default value is UNK. If you do not want to assign a cost center to a user, you should select the Unknown option from the drop-down list. Leaving the field at the default value may cause unpredictable results.
-
-
Click Save.
-
Click Close.
Associating cost centers with companies and resources
Resources can be associated with cost centers in three ways:
-
The system automatically assigns the cost center recorded in a user’s profile when the user creates a new company, driver, tractor, or trailer profile.
Note: In addition to creating company and resource profiles in File Maintenance, you can create them on the fly using the quick add windows. When a user adds resources using these windows, the system does not stamp them with his/her cost center. However, when a user creates a company record using the Add New Company window, his/her cost center is stamped on the company record.
-
In the Tractor File Maintenance window and Trailer File Maintenance window, the Classification section includes the Branch field, which is used to specify the association. This field is useful for making associations in tractor or trailer profiles that existed before you set up the system to use branches as cost centers, or to change a cost center assignment.
-
The Driver File Maintenance window does not provide a field for associating a driver with a cost center. However, a driver will be assigned a cost center if the user creating the profile is assigned to one; a driver can be assigned to a cost center in the cost center’s branch profile; the Add New Driver window’s Branch field allows you to associate a driver with a cost center when you are adding a driver on the fly.
-
The Brokerage section of the Company File Maintenance window’s Additional Details sub window includes the Branch field, which is used to specify the association.
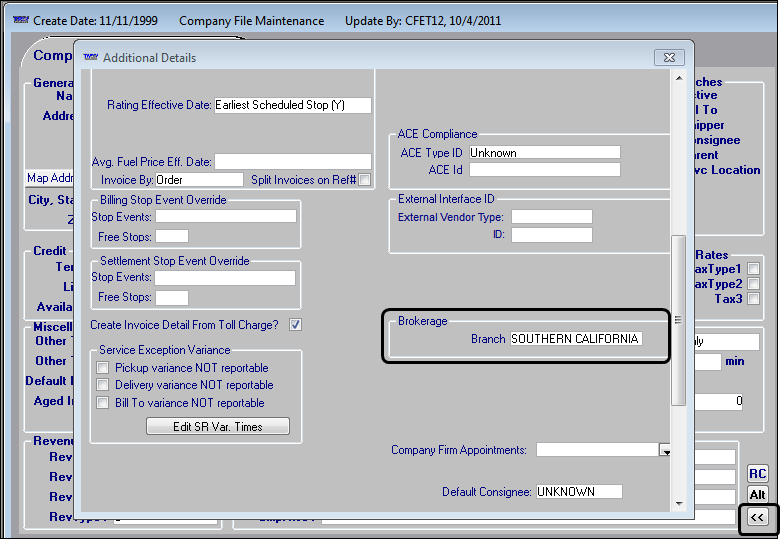
To access the Additional Details sub window, click
 to the right of the Comments section. Click it again to close the window.
 -
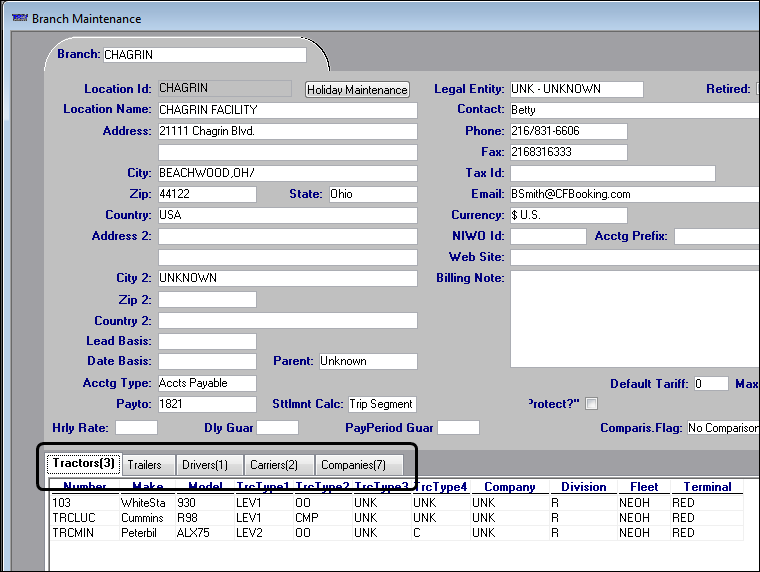
The Branch File Maintenance window’s Driver, Tractor, and Trailer tabs allow resources to be associated with the cost center.
To use the Branch File Maintenance window to link a cost center to companies and resources, follow these steps.
-
Open the profile of the branch for which you will be making links.
-
At the bottom of the window, select the appropriate tab for the entity you want to link to the branch.
Note: When you create associations with companies and resources in a branch profile, the system allows you to create links for any resource.
-
Click Add.
-
Enter the entity’s unique system ID in the Number field on the Tractors tab or the ID field on the Trailers, Drivers, and Companies tabs.
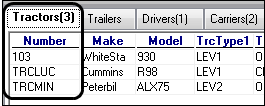
Tractor tab’s Number field
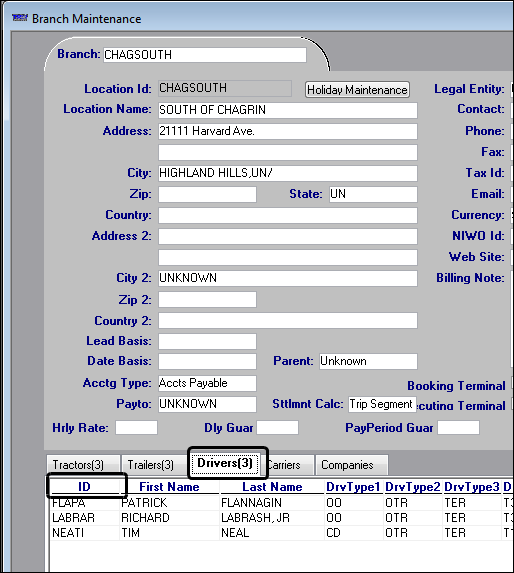
Driver tab’s ID field
The system populates the remaining fields on the tab from the entity’s profile.
Note: When you are using branches as cost centers, you do not associate carriers with cost centers. Carrier associations are required when you use branches as booking terminal and executing terminal entities.
-
Click
 Save.
Save.
Using cost centers as restrictions in Dispatch
When you have set up branches as cost centers, you can use them as restrictions in Dispatch. You can define views for the Planning Worksheet’s Available Trips and Available Resources grids to limit the orders and resources a user sees to specific cost centers.
A trip’s cost center appears in the BookedRevType1 column in these grids:
-
Available Trips
-
Tractor/Trip Segment
-
Add Orders to Movement
-
Dispatch Worksheet
A column for branch values does not appear on the Driver or Trailer tabs. However, when you apply a view that includes cost center restrictions, the retrieved list of records in both tabs is limited to resources associated with those cost centers.
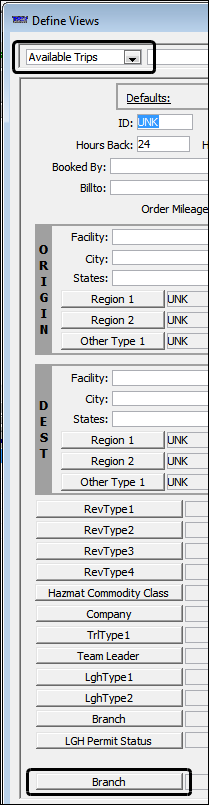
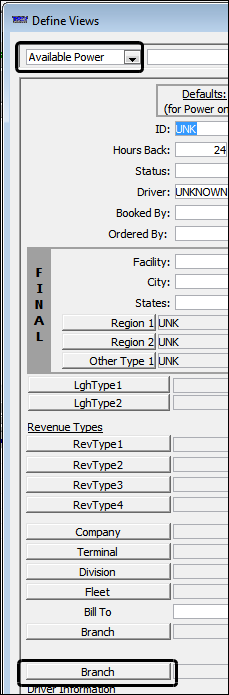
You can set cost center restrictions in an Available Trips view or in an Available Resources view using the Define Views window. Alternatively, you can temporarily add a cost center to, or remove one, from a saved view in the Modify Restriction Set window.
The Define Views window has two Branch buttons. When setting a cost center as a restriction for a view, use the second Branch button.
|
|
|
Defaulting branch fields in scroll windows to Unknown
By default, when a user has a branch assigned in his/her profile, that value is used as a restriction in scroll windows. If you want, you can use the TrackBranchScrolls General Info Table setting to set up the system to use UNKNOWN in these fields. This allows users to retrieve records as if the track branch feature is not activated.
For more information about assigning a cost center to a user, see Assigning cost centers to users.
Understanding where branches replace booking revenue types
When the branch tracking feature is inactive, orders created in Order Entry are given a booking revenue type value. This value is recorded in the ord_booked_revtype1 field, identified in the window as BK:RevType1. The value associates the order with a category your company defines using the RevType1 label. The value on the order can be set manually, or you can set up the system to have it default from the profile of the user creating the order.
| In some other areas of the system, the BK: RevType1 field name is shown as Booking RevType1. |
When the branch tracking feature is activated (you are set up to use branches as cost centers) the ord_booked_revtype1 field name changes from BK: RevType1 or Booked RevType1 to Branch.
In the windows listed in the table below, the following TrackBranch logic applies:
-
If
TrackBranch=N, the BK: RevType1 and Booked RevType1 field names identify the ord_booked_revtype1 field. The field’s drop-down list contains RevType1 values. -
If
TrackBranch=Y, the Branch field name replaces the BK: RevType1 and Booked RevType1 names for the ord_booked_revtype1 field in these windows. The field’s drop-down list contains branches (cost centers).
| Application/Window | Location |
|---|---|
Order Entry Folder |
In the order header. This field allows you to assign a cost center to a new order. If you want, you can change the name using the Branch label. |
Invoicing/Restrict Orders Ready to Invoice |
The Branch field replaces the BookedRevType1 field as a restriction. If you want, you can change the name using the Branch label. |
Invoicing/Additional Invoice Header Information |
The Branch field allows you to see which cost center is tied to the invoice. The branch recorded on the order in Order Entry cannot be changed on the order’s invoice. However, you can set the branch in this window when you create a miscellaneous invoices. The field name is hard-coded and cannot be changed. |
Viewing the Branch field in TMWSuite
When branch tracking is activated, fields that allow you to select cost centers are displayed throughout TMWSuite.
The following table lists the location of the Branch field in the core applications. Except where noted, the field name can be changed using the Branch label’s Name field.
| Application | Window | Branch Field Location |
|---|---|---|
All |
Add New Company |
Below the RevType2 field |
Find Companies |
On the Quick Find tab |
|
Find Orders |
On the Reference tab |
|
Find Third Parties |
In the User tab |
|
Dispatch/Planning Worksheet |
Define Views Modify Restriction Set |
Below the LghType2 field |
Dispatch/Trip Folder |
Order Header Information |
In the lower right of the window |
File Maintenance |
Third Party Resource Maintenance |
Below the Phone section |
Pay To File Maintenance |
Below the Termination Date field Note: The field name is hard-coded and cannot be changed. |
|
Company File Maintenance |
In the Additional Details window |
|
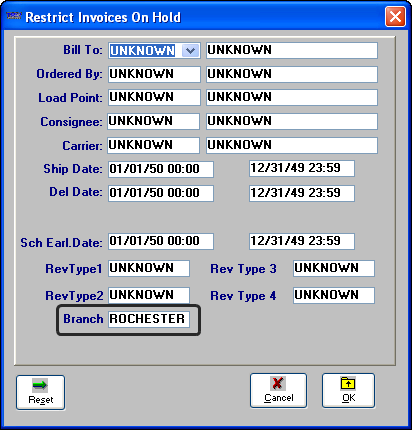
Invoicing |
Restrict Orders Ready to Invoice Restrict Invoices On Hold Restrict Invoices On Hold for Audit |
Below the RevType2 field Note: In the Restrict Invoices on Hold and Restrict Invoices on Hold for Audit windows, the field name is hard-coded and cannot be changed. |
Additional Header Information |
To the left of the BookedBy field. It is a read-only field. Note: The Branch field name in this window is hard-coded and cannot be changed. |
|
Find Invoices |
In the Reference tab Note: The Branch field name in this window is hard-coded and cannot be changed. |
|
Order Entry |
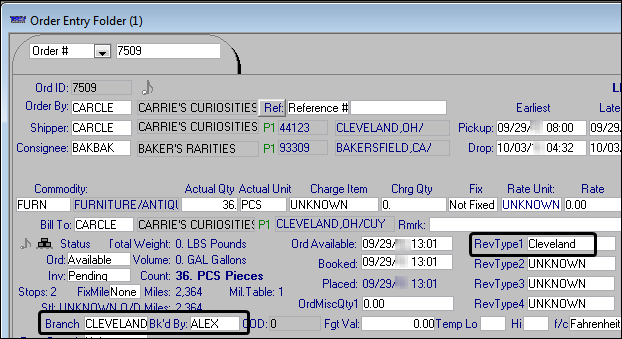
Order Entry Folder |
In the order header, to the left of the Bk’d By field |
Settlements |
Trips Ready To Settle Trips On Hold Scroll Settlement Items View Standing Deductions |
In the queue retrieval data Note: The Branch field name in this window is hard-coded and cannot be changed. |
Restrict Settlement Data |
In the Resource section Notes:
|
|
System Administration |
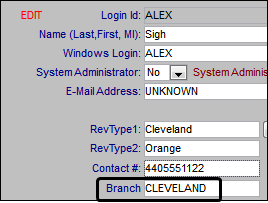
Edit User Profiles |
Below the Contact # field |
When TrackBranch=Y, the Executing Terminal field always displays in some windows, even when your system is set up to use branches as cost centers instead of booking and executing terminals. Therefore, when you use the cost center setup, TMW recommends that you use Screen Designer to remove the Executing Terminal field wherever it is shown to prevent confusion for users.
The following table provides a list of windows in which the Executing Terminal field appears. The table also indicates whether the Branch field is shown as well. Having both fields display on a window could result in data entry errors, so it is especially important to remove the Executing Terminal field in those locations.
| Application | Window(s) | Branch field also appears |
|---|---|---|
All |
Add New Driver |
No |
All |
Add New Tractor |
No |
All |
Add New Trailer |
No |
All |
Find Carriers |
No |
All |
Find Drivers |
No |
All |
Find Orders |
Yes |
All |
Find Tractors |
No |
All |
Find Trailers |
No |
Dispatch |
Add New Carrier |
No |
Dispatch /Planning Worksheet |
Define Views Modify Restriction Set |
Yes |
Dispatch/Trip Folder |
Freight Detail grid Stop Detail grid |
No |
File Maintenance |
Carrier File Maintenance |
No |
File Maintenance |
Tractor File Maintenance |
No |
File Maintenance |
Trailer File Maintenance |
No |
Order Entry |
Order Entry Folder |
Yes |
System Administration |
Edit User Profiles |
Yes |