Adding, looking up, and deleting carrier file records
Adding a carrier file record
Before a carrier can be assigned on trips, you must create a profile for it.
-
Select Edit > Carrier or click
 Carrier in the frame toolbar. A blank Carrier File Maintenance window is shown, along with the icons that make up the sheet toolbar.
 -
Do one of the following:
-
Select File > New.
-
Click
 New in the sheet toolbar.
A new carrier profile is displayed.
-
-
Complete the carrier profile by entering data in all appropriate fields, leaving those fields that do not apply blank. Use TAB to move forward through data fields and SHIFT+TAB to move backward through data fields.
Note: If carrier payment is based on the carrier class to which the carrier belongs, make the appropriate entries in the Carrier Type field(s), located in the Carrier Types section of the window. Your company can customize the names of these fields, and the options listed for them, in the CarType1-4 labels accessed in the System Administration application.
-
Select File > Save, or click
 Save in the sheet toolbar.
| While each carrier should have a complete profile to maintain the accuracy of system data, it is possible to add a mini-profile on the fly. If, for example, the dispatcher finds that the carrier has not yet been added to the system, you can select Tools > Add Carrier to create a carrier profile that contains the minimum amount of information necessary to use the carrier in the system. That mini-profile must later be modified to create a complete profile. |
Assigning a carrier ID
By default, you must enter the carrier ID manually when you create a new carrier record. However, you can set up the system to assign a carrier ID automatically when a new carrier record is first saved. You can configure the system to do either of the following:
-
Use the same format as the company IDs created in Company File Maintenance (that is, the first three characters of the carrier name, followed by the first three characters of the city name).
-
Use the MC number entered in the MC No field to generate the carrier ID code.
Letting the system assign a carrier ID based on carrier name and city
You must use the [Misc]CreateCarrierCode INI setting to set up the system to create a carrier ID based on the carrier' name and the name of the city where it is located.
To let the system assign the carrier code based on the carrier name and city name, do the following:
-
Enter the carrier’s name in the Name field.
-
Make the appropriate entry in the City, St field.
-
Leave the ID field blank.
Note: When you tab out of the City, St field, the system automatically assigns a carrier code in the ID field. The code consists of the first three characters of the carrier name, followed by the first three characters of the city name. For example, if Gifford Freight is located in Columbus, Ohio, the system assigns the carrier ID GIFCOL.
To prevent multiple carriers from having the same carrier ID, the system appends a 2-digit suffix to each duplicate of a 6-character code. The suffix 01 is assigned to the first instance, 02 is assigned to the second instance, and so on. For example, if Gifford Freight, Giffinger Moving, and Giffolk Distribution were all located in Columbus, Ohio. The system would assign codes of GIFCOL, GIFCOL01, and GIFCOL02, respectively.
-
Click
 Save.
Save.If you attempt to create and save a duplicate profile for a carrier, the system displays a message stating "Carrier Id already exists. You must change the ID to save."
Click OK to close the message. Enter a unique carrier ID in the ID field and click
Save again.
Using a carrier’s MC number as the carrier ID
You must use the [Misc]CarrierIDFormat INI setting to set up the system to use the carrier’s MC Number as its carrier ID.
To use a carrier’s MC number as the carrier ID code, do the following:
-
Enter the carrier’s name in the Name field.
-
Make the appropriate entry in the City, St field.
-
Leave the ID field blank.
-
Enter the carrier’s motor carrier number in the MC No field.
-
Select File > Save, or click
Save in the sheet toolbar.The system copies your entry in the MC No field to the ID field.
Looking up a carrier record
To view the profile of a carrier already entered into the system, do the following:
-
Select Edit > Carrier, or click
Carrier in the frame toolbar. A blank Carrier File Maintenance folder is displayed, along with the icons that make up the sheet toolbar. -
In the tab area of the folder, enter the carrier ID.
-
Do one of the following:
-
Press ENTER.
-
Select File > Open.
-
Click
 Open in the sheet toolbar.
The carrier profile is displayed.
-
Deleting a carrier record
It is recommended that you make unneeded carriers unavailable rather than deleting them. To do so, create an expiration for the carrier that uses the Inactive system code as the expiration type. This will prevent the carrier’s ID from being displayed in drop-down lists from which you would select a carrier for assignment on an order.
| You can still see IDs for inactive carriers if you have the Show Retired Items check box selected in the Set List Box Property window. The window is accessed from the Tools menu in all base applications. |
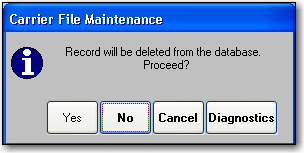
However, if needed, you can delete a carrier record, as long as the carrier has never been recorded on a trip.
| The system does not check for references to a carrier on any records other than trips. |
-
With the record for the carrier you want to delete displayed in the Carrier File Maintenance window, do one of the following:
-
Click
 Delete in the sheet toolbar.
 -
Select File > Delete.
-
-
With the record for the carrier you want to delete displayed in the Carrier File Maintenance window, do one of the following:
-
Click Yes to delete the carrier record.
The system checks to see if the record has been used on a trip.
-
If the system check shows that the carrier was never used on an order, the record will be deleted.
-
If the system check shows that the carrier has been used on a trip, the record will not be deleted and a message similar to the one shown here is displayed:
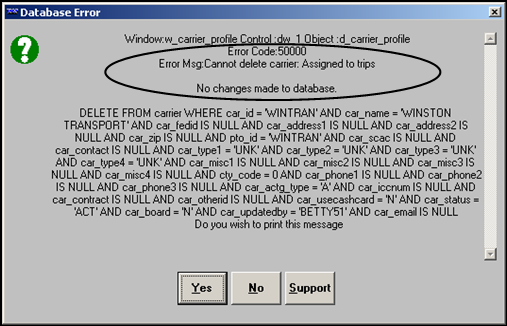
In this example, the carrier has been assigned on trips and will not be deleted.
-