Pay To File Maintenance
What is a Pay To?
Within TMWSuite, owner/operators and third party carriers are called Pay To’s. This is because payment is made to them, rather than to the drivers who work for them. Before you can issue a settlement to an owner/operator or carrier, you must establish a profile in the Pay To master file.
| You must set up a Pay To profile before you set up profiles for any resources (drivers/ tractors) belonging to an owner/operator or carrier. This is because you need to enter the Pay To ID in each resource profile. |
The Pay To File Maintenance window is used to record Pay To profile information.
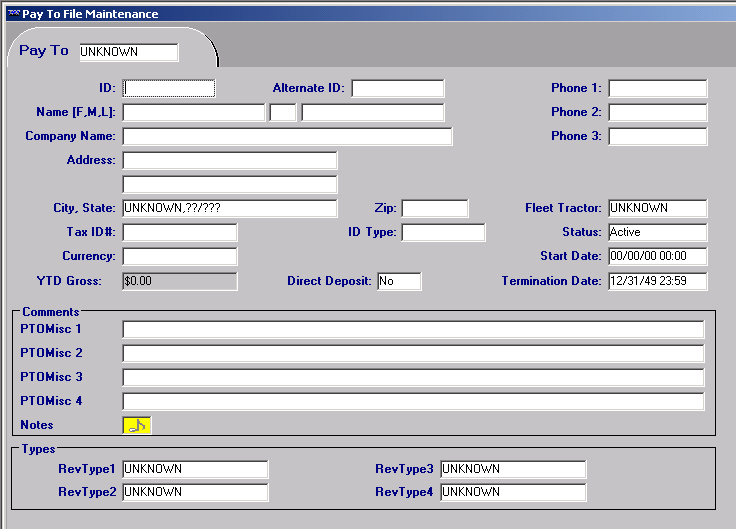
Pay To File Maintenance window field definitions
ID |
Unique identification code for the owner/operator or carrier. A maximum of 12 alphanumeric characters is allowed. |
Alternate ID |
Alternate identification code used to identify the owner/operator or carrier. A maximum of 12 alphanumeric characters is allowed. Note: An alternate ID is sometimes needed to identify the owner/operator or carrier in a separate computer system (such as an accounting package) to which TMWSuite interfaces. |
Name [F,M,L] |
If the Pay To is a specific person, use these three fields to record the owner/operator’s name:
|
Company Name |
If the Pay To is a company, record the company’s name. |
Address (Line 1) |
First of two lines used to record the street address of the Pay To. A maximum of 30 alphanumeric characters is allowed. |
Address (Line 2) |
Second of two lines used to record the street address of the Pay To. A maximum of 30 alphanumeric characters is allowed. |
City, State |
City and state location of the Pay To. |
Zip |
Five- or nine-digit zip code of the Pay To. |
Tax ID# |
The Federal Tax Identification Code or the Social Security Number for the Pay To. |
ID Type |
Indicate if the number in the Tax ID# field is a Federal Identification Number or a Social Security Number. |
Currency |
Type of currency in which the Pay To is to be paid. Note: The Currency options are user-defined in the Currency label, accessed in the System Administration application. |
YTD Gross |
The Year-To-Date gross paid to date. The system will update this field as settlements are made to the Pay To. Note: For clients converting mid-year, enter the amount that should be the starting balance at the time of conversion as a pay detail in Settlements. The system will populate the field with that amount. |
Direct Deposit |
Indicates whether the owner/operator or carrier participates in a direct deposit program. The options are either Yes or No. |
Phone 1 |
Primary phone number |
Phone 2 |
Alternate phone number |
Phone 3 |
Alternate phone number |
1099 Type |
Select the Pay To’s 1099 status. Notes:
|
Fleet Tractor |
Currently not operational. |
Status |
Indicates whether the Pay To record is currently Active or Inactive. |
Start Date |
Start date of the contract between the Pay To and your company. |
Termination Date |
End date of the contract between the Pay To and your company. |
Pto Misc1 Pto Misc2 Pto Misc3 Pto Misc4 |
The name for these fields is user-defined in the corresponding PtoMisc label, accessed in the System Administration application. You can use this field to enter a free-form comment about the Pay To. A maximum of 254 characters is allowed. |
Notes |
Click the Notes indicator to view/record notes for a Pay To.
If a note has been assigned Alert status exists, the indicator is red. |
RevType1 RevType2 RevType3 RevType4 |
The name and options for these fields are user-defined in the corresponding RevType label, accessed in the System Administration application. Assignment of Pay To’s to revenue classifications allows you to track the payments made to each type. Such classification may also govern the pay rates used to calculate settlements, and transfers to your accounting system. |
Adding/maintaining a Pay To record
Primary Pay To profile information is recorded in the Pay To File Maintenance window.
Adding a Pay To record to your system
It is recommended that you set up a Pay To profile before you set up profiles for any resources belonging to an owner/operator or carrier. This is because you need to enter the Pay To ID in each resource profile.
-
To open the Pay To File Maintenance window, do one of the following:
-
Select Edit > Pay To.
-
Click
 Pay To in the frame toolbar.
A blank Pay To File Maintenance window is shown, along with the icons that make up the Pay To sheet toolbar.
-
-
Select File > New, or click
 New in the sheet toolbar. A new Pay To profile is displayed.
 -
Complete the Pay To profile by entering data in all appropriate fields, leaving those fields that do not apply blank. Use TAB to move forward through data fields and SHIFT+TAB to move backward through data fields.
-
Select File > Save, or click the Save
 icon in the sheet toolbar.
Opening an existing Pay To record
-
Select Edit > Pay To, or click the Pay To
icon in the frame toolbar to display the Pay To File Maintenance window. -
In the tab area of the folder, enter the Pay To ID.
-
Do one of the following:
-
Press ENTER.
-
Select File > Open.
-
Click the Open
 icon in the sheet toolbar.
-
The Pay To profile is displayed.
Deleting a Pay To record
Although the system allows you to delete Pay To records, to ensure data integrity, it is recommended that you do not delete them.
| Since a Pay To is never directly recorded on a trip, the system allows you to delete a Pay To that has been specified in a resource’s profile, even if pay details exist. |
-
With the record for the Pay To you want to delete displayed in the Pay To File Maintenance window, do one of the following:
-
Click
 Delete in the sheet toolbar.
 -
Select File > Delete.
-
-
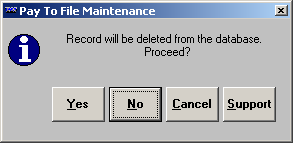
The system will ask for confirmation before deleting the record.
-
Click Yes to delete the record.
Adding/maintaining notes on a Pay To
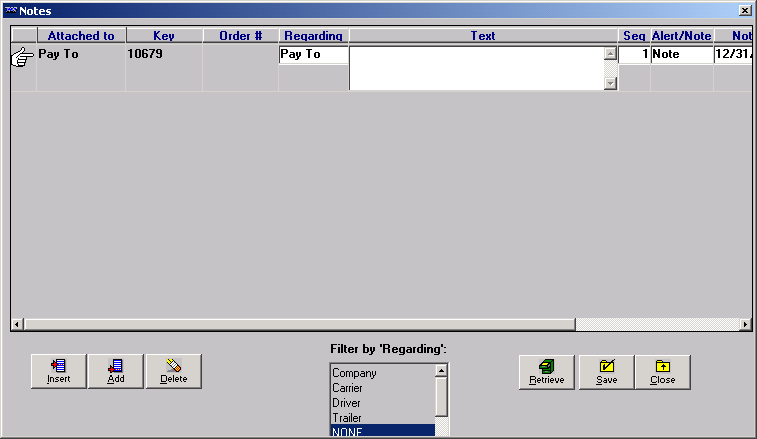
From the Pay To File Maintenance window, you can access the Notes window where you can add, insert, or delete notes about a Pay To entity.
Notes entered for a Pay To are accessible in all base applications, except System Administration and Rate Schedules.
Adding notes for a Pay To
-
Select Edit > Note, or click
 Note in the sheet toolbar. The Note window is displayed.
 -
Do one of the following:
-
To add a note to the end of the list, click Add.
-
To insert a note before an existing one, highlight the existing note and click Insert.
The system fills in Pay To in the Attached to*_ field and the company ID in the Key field.
-
-
Select the appropriate entry in the Regarding field. The option you select controls how the note is filtered when a user retrieves notes later. The options are:
-
Company
-
Settlements
-
Carrier
-
Pay To
-
Driver
-
Billing
-
Trailer
-
Order
-
Tractor
-
-
Enter the text of the note in the textbox. You may enter up to 256 characters, but only 68 characters can display in the textbox at one time.
-
If your note exceeds 68 characters, use the Left Arrow or Right Arrow keys to scroll the rest of the note into view. You can also highlight the note, right-click on the text box, and select Zoom Field from the shortcut menu to view the text in its entirety.
-
To copy a word or phrase from an existing note, highlight the portion you want to duplicate and press CTRL+C. Then position the cursor in the spot where the word(s) are to be pasted and press CTRL+V.
-
You can cut a word or phrase from an existing note and paste it in a different spot. To do so, highlight the portion to be cut and press CTRL+X. Note that the word(s) are deleted from their original location. Position the cursor in the spot where the word(s) are to be pasted and press CTRL+V.
-
-
Position the cursor in the Note/Alert field. Highlight one of the options to rank the importance of your note.
-
Select Note if your note is informational, but not of critical importance.
-
Select Alert if your note is of critical importance, not merely informational.
The ranking determines how the system displays the Note indicator on windows associated with your note. For notes ranked as Note, a yellow indicator is displayed; for notes ranked as Alert, a red indicator is displayed.
-
-
Notes may be assigned an expiration date. Position the cursor in the Expiration Date field, and enter the date and time the note is to expire, if applicable.
Note: Once the expiration date has passed, the note no longer triggers the Note indicator to show as yellow or red. However, the expired note continues to display in the Note window. -
Click the Save button to save the note.
Note: To cancel any changes, click the Retrieve button; the system displays the previously existing notes. -
Click the Close button to exit the window.
Deleting a note
You can delete a note by positioning the cursor in any field and clicking the Delete button. The system displays a confirmation dialog box that asks: Are you sure you wish to delete this now?
Click the Yes button to delete the note.
Viewing notes
Notes are available from almost all TMWSuite applications. The color of the Notes indicator denotes the state of notes for the company:
-
Gray
There are no notes, or there are only expired notes. -
Yellow
An unexpired note is available. -
Red
A note has been assigned Alert status.
The location of the indicator varies, depending on the application.
-
To open the Notes window, do one of the following:
-
Click
Notes in the sheet toolbar. -
Select Edit > Notes.
-
Click the Notes indicator located in the bottom of the Comments section of the Pay To File Maintenance window.
-
-
Use the Filter By Regarding drop-down list to select the type of notes you want to see. To see all notes, select None. As you select different filtering options, the displayed notes reflect the current filter.
-
Click the Close button to close the Notes window.
If you want to You must: Add a note.
Click the Add button.
Insert a note between existing notes.
Highlight the note you want the new note to be above and click the Insert button.
Save your entries.
Click the Save button.
Cancel all entries made since the last time you saved, i.e., retrieve only those entries that have been saved.
Click the Retrieve button.
Restrict the notes displayed to those for a specific filter category.
-
Click the up or down arrow at the right of the Filter field to display the drop-down list of filter categories.
-
Select the desired category; the system removes any note not associated with the selected category.
Display all notes, regardless of filter category.
-
Click the up or down arrow at the right of the Filter field to display the drop-down list of filter categories.
-
Select None to remove any filter, i.e., restriction, that was set previously.
View a note in its entirety if it exceeds the 68-character limit allowed by the text display.
Do one of the following:
-
Use the Left Arrow or Right Arrow keys to scroll the rest of the note into view.
-
Highlight the note, right-click on the text box, and select Zoom Field from the shortcut menu to view the text in its entirety.
Delete a note.
-
Position the cursor in any field in the line for the note to be deleted.
-
Click the Delete button.
-
The system will ask you whether it should continue with the deletion. Click Yes.
Note: To cancel the deletion, click No.
Exit the Notes window
Do one of the following:
-
Click the Close button.
-
Press the ALT+F4 keys.
Note: If you have not saved your entries, you will be asked if you want to do so before you exit.
-