Adding/maintaining miscellaneous tractor information
From the Tractor File Maintenance window, you can access a number of supporting windows used to record supplemental driver information. These windows are listed here:
| Window | Icon | Used to | For more information |
|---|---|---|---|
Driver/Equipment Status |
|
Schedule key activities for tractors, as well as dates and reasons they will be unavailable for service in the future. |
|
Assignment History |
|
Look up a list of trips to which a tractor was assigned during a specific date range. |
|
Accessories |
|
Record tractor characteristics and/or supplemental items carried by the tractor. |
|
Extra Info |
|
Custom feature |
|
Notes |
|
Record free-form notes about the tractor. |
The following sections provide information about these windows.
Recording/viewing a tractor’s expirations
TMWSuite allows you to schedule key activities for your resources, as well as dates and reasons they will be unavailable for service in the future. Key activities and out-of-service reasons are custom-defined by your company in the label file within System Administration. Within TMWSuite, notices regarding key activities and out-of-service dates are referred to as expirations.
Expirations are used to place new tractors in service so that they can be listed in the Planning Worksheet’s Available Resources grid. In addition, expirations can be used to take tractors out of service, as well as to record dates scheduled for routine preventive maintenance.
Expirations are added, modified, and deleted in the Driver/Equipment Status window, which is accessed in File Maintenance and Dispatch. Any expiration record can be entered or updated in the File Maintenance application. Some records may also be entered or updated in the Dispatch application. Data entered in one application will appear in the other.
|
Two types of driver expirations are set up in System Administration using the TrcExp and TrcStatus labels.
|
To access the Expirations window, do one of the following:
-
Select Edit > Expirations.
-
Click
 Expirations in the sheet toolbar.
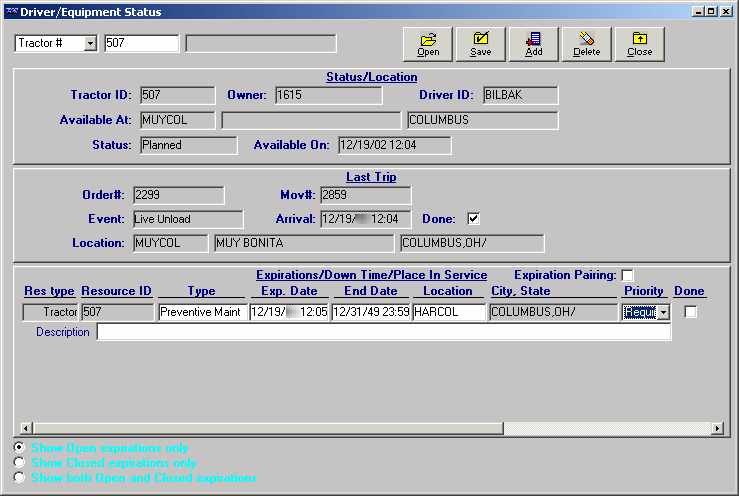
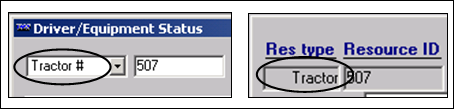
| If you select the Expirations command with a tractor’s profile opened, the system will automatically display that tractor’s expirations. If you select the command with no trailer profile opened, the system will default to Tractor as the resource type, but you must enter the ID in the second of the two fields in the upper left corner of the Driver/Equipment Status window. |
When you enter an expiration record, you must specify its priority. There are two levels of priorities:
-
Priority 1
Critical expirations are assigned a priority of 1. Their completion is necessary before the system will allow dispatch of that resource on, or after, the expiration’s effective date. -
Priority 2
Expirations that are not critical are assigned a priority of 2. If a Priority 2 expiration is not completed by its effective date, the system will display a warning when you assign the resource to a trip occurring on or after that date. However, dispatch is allowed.
| User-defined priority values for expirations are set up in System Administration using the ExpPriority label file. The code assigned to a priority value determines the priority’s effect on the system. A code of 1 signifies a Priority 1 value. A code of 2 or greater signifies a Priority 2 value. |
Although some priority values may be custom-defined by your company, two system codes exist in the ExpPriority label:
-
Required
The label option, Required, has a code of 1, which means it has a Priority 1 value. When an expiration is categorized as Required, dispatch of a resource with that expiration will not be allowed on, or after, the expiration’s effective date until the expiration is marked as completed. -
Key Date
The label option, Key Date, has a code of 9. Since the code is greater than 2, this means it has a Priority 2 value. Key Date can be used for an expiration that represents a significant date. Key Date expirations will never prevent resources from being dispatched.
Selecting the status of expirations you want to view
In the lower left of the Driver/Equipment Status window, three radio buttons are used to specify the status of the expirations you want to see:
-
Show Open Expirations only
Displays expirations that are not marked as Done. -
Show Closed Expirations only
Displays expirations that were marked as Done within a specific date range. -
Show both Open and Closed expirations
Displays both open expirations and those that were marked as Done within a specific date range.
For example, to display only expirations for a tractor that were marked Done, follow these steps:
-
Select the Show Closed Expirations only radio button.

-
The From and To fields are displayed in the lower right corner of the window. They are used to record the range of completion dates for the expirations to be listed.
-
Enter the beginning date in the From field.
-
Enter the ending date in the To field.
-
-
Click Open. The system automatically displays all expirations that have been marked as Done and that have completion dates falling within the specified date range.

Note: Up to three expirations can be seen at one time. If more than three expirations are recorded, the system displays a scroll bar to the right. Use this bar to scroll additional expirations into view.
-
Click Open. The system automatically displays all expirations that have been marked as Done and that have completion dates falling within the specified date range.
Adding an expiration
-
With the tractor’s profile opened, click Add. A new expiration line is displayed. The system automatically transfers the type of look up you initiated, such as Tractor, to the Res type field. The system also transfers the appropriate ID to the Resource ID field.
-
Make entries in these fields:
Type
Select the appropriate expiration type from the drop-down list that is displayed when you click in this field.
Note: The options are set up in the TrcExp label, accessed in System Administration.
Exp Date
Do one of the following:
-
If the expiration occurs on a specific date, enter that date.
-
If the expiration involves a date range, enter the beginning date.
End Date
Enter the date when the expiration is expected to be completed.
Location
If the resource is to go to a particular location to have the expiration satisfied, enter the company code for that site here.
Note: If you are entering a dispatch type expiration for a tractor, you must make an entry in the Location field or the City/State field. Dispatch type expirations have codes of 200 or greater.
City/State
If you made an entry in the Location field, the system will populate this field automatically. If no entry was made in the Location field, you can manually enter a city/state.
Note: If you are entering a dispatch type expiration for a tractor, you must make an entry in the Location field or the City/State field. Dispatch type expirations have codes of 200 or greater.
Priority
To rank the importance of the expiration, select the appropriate priority code.
Expiration Pairing
This field is used to activate the expiration link between a tractor and a driver. For details, see Expiration pairing for tractors and drivers.
Description
Enter free-form text about the expiration.
Done
Do not make an entry here. This check box is used to mark the expiration as complete.
-
-
Repeat Steps 1 - 2 for each additional expiration to be recorded.
-
Click Save to keep your entries.
-
Click Close to exit the Driver/Equipment Status window.
Expiration pairing for tractors and drivers
The Expiration Pairing feature serves as a crosscheck of availability for a driver and tractor that have been linked in their individual resource profiles. In the example shown here, the driver, Bill Baker, is associated with the specific tractor having an ID of 507.
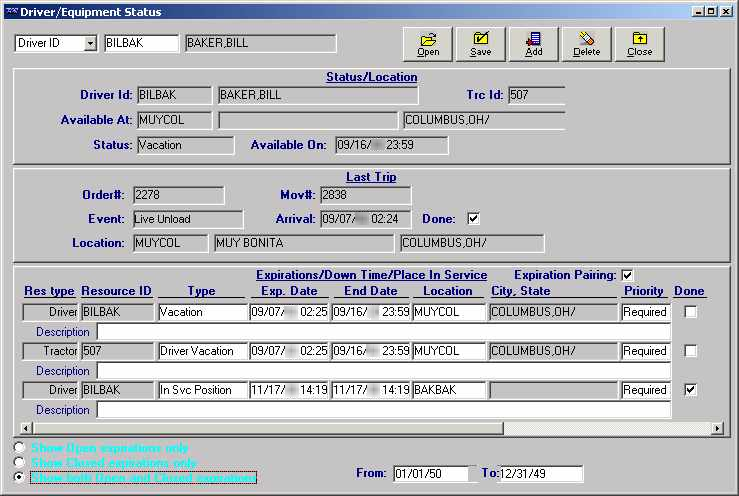
The Expiration Pairing feature is useful if a tractor is usually used by the same driver. In such a situation, the tractor is not in use whenever the driver is not available to work. For example, expiration pairing can be used to send the tractor home with the driver.
With Expiration Pairing turned on, when you add an expiration, the system displays two new lines: one for the driver, and one for the tractor.
By default, the expiration pairing feature is not active. If your company wishes to have this feature turned on whenever you access the status window, you can use the [Misc] ExpirationPairing=Yes setting in the TTS50.ini file.
|
Adding expirations with Expiration Pairing activated
To add expirations using Expiration Pairing, follow these steps:
-
If a check is not shown in the Expiration Pairing check box, click in the box to turn on the functionality.
-
Click Add.
-
For the Tractor expiration line:
-
Select the Type of expiration.
-
Fill in the Exp. Date.
-
Fill in the End Date, if applicable.
-
Fill in the Location, if applicable.
-
Set the Priority.
-
Enter a Description, if needed.
-
-
Repeat Step 3 in the Driver expiration line.
-
If you selected Yes, click Save.
-
Click Close to exit the Driver/Equipment Status window.
| You can verify that the system has added the expiration to both the driver and the tractor by looking up the expirations recorded for the driver associated with the tractor. |
Deleting an expiration
If an expiration has been recorded in error, you can delete it from the system.
-
Position the cursor in any field for the expiration to be removed.
-
Click Delete.
-
The system asks if you are sure you want to continue with the deletion. Do one of the following:
-
Click Yes to complete the deletion.
-
Click No to cancel the deletion
-
-
Click Save. If you selected Yes, the system permanently deletes the expiration.
-
Click Close to exit the Driver/Equipment Status window.
Marking an expiration as complete
When an expiration has been satisfied, you must record its completion. Until you mark the expiration as Done, it is still in effect.
| Once a Priority 1 expiration has reached its effective date, the system will not allow the resource to be dispatched. |
Expirations can be completed manually in the Driver/Equipment Status window, or you can configure the system to automatically complete expirations of a particular type. For details on automatic completion, see the Resource Expirations Guide.
For manual completion, follow these steps:
-
With the Driver/Equipment Status window open, select Tractor # from the drop-down list in the top left of the window.
-
Enter the resource ID in the second field.

-
Click Open. All open expirations are displayed.
-
If needed, change the date shown in the End Date field.
Warning: If you complete an expiration before its End Date, you must manually change the date. The system does not update the date/time in the End Date field when you select the Done check box. Therefore, the system will consider the resource as unavailable until the date recorded in the End Date field, even though the expiration has been marked as completed.
-
Select the Done check box.

-
Click Save.
Notes:
-
If you have the Show Open expirations only radio button selected, the expiration record is no longer displayed in the window. The expiration is still displayed if you have the Show both Open and Closed expirations radio button selected.
-
Once the expiration is marked as Done, the system will not check future trip dates and times against its effective date(s).
-
-
Click Close to exit the Driver/Equipment Status window.
Activating the Expiration Audit report feature
TMWSuite allows you to track all changes that were made to a resource’s expirations in both the File Maintenance and Dispatch applications.
The feature is activated by the ExpirationAudit General Info Table setting.
When the feature is turned on, the Audit button is added to the Driver/Equipment Status window:
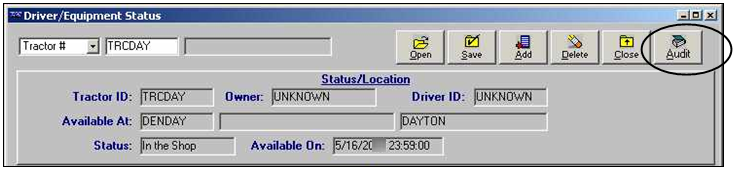
To view/print a report of the activity pertaining to all closed and opened expirations recorded for a resource, click Audit. The Expiration Activities window is displayed. Notice that the resource type and ID are included in the window’s title:
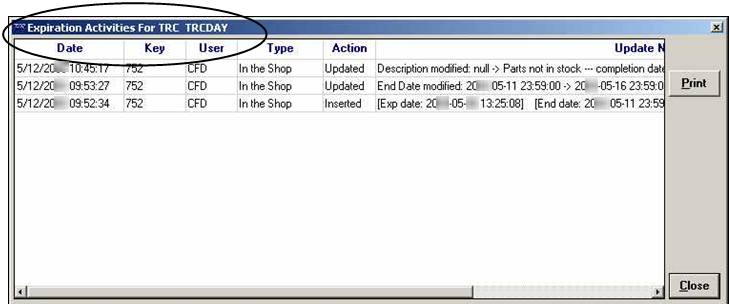
The activity is shown in chronological order, with the latest change as the first line. Information is displayed in these columns:
Date |
The date/time the expiration was created, updated, completed, or deleted. |
Key |
The unique, system-generated identifier assigned to the expiration by the system. Note: This column corresponds to the Key field in the Driver/Equipment Status window. |
User |
The user ID of the person who recorded the expiration or made changes to it. |
Type |
The type of expiration, as recorded in the Driver/Equipment Status window. |
Action |
The type of change made, e.g., created, updated, deleted, or completed. |
Update Notes |
Detailed information about the change(s) made. You can use the scroll bar at the bottom of the window to view the entire Update Note column.
|

| Activity is tracked only for expirations recorded after the feature has been activated. |
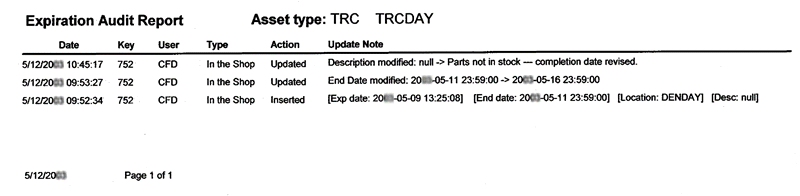
If desired, you can print the audit report. Clicking Print sends the report directly to your default printer. The report is in landscape format. A sample report is shown here:
Recording/viewing tractor accessories and inventory items
Tractor accessories are items attached to, or carried by, a tractor or straight truck. Your customer may require an accessory for a trip; or the commodity type may require an accessory. For such trips, a load requirement may be recorded for that accessory. When a tractor is assigned to the trip in Order Entry or Dispatch, the system will check the tractor profile to verify that tractor has the accessory. If not, a warning is displayed.
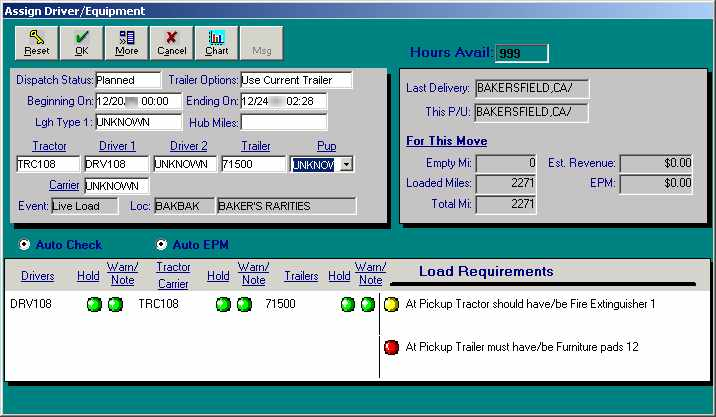
The Assign Driver/Equipment window, accessed in Order Entry, displays Load Requirements in the lower right corner of the window.
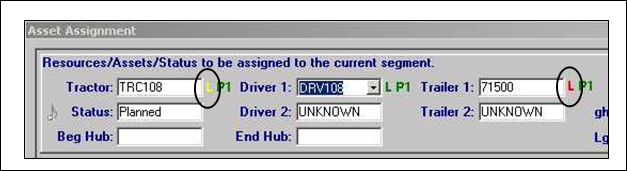
The Asset Assignment window, accessed in Dispatch, displays Load Requirements indicators next to the resource fields once resources have been assigned on the trip.
-
For a missing must have accessory, the indicator is displayed in red.
Dispatch cannot proceed until a properly equipped tractor is assigned or you override the load requirement. -
For a missing should have accessory, the indicator is displayed in yellow.
Dispatch of the tractor can proceed.
The system tracks two types of tractor accessories:
-
Non-inventory items
Non-inventory items can be tools or equipment that can be used repeatedly, e.g., carts, tarps, chains, ramps, etc. -
Inventory items
Inventory items can be used up during normal operations and may need to be replaced or replenished from time to time, e.g., packing boxes, pallets, labels, etc. Inventory items and their quantities are recorded to ensure that the proper accessories are on hand.
Creating accessory types
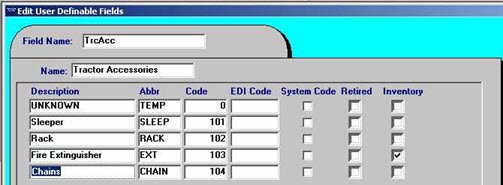
Tractor accessory data for a tractor is maintained in File Maintenance through the Tractor Accessory List window. However, accessory types are set up in System Administration.
Both inventory and non-inventory types of tractor accessory options are set up in the TrcAcc label.
-
Non-inventory items appear as options in the Accessories tab’s Type field.
-
Inventory items appear in the Inventory tab. The same inventory list is displayed for all tractors.
Note: Initially, all inventory quantities default to zero for every tractor; quantities for individual tractors must be entered manually.
The only difference in the set up of inventory and non-inventory accessories is that the Inventory check box is selected for items that must be replenished periodically.
| When creating a load requirement in Order Entry or Dispatch, you cannot inventory from non-inventory items. |
-
In System Administration, do one of the following:
-
Click
 Labels in the frame toolbar.
 -
Select Edit > Label File.
-
-
Display the TrcAcc label.
-
Click
 Insert in the sheet toolbar to display a new row.
 -
Make entries in the following fields:
Description
Enter a descriptive name for the accessory type. This name will be displayed in the drop-down list for non-inventory accessories and as a fixed field value for inventory accessories.
Abbr
Enter a unique abbreviation to represent this row. This value will be stored in the database.
Code
Enter a unique sequential number. This is the order in which the options will display in the drop-down list for this field.
EDI Code
Shows the alternate EDI code entered in File Maintenance’s EDI Code Maintenance window. If you enter an alternate EDI code in this field, it will update the code in the EDI Code Maintenance window.
Notes:
-
If no alternate EDI codes are recorded, either in this field or in the EDI Code Maintenance window, the system uses the first three characters of the item code as the default EDI code.
-
For more information about the EDI Code Maintenance window, refer to the TMWSuite EDI guide.
System Code
When the check box is selected, the item is essential to the integrity of system performance. You cannot modify any fields for a system code label item; you cannot delete such an item.
Retired
If an accessory type is no longer needed, you can retire it instead of deleting it. Selecting this check box prevents an item from showing in lists of inventory and non-inventory accessory types.
Inventory
If the accessory type will need to be replaced or replenished periodically, select this check box. This will allow you to track the quantity of the item recorded for each tractor carrying this accessory type.
-
-
Save your entries and exit System Administration.
Viewing a tractor’s accessory list
With the tractor’s profile opened, do one of the following:
-
Click
 Accessories in the sheet toolbar.
 -
Select Edit > Accessories.
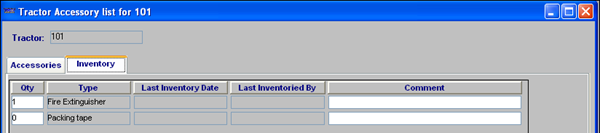
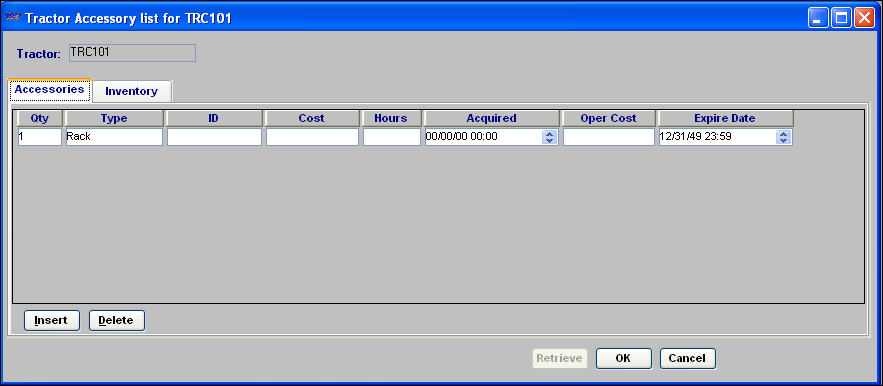
The Tractor Accessories List window is displayed. The tractor’s ID is shown in the title of the window.
![]()
The Accessories tab, which is shown by default, lists any non-inventory items previously recorded for the tractor. The tab displays up to seven accessories at one time. If more than seven accessories have been recorded, a vertical scroll bar is displayed. Use the scroll bar to bring additional items into view.
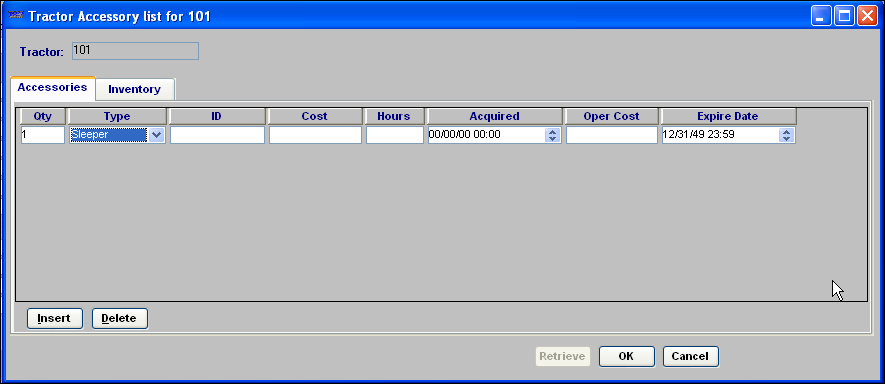
Accessories tab lists only those non-inventory items that are attached to this tractor.
To view inventoried accessories, click on the Inventory tab.
All inventory items recorded in the TrcAcc label are tracked for every tractor. For individual tractors, the item quantities begin as zero. You must manually enter the initial quantity. You must track a tractor’s inventory accessories and update its record as inventoried accessories are used up or worn out.
Adding a non-inventory accessory to a tractor’s profile
Before you can record a specific accessory for a tractor, that accessory type must already exist in the TrcAcc label. If the accessory type is not included in the accessory options list, refer to Creating accessory types for instructions on adding it to the TrcAcc label.
-
With the tractor’s profile opened, do one of the following:
-
Click
Accessories in the sheet toolbar. -
Select Edit > Accessories.
-
-
Make sure the Accessories tab is selected.
-
Click Insert. A new row is displayed.
-
Make the appropriate entries in these fields:
Qty
Quantity of the item.
Note: This is informational only. When the tractor is assigned to a trip and the system checks to see whether the tractor meets a load requirement for this accessory, it does not check the quantity.
Type
From the drop-down list, select the type of accessory found on the tractor.
Note: The options shown in this field are user-defined using the TrcAcc label, which is accessed in System Administration. Any items that have the Inventory check box selected will not display in this field.
ID
ID that is associated with the accessory, e.g., a serial number.
Cost
Purchase price of the accessory.
Hours
Currently not operational.
Acquired
Date that the accessory was acquired.
Oper Cost
Cost to operate the accessory, if applicable.
Expire Date
If applicable, enter the date the load requirement is to expire. After the expiration date, it will no longer be attached to an order.
-
When you have completed your entries, click OK.
-
The system displays a confirmation message. Click Yes to save your entries and close the Accessory List window.
Removing a non-inventory accessory from a tractor’s profile
You can delete an accessory record from a tractor’s Accessories List.
-
With the tractor’s profile opened, do one of the following:
-
Click
Accessories in the sheet toolbar. -
Select Edit > Accessories.
-
-
Make sure the Accessories tab is selected.
-
Click in any field in the row of the accessory you wish to delete.
-
To save your deletion, click OK in the lower right of the window.
-
The system asks if you want to apply your changes, click Yes. The Accessory List window then closes.
Note: You are deleting the specific non-inventory accessory for just this one tractor. The accessory type still exists in the system. If the accessory type is no longer needed for any tractor, you can retire it in the TrcAcc label, accessed in System Administration.
Recording quantities for inventory accessories
You must manually enter quantities for inventoried accessories, both at the time the item is added to a tractor’s list and when you update the record to show quantity changes. When the tractor is assigned to a trip, and the system checks to see whether the tractor meets a load requirement for an accessory, it checks the quantity. Any quantity equal to or less than your entry will satisfy a load requirement for the item. Quantities are recorded on the Tractor Accessory list window.
| In Dispatch, you can access the Tractor Accessory list window by going to Tools > Add Tractor Accessories. |
The date and time you update a quantity, as well as your user ID, are included in the inventory accessory record.
Note: The Last Inventory Date fields for all items are updated at the same time, even if you modify the quantity of only one item.
-
With the tractor’s accessory list displayed, select the Inventory tab.
-
Enter the new amount in the Qty field.
-
If you want, enter free-form text in the Comment field.
-
Click Update.
-
Click OK to exit the window.
Viewing an inventory history
You can view a history of inventory changes for a particular tractor.
-
With the tractor’s accessory list displayed, select the Inventory tab.
-
Click History.
-
Enter a date range using the Start Date and End Date fields.
-
Click Retrieve.
The Inventory History report is displayed as a table:
-
Each item is a column heading.
-
Each inventory update date/time is shown in a separate row.
-
The quantity recorded for each item at the time of the update is shown in the appropriate column.
-
Use the scroll bar at the bottom of the window to view the history for any items that do not fit in the initial display of the table.
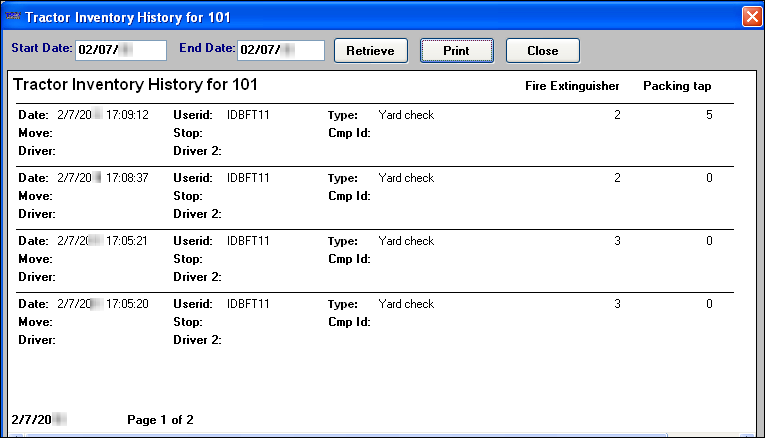
If desired, you can print the report.
How accessories/inventory items are used for load requirements
Load requirements specify special criteria that must, or should be, met when assigning resources to an order in Order Entry or Dispatch. There are two types of load requirements:
-
Default Load Requirements
Based on a company or commodity, default load requirements are automatically applied to all orders for that company or commodity. -
Order-by-order load requirements
Attached to an order in Order Entry or Dispatch, these load requirements specific to that order and are not applied to any other orders.
For complete instructions on recording load requirements, refer to:
Also refer to the sections in these guides:
Guide |
Chapter |
Section |
Order Entry |
Defining load requirements/ conditions for an order |
|
General Dispatch |
The Load Requirements for Move window below shows both types of load requirements.

The first requirement is a default load requirements based on a company or commodity.
-
Notice that no order number is shown for it.
-
It has a value of Yes in its Default LRQ field.
Note: Default load requirements can be suspended on an order-by-order basis. This is possible only when the Overridable check box is selected.
The second requirement was added specifically for the order.
-
Notice that the order number is displayed.
-
The Default LRQ? field is unavailable because it is not a default load requirement.
With the exception of the Bill To check box, the values in the other load requirement fields are not dependent upon whether the load requirement is a default requirement for a company or commodity. The following table describes the remaining fields:
Order Number |
Order ID. |
Stop |
If the condition is applicable at a particular stop, shows the company ID for that stop. Note: The field is read-only if the requirement defaulted from the profile of a company or commodity specified on the order. |
Activity |
Indicates the stop type for which the condition is applicable. The options are:
|
Commodity |
Commodity for which the requirement applies. Note: The field is read-only if the requirement defaulted from the profile of a commodity specified on the order. |
Equip. |
The resource type to which the condition applies. The options are:
Notes:
|
Condition |
The condition/requirement. The first field value is either should or must.
The second field value is either have/be or have not/be. |
Requirement |
The applicable accessory or driver qualification. Notes: Accessories are defined using the DrvAcc, TrcAcc, and TrlAcc labels in the System Administration application. The accessory/qualification should match the value in the Equip. field. The requirement could be an inventory or a non-inventory item. |
Default LRQ? |
You can create default load requirements for companies and commodities.
|
Qty. |
Specify the accessory quantity required.
|
Overridable |
If this check box is selected, you can change the entry in the Default LRQ? field from Yes to Disabled. |
Bill To |
This check box applies only for a load requirement that has defaulted from a company profile. If it is selected, the person who entered the load requirement set a flag that indicates the requirement applies only when the company is used as a Bill To on an order. |
Expire Date |
A default load requirement may have an expiration date. On and after the expiration date, it will no longer be attached to an order. |
|
You should check the tractor’s profile to verify that it has enough of a particular non-inventory item. Order Entry and Dispatch do not check the quantity fields for load requirements. You should view the Qty field as information only rather than as a real restriction. Order Entry and Dispatch will check the quantity fields for inventory items. You can change inventory quantities only in File Maintenance. Changing load requirements in Order Entry or Dispatch will have no effect. |
Recording/viewing notes on a tractor
Notes entered for a tractor are accessible in the base applications, except System Administration and Rate Schedules.
Adding notes to a tractor profile
-
With the tractor’s profile opened, do one of the following:
-
To add a note to the end of the list, click Add.
-
To insert a note before an existing one, highlight the existing note and click Insert.
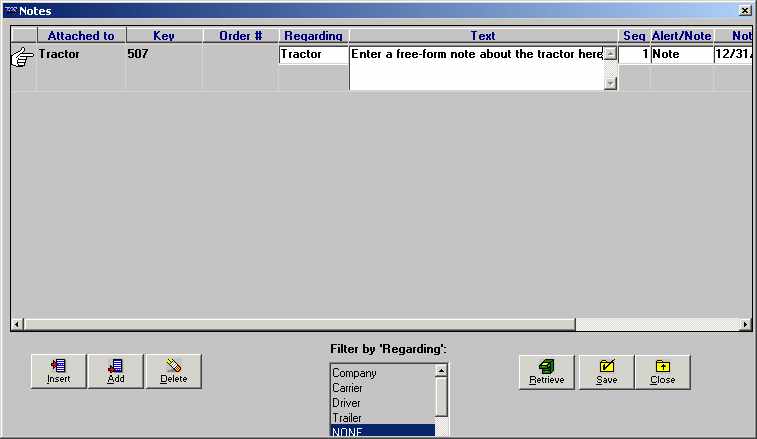
The system automatically provides some information:
-
It displays Tractor in the Attached to field.
-
It displays the tractor’s ID in the Key field.
-
-
Select the appropriate entry in the Regarding field. The option you select controls how the note is filtered when a user retrieves notes later. The options are:
-
Company
-
Settlements
-
Carrier
-
Pay To
-
Driver
-
Billing
-
Trailer
-
Order
-
Tractor
-
-
Enter the text of the note in the textbox. You may enter up to 256 characters, but only 68 characters can display in the textbox at one time.
-
If your note exceeds 68 characters, use the Left Arrow or Right Arrow keys to scroll the rest of the note into view. You can also highlight the note, right-click on the text box, and select Zoom Field from the pop-up menu to view the text in its entirety.
-
To copy a word or phrase from an existing note, highlight the portion you want to duplicate and press CTRL+C. Then position the cursor in the spot where the word(s) are to be pasted and press CTRL+V.
-
You can cut a word or phrase from an existing note and paste it in a different spot. To do so, highlight the portion to be cut and press CTRL+X. Note that the word(s) are deleted from their original location. Position the cursor in the spot where the word(s) are to be pasted and press CTRL+V.
-
-
Position the cursor in the Note/Alert field. Highlight one of the options to rank the importance of your note.
-
Select Note if your note is informational, but not of critical importance.
-
Select Alert if your note is of critical importance, not merely informational.
The ranking determines how the system displays the Note indicator on windows associated with your note. For notes ranked as Note, a yellow indicator is displayed; for notes ranked as Alert, a red indicator is displayed.
-
-
Notes may be assigned an expiration date. Position the cursor in the Expiration Date field, and enter the date and time the note is to expire, if applicable.
Note: Once the expiration date has passed, the note no longer triggers the Note indicator to show as yellow or red. However, the expired note continues to display in the Note window.
-
Click Save to save the note.
Note: To cancel any changes, click Retrieve; the system displays the previously existing notes.
-
Click Close to exit the window.
Deleting a note
You can delete a note by positioning the cursor in any field and clicking Delete. The system displays a confirmation dialog box that asks: Are you sure you wish to delete this row?
Click Yes to delete the note.
Viewing notes
Notes are available from almost all TMWSuite applications. The Notes indicator is gray when there are no notes, or when only expired notes are attached to a particular company, resource, order, or movement, etc. When an unexpired note is available, the Notes indicator is displayed in yellow.
If a note has been assigned Alert status, the indicator is displayed in red. The location of the indicator varies, depending on the application.
-
To open the Notes window, click
 Notes in the sheet toolbar or select Edit > Notes. You may also click the Notes indicator.
 -
Use the Filter By Regarding list box to select the type of notes you want to see. To see all notes, select None. As you select different filtering options, the displayed notes will reflect the current filter.
-
Click Close to exit the Notes window.
| If you want to | You must: |
|---|---|
Add a note |
Click Add. |
Insert a note between existing notes |
Highlight the note you want the new note to be above; click Insert. |
Save your entries |
Click Save. |
Cancel all entries made since the last time you saved, e.g., retrieves only those entries that have been saved. |
Click Retrieve. |
Restrict the notes displayed to those for a specific filter category |
Click the up or down arrow shown to the right of the Filter list box in the lower middle of the window. Scroll through the drop-down list of filter categories. Select the desired category. When you do so, the system removes any note that was not associated with the selected category. |
Display all notes, regardless of filter category |
Click the up or down arrow shown to the right of the Filter list box in the lower middle of the window. Scroll through the drop-down list of filter categories. Select None. This removes any filter, i.e., restriction, that was set previously. |
View a note in its entirety if it exceeds the 68 character limit allowed by the text display |
Do one of the following:
|
Delete a note |
Position the cursor in any field in the line for the note to be deleted. Click Delete. The system will ask you whether it should continue with the deletion. Select Yes or No. |
Exit the Notes window |
Do one of the following:
Note: If you have not saved your entries, you will be asked if you want to do so before you exit. |