Adding/maintaining a driver record
You use the Driver File Maintenance screen to record primary information about all the drivers your company assigns to trips.
| While each driver should have a complete profile to maintain the accuracy of system data, it is possible to add a mini-profile on the fly. If, for example, the dispatcher finds that the driver has not yet been added to the system, you can select the Tools > Add Driver command to create a driver profile that contains the minimum amount of information necessary to use the driver in the system. That mini-profile must later be modified to create a complete profile. |
Adding a driver and, optionally, a Pay To
-
Do one of the following:
-
Go to Edit > Drivers.
-
Click
 Driver in the frame toolbar.
A blank Driver File Maintenance window is displayed, along with the icons that make up the driver sheet toolbar.
-
-
To open the new driver profile, do one of the following:
-
Go to File > New.
-
Click
 New in the sheet toolbar.
-
-
Complete the driver profile by entering data in all appropriate fields. Leave the fields that do not apply blank. Use TAB to move forward through data fields and SHIFT+TAB to move backward through data fields.
Note: If driver payment is based on the driver class to which the driver belongs, make the appropriate entries in the Driver Type field(s), located in the Types section of the window. Your company can customize the names of these fields, and the options listed for them, in the DrvType1-4 labels accessed in the System Administration application.
-
Select File > Save, or click
 Save in the sheet toolbar.
-
If the driver has an accounting type of Payroll, entry of the profile is complete.
-
If the driver has an accounting type of Accounts Payable, and you entered a Pay To ID in the Pay To field, entry of the profile is complete.
-
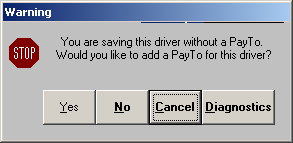
If the driver has an accounting type of Accounts Payable, and you left the Pay To field set to UNKNOWN, the system will prompt you to create a Pay To profile when you save. Continue on to Step 5.
-
-
Do one of the following:
-
If you want to save the driver profile without a designated Pay To, click No.
Entry of the driver profile is complete. An Add Pay To button will appear on the driver profile screen and the system will continue to warn you about the missing Pay To each time that you save.
-
If you want to add a Pay To for the driver, click Yes to open a Pay To File Maintenance screen. The information you have already entered about the driver (name, address, phones numbers, Tax ID and currency) will automatically populate the Pay To profile.
You do not have access to the menu bar or the frame and sheet toolbars. Only the fields needed to create the profile are available.
Continue with Step 6.
Note: You can disable the system’s prompt for a Pay To. For details, see Hiding the Pay To buttons.
-
-
Fill in the rest of the Pay To profile information as needed, including the Pay To ID. Click
Save.Note: For definitions of the fields on the Pay To File Maintenance screen, see Pay To File Maintenance.
-
Click the close button to return to the driver profile.
Note that Pay To field is now populated and an Edit Pay To button appears below the Actg Type field.
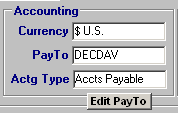
Subsequent changes made to the driver profile will not automatically update the Pay To profile. However, the Edit Pay To button gives you easy access to the driver’s Pay To information so that you can make these changes yourself.
Editing a Pay To profile from the driver profile screen
The autofill option that that allows you add a new Pay To based on the driver profile does not apply when you are editing. If, for example, you change the address on the driver profile, that change will not automatically update the driver’s Pay To.

To open the driver’s Pay To profile, click the Edit Pay To button
Pay To Profile Maintenance window
When you save your changes and close the screen, the system returns you to the driver profile.
Hiding the Pay To buttons
By default, either an Add PayTo or Edit PayTo button displays when you open any Accounts Payable resource profile. However, you can use the [Misc]DisableAutoPayTo setting in your TTS50 to configure the system to hide these buttons if you prefer not to use this feature.
| Hiding the buttons will also disable the save prompts. Therefore, it will be impossible to create a Pay To profile from a driver’s profile. |
Looking up a driver record
To view the profile of a driver already entered into the system, do the following:
-
Select Edit > Driver, or click
Driver in the frame toolbar. A blank Driver File Maintenance folder is displayed, along with the icons that make up the sheet toolbar. -
In the tab area of the folder, enter the driver ID.
-
Do one of the following to display the driver profile:
-
Press ENTER.
-
Select File > Open.
-
Click
 Open in the sheet toolbar.
-
| While each driver should have a complete profile to maintain the accuracy of system data, it is possible to add a mini-profile on-the-fly. If, for example, the dispatcher finds that the driver has not yet been added to the system, you can select Add Tractor from the Tools menu to create a driver profile that contains the minimum amount of information necessary to use the driver in the system. That mini-profile must later be modified to create a complete profile. |
Protecting the driver/tractor relationship
In the driver profile, you can link a driver to a specific tractor. Likewise, in the tractor profile, you can link a tractor to a specific driver.
This driver/tractor relationship simplifies resource assignment because assigning one asset to a trip automatically assigns the other. This is useful if your drivers routinely use the same tractors.
In this example, driver BILBAK is linked to tractor 507 in the driver profile; and tractor 507 is linked to driver BILBAK in the tractor profile.
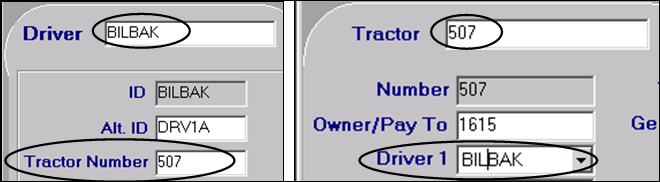
By default, each time the resource is Started on a new trip, the system updates the driver listed in the tractor profile and the tractor listed in the driver profile. In our example, if driver BILBAK is assigned to a trip with tractor 800, the tractor listed in BILBAK’s profile changes from 507 to 800.
However, the DrvTrcProt General Info table setting allows you to specify whether resource assignments on a trip will affect the linked resources recorded in the profiles. When you assign resources to a trip, you can specify that linked resources do one of the following:
-
Remain as recorded
-
Change based on the new assignment (default)
Deleting a driver record
You can delete a driver record as long as the driver has never been recorded on a trip.
| The system does not check for references to a driver on any records other than trips. |
-
With the record for the driver you want to delete displayed in the Driver File Maintenance window, do one of the following.
-
Click
 Delete in the sheet toolbar.
 -
Go to Edit > Delete.
-
-
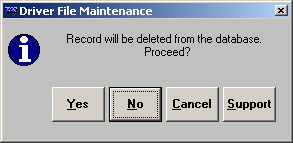
The system will ask for confirmation before deleting the driver record.
-
Click Yes to delete the driver record.
The system checks to see if the record has been used on a trip.
-
If the system check shows that the driver was never used on a trip, the record will be deleted.
-
If the system check shows that the driver has been used on an order, the record will not be deleted and a message similar to the one shown here is displayed:
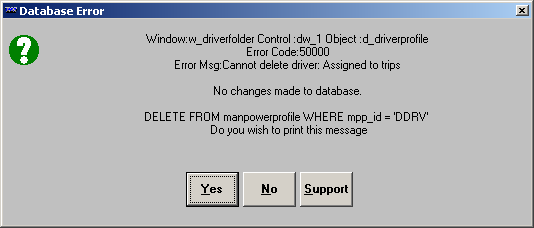
In this illustration, the driver has been assigned to trips and will not be deleted
-
If a driver has been used on a trip and you no longer want to use the driver’s profile, you can create an expiration for the driver. Use the system code, Terminated, as the expiration type. This will prevent the driver’s ID from being displayed in any list from which you would select a driver. For details on expirations, see Recording/viewing a driver’s expirations.
| You can still see IDs for terminated drivers if you have the Show Retired Items check box selected in the Set List Box Property window. The window is accessed from the Tools menu in all base applications. |