Non-Driver Employee Maintenance
What are non-driver employee profiles?
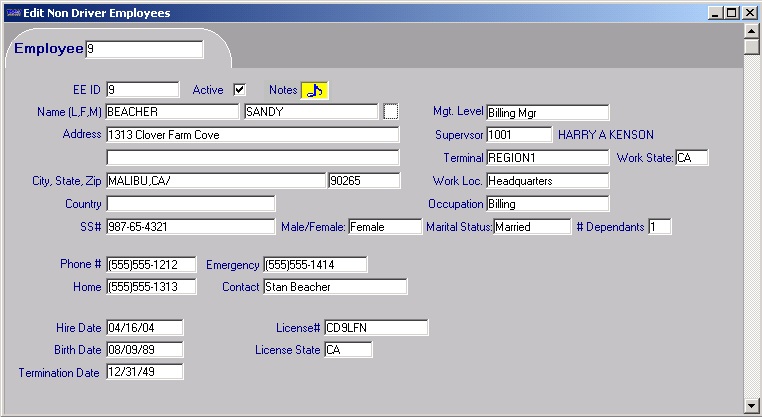
Non-driver employee profiles contain reference information about personnel other than drivers. This information is recorded in the Edit Non Driver Employees window, shown below with sample data. Non-driver employee profiles provide the following:
-
A quick method for looking up contact or other information for personnel other than drivers.
-
Speed, accuracy, and consistency in preparing TMWSuite reports. Employee information can be auto-filled in some types of report forms (e.g. the TMWSuite Safety Report facility).
| Unless you are using a system add-on, such as TMWSuite Safety Reports, that pulls data from non-driver employee profiles, use of this feature is optional. |
Edit Non-Driver Employee window field definitions
The Edit Non Driver Employee window contains the following fields:
Employee |
When you save an employee record, the system automatically fills in the Employee field with the ID you entered in the EE ID field. This ID must be unique in the system. You can open an existing non-driver employee record by entering the employee’s ID in the Employee field, and then pressing ENTER. |
EE ID |
When you create a new employee record, you must enter a unique employee ID of up to eight alphanumeric characters. If you try to assign an ID that already exists in an employee or driver profile, an error message appears. |
Active |
This check box is reserved for future use, and is not functional at this time. |
Name (L, F, M) |
Employee’s last name, first name, and middle initial. |
Address |
Employee’s address. Two address lines are provided, each consisting of up to 48 characters. |
City, State, Zip |
There are two fields. The first field contains the City and state/province in which the employee resides. The second field contains the employee’s five-digit or nine-digit zip coded. |
Country |
See the City, State, Zip information above. |
SS # |
Employee’s Social Security number. |
Male/Female |
Select Male or Female. |
Marital Status |
Select Married or Single. |
# Dependents |
Enter a number. |
Phone # |
Employee’s area code and phone number. |
Home |
Area code and phone number for contacting the employee’s home. |
Emergency |
Area code and phone number to be contacted in case of emergency. |
Contact |
The name of the person being contacted through the emergency phone number. |
Hire Date |
Employee’s hire date. |
Birth Date |
Employee’s date of birth. |
Termination Date |
Date the employee ceased employment with your company. |
License # |
Employee’s license number. |
License State |
Select the state, or enter the two-character code, for the state/province in which the license was issued. |
Management Level |
The name and options for this field are user-defined in the ManagementLevel label, accessed in the System Administration application. |
Supervisor |
Employee ID or Driver ID of a supervisor. You can enter the first few letters of the ID, and then scroll through the list and select from possible IDs based on your entry. |
Terminal |
Indicates the terminal location with which the employee is associated. Note: The Terminal options are user-defined in the Terminal label, accessed in the System Administration application. |
Work State |
Select the state, or enter the two-character code, for the state/province in which the employee works. |
Work Location |
The name and options for this field are user-defined in the WorkLocation label, accessed in the System Administration application. |
Occupation |
Employee’s position within the organization. |
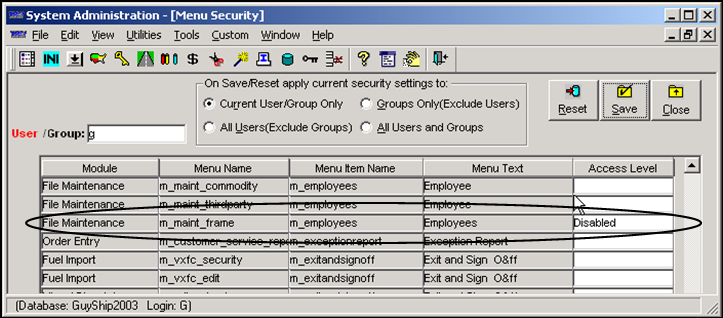
Limiting access to employee profiles
There is no special setup required to access employee profiles. However, privacy policies may require limiting access to this information to certain individuals in an organization. A user logged in as System Administrator has full privileges to read, create, and edit employee profiles. For users not authorized to view this information, access to the Edit Non Driver Employees window can be disabled.
| Only users with System Administrator privileges can set menu level security in TMWSuite. |
-
Log into the System Administration application as System Administrator, and do one of the following:
-
Click
 Menu Security in the frame toolbar.
 -
Select Edit > Menu Security.
The System Administration Menu Security window appears.
-
-
In the User / Group field, select the user or group for whom menu access is to be restricted.
-
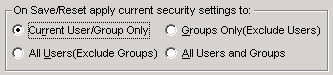
In the On Save/Reset… area, select the appropriate radio button. For more information on these options, refer to the Adding security for menu options and toolbar icons section in the "Setting security for fields, screens, and menus" chapter of the System Administration Guide.
-
Sort the grid by clicking the Menu Text column heading.
-
Locate the row consisting of the following column entries:
-
Module = File Maintenance.
-
Menu Name = m_maint_frame.
-
Menu Item Name = m_employees.
-
Menu Text = Employees.
-
-
Set the Access Level to Disabled.
-
Save your changes before closing the Menu Security window.
Adding/maintaining an employee profile
Primary non-driver employee information is recorded in the Edit Non Driver Employees window.
Adding a new employee record
In File Maintenance, you can add an employee or edit an existing employee record by following these steps:
-
To open the Edit Non Driver Employees window, do one of the following:
Note: If you do not have rights to access employee profiles, the Employee icon and menu command described in the following step will be grayed out and inoperative.
-
Click
 Employees in the frame toolbar.
 -
Select Edit > Employees.
A blank Edit Non Driver Employees window opens:

-
-
Do one of the following:
-
To create a new employee record, click
 New in the sheet toolbar.
 -
To open an existing employee record, enter the employee’s EE ID in the Employee field, and press the ENTER key.
The Edit Non Driver Employees window opens.
-
-
Complete the non-driver employee profile by entering data in all appropriate fields, leaving those fields that do not apply blank. Use TAB to move forward through data fields and SHIFT+TAB to move backward through data fields.
-
When you finish editing fields, click Save
 in the sheet toolbar to save the information. The system copies the unique ID you entered in the EE ID field to the Employee field.
Note: To access this profile in the future, you will need to know this ID.
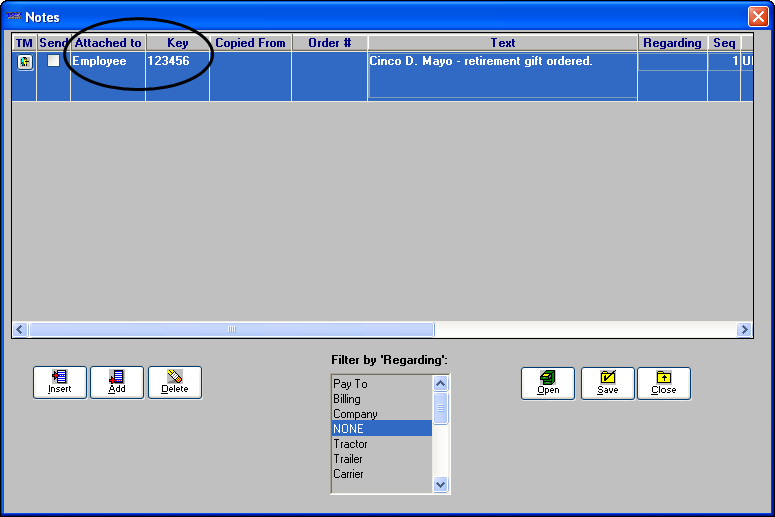
Entering notes
You can record confidential information for a non driver employee in the Notes window, which is only accessible from File Maintenance. Personnel who are not authorized to access the Edit Non Driver Employees window are also prevented from accessing notes. By entering personnel data in the Notes window, you can eliminate a printed copy in the employee’s file.
| By default, the maximum length of the text you can enter for a note is 256 characters. However, you have the option of increasing a note’s length to a maximum of 8,000 characters. For setup instructions, see the Notes feature guide. |
Adding notes to a non driver employee profile
To add a note for the currently displayed non driver employee profile:
-
Use one of these methods to open the Notes window:
-
Click
 Notes in the sheet toolbar.
 -
Click the Notes
 indicator in the profile.
-
-
Click the Add button, and the system fills in the *Attached to* and *Key* fields automatically.
Note: You can also click the Insert button to add a new note before an existing note.
-
Make entries in the following fields:
Attached to
This display-only field shows the profile type for which the note was recorded.
Key
This display-only field shows the ID of the record to which the note applies.
Order
This display-only field will be blank.
Regarding
Use the drop-down list to select the filter that will be applied when the note(s) are retrieved in the future. If you do not want filtering applied to the note, select NONE.
Note: The options available in this field are set up by using the NoteRe label. For example, if you want to filter by accident note, then you must first add the Accident Report option to the NoteRe label. For more information, see the Notes feature guide.
Text
Enter the text of the note in the field. You may enter up to 256 characters, but only 68 characters can display in the text box at one time.
Notes:
-
If your note exceeds 68 characters, use the LEFT ARROW or RIGHT ARROW keys to scroll the rest of the note into view. You can also highlight the note, right-click the text box, and select Zoom Field to view the text in its entirety.
-
You can cut a word or phrase from an existing note and paste it in a different spot by highlighting the portion to be cut and pressing CTRL+X. Note that the word(s) are deleted from their original location. Position the cursor in the spot where you want to paste the word(s) and press CTRL+V.
-
To copy a word or phrase from an existing note, highlight the portion you want to duplicate and press CTRL+C. Then, position the cursor in the spot where you want to paste the word(s) and press CTRL+V.
-
You can configure the system to increase the note length to a maximum of 8,000 characters. For more information, see the Notes feature guide.
Seq
The system will automatically assign a number in this field. You can change this to any number from 0 to 9999.
Notes:
-
The system will assign the number 1 to the first note, 2 to the second, and will increment all subsequent numbers by one.
-
Higher-numbered notes will be displayed first in the Notes window.
-
You may assign the same Seq number to more than one note. If more than one note has the same Seq number, the note that was added most recently displays at the top of the Notes window.
Note Level
From the drop-down list, select the internal classification for the note.
Notes:
-
The options are user-defined in the NotesLevel label, accessed in System Administration.
-
This classification is strictly informational - it is not used by the system for any purpose.
Alert/Note
Use the drop-down list to specify the importance of your note. The options are:
-
Note
The note is informational, but not of critical importance. -
Alert
The note is of critical importance, not merely informational.
The ranking determines how the system displays the Notes indicator on screens associated with your note. For notes ranked as Alert, a red indicator will display; for notes ranked as Note, either a blue or a yellow indicator will display.
Note Expires
Enter the date and time the note is to expire, if applicable.
Note: Once the expiration date has passed, the Notes indicator is shown in gray. However, the expired note continues to display in the Notes window.
Updated By
This display-only field shows the user ID of the user who last updated the note.
Last Updated
This display-only field shows the date and time the note was last updated.
-
-
Click Save to save the note.
-
Click Close to exit the Notes window.
Note: To cancel any changes, do one of the following:
-
Before you save, click Open. When prompted to save your changes, click No to display the original notes.
-
Click Close. When prompted to save your changes, click No to display the Edit Non Driver Employees window.
-
Deleting notes
You can delete notes that are no longer needed.
-
Highlight the note to be deleted by positioning the cursor anywhere in its row.
-
Click Delete.
-
When the Delete Row confirmation message displays, click Yes.
Viewing notes
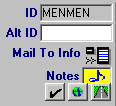
Notes are available from almost all TMWSuite applications. The color of the Notes indicator signifies the status of the note(s) attached. In File Maintenance, the Notes indicator appears in a yellow box.
-
Gray
No active notes are attached. Expired notes may be attached. -
Blue
At least one active note is attached; none of the active notes has an Alert status.Note: In TMWSuite applications other than File Maintenance, the indicator for active notes displays yellow.
-
Red
At least one active note with Alert status is attached.
Follow these steps to view existing notes:
-
Do one of the following
-
Click
Notes in the sheet toolbar -
Click the Notes
indicator.
-
-
Use the Filter By Regarding list box to select the type of notes you want to see. To see all notes, select None. As you select different filtering options, the displayed notes will reflect the current filter.
-
Click the Close button to exit the Notes window.
Opening an existing non-driver employee record
To view the profile of a non-driver employee already entered into the system, do the following:
-
Select Edit > Employee or click
Employee in the frame toolbar. A blank Edit Non-Driver Employee folder is displayed, along with the icons that make up the sheet toolbar. -
In the tab area of the folder, enter the employee’s ID.
-
Do one of the following to display the employee profile:
-
Press ENTER.
-
Select File > Open.
-
Click
 Open in the sheet toolbar.
-
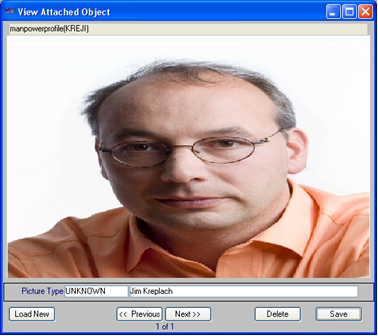
Viewing, adding, or deleting photos in a non-driver employee profile
You can include multiple photos or other types of images in a non-driver employee profile using the View Attached Object window. This window is also available in Driver, Trailer, and Company profiles.
If this is your first time attaching photos to a profile, see Setting up the File Maintenance photo feature to confirm your system is set up properly.
| Your TTS50 must be set up to enable accessing of profile photos, and the computer must have Microsoft Office 2003 or later installed. |
-
Select View > Photo, or click
 Photo in the sheet toolbar.
The View Attached Object window opens. Here, the window displays a previously saved image.
-
In the View Attached Object window:
-
To scroll through all photos attached to the profile, click the Previous or Next button.
-
To add a photo or edit fields, continue with Step 3.
-
If you are finished with the View Attached Object window, click
 to close it.
-
-
To add a photo, click Load New.
-
Browse to and select the photo you want to add.
-
In the Picture Type drop-down list, select a picture type.
Notes:
-
The options in this field are defined by your company, using the PictureType label.
-
If you want to add or modify this field for an existing photo attachment, select an option from the drop-down list and re-save the attachment.
-
This step is optional unless you have
[Misc]RequireTypeOnPicture=Yin your TTS50.
-
-
If you want, you can enter a comment in the field to the right of the Picture Type field.
Note: In you want to add or modify information for an existing photo attachment, edit the field and re-save the attachment.
-
Click Save to store the photo.
-
Click
in the upper right corner of the View Attached Object window to close it.
Deleting a photo from a non-driver employee profile
To delete a photo from the View Attached Object window, follow these steps:
-
In the View Attached Object window, click Previous or Next to select the photo you want to delete.
-
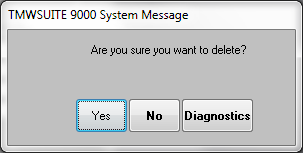
Click the Delete button. The system asks for confirmation.
-
Click Yes. The system deletes the photo.
-
Click Save.
-
Click
in the upper right corner of the View Attached Object window to close it.
Deleting an employee profile
You can delete an employee profile by following these steps:
| If you delete the profile for an employee whose information has been used in a Safety Report, the information remains in the Safety Report. |
-
With the record for the driver you want to delete displayed in the Driver File Maintenance window, do one of the following:
-
Click
 Delete in the sheet toolbar.
 -
Select File > Delete.
-
-
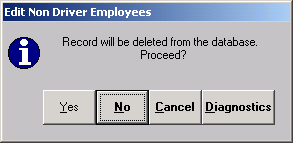
The system displays the Edit Non Driver Employees confirmation message:
-
Click Yes to confirm the deletion.