Setting up a Bill To company
In TMWSuite, a Bill To company is any company to be billed for services rendered. All company profiles must be recorded in the Company File Maintenance window.
| The optional Intelligent Drop-down List feature allows you to limit the selection of commodities and reference number types based on the Bill To company on the order. You create relationships between Bill Tos and reference number types and/or commodities in File Maintenance. The relationships limit the options shown commodity and reference number type drop-down lists in Order Entry, Invoicing, and the Dispatch Trip Folder. For details, see the Intelligent Drop-Down Lists guide. |
The following fields are specific to Bill To companies. Be sure the appropriate entries are made for each Bill To:
Bill To |
Select the Bill To check box in the Switches section of the window if the company is to be billed for work performed. (A check mark indicates that the switch is set to on.) |
Avg. Fuel ID |
This field displays only when the Bill To check box is selected in the Switches section of the window. Use it to enter the ID of the Average Fuel Price table to be used for the company when fuel surcharges are calculated. For details on how to set up an Average Fuel Price table, see the see the Average Fuel Price Maintenance documentation. |
CREDIT |
|
Terms |
Payment terms for the customer. Note: This is a user-definable field and the options for the field are set up in the Credit Terms label in the System Administration application. |
Limit |
Maximum amount of credit allowed the customer. |
Available |
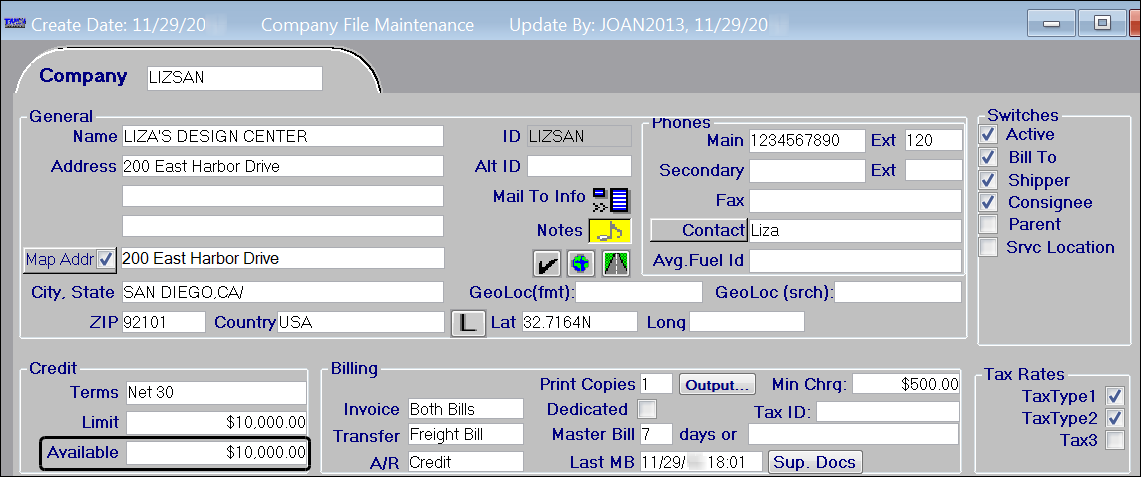
The company’s current credit balance, which you can edit manually, or which can be updated automatically via TMW’s Microsoft Dynamics GP interface. For details on the credit checking feature, see Using the credit check feature. |
BILLING |
|
Invoice |
Applicable for Bill To companies; indicates how the system is to generate invoices and/or master bills for the company. The options are:
|
Transfer |
Indicates the format of the information that is to be included in export files. The options are:
|
A/R |
Indicate if this is a Cash or Credit customer. |
Print Copies |
Applicable for Bill To companies. Determines how many copies of each invoice are to be printed. Note: The system looks at the Bill To company profile Print Copies field and the Invoice Format Maintenance # Copies field, found in the Invoicing application, to determine how many copies of the invoice will print. The applicable INI settings, found in the
|
Master Bill days |
Applicable only for Bill To companies that receive master bills. You use this field and the Last MB field to identify the schedule for printing master bills. For detailed instructions on scheduling master bills, see Setting up a company for master bills. |
Last MB |
Applicable only for Bill To companies that receive master bills. The value in this field identifies when the last master bill was printed. The system updates this field automatically each time a master bill is printed. Notes:
|
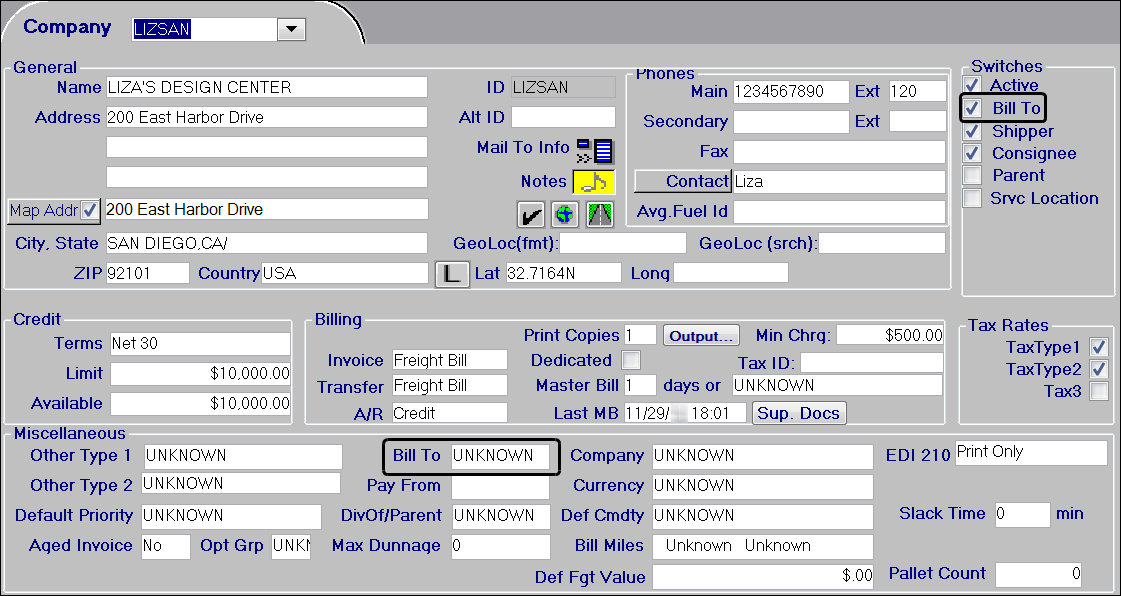
Min Charge |
Company-specific minimum line haul charge allowed for an order. If the line haul amount computed falls below this minimum, Invoicing will add an invoice detail with the description Order Minimum Adjustment to the invoice for the difference. |
TAX RATES The Tax Rate section is designed for use with Canadian taxes. Tax rate rates are set up using the Tax Rate Maintenance window in the System Administration application. Prior to setting up the system for Canadian taxes, these fields are named TaxType1, TaxType2, and Tax3. |
|
GST |
Tax Type 1 is used for GST (Goods and Services Tax). |
PST |
Your setup in the Tax Maintenance window for a particular province determines whether Tax Type 2 is used for PST (Provincial Sales Tax) or HST (Harmonized Sales Tax). Note: If you use Tax Type 2 for both PST and HST, you will only be able to define one name in the label file for display purposes. For example, if you rename the TaxType2 label to PST, it will display as PST on the company profile. Even if the Tax Type 2 check box is labeled PST, your HST setup for a province will cause the system to correctly apply HST when a company is billed. |
Tax3 |
Tax3 field is used for QST (Quebec sales tax). |
MISCELLANEOUS |
|
Other Type 2 |
The name and options for this field are user-defined. Setup occurs in the Other Type 2 label in the System Administration application. Note: If you are using Microsoft Dynamics GP as your accounting package, your entry in this field can turn on the ability to transfer the first reference number recorded in the invoice header to the Document Number field in Microsoft Dynamics GP. To use the entry in this way, you must add an option to the Other Type 2 label that has REF as the value in its ABBR field. You also must select this option in the Other Type 2 field in the company profiles of the customers for which you want to transfer the reference number, as well as the TMW invoice number. For example, you may have Bill To companies that typically reference the reference number in the invoice header, often the Bill of Lading, when they remit payment. Using this feature allows the system to transfer the first reference number and the invoice number. So, if the first reference number is 45633 and the invoice number is 8776A, the document number would be sent to Microsoft Dynamics GP as 45633-8776A. A hyphen is always inserted to separate the reference number from the invoice number. |
Div Of/Parent |
If the company is a division or subcompany of a larger one, this field identifies the parent company. |
Bill Miles |
Indicate the type of miles that will be used to bill the customer. The options are set up in the
Note: Settings that determine the interface to be used for billing miles exist in three locations: the TTS50, Bill To profiles, and rate schedules. When an order is auto-rated in Order Entry, Dispatch, or Invoicing, the system uses the following hierarchy when determining which mileage type to use:
|
Maintaining credit information for Bill To companies
TMWSuite’s credit checking feature can save you money by warning or preventing you from booking orders for bad credit risks. Your customers may have accounts receivable balances that approach or exceed the limit set in their contracts or your credit policy.
You can have the system do a credit check on the Bill To company when a new order is saved. The Credit Check feature will compare the total of outstanding invoices against the credit limit you set in the Bill To company’s profile. Based on your system’s configuration, when you attempt to save an order and the Bill To’s credit limits are exceeded, you will see a warning and the system may prevent you from saving.
|
Setting up labels for Credit Information fields
In File Maintenance, you can access credit information by selecting Edit > Credit Info, or by clicking ![]() Credit Aging in the sheet toolbar. The Credit Information dialog box lists dollar amounts in several time frames representing the aging of accounts receivable.
Credit Aging in the sheet toolbar. The Credit Information dialog box lists dollar amounts in several time frames representing the aging of accounts receivable.
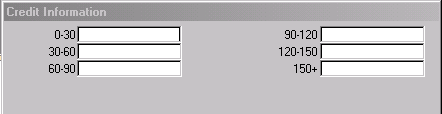
You can use the default field names (0 - 30 days, 30 - 60, etc.), or you can set up field names that better fit your company’s business. The descriptive names of the aging periods are changed in the AgingPeriod1-AgingPeriod6 labels in System Administration. For more information, see Using the label file to customize fields in the System Administration guide.
Entering customer credit information
To enter the maximum credit you will extend to a customer, you must manually enter the amount in the Limit field of the Bill To’s company profile.
Using the Credit Information dialog box, you can:
-
Enter the accounts receivable aging data manually.
-
Populate the fields automatically in your accounting package if you are using Microsoft Dynamic GP. If you are not using this accounting package, the information can be entered using a SQL statement.
Entering a credit limit
The system tracks recorded orders and outstanding invoices against the established credit limit that you set manually as follows:
-
With the desired Bill To company profile displayed, enter the credit limit amount in the Limit field, located in the Credit section of the window.
Note: The Limit field relates to the cmp_creditlimit field in the TMWSuite database.
-
Save your entry.
Manually entering aging information
If you are not using Microsoft Dynamics GP automated updates, you can still use the credit check feature manually. To populate the creditcheck table in your TMWSuite database, use the Credit Information window accessed from the Bill To’s company profile.
To enter data in the Credit Information window:
-
Retrieve the desired Bill To’s company profile.
-
Click
 Credit Aging in the sheet toolbar, or select Edit > Credit Info.
-
Position the cursor in the first field, and enter the appropriate amount for the aging period. Repeat for each aging period that is applicable for the Bill To.
Note: If you want to enter the total credit the customer started with, you can use the aging periods to show used credit. For example, if the credit limit for a company is $5,000, and they are currently at $3,000 available, you would enter $2,000 in the first aging period (0 - 30 days).
-
Click
Credit Aging again to close the window. -
Click
 Save in the sheet toolbar to save your entries.
Note: If you enter the credit information in error, you can use the Delete Credit Record button to remove it. For more information, see Clearing credit check information.
Using a SQL statement to populate the creditcheck table
Your system administrator can write a SQL statement to enter aging information. The relationship between the fields in the Credit Information window and the creditcheck table format is as follows:
creditcheck Table |
||
Credit Information Window Field |
cmp_id |
varchar |
AgingPeriod1 - Default label: 0-30 |
cmp_aging1 |
decimal |
AgingPeriod2 - Default label: 30-60 |
cmp_aging2 |
decimal |
AgingPeriod3 - Default label: 60-90 |
cmp_aging3 |
decimal |
AgingPeriod4 - Default label: 90-120 |
cmp_aging4 |
decimal |
AgingPeriod5 - Default label: 120-150 |
cmp_aging5 |
decimal |
AgingPeriod6 - Default label: 150+ |
cmp_aging6 |
decimal |
| In the creditcheck table, cmp_id is the primary key. Data entered in the cmp_id column should be a valid company ID in your TMWSuite database. The system adds the aging amounts together to determine if the credit limit has been exceeded. |
Clearing credit check information
At times, you may want to delete credit information for a particular company.
-
Look up the profile for the Bill To company.
-
Do one of the following to open the Credit Information dialog box:
-
Select Edit > Credit Info.
-
Click
Credit Info in the sheet toolbar.
The Credit Information dialog box is displayed.
-
-
Click Delete Credit Record to clear the recorded credit information.
Note: The Delete Credit Record button does not appear unless the company profile has been saved since the credit information was entered.
-
The system asks you to confirm the deletion. Click Yes to complete the deletion.
The system redisplays the Credit Information dialog box with no entries in its fields. You can enter the correct information.
-
To close the dialog box, do one of the following:
-
Select Edit > Credit Info.
-
Click
Credit Info in the sheet toolbar.
-
Accessing credit review information
In Company File Maintenance, use the Edit > Credit Review command to view credit information for a Bill To. The Credit Warning window displays:
Enter the company’s TMWSuite ID in the Bill To ID field, and press ENTER. The window displays the available credit information for the specified Bill To.
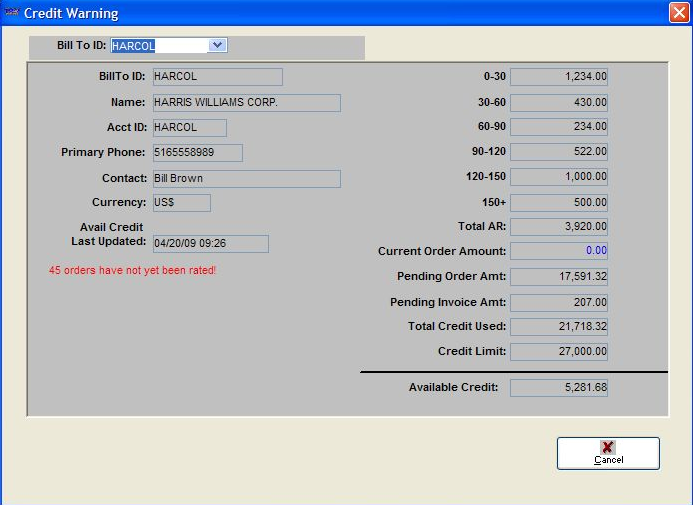
Click Cancel to close the window.
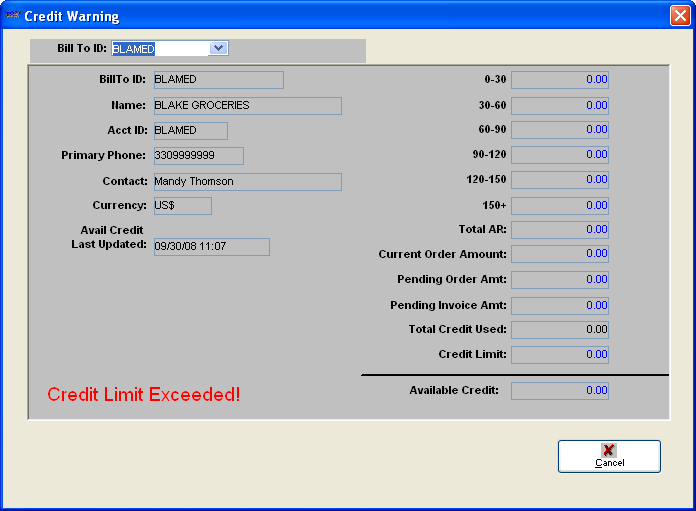
If no information is available for the selected Bill To, the system displays the Credit Warning window, similar to the one shown below.
Searching and modifying Bill To links
A company can be a Bill To for itself, or it can be the Bill To for another company. The Company File Maintenance window has two fields related to setting up the Bill To for a company.
-
When a company is to be invoiced, the Bill To check box in the Switches section is selected. The company can be invoiced for its own orders, and for orders of other companies using it as their Bill To. Active Bill To companies are listed in the Bill To drop-down list in the order header, both in Order Entry and in the Dispatch Trip Folder.
Note: If the Bill To check box is selected, the Bill To field in the Miscellaneous section must be set to UNKNOWN to prevent billing problems.
-
When a company is not to be invoiced, the Bill To field in the Miscellaneous section identifies which Bill To company will be invoiced in its place. The company to be billed for orders placed by this company is selected from the Bill To field’s drop-down list. This is true here, in Order Entry, and in the Dispatch Trip Folder.
| If you have any entry other than UNKNOWN in the Bill To field, you must clear the Bill To check box in the Switches section. |
When you clear a company’s Bill To check box, the system searches for all companies using it as their Bill To. The validation of affected links occurs as soon as you clear the Bill To check box.
The Default Billto Companies window is displayed. It lists all of the companies linked to the one from which you are removing Bill To status. This link-validation check can prevent billing problems after an existing Bill To becomes invalid.
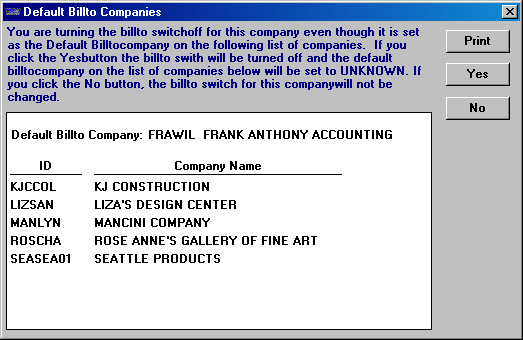
You have three options:
-
Print
Prints a hard copy of the list displayed in the window.Note: If you proceed with canceling the current company’s Bill To status, the printed list can be a helpful reference. Because the system will change the Bill To field in each of their profiles to UNKNOWN, you must either make them Bill To’s or assign each of them a new Bill To.
-
Yes
Turns off the Bill To switch of the current company and sets the Bill To field of all linked companies to UNKNOWN. When you save the company profile, you will be reminded how many other companies were modified by the Bill To change.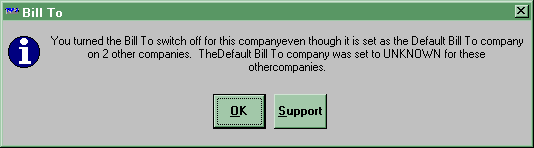
Note: Affected companies will lose their billable status because their Bill To field is changed to UNKNOWN and their Bill To check box remains unselected. You must open each company’s profile individually and either make them a Bill To or specify another Bill To company for them. A printed reference list can help you find all the affected companies.
-
No
Cancels the clearing of the current company’s Bill To check box. No changes are made to any company profiles.Note: A quick way to create a report of Bill To links is to clear the Bill To check box and view or print the list before selecting No.
Setting up a company for master bills
A master bill is a summary statement that lists totals for individual invoices for a particular Bill To company.
| For details on how to use master bills, see: Guide: Invoicing | Chapter: Setting up master bills |
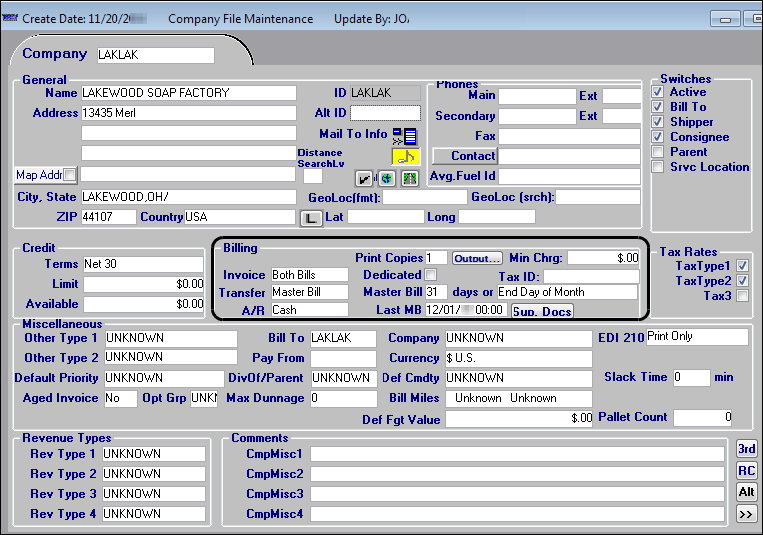
Make entries in the Billing section of the Bill To company profile to set up the company’s master bill schedule.
Invoice |
Indicates whether the company is to receive individual invoices as well as master bills. The options are:
Note: The Freight Bill and No Output options are not applicable for master bills. |
Transfer |
Indicates the format in which information will be exported to your accounting system.
For TMWSuite, it identifies which format will be printed. |
Master Bill __ days or |
These fields identify the schedule for printing master bills. The first field accepts a numerical entry. Enter the number of days between master bills. For example:
A second field displays a drop-down list. The options are:
|
Last MB |
The value in this field identifies when the last master bill was printed. The system updates this field automatically each time a master bill is printed. When you set up a new company’s record, the system enters the current date in this field. The field cannot be blank. Otherwise, master bills will not print.
|
You print master bills using the Invoicing application’s Print Invoices queue. The Last MB date in the company’s profile determines when the next master bill can be printed.
The system compares the company profile’s Last MB date with the Date Invoices entry in the Print Invoices queue window.
-
When you specify the number of days between master bills, the system verifies that the date in the Date Invoices field is that many days after the date in the company’s Last MB field.
-
When you set up a Bill To’s master bills to print on the last day of the month, the date in the Date Invoices field must be the last day of the month following the Last MB date in the company’s profile.
For example, the Last MB field value in Bill To JEMCLE’s profile is 02/28.
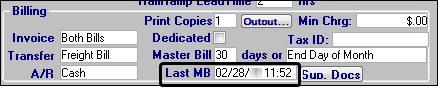
When the Date Invoices field in the Print Invoices queue window is set to 03/31, a master bill can be printed.
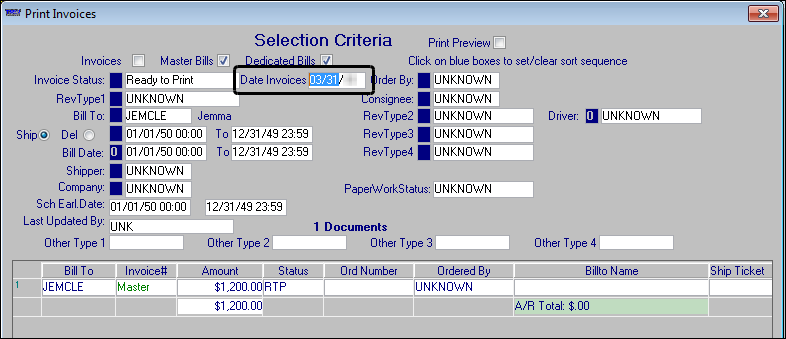
If the date in the Date Invoices field is set to an earlier date in the same month, the system displays a message stating, "No records meeting the selected restrictions were found."
Recording a mailing address for a freight payment service company
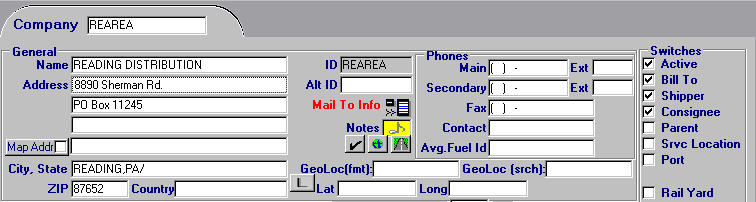
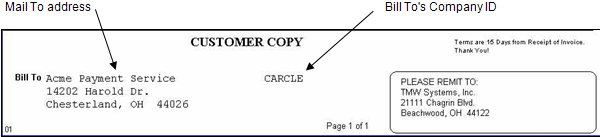
By default, when an invoice is printed the system uses the address of the Bill To company as the mailing address. However, for some Bill To customers you may need to specify that invoices be mailed to a third party freight payment company instead. An alternate mailing address for a Bill To company is recorded in the Mail To Info window.

Entering the Mail To address
Follow these steps to record a mail to address:
-
With the Bill To’s company profile open, click
 Mail To Info to access the Mail To Info window.
 -
Make entries in the following fields for the freight payment company:
Name
Company’s name.
Address
Street address.
Note: The second address field is not labeled.
City, State
City/state location.
ZIP
ZIP Code.
-
Do one of the following:
-
If you always want the alternate address is to print on all invoices created for the Bill To, be sure that these check boxes are cleared:
Click
 Close to exit the Mail To Info window. Save the company profile.
 -
If the alternate address is to print only when one or both of the following conditions are true, see Specifying when the alternate address is to print.
-
The invoice must include a line haul charge.
-
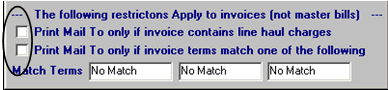
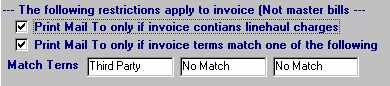
The payment terms recorded on the invoice header matches an entry in one of the Match Terms fields on the Mail To Info window.
-
-
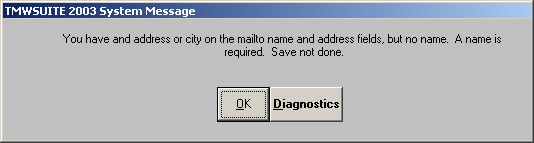
The Mail To Info window shows a warning, such as the one displayed below, when you have entered information incorrectly and try to save the company profile:
-
If you entered an address or city but you did not enter the name of the freight payment company, you will see this warning and your entries will not be saved:
-
If you entered the name of the freight payment company but you did not record an address or city, you will see this warning and your entries will not be saved:
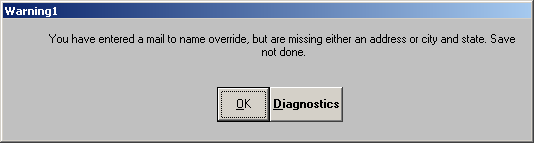
At least one address line and a city are required.
Specifying when the alternate address is to print
If you do not want the alternate address to print on all invoices created for a Bill To, you can use either or both of the check boxes in the lower portion of the Mail To Info window to specify printing conditions:
Use this table to determine the setup that is appropriate for the condition(s) you want to impose:
| If conditions are set like this: | The Mail To address is handled like this |
|---|---|
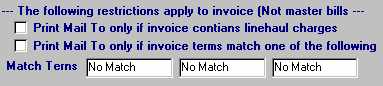
Option 1:
|
Mail To address prints on every Bill To company invoice. |
Option 2:
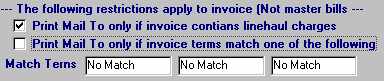
|
Mail To address prints only when an invoice has a line haul charge. This means that at least one of the invoice detail lines must have a primary charge type. Charge types are set up in the Enter/Edit Charge Type window. Note: To be considered primary, the charge type must have an entry of Shipment in the Basis field. It also must have the Primary (line haul) check box selected. |
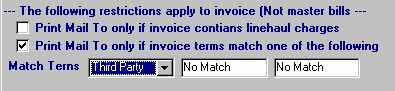
Option 3:
Note: If you select the check box Print Mail To only if invoice terms match one of the following, you must also make an entry in at least one of the Match Terms fields beneath the check box. |
Mail To address prints only when the payment terms in the Ppd/Col field on the invoice header matches an entry in one of the Match Terms fields on the Mail To Info window. Notes:
|
Option 4:
|
Mail To address prints only if both of these conditions are true:
Note: This option is the system default. |
If Mail To information does not exist for a company, the Mail To Info field name displays in blue. When you record an alternate mailing address for a Bill To company, the Mail To Info text displays in red. The red text immediately alerts you that there is a different billing address for the company.
Setting defaults for the Mail To check boxes
These settings in the [FileMaint] section of your TTS50 are used to specify the default settings for the check boxes in the Mail To Info window:
| These settings determine only the check box defaults. If needed, you can manually select or clear the check boxes on the Mail To Info window. |
How Invoicing uses the Mail To information
When an invoice for a company with a Mail To address is retrieved, the Different Mail To address exists notation is displayed in red below the Bill To company’s name and address.

If the invoice matches the conditions you set on the Mail To Info window, the address for the freight payment company is printed in the Bill To field on the hardcopy invoice. The Bill To company ID is shown next to the Mail To address.
Enforcing a company-specific minimum line haul charge
TMWSuite supports enforcing a company-specific minimum charge for an order. When the line haul charge is less than the minimum charge recorded in the Bill To’s profile, the system will add an invoice detail for the difference.
| Because supplemental invoices have no line haul amount, the system applies the entire company minimum charge on supplemental invoices for companies that have a minimum charge recorded in their profiles. |
| The company specific minimum line haul feature is designed for use with companies that are billed in Rate by Detail mode. If you use the Rate by Total rating method for a Bill To, you should specify the line haul minimum in the header of the primary rate. |
Recording a company’s minimum charge
In the Bill To’s profile, record the minimum line haul charge. Make your entry in the Minimum Charge field, which is located in the Billing section of the window.

How the company’s minimum charge is enforced
When an order is rated for a Bill To having a minimum line haul charge, the system compares the line haul charge on the order with the minimum charge. If the line haul does not meet the minimum charge, the system adds an invoice detail for the difference. In the example shown here, the line haul charges for this Rate by Detail order do not equal the $500 minimum charge recorded for Bill To company, LIZSAN.
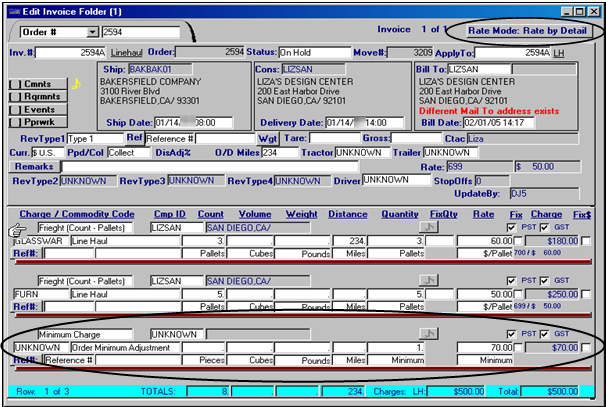
An invoice detail for the adjustment is added.
Although the detail for the adjustment uses the Minimum Charge system code charge type, it is used differently than it would be if you used it to create a minimum charge rate. Special coding has been added to allow the Order Minimum Adjustment description, to be displayed. This description is not shown when the charge type is used for a minimum charge rate.
|