City File Maintenance
What is a city profile?
A city profile is an electronic file containing all data relevant to an individual city. Information such as the area code, latitude, longitude, and operations regions may be found in a city’s profile.
A profile must exist for each city where you wish to show your resources. These city profiles are most commonly furnished with a purchased mileage interface, but they may be added to, deleted, or modified.
The City File Maintenance window is used to record city profile information.
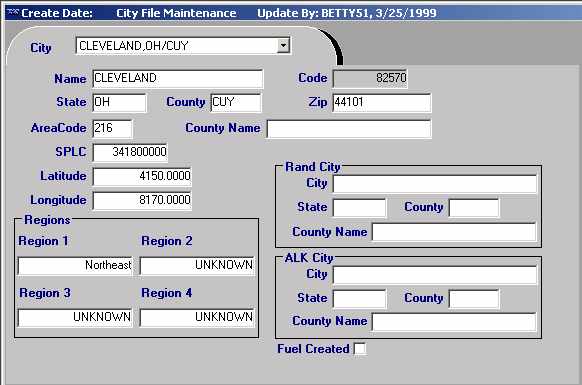
City File Maintenance window field definitions
General information
Name |
The city’s name. A maximum of 18 characters is allowed. |
Code |
Unique identification code for the city. |
State |
The two-character code that represents the state or province in which the city is located. |
County |
The three-character code that represents the county in which the city is located. |
Zip |
Five-digit or nine-digit zip/postal code for the city. |
Area Code |
Three-digit area code for the city. |
County Name |
The complete county name. |
SPLC |
The 9-digit Standard Point Location Code. Note: SPLC codes identify each location for originating/ receiving freight. The Continental Directory of Standard Point Location Codes, published by the National Motor Freight Traffic Association (NMFTA), provides a nine-digit code number for locations in the United States, Canada, and Mexico. |
Latitude |
Numeric code that represents the latitude for the city. |
Longitude |
Numeric code that represents the longitude for the city. |
Regions section
The names of these fields are user-defined in the RegionTypes label, accessed in System Administration. The options for these fields are user-defined in the Define Regions window, accessed in System Administration. For more information on customizing these fields, refer to the appropriate chapters in the System Administration guide.
Region Type 1 |
Area within Region 1 to which the city belongs. |
Region Type 2 |
Area within Region 2 to which the city belongs. |
Region Type 3 |
Area within Region 3 to which the city belongs. |
Region Type 4 |
Area within Region 4 to which the city belongs. |
Rand City and ALK City sections
These fields represent the correspond Rand or ALK city for mileage lookups if different from your city file entry. For example, your city file may use "St." for "Saint" or "Hts." for "Heights", etc.
City |
The city name, as it is provided by Rand or ALK. |
State |
The state in which the city is located. |
County |
The three-character abbreviation for the county in which the city is located. |
County Name |
The complete name of the county in which the city is located. |
Adding/maintaining a city record
Primary city profile information is recorded in the City File Maintenance window.
Adding a city to your system
A city is added to the system by creating a profile for the city.
-
Select Edit > Cities, or click
 City in the frame toolbar. A blank City File Maintenance window is displayed, along with the city sheet toolbar.
 -
To display a new city profile, do one of the following:
-
Select File > New.
-
Click
 New in the sheet toolbar.
-
-
Complete the city profile by entering data in all appropriate fields, leaving those fields that do not apply blank. Use TAB to move forward through data fields; use SHIFT+TAB to move backwards through the fields.
-
If the city is set up just for use in your fuel export interface, select the Fuel Created check box.
Note: Fuel Created cities are not displayed in city drop-down lists.
-
Do one of the following:
-
Select File > Save
-
Click
 Save in the sheet toolbar.
-
Recording latitude and longitude data in the city profile
You can record latitude and longitude data for a city in its profile. The latitude and longitude data recorded in the city profile may be used by:
-
TMWSuite’s Dispatch features:
-
Available Tractor Lookup
-
Closest Available Units
-
Check calls that have been manually entered
-
Map plotting
-
Sort Power Closest to Trip and the Sort Trips Closest to Power commands
-
-
TotalMail
-
Some mobile communications systems
Latitude and longitude information can be entered manually in the city profile, or you can pull latitude and longitude data directly from your PC*MILER software on a city-by-city basis.
| This feature works with ALK’s PC*MILER|Streets. At this time, the RAND mileage utility is not supported. |
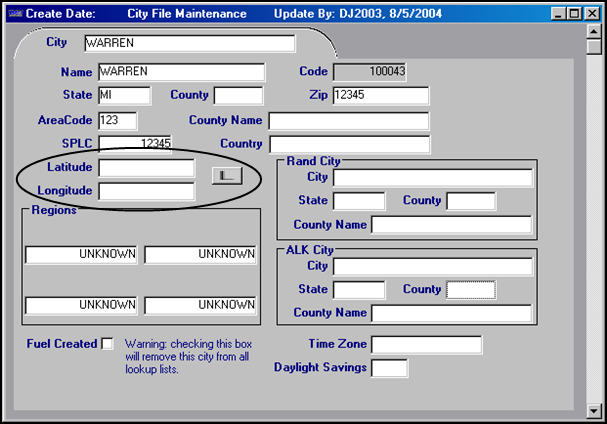
Activating the latitude/longitude feature
The latitude/longitude feature works in conjunction with ALK’s PC*MILER|Streets. The ![]() Get Lat/Long button is available in the city profile when the existing INI setting,
Get Lat/Long button is available in the city profile when the existing INI setting, [PCMilerMap]MappingInstalled, uses either of these options:
-
PCMILERSTREETS -
PCMILERSTREETSNEW
Using the latitude/longitude feature
Follow these steps to populate the Latitude and Longitude fields in the city profile from your PC*MILER software.
-
Open the city’s profile.
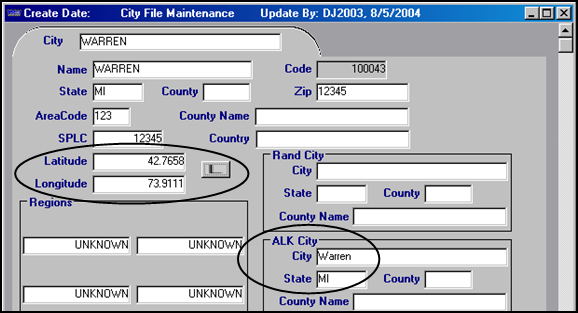
-
In the ALK City section, fill in these fields:
City
Enter the city name, as recorded by ALK.
Note: For instructions on accessing ALK city names, contact your ALK support representative.
State
From the drop-down list, select the state in which the city is located.
Note: Tab out of the field to complete your entry.
-
Click
 Get Lat/Long. After a moment, the system populates the Latitude and Longitude fields.
Note: The system will overwrite any existing latitude/longitude data.
-
Click
 Save before exiting the profile.
Looking up a city record
-
Select Edit > Cities, or click
City in the frame toolbar. A blank City File Maintenance folder a, along with the icons that make up the city sheet toolbar. -
In the tab area of the folder, enter the city name.
-
To display the city profile, do one of the following:
-
Press ENTER
-
Select File > Open.
-
Click
 Open in the sheet toolbar.
-
Deleting a city record
It is not recommended that you delete city records. However, if needed, you can delete a city record, as long as it has never been recorded as the location for a stop on a trip.
| The system does not check for references to a city on any records other than trips. |
-
With the record for the city you want to delete displayed in the City File Maintenance window, do one of the following:
-
Click
 Delete in the sheet toolbar.
 -
Select File > Delete.
-
-
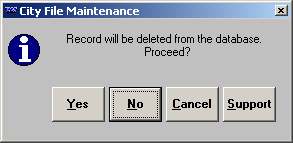
The system will ask for confirmation before deleting the city record.
-
Click Yes to delete the city record.
The system checks to see if the record has been used on an order.
-
If the system check shows that the city was never used on a trip, the record will be deleted.
-
If the system check shows that the city has been used as the location of a stop on a trip, the record will not be deleted and a message similar to the one shown here is displayed:
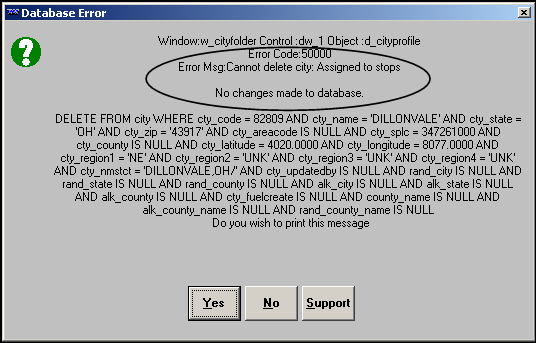
In this example, the city has been used as a stop location on an order and will not be deleted.
-