Adding/maintaining miscellaneous trailer information
From the Trailer File Maintenance window, you can access a number of supporting windows used to record supplemental trailer information. These windows are listed here:
| Window | Icon | Used to: |
|---|---|---|
Trailer photo area |
— |
Add a photo to the trailer profile. |
Driver/Equipment Status |
|
Schedule key activities for trailers, as well as dates and reasons they will be unavailable for service in the future. |
Assignment History |
|
Look up a list of trips to which a trailer was assigned during a specific date range. |
Accessories |
|
Record trailer characteristics and/or supplemental items carried by the trailer. |
Trailer Details |
|
Record information about the trailer compartments. |
Extra Info |
|
Custom feature. |
Notes |
|
Record free-form notes about the trailer. |
Viewing, adding, or deleting photos in a trailer profile
You can include photos in Trailer File Maintenance using these methods:
-
You can attach one photo directly to a trailer profile. This photo is visible automatically when you open the profile.
-
You can attach and view multiple photos to a trailer profile using the View Attached Object window.
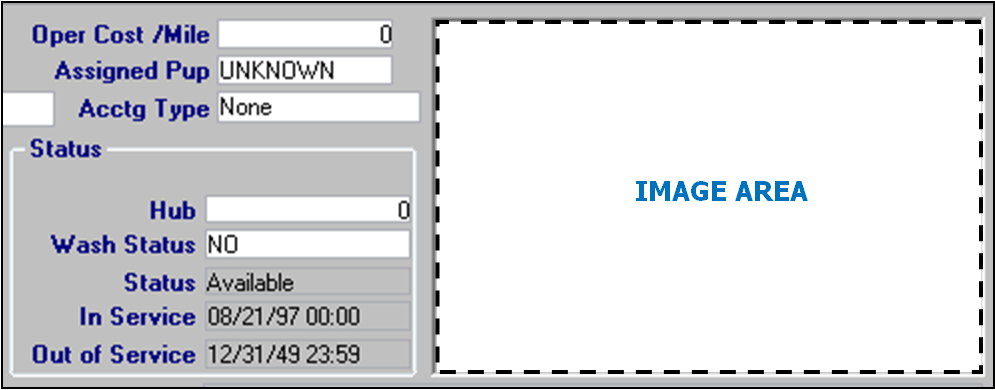
Inserting a photo in the Trailer File Maintenance window
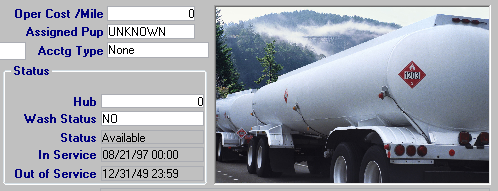
The trailer profile window contains an image area that can store and display one image. The image will be visible when you access the trailer profile.
To add or change a trailer profile image, follow these steps.
| If the area already contains an image, the image will be replaced when you assign another. |
-
Click within the image area.
-
In the Select File window, select the format of the image file that you want to add in the Files of Type drop-down list.
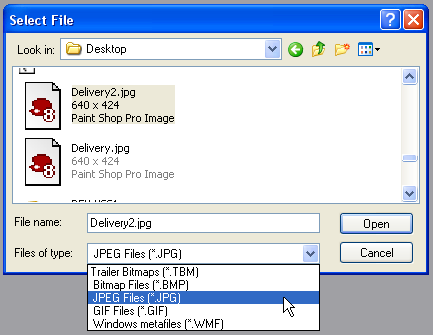
Note: You can add a .BMP, .JPEG (.JPG), .GIF, or .WMF image file.
-
In the upper part of the window, browse to the image file you want to add, and click the file name. The file name appears in the File name field.
-
Click Open. The image appears in the Image Area.
-
Save the profile.
Deleting a photo from the Trailer File Maintenance window
The trailer profile image area does not include a button to delete an attached photo. However, you can restore a blank image area to the trailer profile using these steps:
| This technique works only for trailer profiles. |
-
On your desktop, right-click and select New > Text Document from the shortcut menu.
-
Change the new text document’s file name to something descriptive, such as "NO_IMAGE.JPG."
Note: The filename extension must be ".JPG".
-
Using the steps listed for Inserting a photo in the Trailer File Maintenance window, attach the file you just created to the profile. The image area becomes blank.
-
Save the profile.
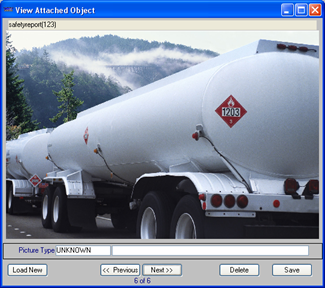
Viewing and attaching photos in the View Attached Object window
You can include multiple photos or other types of images in a trailer profile using the View Attached Object window. This window is also available in Driver, Company, and non-driver employee profiles.
If this is your first time attaching photos to a profile, see Setting up the File Maintenance photo feature to confirm your system is set up properly.
| Your TTS50 file must be set up to enable accessing profile photos, and the computer must have Microsoft Office 2003 or later installed. |
-
Select View > Photo, or click
 Photo in the sheet toolbar.
The View Attached Object window opens. Here, the window displays an image.
-
In the View Attached Object window:
-
To scroll through all photos attached to the profile, click the Previous or Next button.
-
To add a photo or edit fields, continue with Step 3.
-
If you are finished with the View Attached Object window, click
 to close the window.
-
-
To add a photo, click Load New.
-
Browse to and select the photo you want to add.
-
In the Picture Type drop-down list, select a picture type.
Notes:
-
The options in this field are defined by your company, using the PictureType label.
-
If you want to add or modify this field for an existing photo attachment, select an option from the drop-down list and re-save the attachment.
-
This step is optional unless you have
[Misc]RequireTypeOnPicture=Yin your TTS50.
-
-
If you want, you can enter a comment in the field to the right of the Picture Type field.
Note: In you want to add or modify information for an existing photo attachment, edit the field and re-save the attachment.
-
Click Save to store the photo.
-
Click
in the upper right corner of the View Attached Object window to close it.
Deleting a photo in the View Attached Object window
To delete a photo from the View Attached Object window, follow these steps:
-
In the View Attached Object window, click Previous or Next to select the photo you want to delete.
-
Click the Delete button. The system asks for confirmation.
-
Click Yes. The system deletes the photo.
-
Click Save.
-
Click
in the upper right corner of the View Attached Object window to close it.
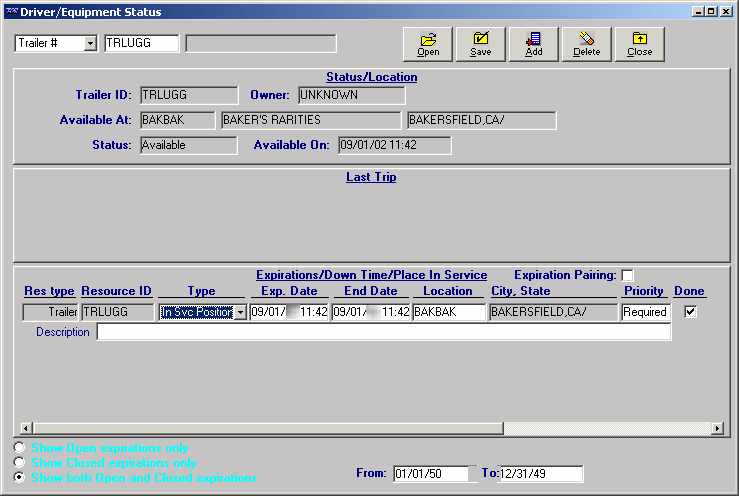
Recording/viewing a trailer’s expirations
TMWSuite allows you to schedule key activities for your resources, as well as dates and reasons they will be unavailable for service in the future. Key activities and out-of-service reasons are custom defined by your company in the System Administration module. Within the system, notices regarding key activities and out-of-service dates are referred to as expirations.
Expirations can be used to take trailers out of service, as well as to record dates scheduled for routine preventive maintenance.
Expirations are added, modified, and deleted in the Driver/Equipment Status window, which is accessed in File Maintenance and Dispatch. Any expiration record can be entered or updated in the File Maintenance application. Some records may also be entered or updated in the Dispatch application. Data entered in one application will appear in the other.
|
Two types of trailer expirations are set up in System Administration using the TrlExp and TrlStatus labels.
|
To access the Expirations window, do one of the following:
-
Select Edit > Expirations.
-
Click
 Expirations in the sheet toolbar.
| If you select the Expirations command with a trailer’s profile opened, the system will automatically display that trailer’s expirations. If you select the command with no trailer profile opened, the system will default to Trailer as the resource type, but you must enter the ID in the second of the two fields in the upper left corner of the Driver/Equipment Status window. |
When you enter an expiration record, you must specify its priority. There are two levels of priorities:
-
Priority 1
Critical expirations are assigned a priority of 1. Their completion is necessary before the system will allow dispatch of that resource on, or after, the expiration’s effective date. -
Priority 2
Expirations that are not critical are assigned a priority of 2. If a Priority 2 expiration is not completed by its effective date, the system will display a warning when you assign the resource to a trip occurring on or after that date. However, dispatch is allowed.
| User-defined priority values for expirations are set up in System Administration using the ExpPriority label in the label file. The code assigned to a priority value determines the priority’s effect on the system. A code of 1 signifies a Priority 1 value. A code of 2 or greater signifies a Priority 2 value. |
-
Required
The label option, Required, has a code of 1, which means it has a Priority 1 value. When an expiration is categorized as Required, dispatch of a resource with that expiration will not be allowed on, or after, the expiration’s effective date until the expiration is marked as completed. -
Key Date
The label option, Key Date, has a code of 9. Since the code is greater than 2, this means it has a Priority 2 value. Key Date can be used for an expiration that represents a significant date. Key Date expirations will never prevent resources from being dispatched.
Your System Administrator can give you a list of the Priority 1 and Priority 2 values set up for your company.
Selecting the status of expirations you want to view
In the lower left of the Driver/Equipment Status window, three radio buttons are used to specify the status of the expirations you want to see:
-
Show Open Expirations only
Displays expirations that are not marked as Done. -
Show Closed Expirations only
Displays expirations that were marked as Done within a specific date range. -
Show both Open and Closed expirations
Displays both open expirations and those that were marked as Done within a specific date range.
For example, to display only expirations for a trailer that were marked Done, follow these steps:
-
Select the Show Closed Expirations only radio button.

-
The From and To fields are displayed in the lower right corner of the window. They are used to record the range of completion dates for the expirations to be listed.
-
Enter the beginning date in the From field.
-
Enter the ending date in the To field.
-
-
Click Open. The system automatically displays all expirations that have been marked as Done and that have completion dates falling within the specified date range.
Note: Up to three expirations can be seen at one time. If more than three expirations are recorded, the system displays a scroll bar to the right. Use this bar to scroll additional expirations into view.
-
After you complete your review of the expirations, you can clear them from the window by deselecting the Show Closed expiration only check box.
Adding an expiration
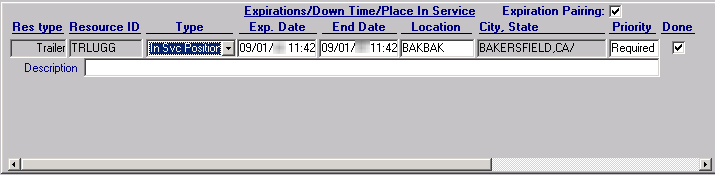
-
With the trailer’s profile opened, click Add. A new expiration line is displayed. The system automatically transfers the type of look up you initiated, such as Trailer, to the Res type field. The system also transfers the appropriate ID to the Resource ID field.

-
Make entries in these fields:
Type
Select the appropriate expiration type from the drop-down list that is displayed when you click in this field.
Note: The options are set up in the TrlExp label, accessed in System Administration.
Exp Date
Do one of the following:
-
If the expiration occurs on a specific date, enter that date here.
-
If the expiration involves a date range, enter the beginning date here.
End Date
Enter the date when the expiration is expected to be completed.
Location
If the resource is to go to a particular location to have the expiration satisfied, enter the company code for that site here.
City/State
If you made an entry in the Location field, the system will populate this field automatically. If no entry was made in the Location field, you can manually enter a city/state.
Priority
To rank the importance of the expiration, select the appropriate priority code.
Expiration Pairing
This field is not applicable in a trailer’s expiration.
Done
Do not make an entry here. This check box is used to mark the expiration as complete.
-
-
Repeat Steps 1 - 2 for each additional expiration to be recorded.
-
Click Save to keep your entries.
-
Click Close to exit the Driver/Equipment Status window.
Deleting an expiration
If an expiration has been recorded in error, you can delete it from the system.
-
Position the cursor in any field for the expiration to be removed.
-
Click Delete.
-
The system asks if you are sure you want to continue with the deletion. Do one of the following:
-
Click Yes to complete the deletion.
-
Click No to cancel the deletion.
-
-
If you selected Yes, Click Save. The system permanently deletes the expiration.
-
Click Close to exit the Driver/Equipment Status window.
Marking an expiration as complete
When an expiration has been satisfied, you must record its completion. Until you mark the expiration as Done, it is still in effect.
| Once a Priority 1 expiration has reached its effective date, the system will not allow the resource to be dispatched. |
Expirations can be completed manually in the Driver/Equipment Status window, or you can configure the system to automatically complete expirations of a particular type. For details on automatic completion, see the Expirations Guide.
For manual completion, follow these steps:
-
With the Driver/Equipment Status window open, select the Trailer # from the drop-down list in the top left of the window.
-
Enter the resource ID in the second field.

-
Click Open. All open expirations are displayed.
-
If needed, change the date shown in the End Date field.
Warning: If you complete an expiration before its End Date, you must manually change the date. The system does not update the date/time in the End Date field when you select the Done check box. Therefore, the system will consider the resource as unavailable until the date recorded in the End Date field, even though the expiration has been marked as completed.
-
Select the Done check box.

-
Click Save.
Notes:
-
If you have the Show Open expirations only radio button selected, the expiration record is no longer displayed in the window. The expiration is still displayed if you have the Show both Open and Closed expirations radio button selected.
-
Once the expiration is marked as Done, the system will not check future trip dates and times against its effective date(s).
-
-
Click Close to exit the Driver/Equipment Status window.
Activating the Expiration Audit report feature
TMWSuite allows you to track all changes that were made to a resource’s expirations in both the File Maintenance and Dispatch applications.
The feature is activated by the ExpirationAudit General Info Table setting.
When the feature is turned on, the Audit button is added to the Driver/Equipment Status window:
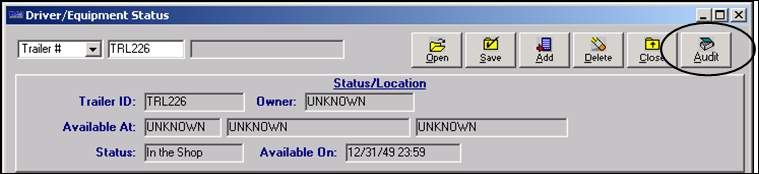
To view/print a report of the activity pertaining to all closed and opened expirations recorded for a resource, click Audit. The Expiration Activities window is displayed. Notice that the resource type and ID are included in the window’s title:
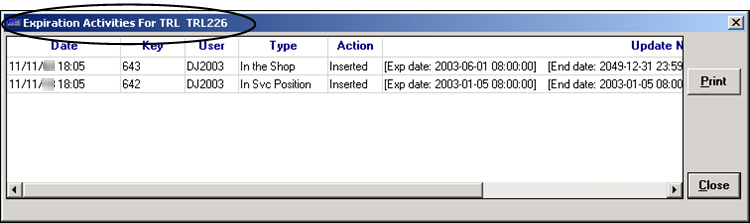
The activity is shown in chronological order, with the latest change as the first line. Information is displayed in these columns:
Date |
The date/time the expiration was created, updated, completed, or deleted. |
Key |
The unique, system-generated identifier assigned to the expiration by the system. Note: This column corresponds to the Key field in the Driver/ Equipment Status window. |
User |
The user ID of the person who recorded the expiration or made changes to it. |
Type |
The type of expiration, as recorded in the Driver/Equipment Status window. |
Action |
The type of change made, e.g., created, updated, deleted, or completed. |
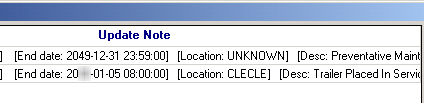
Update Notes |
Detailed information about the change(s) made. You can use the scroll bar at the bottom of the window to view the entire Update Note column.
|
| Activity is tracked only for expirations recorded after the feature has been activated. |
If desired, you can print the audit report. Clicking Print sends the report directly to your default printer.
Recording/viewing trailer accessories and inventory items
Trailer accessories are items attached to, or carried by, a trailer. Your customer may require an accessory for a trip; or the commodity type may require an accessory. For such trips, a load requirement may be recorded for that accessory.
When a tractor is assigned to the trip in Order Entry or Dispatch, the system will check the trailer profile to verify that trailer has the accessory. If not, a warning is displayed.
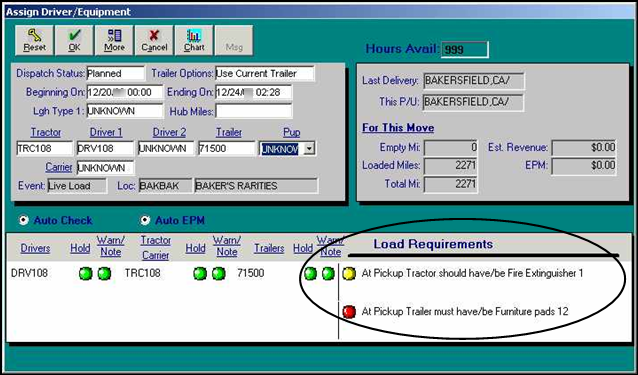
The Assign Driver/Equipment window, accessed in Order Entry, displays Load Requirements in the lower right corner of the window.
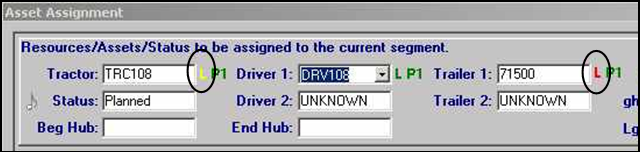
The Asset Assignment window, accessed in Dispatch, displays Load Requirements indicators next to the resource fields, once resources have been assigned on the trip.
-
For a missing must have accessory, the indicator is displayed in red.
Dispatch cannot proceed until a properly equipped trailer is assigned or you override the load requirement. -
For a missing should have accessory, the indicator is displayed in yellow.
Dispatch of the trailer can proceed.
The system tracks two types of trailer accessories:
-
Non-inventory items
Non-inventory items can be tools or equipment that can be used repeatedly, e.g., carts, tarps, chains, ramps, etc. -
Inventory items
Inventory items can be used up during normal operations and may need to be replaced or replenished from time to time, e.g., packing boxes, pallets, labels, etc. Inventory items and their quantities are recorded to ensure that the proper accessories are on hand.