Locations and geography
Adding a custom location for a company
When a company’s city location does not exist in your TMWSuite database or when there is no true street address, there are two features that allow you to create custom locations:
-
You can set up the system to add a new custom city record at the same time you create the company profile. This feature requires the use of a version of ALK’s PC*Miler that supports Custom Place entries.
-
You can use free-form geographic identifiers in place of a street address. This is a useful feature for any pickup or drop location, such as an oilrig site, that does not have a true street address. You may still need to add a city profile as described above since it is a system requirement that you have both an address and a city/state for any company location. However, the free-form geographic identifiers will display in place of the city/state in Order Entry, Dispatch, Invoicing and Settlements.
-
These features are independent of each other. You can use one feature for some companies and the other feature for other companies.
Adding a city profile from Company File Maintenance
You can add a city profile from within the Company File Maintenance window, provided you are using a version of ALK’s PC*Miler that supports Custom Place Entries. This feature extends the concept of city to any custom location such as an oilfield or new highway construction site that the company may want to use as a pickup or drop.
You must take two steps before you are ready to create a city profile from within Company File Maintenance:
-
Activate the Company City Creation feature using the
[FileMaint]AllowCompanyCityCreationsetting in your TTS50. When the feature is active, a check box displays in the Company File Maintenance window. -
Set up a matching Custom Place within PC*Miler.
| Not all versions of PC*Miler support this feature. It is not available with other software, such as Rand MileMaker. |
Setting up the system to add a city profile on the fly
The ability to have the system add a city profile from the Company File Maintenance window is controlled by the [FileMaint]AllowCompanyCityCreation INI setting. When the feature is enabled, you can create new cities and custom places on the fly or as you need them from within the Company File Maintenance window.
Creating a custom place in ALK’s PC*Miler
Before you can add a city profile to the TMWSuite database, you must create a matching Custom Place record within PC Miler. You identify the new city by Custom Name and by Location or latitude/longitude coordinates.

Make careful note of the entries you make in the Custom Place Manager window because you must enter exactly the same custom place name or lat/long coordinates in Company File Maintenance and you must close PC*Miler before you open the File Maintenance window.
| For information about creating a custom place, refer to your PC*Miler user documentation. |
Adding the custom place as a city while creating the company profile
Once you have created the custom place in PC*Miler, you can add a matching city record from the Company File Maintenance window.
-
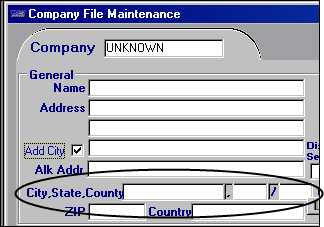
With the company profile opened, select the Add City check box. It is located next to the third Address field.
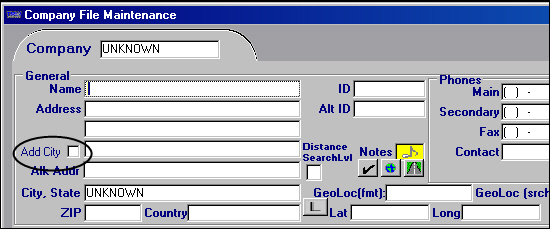
When you select the check box, the single City, State field is replaced by separate fields for City, State, and County.
-
Enter the custom place name in the City and State fields, or enter the lat/long coordinates in the Lat and Long fields.
-
Complete the company profile and save.

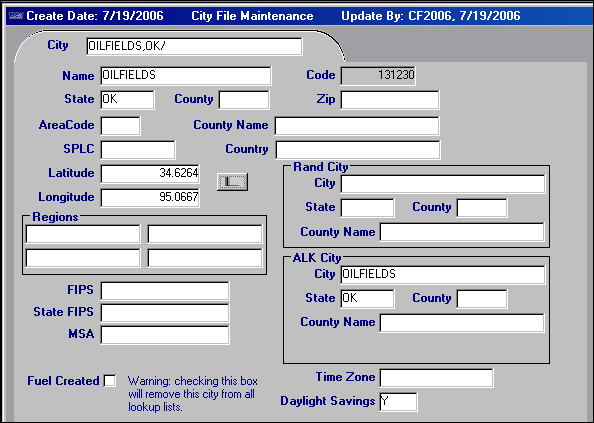
When you save, the system verifies the mileage between Beachwood, Ohio and the new location. The city profile is saved, even when the mileage cannot be verified. Now when you access the City File Maintenance window, you can retrieve the record for the new location.
Using free-form geographic identifiers for company locations without standard addresses
You may have customers with pickup or drop locations that do not have true street addresses, such as oil rig sites. To allow you to enter stops on orders without using a shipper/consignee street address, geographic location fields are provided on the company profile. If more than one of your customers uses the same pickup/drop location, you can record the same geographic location in the profiles of multiple companies.
|
Technically, a geographic location can replace both a street address and the city/state. However, since TMWSuite requires that company profile include a city, you must enter one. If needed, you can set up a fictitious city in your city table to use when recording geographic locations for companies. However:
|
Geographic location fields are displayed in more than just the company profile. They can also be found in these windows:
-
Order Entry Folder
-
Dispatch’s Trip Folder and Planning Worksheet
-
Edit Invoice Folder
-
Trip Settlements Folder
-
Find Companies scroll window’s Address tab
Recording a geographic location for a company
With the company profile for which you want to record a geographic location displayed, do the following.
| To accommodate the various standards that TMW clients use to record geographic locations; both GeoLoc fields in the company profile are free-form text fields that accept up to 50 alphanumeric characters. |
-
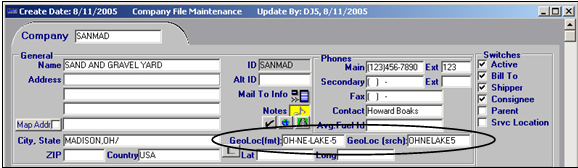
In the GeoLoc(fmt) field, enter the geographic location using the formatting your company requires.
-
In the GeoLoc(srch) field, enter the geographic location in the format that a search should use, i.e., without formatting.
The system uses your entry in this field when you search for companies based on a geographic location.
-
Save your entries.
How geographic locations are displayed
Once a geographic location has been recorded for a company, it is displayed as the shipper or consignee location on orders instead of a city/state. In our sample order #2992, the shipper has a geographic location displayed in the order header. The geographic location also appears in the Stop Detail section.
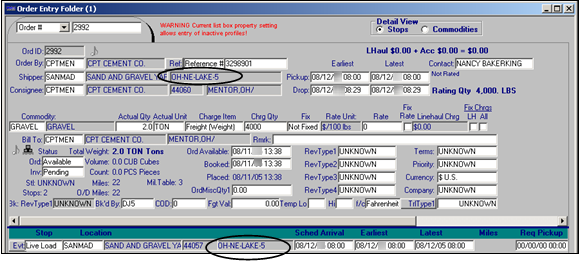
| To see the city/state recorded for the location, right-click the company ID and select the Company: Information command. This gives you access to the company profile. |
In Dispatch’s Trip Folder, the geographic location recorded for a company displays in the Geo Location column in the Freight Detail grid.
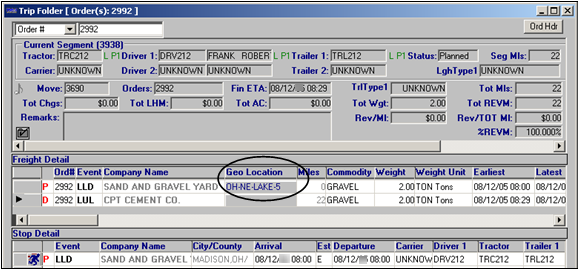
Geographic location data does not display in the Trip Folder’s Stop Detail grid.
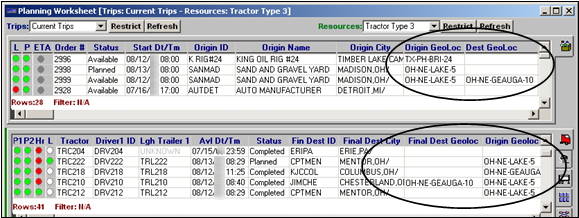
In Dispatch’s Planning Worksheet, the geographic location recorded for a company displays in the Origin GeoLoc and the Final Dest GeoLoc columns in both the Available Trips grid and the Available Power grid.
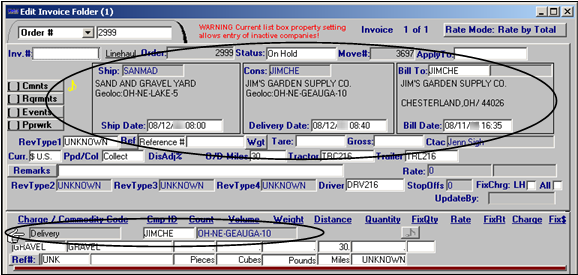
In the Edit Invoice Folder, when a geographic location is recorded for the shipper and/or consignee company, the geographic location is displayed instead of the city/state in the respective company’s information in the invoice header. It is also shown in the Delivery information in the invoice detail section of the window.
In the example below, notice that a geographic location is recorded for both the shipper and consignee. Also, notice that the system does not display a geographic location for the Bill To.
|
Geographic locations do not:
|
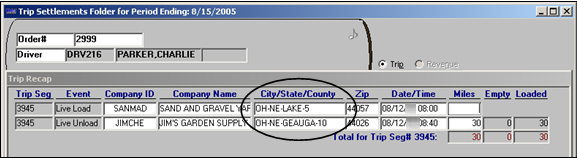
In the Trip Settlements Folder, when a geographic location is recorded for the stop company, it is shown in the City/State/County field.
Using geographic location as company search criteria
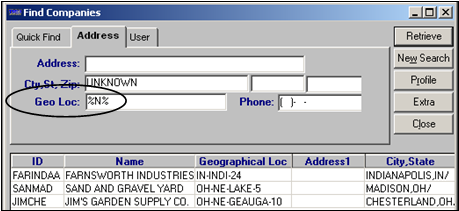
The Geo Loc field is found on the Address tab of the Find Companies scroll window. You can use it as search criteria when retrieving a list of companies. Enter a complete geographic location or a partial one with a wildcard. The percent sign (%) is the wildcard symbol. It can be entered before and/or after the partial geographic location.
Dispatchers are often accustomed to entering an unformatted portion of the official code for a geographic location. With the unformatted code recorded in the GeoLoc(search) field in the company profile, dispatchers can use a portion of the code as search criteria to retrieve the correct company. For example, the standard geographic location is 00 12-03-065-09 W4 and dispatchers normally use 0306509 as the look up criteria. They can still enter 0306509 in the Geo Loc field in the Find Companies scroll window. This search uses the alternate version of the formatted code.
If you frequently look up companies by geographic location, you can use the [Misc]CompanyScrollStartField=GeoLoc setting in your TTS50 to make the look up process faster. This setting allows you to designate the Geo Loc field as the default field in which the cursor will be located whenever you select the Tools > Find Companies command.
|
Determining a company’s latitude and longitude
You can use any of these methods to record the latitude and longitude in a company’s profile:
-
Automatic lookup using PC*MILER|Streets V.14 or later
Note: Lookups can be done on a company-by-company basis, or they can be done for multiple companies at one time. -
Manual entry
-
GPS readings
Notes:
-
The automatic update via GPS readings operates only if the following is true:
-
You are using TotalMail V.6.4.661 or later.
-
You are using the PeopleNet mobile communication system.
-
In PeopleNet, PACOS? and Geofence support has been activated.
-
-
See the TotalMail PeopleNet interface setup and operation guide for details on setting up PeopleNet and PACOS, and on GPS-based latitude and longitude lookups.
-
Configuring the system to use PC*MILER|Streets for lookups
If you use PC*MILER|Streets V.14 or later, you can use three INI settings to set up the company latitude/longitude lookup feature:
-
Configure the system to use PC*MILER|Streets V.14 or later.
[PCMilerMap]MappingInstalled -
Determine whether latitudes should be considered North or South.
[Internationalize]DefaultLatitude -
Determine whether longitudes should be considered East or West.
[Internationalize]DefaultLongitude
The system uses these data elements from the company profile when it attempts to retrieve a company’s latitude and longitude from PC*MILER|Streets:
-
Address 1
-
Address 2
-
ZIP/postal code
-
City/state or province
Note: If a lookup is based on city, the latitude and longitude used will be those of the exact center of the city.
Recording latitude/longitude information in a company’s profile
To populate an individual company’s Lat and Long fields:
-
Open the company’s profile in File Maintenance.
-
Do one of the following:
-
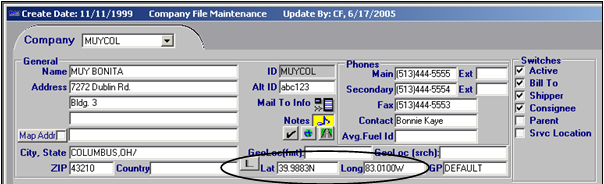
Manually enter latitude and longitude information in the Lat and Long fields.
-
To have the system automatically look up latitude and longitude, you must:
-
Enter a city/state or province, at minimum. In addition, a valid street address and ZIP Code or postal code will ensure the retrieval of the most accurate latitude and longitude values.
-
Click the
 Get Lat/Long button.
-
-
When you have the system look up the latitude and longitude in PC*MILER|Streets, the values it finds depend on the accuracy of the address information you have recorded in the company profile. One of the following occurs:
-
If you have entered a street address that is an exact match to an address in PC*MILER|Streets, the system will use that address to determine the latitude/longitude. Those values are written automatically to the Lat and Long fields.
-
If the system cannot find a PC*MILER|Streets address that matches exactly, it looks for a close match. If it finds one, the latitude/longitude values are written automatically to the Lat and Long fields.
-
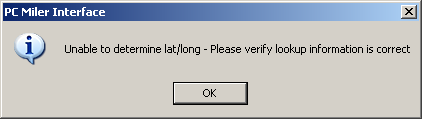
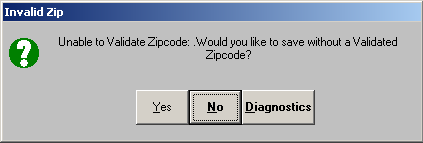
If it cannot find a close match, it will not update the Lat and Long fields. Instead, it will display an invalid address message, similar to this:
Assigning a confidence rating to a lat/long reading
The Additional Details window, accessed through the Company File Maintenance window, contains a Times Verified field in the Company Lat/Long area. This field serves as both an accuracy indicator and a control device for fine-tuning a company’s latitude and longitude.
When you click the ![]() button in the lower right corner of the Company File Maintenance Folder, the Additional Details window opens.
button in the lower right corner of the Company File Maintenance Folder, the Additional Details window opens.

The Times Verified field is circled in this illustration of the Additional Details window.
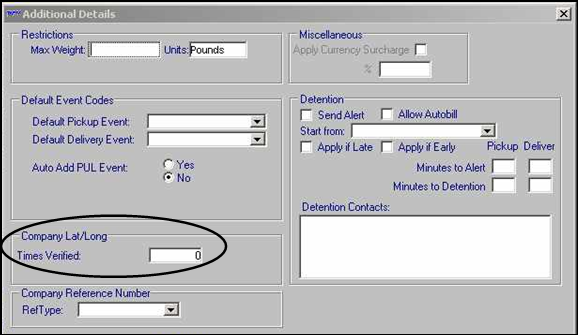
If the number shown in the Times Verified field is greater than zero, it represents the number of GPS sightings used to average the company’s latitude and longitude values-the higher the number, the greater the confidence (accuracy) level.
For example, an entry of 20 means that the lat/long reading has the confidence level of 20 GPS readings. An entry of 50 means the lat/long reading has the confidence level of 50 GPS readings. Therefore, an entry of 50 indicates greater accuracy than an entry of 20.
The Times Verified field can be updated in one of three ways:
-
The number increments automatically with each additional GPS reading that is within a user-specified distance from the company location.
The automatic update via GPS readings operates only if you are using TotalMail V.6.4.661 or later. Also, one of the following must be true:
-
You are using the TotalMail Omnitracs(tm) Automated Arrival and Departure (AAD) facility that is part of the TotalMail - TMWSuite check call interface.
or
-
You are using the PeopleNet mobile communication system, and PACOS? and Geofence support has been activated.
In addition, you must activate the feature using the
TMUpdCmpLatLongToleranceGeneral Info Table setting. For details, see Using TotalMail to auto-tune a company’s latitude and longitude. -
-
You update the number manually.
This method is useful if you do not have PeopleNet, but would still like to assign a confidence level. Although your manual entry is not based on a number of GPS readings, you can enter a number that is equal to the confidence level represented by a particular number of GPS readings.
If you are using PeopleNet, you can change the number manually to adjust the confidence level.
-
You use the Mass Lat/Long Assign window to have the system use PC*MILER|Streets to look up latitudes and longitudes for multiple companies.
The Mass Lat/Long Assign window assigns confidence levels based on the quality of the criteria used to determine the latitude and longitude. For details on this window, see Assigning latitudes/longitudes for multiple companies at one time.
Using TotalMail to auto-tune a company’s latitude and longitude
Auto-tuning latitude and longitude is supported for the AAD facility and the PeopleNet interface.
-
You can configure the AAD facility to reset the latitude-longitude value for a company when the GPS sighting on an Auto-Arrive form message is different from the company’s recorded latitude-longitude value.
-
When a driver arrives at a company destination, the PeopleNet mobile communication terminal prompts the driver to confirm the arrival. When the driver confirms the arrival, the standard PACOS Arrived macro, containing a GPS sighting, is sent to TotalMail.
Activating the auto-tuning feature
To enable auto-tuning, you must do the following:
-
To enable it for a specific company, you must open its profile, access the Additional Details window, and set the Times Verified field to 0.
-
For any companies where the Times Verified field is to set to 0, activate the feature via the
TMUpdCmpLatLongTolerancesetting in the General Info Table. It determines the tolerance level for a GPS sighting, as well as whether an out-of-tolerance reading generates an error in TotalMail.
Deactivating the auto-tuning feature
To disable auto-tuning, you must do the following:
-
To disable it for a specific company, you must open its profile, access the Additional Details window, and set the Times Verified field to -1.
-
To deactivate the feature for all companies, set the Int1 field in the
TMUpdCmpLatLongToleranceGeneral Info Table setting to -1. Another option is to edit the PACOS Arrival form (for PeopleNet) or edit the Auto-Arrive form (for AAD). Delete the Update Company Lat-Longs view.
How auto-tuning works
For PeopleNet
When a driver arrives at a company destination, the PeopleNet mobile communication terminal prompts the driver to confirm the arrival. When the driver confirms the arrival, the standard PACOS Arrived macro, containing a GPS sighting, is sent to TotalMail.
For AAD
When a driver arrives at a company destination, the AAD facility creates an Auto-Arrive form message, containing a GPS sighting.
For both PeopleNet and AAD, the lat-long tuning process works as follows:
-
If the company lat-long is set to -1, no tuning occurs.
-
If the GPS sighting is out of tolerance, no tuning occurs. If String1 in the
TMUpdCmpLatLong Tolerancesetting is set to E, the Arrived message is failed by TotalMail and set with error information. -
If the GPS sighting is within tolerance and a lat-long does not exist for the company, the GPS sighting is set as the new lat-long.
-
If the GPS sighting is within tolerance and a lat-long exists for the company, the value in the Times Verified field increments, and the company lat-long is averaged to include the new lat-long, weighted according to the verifications count.
Assigning latitudes/longitudes for multiple companies at one time
If you prefer not to look up latitude and longitude values on a company-by-company basis, you can use the Mass Lat/Long Assignment window, which allows you to have the system:
-
Automatically assign values for companies that are missing latitude/longitude entries, and
-
Override values for companies that have existing entries.
Follow these steps to populate the Lat and Long fields for a group of companies.
-
Select Edit > Populate Company Lat/Long.
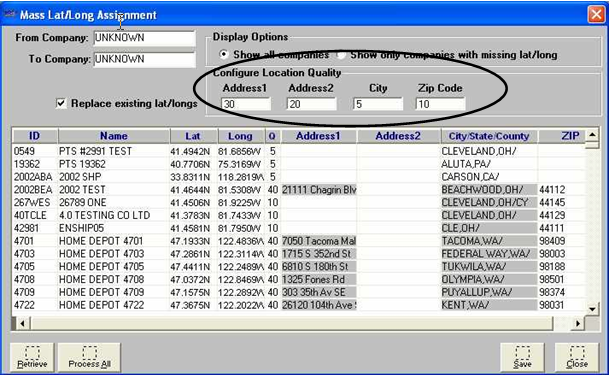
The Mass Lat/Long Assignment window is displayed.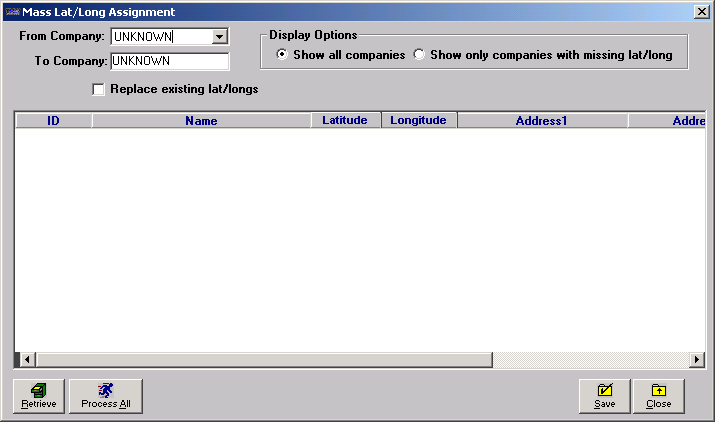
-
In the From Company and To Company fields, enter company IDs to specify the range of company records to be retrieved.
Notes:
-
The system will retrieve a list of all companies having names that fall alphanumerically within the range you entered in the From Company and To Company fields.
-
To retrieve all companies, leave UNKNOWN in the From Company and To Company fields.
-
-
In the Display Options section, select either of these radio buttons:
-
Show all companies
Show all companies in the range specified in the From Company and To Company fields. The system will look up latitudes and longitudes for all companies that do not already have these values.Note: By default, companies that already have latitude and longitude values will be listed, but those values will not be overridden.
-
Show only companies with missing lat/long
Show all companies in the range specified in the From Company and To Company fields that are missing latitude/longitude information.
-
-
If you selected the Show all companies option in Step 3 and you want to override existing latitude/longitude entries, select the Replace existing lat/longs check box.
-
Click Retrieve. The system lists all the companies that fall within the range you specified.

In this illustration, the names of all companies except the last one are shown with a red background. When you retrieve a list of companies, in addition to red, you may see a green background for some companies and a white background for others. For an explanation of the color-coding, see How numeric codes and color codes are used to indicate confidence levels.
-
Click Process All to update the company profiles.
Notes:
-
Under normal conditions, the mass assignment of latitude/longitude to company profiles is a quick process. Depending on your configuration, the system should process several companies per second. You can test the processing speed by processing a portion of your companies.
-
It is recommended that you monitor the system as it processes latitude/longitude positions. If the system encounters errors, a message displays to indicate the problem, and processing will be paused until you click OK.
-
If latitude and longitude are retrieved successfully for a company shown with a red background, the background changes to white.
-
-
Click Save.
How numeric codes and color codes are used to indicate confidence levels
When you click the Process All button in the Mass Lat/Long Assignment window, the system uses each company’s address, city, and/or ZIP Code or postal code to determine its latitude and longitude. When you use TotalMail to update lat-longs, the system uses GPS readings.
Color-coding is used to indicate whether a lookup was successful. It also identifies the confidence level assigned to a successful lookup. In addition to colors, the system assigns a numeric code that indicates the criteria used to determine the latitude and longitude. It is shown in the Q column.
This illustration shows the list of companies after processing in the Mass Lat/Long Assignment window.
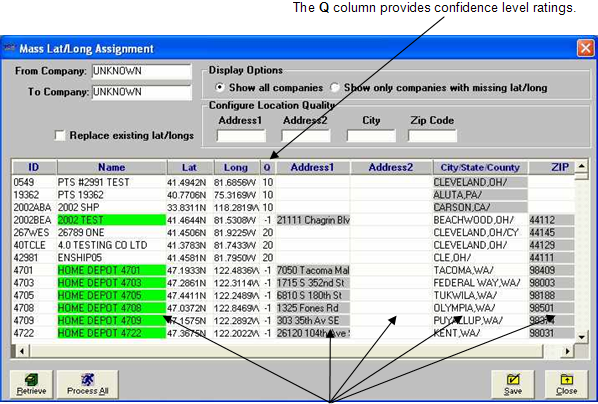
Colors in the Name, Address 1, Address 2, City/State/County, and ZIP columns indicate success level of the lookups, as well as which data elements were used to determine the lat/longs
| The number in the Q column reflects what is recorded in the Times Verified field in a company’s profile. |
By default, the system uses one or more criteria-the company’s address, city, and/or ZIP/postal code-to determine its latitude and longitude. It assigns numeric confidence values based on which of these data elements (or combination of data elements) it used to determine the latitude and longitude. However, if you want, you can assign your own quality codes.
The quality code for each lat/long lookup is displayed in the Q (Quality) column. Meanings of colors and the confidence indicators are listed here:
| Color | Shown In | Confidence level indicator in Q column | Meaning |
|---|---|---|---|
Red |
Name field |
Blank |
These conditions cause this:
|
White |
Name field |
10 (Lowest rating the system can assign.) |
Lookup was by city/state only. |
White |
Name field |
20 |
Lookup was by ZIP/postal code only. |
White |
Name field |
30 |
Lookup was by Address 2 and city/state. |
White |
Name field |
40 |
Lookup was by Address 1 and city/state. |
White |
Name field |
50 |
Lookup was by Address 2 and ZIP/postal code. |
Green |
Name field |
-1 (Highest rating the system can assign.) |
Lookup was by Address 1 and ZIP/postal code. |
Gray |
Address 1, Address 2, City/State/County, and ZIP fields |
N/A |
Indicates the criteria the system used when it performed the lookup. For example, if it used city/ state and ZIP, those columns would have a gray background. |
| If you use user-defined quality codes, the system default quality codes listed in this table are not applicable. However, the information in the Color, Shown in, and Meaning columns remains the same, with one exception: You will never see the color green in the Name field. Green represents a quality code of -1, which is a numeric value that cannot be attained by totaling user-defined values. |
Using user-defined confidence options to rate accuracy of lat/long lookups
You can define your own confidence level codes, instead of using the system-assigned codes. With one exception, a system default quality code represents the number of GPS sightings used to average the company’s latitude and longitude values. For example, an entry of 20 means that the lat/long has the confidence level of 20 GPS readings. An entry of 50 means the lat/long has the confidence level of 50 GPS readings. Therefore, an entry of 50 indicates greater accuracy than an entry of 20. The exception is the use of -1. This code is displayed when the lookup is by Address 1 and ZIP/postal code; it is defined as the highest rating.
If you prefer not to use the hard-coded values to identify confidence levels, you can assign your own numeric quality values to lookup criteria. The Configure Location Quality section is located in the upper portion of the window. It consists of the Address1, Address2, City, and Zip Code fields. You can enter a separate confidence value for each of these fields. When the system calculates the lat/long for a company, the codes for the criteria used in the lookup are added together and the total is used as the confidence level quality code. Lookups with the highest totals are deemed to have the most accurate latitudes/longitudes. Totals are shown in the Q column.
The following examples illustrate the confidence level results you would get when using the system default quality values, and the results you would get when you assign your own quality values.
In this example, no user-defined confidence values have been entered. Therefore, the results reflect the system default values.
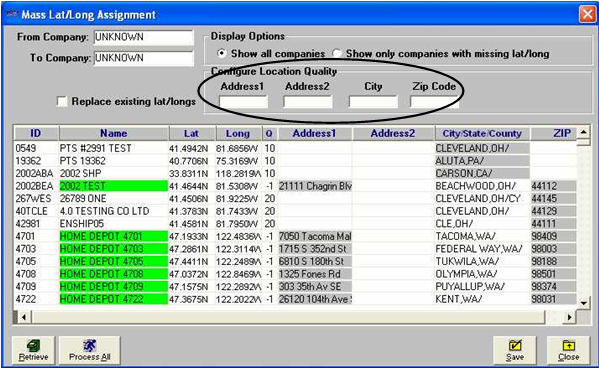
In this example, a user-defined confidence value has been entered for each field in the Configure Location Quality section.
|
Running the Company City test
When entering companies into the master company file, you may record a city location that is not in your mileage database. This can cause errors down the line, e.g., in Order Entry, Dispatch, Invoicing, or Settlements. To ensure that the system can return mileage for every company’s city location, you can run the Company City test. This test allows you to verify the mileage between all cities entered in company profiles and Beachwood, Ohio.
To run the test, follow these steps:
-
Select Tools > Company City Test.
Note: The Tools > Company City Test command is available only in the File Maintenance application.
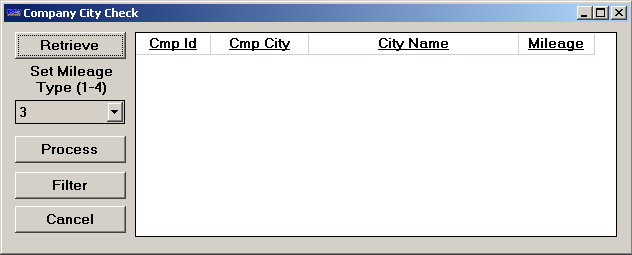
The Company City Check window displays:
-
Click Retrieve. The system retrieves the list of companies.
-
In the Set Mileage Type (1-4) field, select the mileage type to use for the check.
Mileage types are defined in your TTS50, using settings in the
[MileageInterface]and the[MileageType]sections.For example, in our TTS50, the ALK mileage interface is defined as:
[MileageInterface]
XFace[3]=A - ALK
Type[3]=P - Practical
Path[3]='DLL'
And we specified the same interface to be used when the system needs to look up mileage:
[MileageType]
Default=3
Operations=3
Billing=3
Settlements=3
FuelTax=3
Inquiry=3
Empty=3
Note: For more information about mileage setup, see the Mileage database maintenance chapter in the System Administration guide.
-
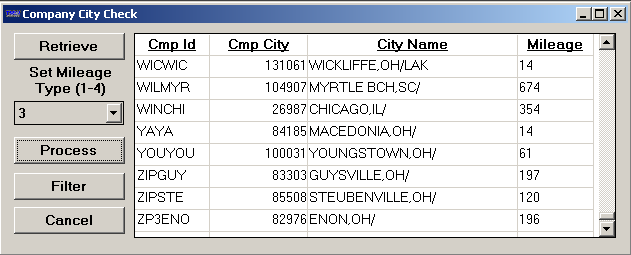
Click Process. As the system determines the mileage between each company’s city and Beachwood, Ohio, mileage lookup messages will flash briefly on the screen. When the process is complete, the columns in the Company City Check window will display the following information:
Cmp ID
The unique identifier assigned to the company in the company table.
Cmp City
The unique code assigned to the city in the city table.
Note: TMWSuite assigns alphanumeric codes to cities as they are recorded in the city master file in File Maintenance. The system uses the codes in tables, rather than the city name. To provide an actual city name, the system uses the city code number in a table to look up the actual name from the city table.
City Name
The actual name of the company’s city location.
Mileage
The distance between that company’s city and Beachwood, Ohio, using the specified mileage lookup.
In our example, the Mileage column shows the distance calculated using ALK’s practical mileage lookup.
-
To view a list of those company cities for which the mileage test failed, click Filter. The list is limited to those company cities that have a negative (-1) value in the Mileage column.
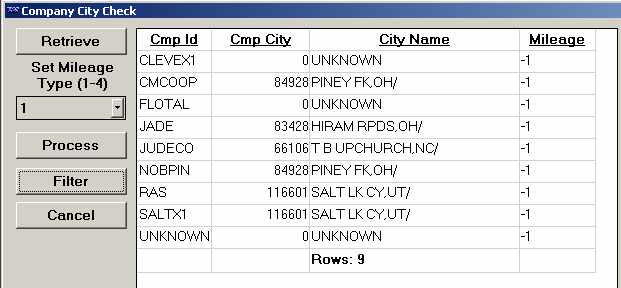
You will need to add city records for each of the company cities that failed the mileage test.
Verifying company ZIP Codes
Use the [Misc]VerifyCmpZip setting in your TTS50 to configure TMWSuite to verify the ZIP Codes entered on company profiles. The system uses the ALK mileage application for verification. If the combination of city and ZIP Code in ALK is different from the combination in the company profile, a warning message will display.
| This feature works only if you are using an ALK mileage application. The feature does not work with Rand mileage applications. |
In our example, we have entered 44101 in the ZIP field of the Company File Maintenance window for company TMWBEA, which is located in Beachwood, OH:
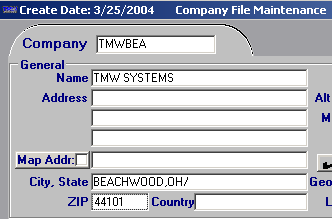
Because we have VerifyCmpZip=Y in our TTS50, when we save the company profile the system checks the ALK mileage application for the city associated with the entry in the ZIP field. The system then compares the city identified in ALK with the city entered in the City, State field in the company profile.
Because the two cities do not match, the Invalid Zip message is displayed. The message informs us that the entered ZIP Code is valid for a different city:
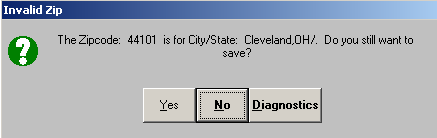
If we click Yes, the system will save the company profile, even though the ZIP Code entered in it has not been validated. The Invalid Zip message window is for informational purposes only, and does not force us to change the ZIP Code.
|
If we click No in the Invalid Zip message, the system will not save the updates to the company profile.
Recording/viewing directions to a company
Directions to a specific company can be recorded and accessed using the Directions window. To ensure they are not overridden by unauthorized personnel, you can apply security.
Entering directions
Open the Directions window by clicking ![]() Directions in the sheet toolbar, or by selecting Edit > Directions. The window displays the company name and ID and allows you to enter free-form text.
Directions in the sheet toolbar, or by selecting Edit > Directions. The window displays the company name and ID and allows you to enter free-form text.
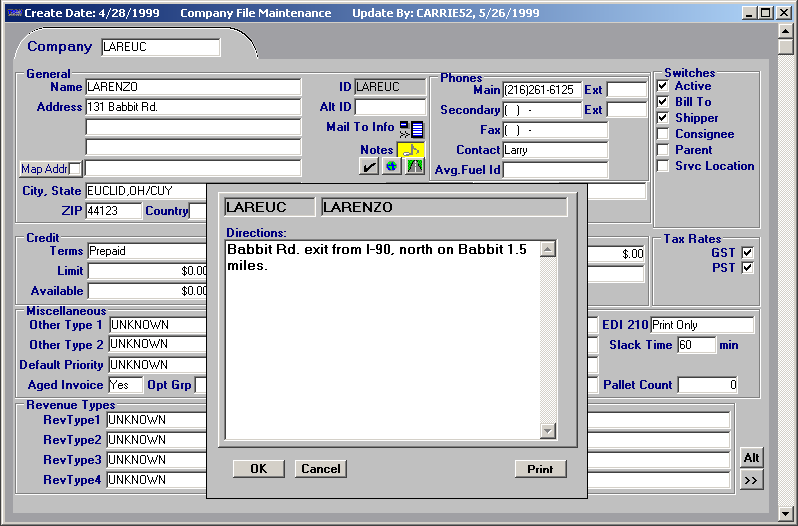
Click Print to print the directions to the default TMWSuite printer.
To save the directions and exit the window, click OK.
Making directions display only
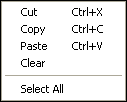
By default when you right-click on the Directions window, you will see this right-click shortcut menu:
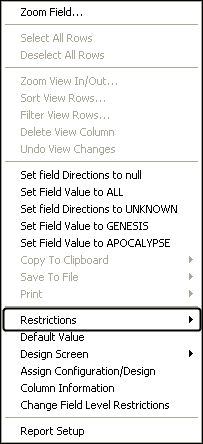
If you are a system administrator, you may want to restrict a user or group from having the ability to change directions. To set restrictions for the Directions window, you must be able to access the standard right-click shortcut menu because it provides the Restriction command, which allows you to apply security to the window:
You can set up the system to show the standard right-click menu from the Directions window by setting UseStandardDWSecurityForDirections=Y.
Setting security for the Directions window
In any core TMWSuite application, using the Company command from the right-click menu you can view a company’s profile and any directions for it that have been recorded in File Maintenance. To do so, position the cursor in a company field that has a company ID already entered. Click once on the right mouse button. A listing of functions is displayed. To access the Directions window, go to Company > Directions.

By default, any user can update directions. As a system administrator, you can apply security to the Directions window and restrict a user or group from having the ability to change directions. Restrictions affect the Directions window when it is accessed in either of these locations:
-
Company File Maintenance window.
-
In any core TMWSuite application where you can right-click on a company field that has the company ID already entered and select Company > Directions.
To apply security to the Directions window, follow these steps:
-
Open the Directions window in Company File Maintenance.
-
Right-click, and select Restrictions > Selected Object: Directions.
-
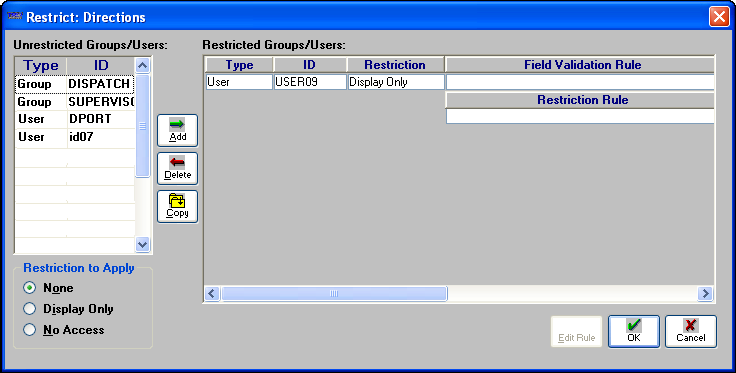
At the Restrict: Directions window, set security for a user or group as appropriate.
| For more information about setting security, see "Applying security restrictions for a screen" in the Setting up security for fields, screens, and menus chapter in the System Administration Guide. |
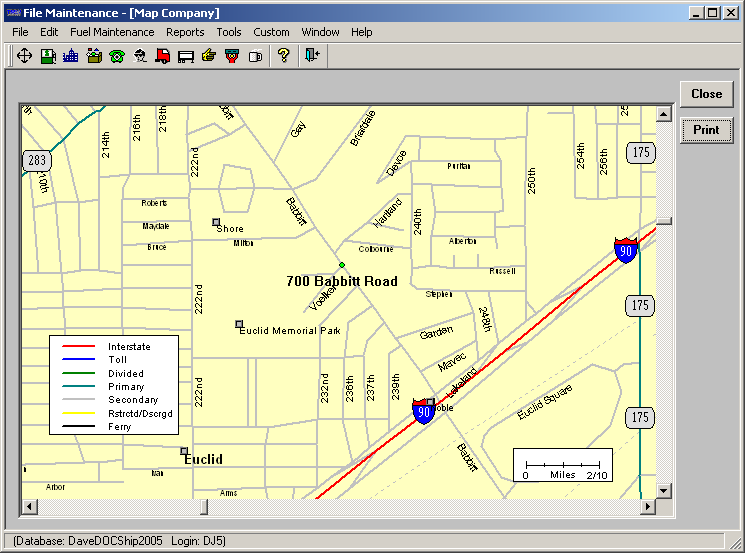
Recording/viewing mapping information
The Company File Maintenance window has a Map Address field and three mapping buttons, as shown below.
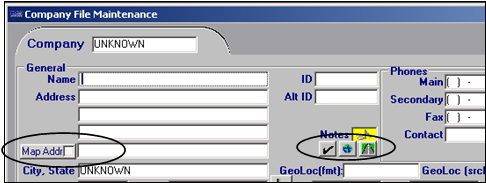
When the Map Address check box is selected, ALK’s PC*MILER|Streets will use the designated street address for mileage lookups and mapping. This address will be used only for mapping and mileage - not as a mailing address.
The three mapping buttons are used to:
|
Check the street address against the PC*MILER database. |
|
Show a map of the company location.
Note: The |
|
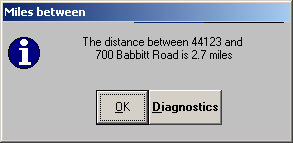
Compute the mileage between the location in the Map Address field and the main post office (usually near the center of a city) for that ZIP code.
|
Recording an alternate address for mapping purposes
If PC*MILER|Streets is installed and you click the ![]() Check Address button on a company profile, the system will try to match the company’s address to an address in PC*MILER|Streets. When you save a company profile that has an address that PC*MILER|Streets does not recognize, the system automatically searches for an alternate address.
Check Address button on a company profile, the system will try to match the company’s address to an address in PC*MILER|Streets. When you save a company profile that has an address that PC*MILER|Streets does not recognize, the system automatically searches for an alternate address.
One of the following will happen:
-
If an exact match is found, the system displays a message similar to the following:
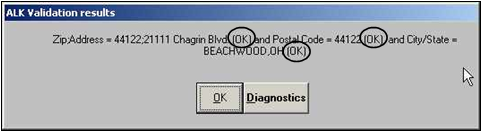
The indicator (OK) is shown to the right of each data element for which a successful match was made.
-
If a partial match is found, the system displays a message similar to the following:

The indicator (BAD) is shows to the right of each data element for which a match failed.
-
If an exact address match is not found but similar addresses exist in the same city, the alternative addresses are presented so that you can select the best one.
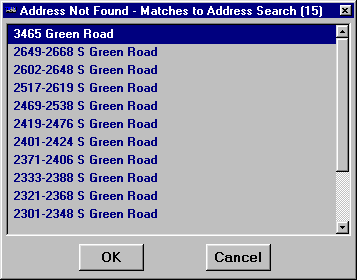
If you select an alternate address from the list and click OK, the system populates the Map Addr field with the address.
If you do not want to select an alternate address for the company, click Cancel in the Address Not Found window.
Note: If you do not select an alternate address, when you attempt to view the company on a map the system will display the Address Not Found window or the valid/invalid address message. You can view a company on a map by clicking
 Map in the sheet toolbar, the Map button in the General section of the Company File Maintenance window, or selecting the Edit > Draw Map command.
When you select the Map Addr check box, the alternate address is available for use by the TMWSuite mapping feature.

Notice that the original address you entered for the company remains in the Address field. The alternate address you selected is used only for mapping purposes.