Driver File Maintenance
What is a driver profile?
The Driver File Maintenance screen is used to record primary information about company drivers, owner/operators and the drivers employed by owner/operators and carriers. Use this window to enter a profile for any driver that your company assigns to trips, regardless of who employs and pays that driver.
The Driver File Maintenance screen is shown below with sample data.
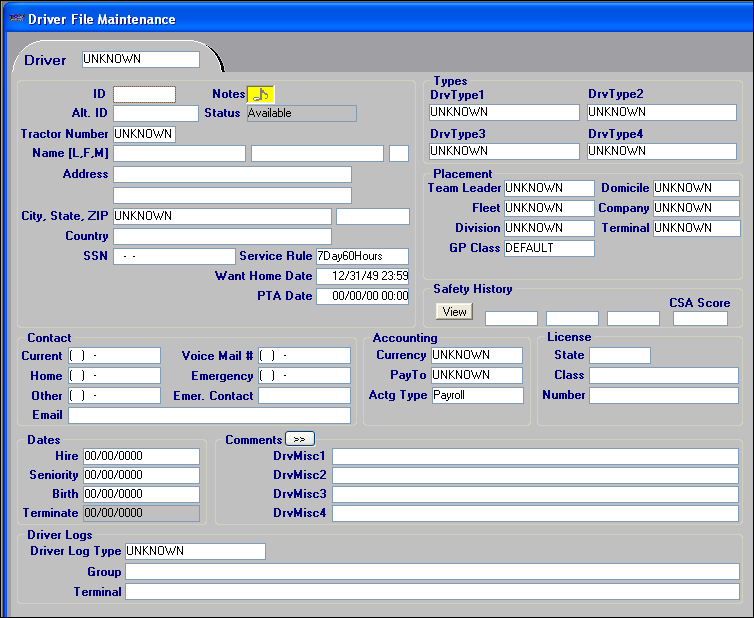
Driver File Maintenance window field definitions
Information in fields identified with a blue asterisk (*) in the topics below shows in driver field drop-down lists.
General section
ID * |
Identification code that is unique for the driver record. Depending on the entries made for the
You can also manually enter a user-defined driver ID. For more information, refer to Determining the Driver ID. |
Alt ID * |
Alternative identification code for the driver record. This code may represent a code from another computer system, such as an accounting system. A maximum of eight alphanumeric characters is allowed. |
Tractor Number |
Depending on the entry made for the
For more information, refer to Protecting the driver/tractor relationship. |
Notes |
Click the Notes indicator to view/record notes for a driver.
|
Status |
Driver’s current status. The system code options are:
Notes:
|
Name [L, F, M] * |
Driver’s last name, first name, and (optional) middle initial. Use the TAB key to move between fields. |
Address (Line 1) * |
First of two address lines for the driver’s street address. A maximum of 30 alphanumeric characters are allowed. |
Address (Line 2) |
Second of two address lines for the driver’s street address. A maximum of 30 alphanumeric characters are allowed. |
City * State * ZIP * |
City and state/province in which the driver resides in the first field; the five-digit or nine-digit zip code in the second field. |
SSN |
Driver’s Social Security number Notes:
|
Service Rule |
Identifies the service rule that determines the driver’s legal workweek. This field is user-defined in the ServiceRule label, accessed in System Administration. |
Want Home Date |
Beginning date the driver would like to be home. Enter the date in the format MM/DD/YY. Notes:
|
PTA Date |
PTA stands for Projected Time of Availability. A PTA date is the date the driver expects to be ready for the next load assignment, based on log entries and/or other factors that may not be recorded in the system. It is a "best guess" date |
Contact section
Enter telephone numbers without spaces or dashes. The system will format the number properly.
Current * |
Primary phone number where the driver can be reached. |
Home |
Driver’s home phone number. |
Other |
Alternative phone number to reach driver. |
Voice Mail # |
Telephone number of the driver’s voice mailbox. |
Emergency |
Telephone number to call in the event of an emergency related to the driver. |
Emer. Contact |
Individual to contact in the event of an emergency related to the driver. |
Types section
DrvType1 - 4 * |
The names and options for these fields are user-defined in the DrvType1 - 4 labels, accessed in the System Administration application. Assignment of drivers to driver classifications allows you to track the revenue collected for trips assigned to those drivers. In some cases, these classifications may also govern the pay rates used to determine driver settlements. |
Placement section
Team Leader |
Identifies the driver’s team leader. Note: The Team Leader options are user-defined in the TeamLeader label, accessed in the System Administration application. |
Fleet |
Indicates if the driver is a part of a fleet and identifies the fleet. Note: The Fleet options are user-defined in the Fleet label, accessed in the System Administration application. |
Division |
Indicates if the driver belongs to a particular division of the company. Note: The Division options are user-defined in the Division label, accessed in the System Administration application. |
Domicile |
Identifies the home location for the driver. Note: The Domicile options are user-defined in the Domicile label, accessed in the System Administration application. |
Company |
Indicates the company with which the driver is associated. Note: The Company options are user-defined in the Company label, accessed in the System Administration application. |
Terminal |
Indicates the terminal location with which the driver is associated. Note: The Terminal options are user-defined in the Terminal label, accessed in the System Administration application. |
Accounting section
Currency |
Currency in which the driver should be paid. Note: The Currency options are user-defined in the Currency label, accessed in the System Administration application. |
Pay To |
Person or organization that should be paid for loads that this driver hauls. Notes:
|
Actg Type |
Accounting system that will be used to pay the driver. The options are:
|
Add Pay To button Edit Pay To button |
If the Actg Type for this driver is Accts Payable, meaning that he or she is an owner/operator, the Add Pay To button will display just below the Actg Type the first time that you save the driver profile. Use the button to access the Pay To File Maintenance screen in order to add a new profile or edit current Pay To information. After a Pay To record exists for the driver, the name of the button will change to Edit Pay To. Use it to access the Pay To profile when changes are needed. Note: The buttons can be hidden if you decide not to use this feature. |
License section
State |
Enter the two-character code for the state/province in which the license was issued. |
Class |
Class of vehicle for which the license was issued. This is a free-form text field, with a maximum field length of six alphanumeric characters. |
Number |
License number of the driver. The maximum field length is 20 alphanumeric characters. |
Dates section
Hire |
Driver’s hire date. |
Seniority |
Date the driver received his current seniority rating. |
Birth |
Driver’s date of birth. |
Terminate |
Date the driver ceased employment with your company. |
Comments section
Drv Misc1 - 4 |
The names of these fields are user-defined in the DrvMisc1 - 4 labels, accessed in the System Administration application. You can use these fields to enter free-form comments about the driver. A maximum of 254 characters is available. The
|
Dly Guaranteed Hrs Pay Period Guar’td Hrs Average Pay Period Pay Avg Hrly Pay Hrly rate Comparison Flag 90 day start date |
Custom fields |
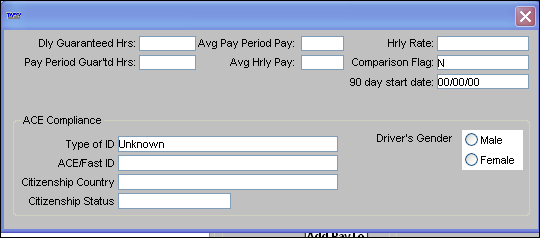
ACE Compliance section
These fields are specific to the Automated Commercial Environment (ACE) add-on feature, which is available for purchase. If you have not bought this add-on, the fields will not be visible.
Type of ID |
This field provides a drop-down list consisting of the options recorded for the ACE IDType label in the System Administration label file. The options are:
|
ID |
If the selection in the ID Type field is FAST ID, enter the FAST card number in this field. Otherwise, leave the field blank. |
Citizenship Country |
Enter the two-character ISO country code for the driver’s country. |
Citizen Status |
This field provides a drop-down list of Citizenship statuses. The options are defined in the CitizenshipStatus label in System Administration. The standard options are:
|
Driver’s Gender |
Select the Male or Female radio button. |
Driver field drop-down list information
Information in fields identified with a blue asterisk (*) in the tables above shows in driver field drop-down lists. The information layout varies depending on where the drop-down list appears within an application. This illustration shows how the information is displayed in the Dispatch Trip Folder’s Stop Detail grid.

Affected Driver field drop-down lists are found in:
| Application | Window/Field |
|---|---|
File Maintenance |
Driver File Maintenance
|
Order Entry |
Assign Driver/Equipment
|
Rate Schedules |
Edit Billing Rate Schedule Folder > Index Asset Edit Settlement Rate Schedule Folder > Index Asset
|
Settlements |
Advances/Misc Labor Paydetail Audit by Asset
|
Determining the Driver ID
The DrvIDAutoGen setting in the General Info Table determines the format the system uses when you create driver records in Driver File Maintenance, Recruit File Maintenance, or the Add New Driver window. The system automatically generates either:
-
A combination of the driver’s first and last name. A maximum of six characters is allowed.
-
A system-generated number. A maximum of eight digits is allowed.
You can also change the system-generated ID by manually entering a user-defined driver ID before you save the record. A maximum of eight alphanumeric characters is allowed.
If you manually enter a duplicate driver ID and attempt to save the profile, the system will display a warning message to let you know that a driver with the same ID already exists. You must change the ID before you can save the record.
The default is to generate a driver ID consisting of the first three characters of the driver’s last name, followed by the first two characters of the driver’s first name.
If you attempt to create and save a driver profile with the same six characters as an existing profile, the system will append a 2-digit suffix to each subsequent instance of the 6-character ID. The suffix 01 will be assigned to the first instance of a duplicate ID, 02 will be assigned to the second instance, and so on. After the system reaches 99 as the 2-digit suffix, if you try to create a new ID, you are prompted to make a new entry because the system is unable to auto-generate an ID.
|
When using the
|
Choosing the right accounting type
All resource profiles have an Accounting Type field that determines how the resource (driver/ carrier/tractor) is paid. There are three Accounting Types: Payroll, Accounts Payable and None:
-
Payroll is for company drivers whose settlement comes through payroll. This is the default for the Driver File Maintenance screen.
-
Accounts Payable designates owner/operators and carriers whose settlement comes through Accounts Payable. It can also apply to tractors if that is how your company pays owner/operators.
Note: TMW recommends that you set up owner operators as tractors.
-
None is reserved for resources that are never paid through TMWSuite. A good example would be the drivers employed by owner/operators and carriers. Driver profiles must be entered for these individuals so that they can be scheduled but their pay comes from their own employers and not from your company.
The importance of the Pay To
Just as the Accounting Type determines how the resource is paid, the Pay To provides the information needed to issue the check. When you enter the profile of an owner/operator, you must also enter a Pay To profile. You tie each AP resource to the applicable Pay To by including a Pay To ID on the resource’s profile.
If you leave the Pay To field set to UNKNOWN, the system will prompt you to create a new Pay To when you save.
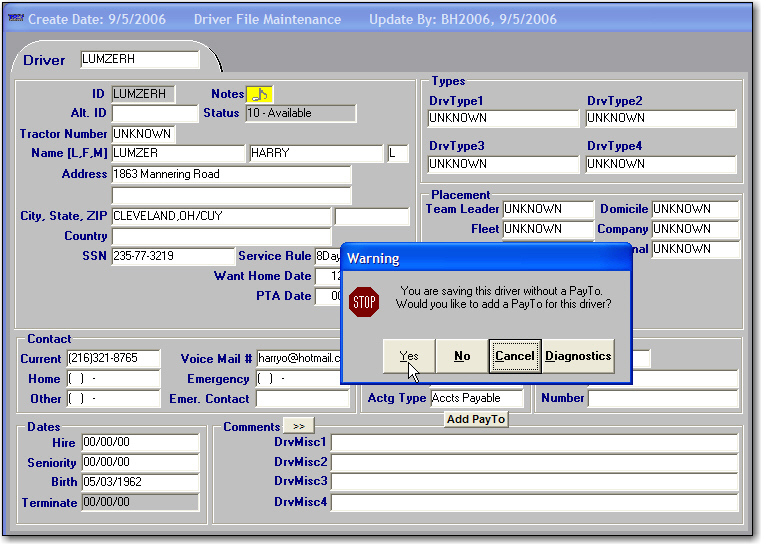
All Accounts Payable resource profiles must include a Pay To
Before you take advantage of this easy-to-use feature and create a new profile, make sure that the Pay To for this resource really is "unknown" and that it has not already been entered under a name that is slightly different from the one you may be using. A duplicate Pay To causes confusion when settlements are processed and could ultimately lead to errors in accounting for settlements and issuing checks.
| To avoid duplicates, you must follow a consistent rule for naming the Pay To. |
The system will prevent you from entering a duplicate Pay To—one that has the same name as another Pay To within your system—but it will not search for duplicates by cross checking other fields such as address or tax identification number.
The Pay To is a requirement for any resource with an AP accounting type, but it can also be used purely for information purposes with other accounting types. You might, for example, want to tie together all the non-company drivers that you schedule for a particular owner/operator. These non-company drivers would have an accounting type of None to indicate that no settlement should be calculated for them, but they might also have a Pay To ID that links them to the owner/operator who employs them.
For details about adding a Pay To record when you create a tractor profile, see Adding/maintaining a tractor record.