Adding/maintaining miscellaneous driver information
From the Driver File Maintenance window, you can access a number of supporting windows used to record supplemental driver information. These windows are listed here:
| Window | Icon | Used to | For more information |
|---|---|---|---|
Accident History |
|
Record accident details for a driver. |
|
Complaint History |
|
Record complaints made about a driver. |
|
Driver Observation |
|
Record observations made about a driver. |
|
Log Violation History |
|
Record speeding and service-rule violations. |
|
Driver Testing |
|
Record information regarding tests a driver has taken. |
|
Training |
|
Record information regarding training a driver has taken. |
|
Driver/Equipment Status |
|
Schedule key activities for drivers, as well as dates and reasons they will be unavailable for service in the future. |
|
Assignment History |
|
Look up a list of trips to which a driver was assigned during a specific date range. |
|
Qualifications |
|
Record qualifications that a driver has acquired. |
|
Extra Info |
|
Custom feature. |
|
View Attached Object |
|
View, add, or delete photos attached to a driver profile. |
|
Notes |
|
View and attach notes to the driver’s profile. |
Viewing, adding, or deleting photos in a driver profile
You can include multiple photos or other types of images in a driver profile using the View Attached Object window. This window is also available in Company, Trailer, and non-driver employee profiles.
If this is your first time attaching photos to a profile, see Setting up the File Maintenance photo feature to confirm your system is set up properly.
| Your TTS50 must be set up to enable accessing profile photos, and the computer must have Microsoft Office 2003 or later installed. |
-
Select View > Photo, or click
 Photo in the sheet toolbar.
The View Attached Object window opens. Here, the window displays a previously saved image.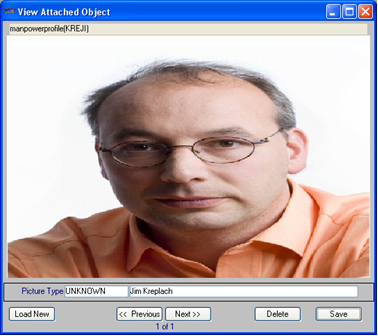
-
In the View Attached Object window:
-
To scroll through all photos attached to the profile, click the Previous or Next button.
-
To add a photo or edit fields, continue with Step 3.
-
If you are finished with the View Attached Object window, click
 to close it.
-
-
To add a photo, click Load New.
-
Browse to and select the photo you want to add.
-
In the Picture Type drop-down list, select a picture type.
Notes:
-
The options in this field are defined by your company, using the PictureType label.
-
If you want to add or modify this field for an existing photo attachment, select an option from the drop-down list and re-save the attachment.
-
This step is optional unless you have
[Misc]RequireTypeOnPicture=Yin your TTS50.
-
-
If you want, you can enter a comment in the field to the right of the Picture Type field.
Note: If you want to add or modify information for an existing photo attachment, edit the field and re-save the attachment. -
Click Save to store the photo.
-
Click
in the upper right corner of the View Attached Object window to close it.
When you add a picture to a driver’s profile, the top-left corner of the Driver File Maintenance window displays an icon. Click the icon to open the View Attached Object window, with the picture displayed.
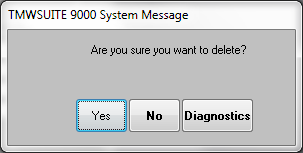
Deleting a photo from a driver profile
To delete a photo from the View Attached Object window, follow these steps:
-
In the View Attached Object window, click Previous or Next to select the photo you want to delete.
-
Click the Delete button. The system asks for confirmation.
-
Click Yes. The system deletes the photo.
-
Click Save.
-
Click
in the upper right corner of the View Attached Object window to close the window.
Recording/viewing a driver’s accident history
The Accident History window allows you to record detailed information about an accident in which a driver was involved. With the driver’s profile opened, do one of the following to access the window:
-
Go to Edit > Accident.
-
Click
 Accident in the sheet toolbar.
The Accident History window opens.
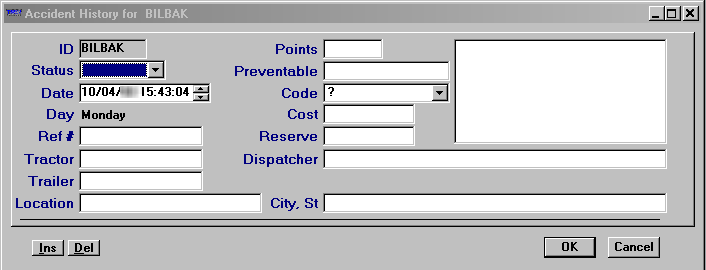
If accident records have already been entered, the window displays one record at a time. If there are multiple records, a scroll bar is displayed to the right. Use the scroll bar to move from one record to another.
Adding an accident record
To add an accident record, click Ins in the lower left of the window. Make entries in the following fields:
ID |
Driver ID. |
Status |
The status of the accident report. Available options are blank (no entry), Open and Closed. Note: The options for this field are user-defined in the DrvAccidentStatus label, accessed in System Administration. |
Date |
Date of the accident. Note: This field is required. |
Day |
Day of the accident. The system will calculate this value based on the entry in the Date field. |
Ref # |
User-defined ID number associated with the accident. |
Tractor |
The ID of the tractor involved in the accident. |
Trailer |
The ID of the trailer involved in the accident. |
Location |
Free-form text field that you can use to describe where the accident happened. |
City, St |
City and state/province where the accident occurred. |
Points |
Points that were applied against the driver’s license due to the accident |
Preventable |
A determination of whether the accident could have been avoided. |
Code |
Code associated with the type of accident. Note: The Code options are user-defined in the DrvAcdCd label, accessed in the System Administration application. |
Cost |
Currency field used to record the estimated cost for this event. |
Reserve |
Currency field used to record the estimated amount needed to satisfy the financial requirements of the claim. T |
Dispatcher |
The TMWSuite user ID of the trip’s dispatcher. |
Description |
This unnamed free-form text field at the far right of the window can be used to describe the details of the accident. |
To save the record and exit the window, click OK.
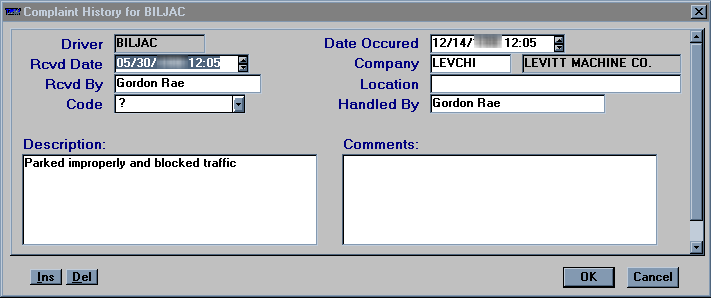
Recording/viewing a driver’s history of complaints
The Complaint History window allows you to record detailed information about a complaint against the driver.
With the driver’s profile opened, do one of the following:
-
Click
 Complaint in the sheet toolbar.
 -
Go to Edit > Complaint.
The Complaint History window opens.
If complaint records have already been entered, the window displays one complaint record at a time. If there are multiple records, a scroll bar is displayed to the right. Use the scroll bar to move from one record to another.
Adding a complaint record
To add a complaint record, click Ins in the lower left of the window. Make entries in the following fields:
Driver |
Driver ID. |
Recvd Date |
Date that the complaint was received. Note: This field is required. |
Rcvd By |
Free-form text field to indicate who received the complaint. |
Code |
Code assigned to the type of complaint. Note: The Code options are user-defined in the DrvCmpCd label, accessed in the System Administration application. |
Date Occurred |
The date and time of the incident that caused the complaint. |
Company |
The company of the complaining party. |
Location |
Location where the incident took place. |
Handled By |
Free-form text field to indicate who followed up on the complaint. |
Description |
A free-form text field for describing the complaint in detail. |
Comments |
A free-form text field for recording any comments regarding the complaint. |
The window displays one complaint record at a time. If there are multiple records, a scroll bar is displayed to the right. Use the scroll bar to move from one record to another.
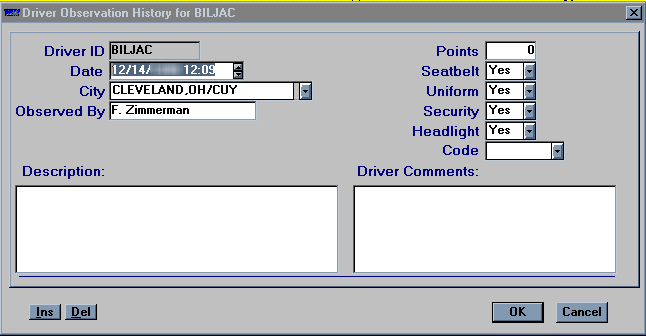
Recording/viewing observations about a driver
The Driver Observation History window provides detailed information regarding an observation made about a particular driver. With the driver’s profile opened, do one of the following:
-
Click
 Observation in the sheet toolbar.
 -
Go to Edit > Observation.
The window displays one observation record at a time. If there are multiple records, a scroll bar is displayed to the right. Use the scroll bar to move from one record to another.
Adding an observation
-
To add an observation record, click Ins in the lower left corner of the window. Make entries in the following fields:
Driver ID
Driver’s ID.
Date
Date of the observation.
Note: This is a required field.
City
City where the observation took place.
Observed By
Free-form field that identifies the person making the observation.
Points
Number of points charged against the driver’s license.
Seatbelt
Indicates if the driver was using a seatbelt.
Uniform
Indicates if the driver was wearing a uniform.
Security
Indicates if the driver was following established security procedures.
Headlight
Indicates if the driver was using headlights.
Code
Code associated with the type of observation.
Note: The Code options are user-defined in the DrvObsCd label, accessed in the System Administration application.
Description
A free-form field for describing the observation details.
Driver Comments
A free-form field for any pertinent comments made by driver.
-
To save the record and exit the window, click OK.
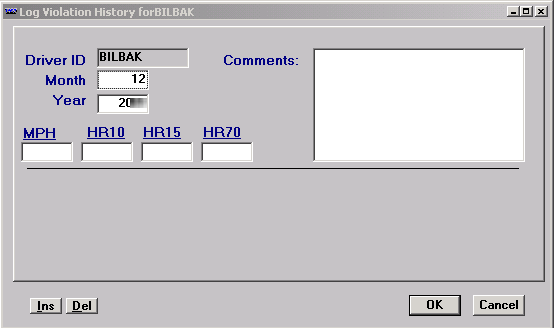
Recording/viewing a driver’s violations history log
The Log Violation History window provides detailed information regarding violations of speeding, as well as log reporting violations of the applicable service rule. With the driver’s profile opened, do one of the following:
-
Click
 Violations in the sheet toolbar.
 -
Go to Edit > Violation.
The window displays one violation record at a time. If there are multiple records, a scroll bar is displayed to the right. Use the scroll bar to move from one record to another.
Adding a violation
-
To add a violation record, click Ins in the lower left of the window.
-
Make entries in the following fields:
Driver ID
Driver’s ID.
Month
Month of the violation.
Year
Year of the violation.
MPH
Speeding violation.
HR10
Service rule violation.
HR15
Service rule violation.
HR70
Service rule violation.
Comments
A free-form field for any pertinent comments or description about the violation.
-
To save the record and exit the window, click OK.
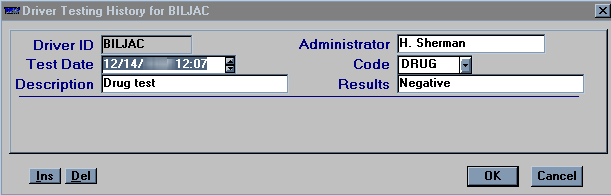
Recording/viewing a driver’s testing history
The Driver Testing History window displays detailed information about tests that a driver has taken. With the driver’s profile opened, do one of the following:
-
Click
 Testing in the sheet toolbar.
 -
Select Edit > Testing.
The window displays one testing record at a time. If there are multiple records, a scroll bar is displayed to the right. Use the scroll bar to move from one record to another.
Adding a testing record
-
To add a test record, click Ins in the lower left of the window.
-
Make entries in the following fields:
Driver ID
Driver’s ID.
Test Date
Date that the test was taken.
Note: This field is required.
Description
Description of the test that was taken.
Administrator
Free-form text field indicating the person administering the test.
Code
Code for the type of test.
Note: The Code options are user-defined in the DrvTstCd label, accessed in the System Administration application.
Results
Results of the test.
-
To save the record and exit the window, click OK.
Recording/viewing a driver’s training history
The Driver Training History window displays detailed information about the training that a driver has taken. With the driver’s profile opened, do one of the following:
-
Click
 Training in the sheet toolbar.
 -
Select Edit > Training.
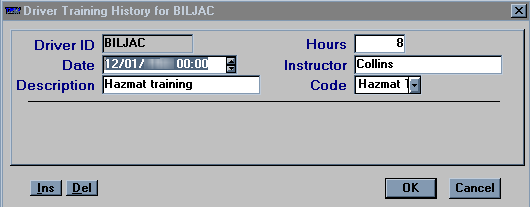
The window displays up to four training record at a time. A scroll bar is displayed at the right of the Driving Training History window when there are more than four training records. Use the scroll bar to move from one record to another.
Adding a training record
-
To add a training record, click Ins in the lower left of the window.
-
Make entries in the following fields:
Driver ID
Driver’s ID.
Date
Date that the training was taken.
Note: This field is required.
Description
Free-form text field giving a description of training.
Hours
Free-form text field indicating the number of hours of training taken.
Instructor
Free-form text field indicating the name of person/organization giving the training.
Code
Code for the type of training.
Note: The Code options are user-defined in the DrvTrnCd label, accessed in the System Administration application.
-
To save the record and exit the window, click OK.
Recording/viewing a driver’s expirations
TMWSuite allows you to schedule key activities for your resources, as well as dates and reasons they will be unavailable for service in the future. Key activities and out-of-service reasons are custom-defined by your company in the in the label file within System Administration. Within TMWSuite, notices regarding key activities and out-of-service dates are referred to as expirations.
For a driver, expirations might include the renewal of his driver’s license, sick time, training time, and vacation.
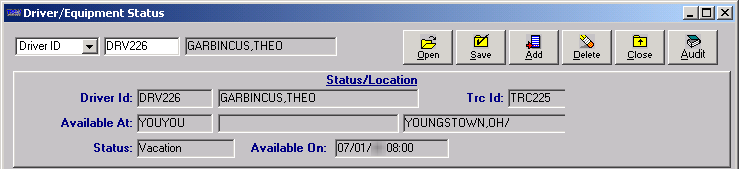
Expirations are added, modified, and deleted in the Driver/Equipment Status window, which is accessed in File Maintenance and Dispatch. Any expiration record can be entered or updated in the File Maintenance application. Some records may also be entered or updated in the Dispatch application. Data entered in one application will appear in the other.
|
Two types of driver expirations are set up in System Administration using the DrvExp and DrvStatus labels.
|
To access the Expirations window, do one of the following:
-
Select Edit > Expirations.
-
Click
 Expirations in the sheet toolbar.
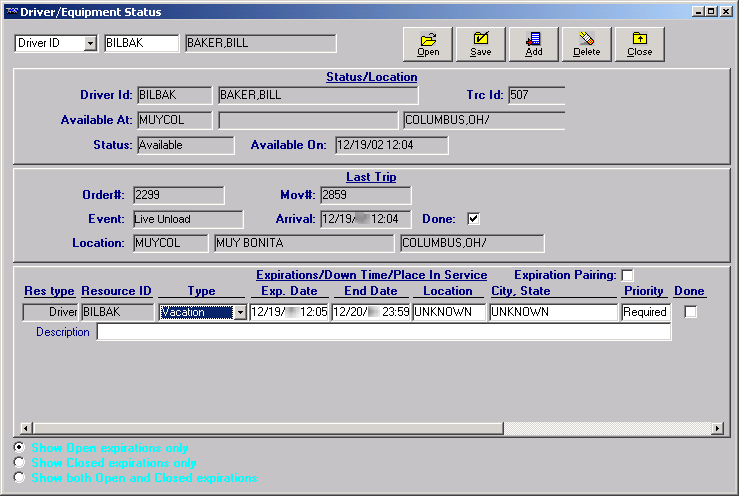
| If you select the Expirations command with a driver’s profile opened, the system will automatically display that driver’s expirations. If you select the command with no driver profile opened, the system will default to Driver as the resource type, but you must enter the ID in the second of the two fields in the upper left corner of the Driver/Equipment Status window. |
When you enter an expiration record, you must specify its priority. There are two levels of priorities:
-
Priority 1
Critical expirations are assigned a priority of 1. Their completion is necessary before the system will allow dispatch of that resource on, or after, the expiration’s effective date. -
Priority 2
Expirations that are not critical are assigned a priority of 2. If a Priority 2 expiration is not completed by its effective date, the system will display a warning when you assign the resource to a trip occurring on or after that date. However, dispatch is allowed.
| User-defined priority values for expirations are set up in System Administration using the ExpPriority label in the Label File. The code assigned to a priority value determines the priority’s effect on the system. A code of 1 signifies a Priority 1 value. A code of 2 or greater signifies a Priority 2 value. |
Although some priority values may be custom-defined by your company, two system codes exist in the ExpPriority label:
-
Required
The label option, Required, has a code of 1, which means it has a Priority 1 value. When an expiration is categorized as Required, dispatch of a resource with that expiration will not be allowed on, or after, the expiration’s effective date until the expiration is marked as completed. -
Key Date
The label option, Key Date, has a code of 9. Since the code is greater than 2, this means it has a Priority 2 value. Key Date can be used for an expiration that represents a significant date. Key Date expirations will never prevent resources from being dispatched.
Selecting the status of expirations you want to view
In the lower left of the Driver/Equipment Status window, three radio buttons are used to specify the status of the expirations you want to see:
-
Show Open Expirations only
Displays expirations that are not marked as Done. -
Show Closed Expirations only
Displays expirations that were marked as Done within a specific date range. -
Show both Open and Closed expirations
Displays both open expirations and those that were marked as Done within a specific date range.
For example, to display only expirations for a driver that were marked Done, follow these steps:
-
Select the Show Closed Expirations only radio button.

-
The From and To fields are displayed in the lower right corner of the window. They are used to record the range of completion dates for the expirations to be listed.
-
Enter the beginning date in the From field.
-
Enter the ending date in the To field.
-
-
Click Open. The system automatically displays all expirations that have been marked as Done and that have completion dates falling within the specified date range.
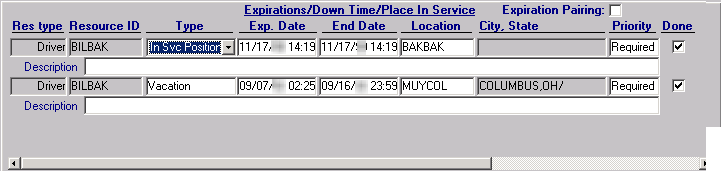
Note: Up to three expirations can be seen at one time. If more than three expirations are recorded, the system displays a scroll bar to the right. Use this bar to scroll additional expirations into view.
-
After completing your review of the expirations, you can clear them from the window by deselecting the Show Closed expiration only check box.
Adding an expiration
To add an expiration, follow these steps:
-
With the driver’s profile opened, click Add. A new expiration line is displayed. The system automatically transfers the type of look up you initiated, such as Driver, to the Res type field. The system also transfers the appropriate ID to the Resource ID field.

-
Make entries in these fields:
Type
Select the appropriate expiration type from the drop-down list that is displayed when you click in this field.
Note: The options are set up in the DrvExp label, accessed in System Administration.
Exp Date
Do one of the following:
-
If the expiration occurs on a specific date, enter that date here.
-
If the expiration involves a date range, enter the beginning date here.
End Date
Enter the date when the expiration is expected to be completed.
Location
If the resource is to go to a particular location to have the expiration satisfied, enter the company code for that site here.
City/State
If you made an entry in the Location field, the system will populate this field automatically. If no entry was made in the Location field, you can manually enter a city/state.
Priority
To rank the importance of the expiration, select the appropriate priority code.
Expiration Pairing
This field is used to activate the expiration link between a driver and a tractor. For details, see Using Expiration Pairing for tractors and drivers.
Description
Enter free-form text about the expiration.
Done
Do not make an entry here. This check box is used to mark the expiration as complete.
-
-
Repeat Steps 1 - 2 for each additional expiration to be recorded.
-
Click Save to keep your entries.
-
Click Close to exit the Driver/Equipment Status window.
Using Expiration Pairing for tractors and drivers
The Expiration Pairing feature serves as a crosscheck of availability for a driver and tractor that have been linked in their individual resource profiles. In the example shown here, the driver, Bill Baker, is associated with the specific tractor having an ID of 507.
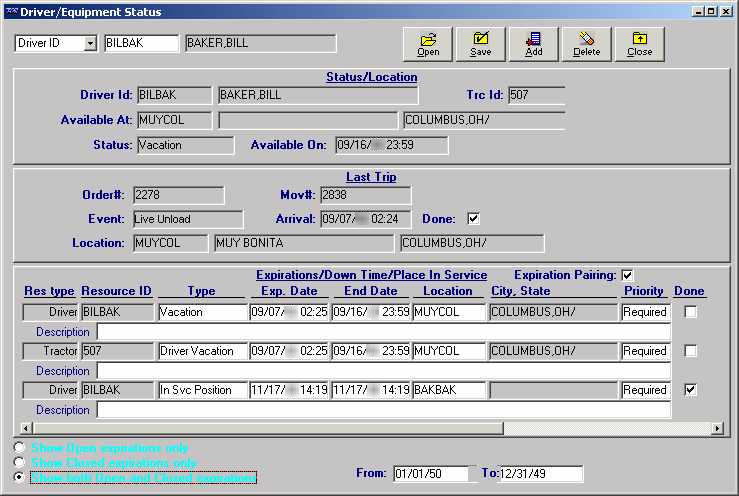
The Expiration Pairing feature is useful if a driver usually uses the same tractor. In such a situation, the tractor is not in use whenever the driver is not available to work. For example, expiration pairing can be used to send the tractor home with the driver.
With Expiration Pairing turned on, when you add an expiration, the system displays two new lines: one for the driver, and one for the tractor.
By default, the expiration pairing feature is not active. If your company wishes to have this feature turned on whenever you access the status window, you can use the [Misc] ExpirationPairing=Yes setting in your TTS50.
|
Adding an expiration with Expiration Pairing activated
To add expirations using Expiration Pairing, follow these steps:
-
If the Expiration Pairing check box is not selected, click in it turn on the functionality.
-
Click Add.
-
For the Tractor expiration line:
-
Select the Type of expiration.
-
Enter the Exp. Date.
-
Enter the End Date, if applicable.
-
Enter the Location, if applicable.
-
Set the Priority.
-
Enter a Description, if needed.
-
-
Repeat Step 3 in the Driver expiration line.
-
Click Save.
-
Click Close to exit the Driver/Equipment Status window.
Note: You can verify that the system has added the expiration to both the driver and the tractor by looking up the expirations recorded for the tractor associated with the driver.
Deleting an expiration
If an expiration has been recorded in error, you can delete it from the system.
-
Position the cursor in any field for the expiration to be removed.
-
Click Delete.
-
The system asks if you are sure you want to continue with the deletion. Do one of the following:
-
Click Yes to complete the deletion.
-
Click No to cancel the deletion.
-
-
If you selected Yes, click Save. The system permanently deletes the expiration.
-
Click Close to exit the Driver/Equipment Status window.
Marking an expiration as complete
When an expiration has been satisfied, you must record its completion. Until you mark the expiration as Done, it is still in effect.
| Once a Priority 1 expiration has reached its effective date, the system will not allow the resource to be dispatched. |
Expirations can be completed manually in the Driver/Equipment Status window, or you can configure the system to automatically complete expirations of a particular type. For details on automatic completion, see the Resource Expirations Guide.
For manual completion, follow these steps:
-
With the Driver/Equipment Status window open, select Driver ID from the drop-down list in the top left of the window.
-
Enter the resource ID in the second field.

-
Click Open. All open expirations are displayed.
-
If needed, change the date shown in the End Date field.
Warning: If you complete an expiration before its End Date, you must manually change the date. The system does not update the date/time in the End Date field when you select the Done check box. Therefore, the system will consider the resource as unavailable until the date recorded in the End Date field, even though the expiration has been marked as completed.
-
Select the Done check box.

-
Click Save.
Notes:
-
If you have the Show Open expirations only radio button selected, the expiration record is no longer displayed in the window. The expiration is still displayed if you have the Show both Open and Closed expirations radio button selected.
-
Once the expiration is marked as Done, the system will not check future trip dates and times against its effective date(s).
-
-
Click Close to exit the Driver/Equipment Status window.
Activating the Expiration Audit report feature
TMWSuite allows you to track all changes that were made to a resource’s expirations in both the File Maintenance and Dispatch applications.
The feature is activated by the ExpirationAudit General Info Table setting.
When the feature is turned on, the Audit button is added to the Driver/Equipment Status window:
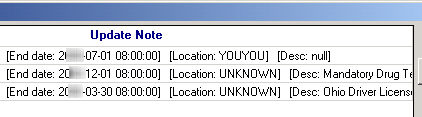
To view/print a report of the activity pertaining to all closed and opened expirations recorded for a resource, click Audit. The Expiration Activities window is displayed. Notice that the resource type and ID are included in the window’s title:
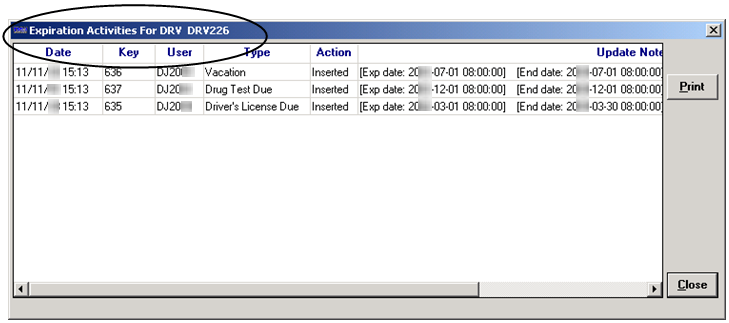
The activity is shown in chronological order, with the latest change as the first line. Information is displayed in these columns:
Date |
The date/time the expiration was created, updated, completed, or deleted. |
Key |
The unique, system-generated identifier assigned to the expiration by the system. Note: This column corresponds to the Key field in the Driver/Equipment Status window. |
User |
The user ID of the person who recorded the expiration or made changes to it. |
Type |
The type of expiration, as recorded in the Driver/Equipment Status window. |
Action |
The type of change made, e.g., created, updated, deleted, or completed. |
Update Notes |
Detailed information about the change(s) made. You can use the scroll bar at the bottom of the window to view the entire Update Note column.
|
| Activity is tracked only for expirations recorded after the feature has been activated. |
If desired, you can print the audit report. Clicking Print sends the report directly to your default printer.
Generating user-defined driver expiration forms
TMW’s Integrated Reporting feature provides a means of merging driver expiration information from your TMWSuite database with forms based on Microsoft SQL Server Reporting Services (SSRS) reports. The system is set up to allow menu access to two different forms. Although you can create your forms from scratch, these two formats are available as SSRS templates and can be requested from your TMW Support representative:
-
A driver license renewal letter
This sample is a reminder letter to the driver that his/her driver’s license is due for renewal.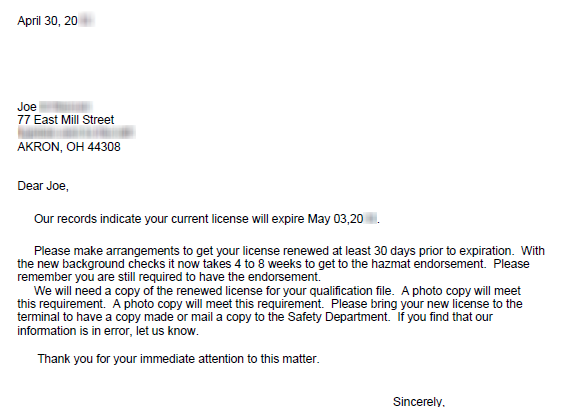
-
Driver cards
The template layout consists of six small cards and space for two additional cards. The cards provide information about a driver license, Hazmat certification, and medical examiner’s certification. However, you can modify the template’s content and use different expiration types.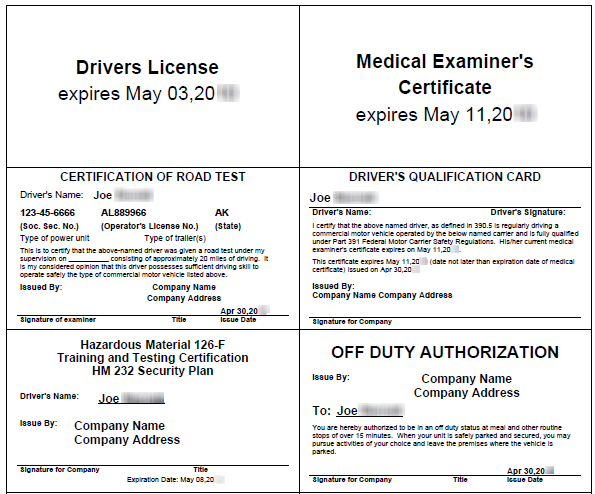
| If your staff has extensive reporting experience and an understanding of the TMWSuite database structure, your company can design its own formats. Alternatively, if you do not have the necessary resources, you may contact your TMW Support representative to request that a report be designed for you. |
Expirations are recorded in the Driver/Equipment Status window, which can be accessed in File Maintenance and Dispatch.
Prerequisites
When creating driver expiration forms using SQL Server Reporting Services, be aware that user logins cannot contain slashes, for example, TMW\user1. When driver expiration forms based on SQL Server Reporting Services are printed, the print function stores temporary files with a slash preceding the user login. A slash in the login to separate the domain from the user ID will conflict with the print function.
To use SQL Server Reporting Services, you must have:
-
SQL Server
-
SQL Server Reporting Services
-
IIS
-
Business Intelligence Development Studio
Required for editing. -
TMWSuite
-
The TMWSuite Add-ins feature
You can install Add-ins when you use the TMWSuite Installer to update to a new release of TMWSuite. You must activate the feature by using the[TmwSuiteAddins]EnableInterface=Ysetting in your TTS50. -
The Integrated Reporting license
The license is available at no charge and can be obtained from your TMWSuite Support representative. -
A PDF viewer
The form is displayed in a PDF viewer when it is rendered in SQL Reporting Services.
After developing a form that meets your company’s needs, deploy it to your reporting server.
For assistance with prerequisite setup, contact TMW Support.
Adding your form to TMWSuite
To add the deployed forms to TMWSuite, do the following:
-
In System Administration, go to Edit > Integrated Report Setup > Original Integrated Report Setup.
-
Use System Administration’s Integrated Report Setup window to add the form to TMWSuite.
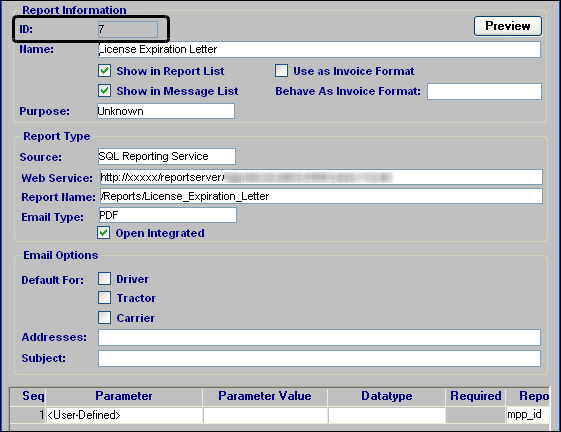
Sample report setup for ID 7: License Expiration Letter
When setting up the driver expiration form, you must:
-
Specify the source as SQL Reporting Services.
-
Indicate the full web site address.
-
Enter the report location and name.
-
Select an Email Type of PDF.
-
For previewing the form, identify the
mpp_idreport parameter as the data retrieval argument for the report.
-
-
Click Save.
The system automatically assigns a numeric ID to the report. -
Make a note of the report’s ID number so you can enter it into the General Info Table settings, which are described in the next section.
| For more information about Integrated Reporting, see the Integrated Reporting Guide. |
Setting up your system to use the driver expiration forms
After the SSRS form is added to TMWSuite, you must configure the DriverRenewalLetter and CardPrintExpirations General Info Table settings.
Printing a driver expiration form
Use this procedure to print one of the driver expiration forms, based on SQL Server Reporting Services reports. The Driver Cards and the Renewal Letter forms are generated in PDF format.
-
In File Maintenance, retrieve the driver record.
-
With the driver’s record displayed, select one of the following:
-
File > Print > Driver Cards
-
File > Print > Renewal Letter
-
The form is sent to your default printer.
If no report form ID has been identified in the CardPrintExpirations or DriverRenewalLetter General Info Table settings, a message is displayed. It states: "No report has been configured for driver cards."
Recording/viewing a driver’s qualifications
The Qualifications window allows you to record qualifications that a driver has acquired. With the driver’s profile opened, do one of the following:
-
Click
 Qualifications in the sheet toolbar.
 -
Select Edit > Qualifications.
The window displays up to six qualification records at a time. When more than qualifications are recorded, a scroll bar is displayed to the right. Click the scroll bar to view additional records.
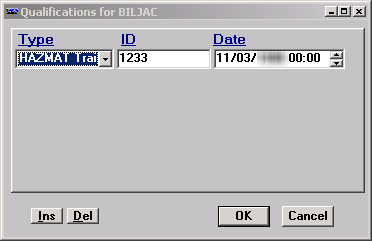
Adding a qualification record
To add a qualification record, click Ins in the lower left of the window. Make entries in the following fields:
Type |
Select the type of qualification driver has acquired. Note: The options are set up in the DrvAcc label, accessed in System Administration. |
ID |
User-defined ID associated with the type of qualification received. |
Date |
Date that the qualification was received. Note: This is a required field. |
To save the record, click OK.
Deleting a qualification record
To delete the record currently highlighted in the Qualifications window, click Del. To save the deletion and exit the window, click OK. The system will ask for confirmation that the changes should be applied. Do one of the following:
-
Click Yes to retain your changes.
-
Click No to cancel the deletion.
Recording/viewing notes about a driver
Notes entered for a driver are accessible in the base applications, except System Administration and Rate Schedules.
Adding notes to a driver profile
-
With the driver’s profile opened, do one of the following:
-
To add a note to the end of the list, click Add.
-
To insert a note before an existing one, highlight the existing note and click Insert.
The system automatically provides some information:
-
It puts Driver in the Attached to field.
-
It puts the driver’s ID in the Key field.
-
-
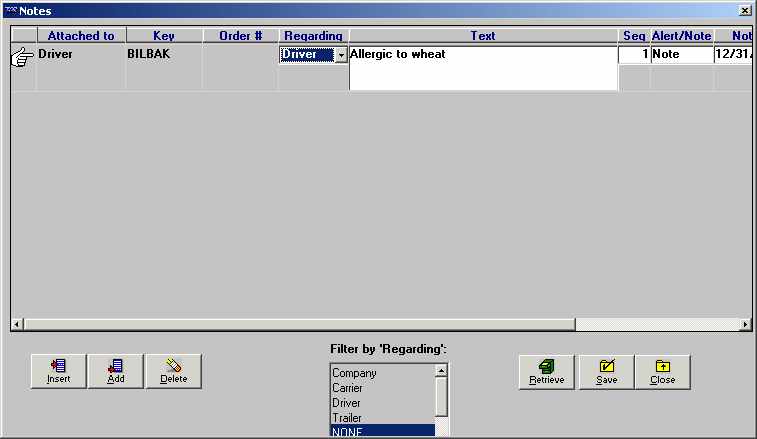
Select the appropriate entry in the Regarding field. The option you select controls how the note is filtered when a user retrieves notes later. The options are:
Company
Settlements
Carrier
Pay To
Driver
Billing
Trailer
Order
Tractor
-
Enter the text of the note in the textbox. You may enter up to 256 characters, but only 68 characters can display in the textbox at one time.
-
If your note exceeds 68 characters, use the LEFT ARROW or RIGHT ARROW keys to scroll the rest of the note into view. You can also highlight the note, right-click on the text box, and select Zoom Field from the pop-up menu to view the text in its entirety.
-
To copy a word or phrase from an existing note, highlight the portion you want to duplicate and press CTRL+C. Then position the cursor in the spot where the word(s) are to be pasted and press CTRL+V.
-
You can cut a word or phrase from an existing note and paste it in a different spot. To do so, highlight the portion to be cut and press CTRL+X. Note that the word(s) are deleted from their original location. Position the cursor in the spot where the word(s) are to be pasted and press CTRL+V.
-
-
Position the cursor in the Note/Alert field. Highlight one of the options to rank the importance of your note.
-
Select Note if your note is informational, but not of critical importance.
-
Select Alert if your note is of critical importance, not merely informational.
The ranking determines how the system displays the Note indicator on windows associated with your note. For notes ranked as Note, a yellow indicator is displayed; for notes ranked as Alert, a red indicator is displayed.
-
-
Notes may be assigned an expiration date. Position the cursor in the Expiration Date field, and enter the date and time the note is to expire, if applicable.
Note: Once the expiration date has passed, the note no longer triggers the Note indicator to show as yellow or red. However, the expired note continues to display in the Note window.
-
Click Save to save the note.
Note: To cancel any changes, click the Retrieve button; the system displays the previously existing notes.
-
Click Close to exit the window.
Deleting a note
You can delete a note by positioning the cursor in any field and clicking Delete. The system displays a confirmation dialog box that asks: Are you sure you wish to delete this row?
Click Yes to delete the note.
Viewing notes
Notes are available from almost all TMWSuite applications. The Notes indicator is gray when there are no notes, or when there are only expired notes attached to a particular company, resource, order, or movement, etc.
When an unexpired note is available, the Notes indicator is displayed in yellow. If a note has been assigned Alert status, the indicator is displayed in red. The location of the indicator varies, depending on the application.
-
Click
 Notes in the sheet toolbar or select the Notes command from the Edit menu to open the Notes window. You may also click the Notes indicator.
 -
Use the Filter By Regarding list box to select the type of notes you want to see. To see all notes, select None. As you select different filtering options, the displayed notes will reflect the current filter.
-
Click Close to exit the Notes window.
| If you want to: | You must: |
|---|---|
Add a note |
Click Add. |
Insert a note between existing notes |
Highlight the note you want the new note to be above; click Insert. |
Save your entries |
Click Save. |
Cancel all entries made since the last time you saved, e.g., retrieves only those entries that have been saved. |
Click Retrieve. |
Restrict the notes displayed to those for a specific filter category |
|
Display all notes, regardless of filter category |
|
View a note in its entirety if it exceeds the 68 character limit allowed by the text display |
Do one of the following:
|
Delete a note |
|
Exit the Notes window |
Do one of the following:
Note: If you have not saved your entries, you will be asked if you want to do so before you exit. |