Creating accessory types
Tractor accessory data for a trailer is maintained in File Maintenance through the Trailer Accessory List window. However, accessory types are set up in System Administration.
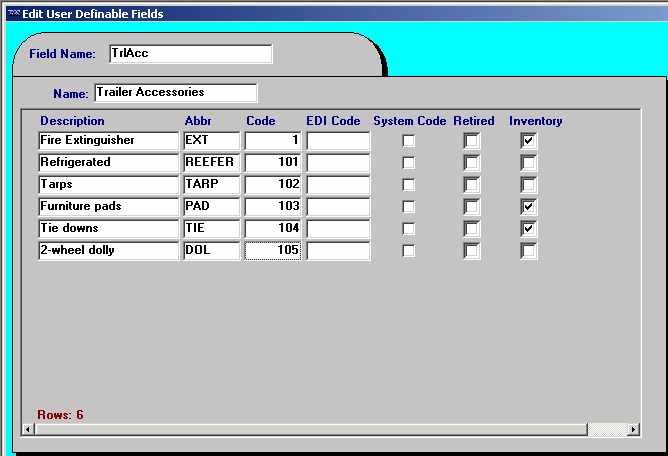
Both inventory and non-inventory types of trailer accessory options are set up in the TrlAcc label.
-
Non-inventory items are shown as options in the Accessories tab’s Type field.
-
Inventory items are shown in the Inventory tab. The same inventory list is displayed for all trailers.
Note: Initially, all inventory quantities default to zero for every trailer; quantities for individual trailers must be entered manually.
The only difference in the set up of inventory and non-inventory accessories is that the Inventory check box is selected for items that must be replenished periodically.
| When creating a load requirement in Order Entry or Dispatch, you cannot inventory from non-inventory items. |
-
In System Administration, do one of the following:
-
Click
 Labels in the frame toolbar.
 -
Select Edit > Label File.
-
-
Display the TrlAcc label.
-
Click
 Insert in the sheet toolbar to display a new row.
 -
Make entries in the following fields:
Description
Enter a descriptive name for the accessory type. This name will be displayed in the drop-down list for non-inventory accessories and as a fixed field value for inventory accessories.
Abbr
Enter a unique abbreviation to represent this row. This value will be stored in the database.
Code
Enter a unique sequential number. This is the order in which the options will display in the drop-down list for this field.
EDI Code
Shows the alternate EDI code entered in File Maintenance’s EDI Code Maintenance window. If you enter an alternate EDI code in this field, it will update the code in the EDI Code Maintenance window.
Notes:
-
If no alternate EDI codes are recorded, either in this field or in the EDI Code Maintenance window, the system uses the first three characters of the item code as the default EDI code.
-
For more information about the EDI Code Maintenance window, refer to the TMWSuite EDI guide.
System Code
When the check box is selected, the item is essential to the integrity of system performance. You cannot modify any fields for a system code label item; you cannot delete such an item.
Retired
If an accessory type is no longer needed, you can retire it instead of deleting it. Selecting this check box prevents an item from showing in lists of inventory and non-inventory accessory types.
Inventory
If the accessory type will need to be replaced or replenished periodically, select this check box. This will allow you to track the quantity of the item recorded for each trailer carrying this accessory type.
-
-
Save your entries and exit System Administration.
Viewing a trailer’s accessory list
With the trailer’s profile opened, do one of the following:
-
Click
 Accessories in the sheet toolbar.
 -
Select Edit > Accessories.
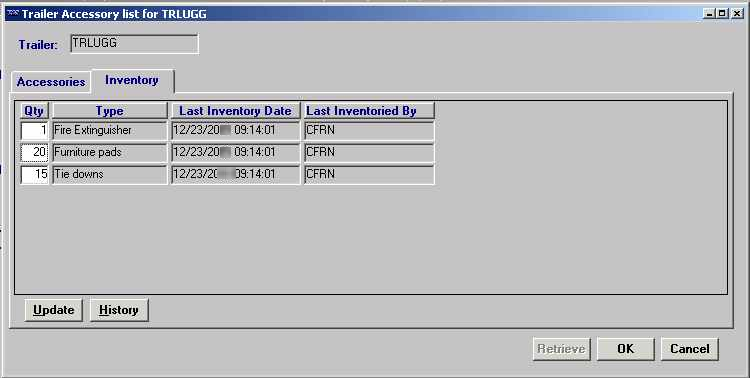
The Trailer Accessories List window is displayed. The trailer’s ID is shown in the title of the window.

The Accessories tab, which is shown by default, lists any non-inventory items previously recorded for the trailer. The tab displays up to seven accessories at one time. If more than seven accessories have been recorded, a vertical scroll bar is displayed. Use the scroll bar to bring additional items into view.
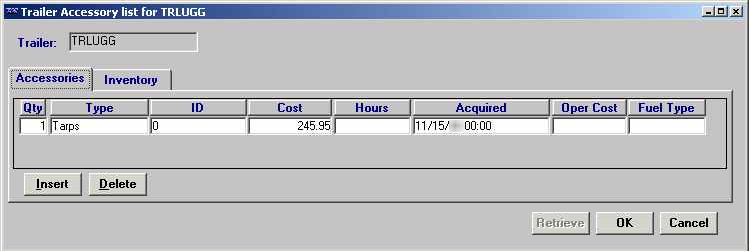
The Accessories tab lists only those non-inventory items that are attached to this trailer.
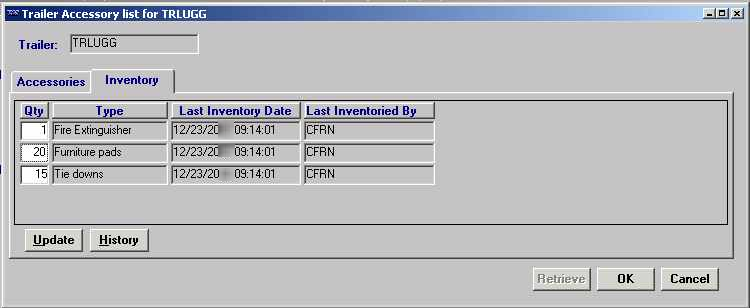
To view inventoried accessories, click on the Inventory tab.
All inventory items recorded in the TrlAcc label are tracked for every trailer. For individual trailers, the item quantities begin as zero. You must manually enter the initial quantity. You must track a trailer’s inventory accessories and update its record as inventoried accessories are used up or worn out.
Adding a non-inventory accessory to a trailer’s profile
Before you can record a specific accessory for a trailer, that accessory type must already exist in the TrlAcc label. If the accessory type is not included in the accessory options list, add it to the TrlAcc label.
-
With the trailer’s profile opened, do one of the following:
-
Click
Accessories in the sheet toolbar. -
Select Edit > Accessories.
-
-
Make sure the Accessories tab is selected.
-
Click Insert. A new row is displayed.
-
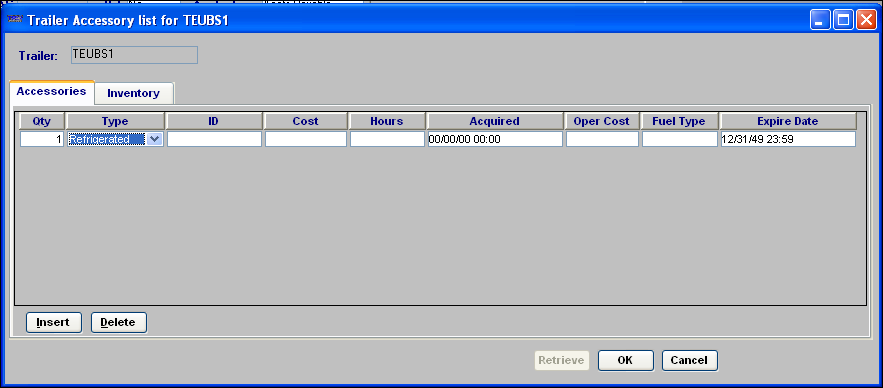
Make the appropriate entries in these fields:
Type
From the drop-down list, select the type of accessory found on the trailer.
Note: The options shown in this field are user-defined using the TrlAcc label, which is accessed in System Administration. Any items that have the Inventory check box selected will not display in this field.
ID
ID that is associated with the accessory, e.g., a serial number.
Cost
Purchase price of the accessory.
Hours
Currently not operational.
Acquired
Date that the accessory was acquired.
Oper Cost
Cost to operate the accessory, if applicable.
Fuel Type
Custom.
Expire Date
If applicable, enter the date the load requirement is to expire. After the expiration date, it will no longer be attached to an order.
-
After completing your entries, click OK.
-
In the confirmation message, click Yes to save your entries and close the Accessory List window.
Removing a non-inventory accessory from a trailer’s profile
You can delete an accessory record from a trailer’s Accessories List.
-
With the trailer’s profile opened, do one of the following:
-
Click
Accessories in the sheet toolbar. -
Select Edit > Accessories.
-
-
Make sure the Accessories tab is selected.
-
Click in any field in the row of the accessory you wish to delete.
-
Click Delete.
-
To save your deletion, click OK in the lower right of the window.
-
The system asks if you want to apply your changes, click Yes. The Accessory List window then closes.
| You are deleting the specific non-inventory accessory for just this one trailer. The accessory type still exists in the system. If the accessory type is no longer needed for any trailer, you can retire it in the TrlAcc label, accessed in System Administration. |
Recording quantities for inventory accessories
You must manually enter quantities for inventoried accessories, both at the time the item is added to a trailer’s list and when you update the record to show quantity changes.
| Your entry in the Quantity field is for reference only. Because the system does not verify that the quantity available and the quantity specified in the load requirement match, any quantity over zero will satisfy a load requirement for the item. |
The date and time you update a quantity, as well as your user ID, are included in the inventory accessory record.
| The Last Inventory Date fields for all items are updated at the same time, even if you modify the quantity of only one item. |
-
With the trailer’s accessory list displayed, select the Inventory tab.
-
Enter the new amount in the Qty field.
-
Click Update.
-
Click OK to exit the window.
Checking the quantity of inventoried trailer accessories
Trailer accessories are recorded in the Trailer Accessory List window, which can be accessed from the Trailer File Maintenance window by going to Edit > Accessories, or by going to Tools > Add Trailer Accessories in the Dispatch application. Using the window’s Inventory tab, you can record the types and quantities of a trailer’s inventoried accessories.
You can set up the system to display a warning when you enter a quantity for an inventoried accessory that is less than the previously-recorded quantity. This checking is enabled by the [Misc]TrailerInventoryQuantityWarning setting in your TTS50.ini file.
With [Misc]TrailerInventoryQuantityWarning=Y in place, if you enter a quantity on the Trailer Accessory List window’s Inventory tab that is less than the existing quantity, the system displays a warning when you tab out of the Qty field.
Click OK in the warning message to proceed. The system then displays a confirmation message asking if you want to apply the change. Click Yes to change the quantity, or No to keep the old quantity.
Viewing an inventory history
You can view a history of inventory changes for a particular trailer.
-
With the trailer’s accessory list displayed, select the Inventory tab.
-
Click History.
-
Enter a date range using the Start Date and End Date fields.
The Inventory History report is displayed as a table:
-
Each item is a column heading.
-
Each inventory update date/time is shown in a separate row.
-
The quantity recorded for each item at the time of the update is shown in the appropriate column.
-
-
Use the scroll bar at the bottom of the window to view the history for any items that do not fit in the initial display of the table.
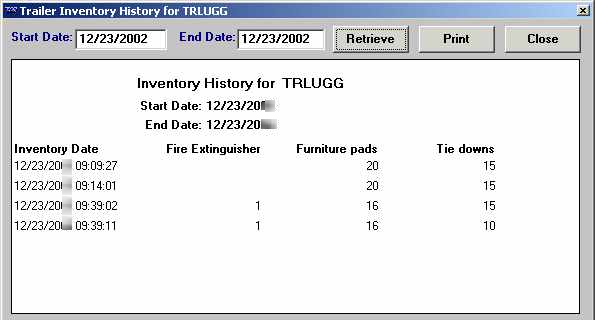
If desired, you can print the report.
How accessories/inventory items are used for load requirements
Load requirements specify special criteria that must, or should be, met when assigning resources to an order in Order Entry or Dispatch. There are two types of load requirements:
-
Default Load Requirements
Based on a company or commodity, default load requirements are automatically applied to all orders for that company or commodity. -
Order-by-order load requirements
Attached to an order in Order Entry or Dispatch, these load requirements specific to that order and are not applied to any other orders.
For complete instructions on recording load requirements, refer to these topics/sections:
| Guide | Chapter | Section/Topic |
|---|---|---|
File Maintenance |
Company File Maintenance |
|
Order Entry |
Defining load requirements/conditions for an order |
|
General Dispatch |
The Load Requirements for Move window below shows both types of load requirements.
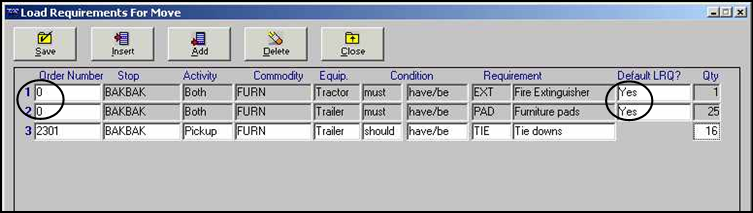
The first two requirements are default load requirements based on a company or commodity.
-
Notice that no order number is shown for them.
-
Each has a value of Yes in its Default LRQ field.
Note: Default load requirements can be suspended on an order-by-order basis.
The third requirement was added specifically for the order.
-
Notice that the order number is displayed.
-
The Default LRQ field is unavailable.
The values in the other load requirement fields are not dependent upon whether the load requirement is a default requirement for a company or commodity. The following table describes the remaining fields:
Stop |
If the condition is applicable at a particular stop, shows the company ID for that stop. |
Activity |
Indicates the stop type for which the condition is applicable. The options are:
|
Commodity |
The commodity transported on the order. |
Equip. |
The resource type to which the condition applies. The options are:
Note: The resource type selected in this field determines the options that will be displayed in the Requirements field. |
Condition |
The condition/requirement.
|
Requirement |
The applicable accessory or driver qualification. Notes:
|
Qty. |
Specifies the accessory quantity required. This field is for reference only. The system does not verify a match in quantity for the required item between the load requirement and the amount recorded in the Inventory tab of the resource’s Accessory List. |
|
Recording/viewing trailer compartment details and innage/outage charts
A trailer detail is a description of a trailer compartment. These descriptions are set up in the Trailer Details window, where you:
-
Record information for individual trailer compartments.
-
Associate a compartment record with an innage/outage chart definition.
With the trailer’s profile opened, do one of the following:
-
Select Edit > Trailer Details.
-
Click
 Trailer Details in the sheet toolbar.
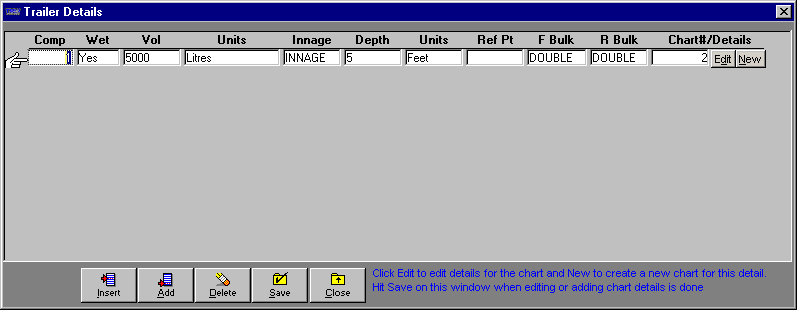
The Trailer Details window is displayed.
Adding a compartment detail record to a trailer profile
You can record detail information for each of a trailer’s compartments.
-
With the trailer’s Trailer Detail window displayed, click Add in the lower left of the window.
-
Make entries in the following fields:
Comp
Record the number of the compartment to which the trailer detail refers.
Wet
Record whether the compartment carries wet or dry commodities.
Vol
Record the number of units, e.g., volume, the compartment holds.
Units
Specify the unit of measure that applies to the entry made in the Vol field.
Innage
Specify whether the detail record describes innage or outage.
Note: Innage is the distance between the bottom of the trailer and the top level of the commodity. Outage is the distance between the top of the trailer and the level of the commodity.
Depth
Record the number of units that make up the depth of the compartment.
Units
Specify the type of units by which the compartment depth is measured.
Ref Pt
Specify whether the reference point is in relation to the top or the bottom of the trailer compartment.
F Bulk
Record the type of partition between the front compartment and the front of the trailer. The options are:
-
Single
-
Double
R Bulk
Record the type of partition between the rear compartment and the front compartment of the trailer. The options are:
-
Single
-
Double
Chart #/Details
An entry in this field is required. Use the drop-down list to specify which innage/outage chart definition applies to this trailer compartment.
-
To create a new chart definition for the compartment record, click New shown to the right of the field.
-
To associate an existing chart definition with the compartment record, select it from the drop-down list. If you need to modify the chart definition, click the Edit button shown to the right of the Chart #/Details field.
In both cases, continue with the steps in Creating or modifying an innage/outage chart definition.
-
-
When all entries are complete, click Save.
-
Click Close to exit the Trailer Details window.
Creating or modifying an innage/outage chart definition
Each trailer detail record must specify an innage/outage chart definition. When you are entering the trailer compartment description, you can add a new chart for it, or modify an existing one.
-
Be sure the compartment record is displayed in the Trailer Details window.
-
Do one of the following:
-
To create a new definition, click New shown to the right of the Chart #/Details field.
-
To modify an existing definition, select the chart number from the drop-down list in the Chart #/Details field. Then click Edit shown to the right of the Chart #/Details field.
-
-
The Innage/Outage Charts window is displayed.

The system automatically enters the following information in the Chart Definition area of the window, based on the data you entered for the compartment record:
Chart #
-
If you are adding a new chart, the system assigns the next incremental number.
-
If you are modifying an existing chart, the system displays the number of the chart you chose.
Chart Type
The type is based on whether you selected Innage or Outage in the Innage field.
Ht. UOM
The Height Unit of Measure is determined by your selection in the Depth Units field.
Volume UOM
The Volume Unit of measure is determined by your selection in the Volume Units field.
-
-
Make entries in the following fields.
Chart Collar
This free-form text field allows up to 25 alphanumeric characters.
Chart Note
Enter an appropriate remark. You may enter up to 256 characters, but only 85 characters can appear at one time.
-
If your note exceeds 85 characters, use the Left Arrow or Right Arrow keys to scroll the rest of the note into view. You can also highlight the note, right-click the text box, and select Zoom Field to view the text in its entirety.
-
To copy a word or phrase from an existing note, highlight the portion you want to duplicate and press CTRL+C. Then position the cursor in the spot where the word(s) are to be pasted, and press CTRL+V.
-
You can cut a word or phrase from an existing note and paste it in a different spot. With the portion to be cut highlighted, press CTRL+X. Note that the word(s) are deleted from their original location. Position the cursor in the spot where the word(s) are to be pasted, and press CTRL+V.
Chart Detail
Notes:
-
You may add additional Height and Volume rows by clicking Add. The system displays an additional row below the current one.
-
You may also insert a row before an existing row. Position the cursor anywhere in the existing row, and click the Insert button.
-
You can delete a row by positioning the cursor anywhere in the row and clicking Delete. The system will ask for confirmation that you want to delete that row.
Height
Enter the height measurement.
Volume
Enter the corresponding volume measurement.
-
-
Click Save to save the chart.
-
Click Close to exit the Innage/Outage Charts window.
-
Click Save in the Trailer Details window to save the detail record.
-
Click Close to exit the Trailer Details window.
Recording/viewing notes on a trailer
Notes entered for a trailer are accessible in the base applications, except System Administration and Rate Schedules.
Adding notes to a trailer profile
-
With the trailer’s profile opened, do one of the following:
-
To add a note to the end of the list, click Add.
-
To insert a note before an existing one, highlight the existing note and click Insert.
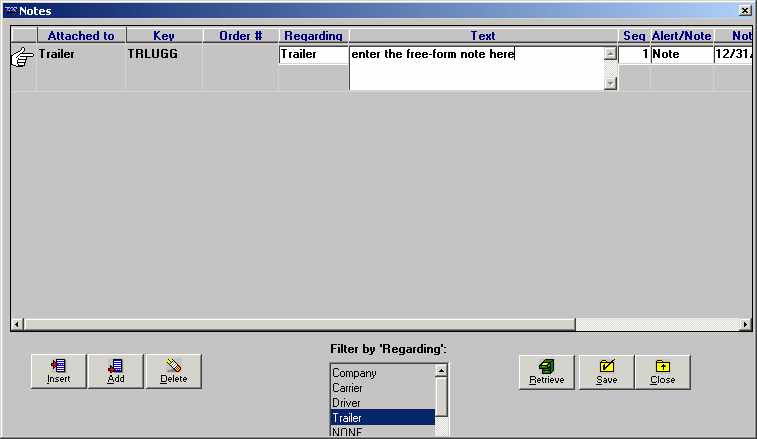
The system automatically provides some information:
-
It puts Trailer in the Attached to field.
-
It puts the trailer’s ID in the Key field.
-
-
Select the appropriate entry in the Regarding field. The option you select controls how the note is filtered when a user retrieves notes later. The options are:
-
Company
-
Settlements
-
Carrier
-
Pay To
-
Driver
-
Billing
-
Trailer
-
Order
-
Tractor
-
-
Enter the text of the note in the textbox. You may enter up to 256 characters, but only 68 characters can display in the textbox at one time.
-
If your note exceeds 68 characters, use the Left Arrow or Right Arrow keys to scroll the rest of the note into view. You can also highlight the note, right-click on the text box, and select Zoom Field from the shortcut menu to view the text in its entirety.
-
To copy a word or phrase from an existing note, highlight the portion you want to duplicate and press CTRL+C. Then position the cursor in the spot where the word(s) are to be pasted and press CTRL+V.
-
You can cut a word or phrase from an existing note and paste it in a different spot. To do so, highlight the portion to be cut and press CTRL+X. Note that the word(s) are deleted from their original location. Position the cursor in the spot where the word(s) are to be pasted and press CTRL+V.
-
-
Position the cursor in the Note/Alert field. Highlight one of the options to rank the importance of your note.
-
Select Note if your note is informational, but not of critical importance.
-
Select Alert if your note is of critical importance, not merely informational.
The ranking determines how the system displays the Note indicator on windows associated with your note. For notes ranked as Note, a yellow indicator is displayed; for notes ranked as Alert, a red indicator is displayed.
-
-
Notes may be assigned an expiration date. Position the cursor in the Expiration Date field, and enter the date and time the note is to expire, if applicable.
Note: Once the expiration date has passed, the note no longer triggers the Note indicator to show as yellow or red. However, the expired note continues to display in the Note window.
-
Click Save to save the note.
Note: To cancel any changes, click Retrieve; the system displays the previously existing notes.
-
Click Close to exit the window.
Deleting a note
You can delete a note by positioning the cursor in any field and clicking the Delete button. The system displays a confirmation dialog box that asks: "Are you sure you wish to delete this row?""
Click Yes to delete the note.
Viewing notes
Notes are available from almost all TMWSuite applications. The Notes indicator is gray when there are no notes, or when only expired notes are attached to a particular company, resource, order, or movement, etc. When an unexpired note is available, the Notes indicator is displayed in yellow. If a note has been assigned Alert status, the indicator is displayed in red. The location of the indicator varies, depending on the application.
-
To open the Notes window, click
 Notes in the sheet toolbar, or select Edit > Notes. You may also click the Notes indicator.
 -
Use the Filter By Regarding list box to select the type of notes you want to see. To see all notes, select None. As you select different filtering options, the displayed notes will reflect the current filter.
-
Click Close to exit the Notes window.
| If you want to | You must: |
|---|---|
Add a note |
Click Add. |
Insert a note between existing notes |
Highlight the note you want the new note to be above; click Insert. |
Save your entries |
Click Save. |
Cancel all entries made since the last time you saved, e.g., retrieves only those entries that have been saved. |
Click Retrieve. |
Restrict the notes displayed to those for a specific filter category |
|
Display all notes, regardless of filter category |
|
View a note in its entirety if it exceeds the 68 character limit allowed by the text display |
Do one of the following:
|
Delete a note |
|
Exit the Notes window |
Do one of the following:
Note: If you have not saved your entries, you will be asked if you want to do so before you exit. |