Adding/maintaining miscellaneous commodity information
From the Commodity File Maintenance window, you can access a number of supporting windows used to record supplemental carrier information. These windows are listed here. Those that are marked with a blue asterisk (*) also display when you click ![]() All Additional Info.
All Additional Info.
| Window | Icon | Used to: |
|---|---|---|
Commodity Makeup * |
|
Record the components that make up a commodity. |
Prior Commodity * |
|
Record the commodities or commodity classes that should or should not be hauled in the same trailer prior to a specific commodity. |
Additional Info * |
|
Record miscellaneous commodity information |
Load Requirements |
|
Record default load requirements specific to a commodity. |
Commodity Class |
|
Create classes to which a commodity may be assigned. |
Extra Info |
|
Custom feature. |
Recording the commodity makeup
The Commodity Makeup window allows you to record the components that make up a commodity. With the commodity profile for which you want to record components opened, do one of the following:
-
Click
 Makeup in the sheet toolbar
 -
Select Edit > Commodity Makeup.
The Commodity Makeup window is displayed.
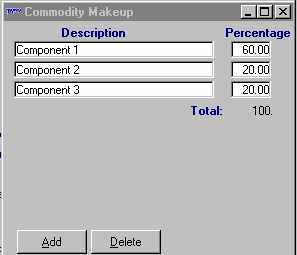
Use the Add button to establish a line for each component. Identify the component in the Description field; in the Percentage field, enter the percentage for the component.
| The percentages must add up to 100%. |
Recording prior commodity information
The Prior Commodity window allows you to record the commodities, or commodity classes, that should, or should not, be hauled in the same trailer before the currently displayed commodity.
| This feature is informational only. It is not used elsewhere in the system. |
With the commodity profile for which you want to record prior commodity information opened, do one of the following:
-
Click
 Prior in the sheet toolbar
 -
Select Edit > Prior Commodity.
The Prior Commodity window is displayed.
Use the Add button to add a line for each commodity or commodity class. Make entries in these fields:
Class |
Make an entry here if an entire class of commodities is involved. Note: Only commodity classes that display in the Fgt Class field, i.e., those established in the Add/Maintain Commodity Class window are available in this drop-down list. Commodity classes displayed in the Fgt 2nd Class field, i.e., those established in the Add/Maintain 2nd Commodity Class window are not available in the drop-down list. For more information, see Setting up commodity classes. |
Commodity |
Make an entry here if a specific commodity is involved. |
Prior |
Select one of the following:
|
Recording additional commodity information
The Additional Info window allows you to record miscellaneous commodity information. With the commodity profile for which you want to record additional information opened, do one of the following:
-
Click
 Additional Info in the sheet toolbar
 -
Select Edit > Additional Info.
The Additional Info window is displayed.
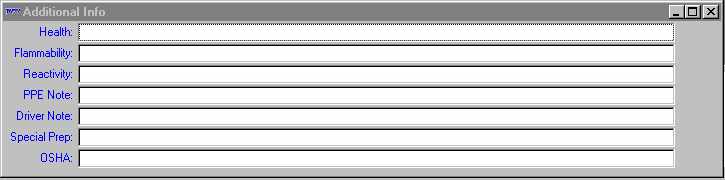
Make entries in the appropriate fields:
Health |
Health rating. |
Flammability |
Flammability rating. |
Reactivity |
Reactivity rating. |
PPE Note |
Personal protective equipment instructions. |
Driver Note |
Driver instructions. |
Special Prep |
Special preparation required. |
OSHA |
OSHA regulations. |
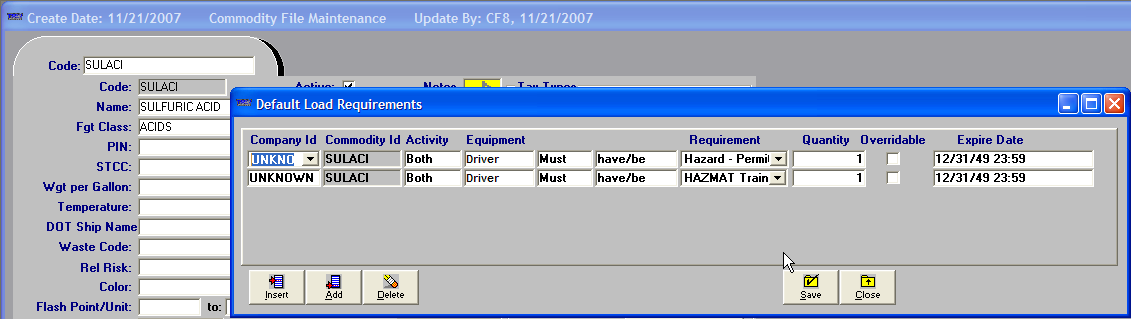
Recording default load requirements for a commodity
Although you can tie load requirement(s) to a specific order in Order Entry or in Dispatch manually, there may be times when you want to have the system automatically attach load requirements to particular commodities. This is useful when you know in advance that certain load requirements will always apply for a particular commodity, or when a certain commodity is shipped from a specific pickup location and/or received at a specific drop location.
You can use the Load Requirements window to record default load requirements for a commodity. For each requirement, you must indicate the conditions under which it is applicable. When you create a new order in Order Entry or the Dispatch Trip Folder, the load requirement will be attached automatically if the order matches the condition(s) you have specified.
You can have the system apply a commodity’s default load requirement(s) to an order under any of these conditions:
-
When the commodity is associated with a particular shipper.
and/or
-
When the commodity is associated with a particular consignee.
or
-
If the commodity is classed as hazardous.
or
-
Any time the commodity is recorded on any order.
To set up default load requirements for a commodity, follow these steps:
-
With the commodity profile for which you want to record default load requirements opened, do one of the following to display the Load Requirements window:
-
Choose Edit > Load Requirements.
-
Click
 Load Requirements in the sheet toolbar.

-
-
Do one of the following:
-
Click the Add button to add a condition to the end of the list.
-
Click the Insert button to add a new condition before an existing condition.
-
-
Make the appropriate entries in these fields:
Company ID
If the load requirement is to be applied when the commodity is associated with a particular shipper or consignee, enter the company’s ID.
Commodity ID
The system automatically displays the commodity for which the load requirement applies.
Note: This field is display only.
Activity
Indicate the type of stop to which the condition applies. The options are:
-
Drop
-
Both
-
Pickup
Equipment
This field allows you to specify the resource to which the condition applies. The options are:
-
Driver
-
Tractor
-
Trailer
-
Carrier
Note: The Third Party option is not applicable for load requirements.
Condition
Two unnamed fields allow you to specify if the condition is a requirement or a preference.
-
In the first field:
-
Select Must to signify a requirement. In the Dispatch application, only a resource that meets the requirement can be assigned to move the load.
-
Select Should to signify that the condition is a preference. In Order Entry and Dispatch, the system shows an indicator or a warning when assigned resource does not satisfy the condition. However, the system will allow the assignment.
-
-
In the second field, select either have/be or have not/be.
Requirement
Select the applicable accessory/qualification from the drop-down list.
Notes:
-
Accessories are defined using the DrvAcc, TrcAcc, and TrlAcc labels in the System Administration application. The options displayed reflect your selection in the Equip. field.
-
The list does not distinguish between inventory and non-inventory items.
Quantity
Currently not functional.
-
-
Click Save to save the load requirement you have added.
-
Click Close to exit the Load Requirement window.
Automatically attaching load requirements based on driver qualifications
Default load requirements are often attached to hazardous material commodities, such as a requirement that assigned drivers have a qualification for HazMat training recorded in their profile. Load requirements that pertain to driver qualifications can be automatically attached to a hazardous material commodity.
| Only load requirements that pertain to driver qualifications can be used with this feature. |
You enable and set up this feature in the General Info Table.
-
To activate the feature, the
AutoCreateHazMatLdRqsetting must have a value ofYin its String1 field. -
To identify the driver qualification(s) on which the load requirement(s) will be based, you use the
HazMatLdRqCodesetting. Using the String1 - String4 fields, you can establish up to four default requirements. Each field can contain one abbreviation for a desired driver qualification, as it is recorded in the DrvAcc label’s Abbr field.
Once the feature is enabled, the system automatically adds the driver-qualification-based load requirements when you create a new commodity and select the Hazardous Yes radio button is selected.
Click ![]() Load Req to view/edit the default load requirements.
Load Req to view/edit the default load requirements.
|
To update an existing commodity profile with driver qualification load requirements, you must reset the commodity’s hazardous classification. To do so:
The system will automatically attach the default driver qualification load requirements. |
Deleting a load requirement
If a load requirement has been recorded in error, you can delete it from the system. Follow these steps.
-
Position the cursor in any field for the load requirement to be deleted.
-
Click the Delete button.
-
The system displays a confirmation dialog box, asking whether you are sure you want to continue the deletion. Do one of the following:
-
To complete the deletion of the requirement, click Yes.
-
To cancel the deletion of the requirement, click No.
-
-
Click Save to save the changes you have made.
-
Click Close to exit the Load Requirement window.
Recording/viewing notes for a commodity
Notes entered for commodities are accessible in most base applications. The exceptions are System Administration and Rate Schedules.
Adding a note for a commodity
-
Select Edit > Note, or click the Note indicator in the profile window.

The Notes window is displayed. From this window, you can insert, add, or delete a note.
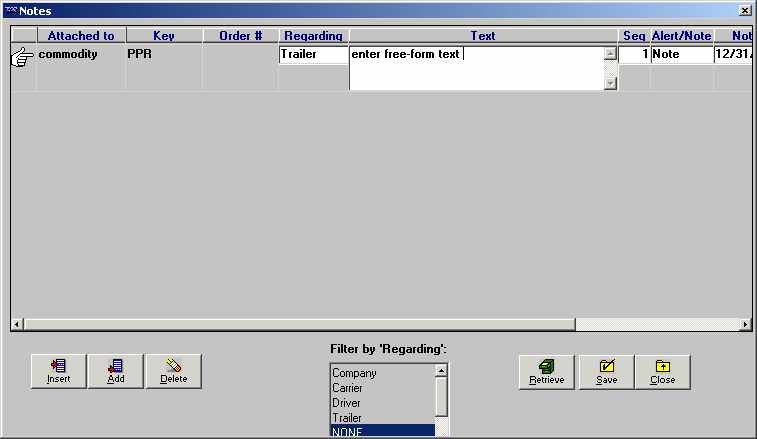
-
Click the Add button, and the system fills in commodity in the Attached to field and the commodity ID in the Key field.
Note: You can also click the Insert button to add a new note before an existing note.
-
Select the appropriate entry in the Regarding field. The option you select controls how the note is filtered when a user retrieves notes later. There are a number of system code options in the NoteRe label. The ones most commonly used are listed here:
-
Company
-
Settlements
-
Carrier
-
Pay To
-
Driver
-
Billing
-
Trailer
-
Order
-
Tractor
-
-
Enter the text of the note in the textbox. You may enter up to 256 characters, but only 68 characters can display in the textbox at one time.
-
If your note exceeds 68 characters, use the LEFT ARROW or RIGHT ARROW keys to scroll the rest of the note into view. You can also highlight the note, right-click on the text box, and select Zoom Field to view the text in its entirety.
-
To copy a word or phrase from an existing note, highlight the portion you want to duplicate and press CTRL+C. Then position the cursor in the spot where the word(s) are to be pasted and press CTRL+V.
-
You can cut a word or phrase from an existing note and paste it in a different spot. To do so, highlight the portion to be cut and press CTRL+X. Note that the word(s) are deleted from their original location. Position the cursor in the spot where the word(s) are to be pasted and press CTRL+V.
-
-
Position the cursor in the Note/Alert field. Highlight one of the options to rank the importance of your note.
-
Select Note if your note is informational, but not of critical importance.
-
Select Alert if your note is of critical importance, not merely informational.
The ranking determines how TMWSuite displays the Note indicator on windows associated with your note. For notes ranked as Note, a yellow indicator is displayed; for notes ranked as Alert, a red indicator is displayed.
-
-
Notes may be assigned an expiration date. Position the cursor in the Expiration Date field, and enter the date and time the note is to expire, if applicable.
Note: Once the expiration date has passed, the note no longer triggers the Note indicator to show as yellow or red. However, the expired note continues to display in the Note window.
-
Click Save.
-
Click Close to exit the window.
Note: To cancel any changes, click the Retrieve button instead of the Save button. The system displays the previously existing notes.
Deleting a note
You can delete a note by positioning the cursor in any of its fields in the Notes window and clicking the Delete button. The system displays a confirmation dialog box that asks:
Are you sure you wish to delete this row?
Click the Yes button to delete the note.
Viewing notes
Notes are available from almost all TMWSuite applications. The Notes indicator is gray when there are no notes, or when there are only expired notes attached to a particular company, resource, order, or movement, etc. When an unexpired note is available, the Notes indicator is displayed in yellow. If a note has been assigned Alert status, the indicator is displayed in red. The location of the indicator varies, depending on the application.
-
In the Commodity File Maintenance window, click the Notes indicator in the profile window or select the Edit > Notes command to open the Notes window. You may also click the Notes indicator.
-
Use the Filter By Regarding list box to select the type of notes you want to see. To see all notes, select None. As you select different filtering options, the displayed notes will reflect the current filter.
-
Click Close to exit the Notes window.
| If you want to | You must: |
|---|---|
Add a note |
Click the Add button. |
Insert a note between existing notes |
Highlight the note you want the new note to be above; click the Insert button. |
Save your entries |
Click Save. |
Cancel all entries made since the last time you saved (e.g., retrieves only those entries that have been saved) |
Click the Retrieve button. |
Restrict the notes displayed to those for a specific filter category |
|
Display all notes, regardless of filter category |
|
View a note in its entirety if it exceeds the 68 character limit allowed by the text display |
Do one of the following:
|
Delete a note |
|
Exit the Notes window |
Do one of the following:
Note: If you have not saved your entries, you will be asked if you want to do so before you exit. |
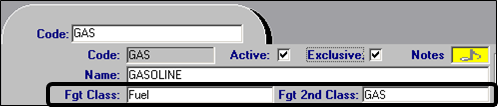
Setting up commodity classes
You may wish to set up commodity classes to which you can assign commodities. Some companies use multiple classifications for their commodities. For example, one classification may be used to determine billing or pay rates, and a second classification may identify a general product type. You can set up two groups of commodity classes. Commodity Class1 options are available in the Fgt Class field. You can select Commodity Class2 options in the Fgt 2nd Class field.
Commodity classes displayed in the Fgt Class field are set up in the Add/Maintain Commodity Classes window. Commodity classes displayed in the Fgt 2nd Class field are set up in the Add/Maintain 2nd Commodity Classes window. Instructions for adding each type are provided below.
|
Unlike the Fgt Class field, Fgt 2nd Class is not available in the following windows:
|
Setting up Commodity Class 1 categories
To add a new commodity class, follow these steps:
-
Open an existing commodity profile or click
 New to display a blank profile.
 -
Do one of the following:
-
Select Edit > Add/Maintain Commodity Class.
-
Click
 Class in the sheet toolbar.
Note: If you attempt to access the Add/Maintain Commodity Class window without a profile displayed, the system displays the following message: You must select a commodity first.
-
-
Click OK to close the message.
-
The Commodity Class Maintenance Selection Window is displayed. You use this window to choose the commodity class list to be edited. Select the Commodity Class check box.
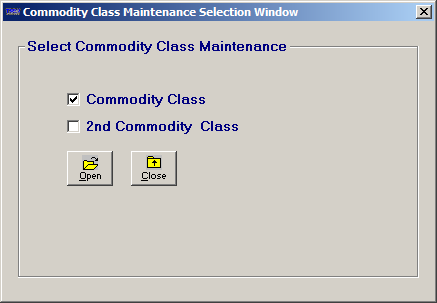
-
The Add/Maintain Commodity Class window displays any existing commodity classes:
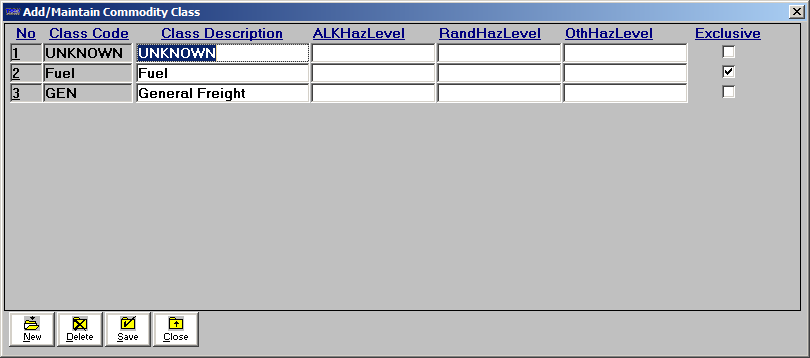
-
Click the New button to display a new row of commodity class fields.
-
Make the following entries:
Class Code
Enter a code of up to eight characters.
Class Description
Enter a description of up to 20 characters.
Exclusive
Select this check box to make the commodity class exclusive.
Note: For more information on commodity exclusivity, see Making commodities and commodity classes exclusive.
| If you are set up to use the hazardous materials mileage features, make entries in the fields as needed. For more information, see Setting up commodities to use a vendor’s hazardous materials mileage options. |
-
Click Save to save the new class.
-
Click Close to close the window.
Note: After you save a commodity class and close the Add/Maintain Commodity Class window, the new class is included in the Fgt Class field’s drop-down list.
Setting up Commodity Class 2 categories
-
Perform Steps 1 and 2 from the previous section.
-
When the Commodity Class Maintenance Selection Window displays, select the 2nd Commodity Class check box.
-
In the Add/Maintain 2nd Commodity Class window, click the New button to add a new commodity class:
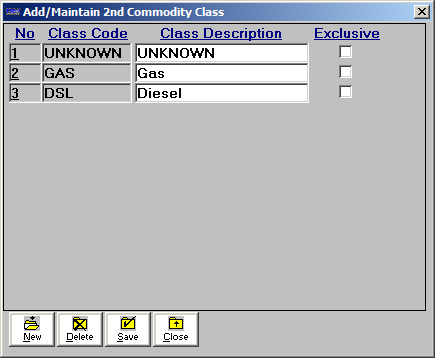
-
Make the following entries:
Class Code
Enter a code of up to eight characters.
Class Description
Enter a description of up to 20 characters.
Exclusive
Select this check box to make the commodity class exclusive.
Note: For more information on commodity exclusivity, see Setting up commodities to use a vendor’s hazardous materials mileage options.
Note: The system automatically generates a unique number for each commodity classes. This number displays in the No column, and cannot be edited.
-
Click Save when you are done adding classes.
-
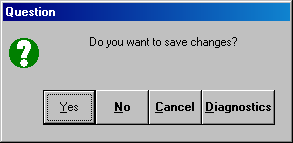
To exit the Add/Maintain 2nd Commodity Class window, click Close.
If you have not saved changes made in the window, click Yes in the Question window to save your changes:
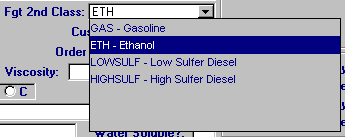
The commodity classes you have set up will now be available in the Fgt 2nd Class field in Commodity File Maintenance:
Deleting a commodity class
If a commodity class has been recorded in error, you can delete it from the system. To maintain history, it is recommended that you do not delete a class to which one or more commodities have been assigned.
-
Access the appropriate commodity class list, as described in the previous two sections.
-
Position the cursor in the Description field for the commodity class to be deleted.
-
Click the Delete button.
-
The system displays a message that asks whether you are sure you want to continue the deletion.
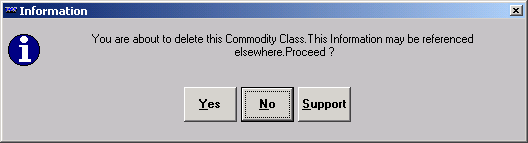
Do one of the following:
-
To complete the deletion, click Yes.
-
To cancel the deletion, click No.
-
-
Click Save to retain the changes you have made to the commodity class list.
-
Click Close to exit the commodity class window.
Making commodities and commodity classes exclusive
Some commodities may be hazardous when transported together. You can prevent loads that combine these commodities by identifying commodities or commodity classes as exclusive. When you save the move, the system verifies that exclusivity is enforced.
-
If the move has an exclusive commodity, no other commodity can be on the load.
-
If the move has a commodity belonging to an exclusive class, only commodities belonging to the same class are on the load.
When the commodities on an order violate the exclusivity rule, an error message appears. It will identify why you cannot save the order.

The order contains an exclusive commodity
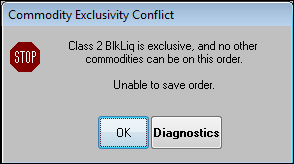
The order contains a commodity belonging to an exclusive class
This feature is applicable when you are using the Rate by Detail rating method. It is enforced in Order Entry and Dispatch.
Making a commodity exclusive
An exclusive commodity must be the only commodity on a movement. If you attempt to add an additional commodity to the movement, the system will not allow you to save the changes. You can add multiple commodity entries of the same exclusive commodity to a movement.
To set a commodity as exclusive, select the Exclusive check box on the commodity’s profile.
| For more information on the Commodity File Maintenance window, see Commodity File Maintenance field definitions. |
Making commodity classes exclusive
You can also make Commodity Class 1 and Commodity Class 2 categories exclusive.
When you create an order with multiple commodities and one of them belongs to an exclusive class, all the others must belong to the same class. You cannot save the load if they do not. You cannot add a commodity that does not have a class recorded in its profile.
| When using commodity class exclusivity, assign the commodity to either a Commodity Class 1 or a Commodity Class 2. Do not assign the commodity to both. |
To make a commodity class exclusive:
-
Access the appropriate commodity class list, as described in Setting up commodity classes.
-
Locate the row of the commodity class you want to make exclusive and select the Exclusive check box.
-
Click Save to save your changes.
-
Click Close to exit the commodity class list.
Setting up commodities to use a vendor’s hazardous materials mileage options
Whether your mileage system is ALK Technologies' PC*Miler or Rand McNally’s IntelliRoute, you can set up the HazMat Mileage feature to return hazardous route restrictions mileage for orders transporting hazardous commodities.
|
To use the HazMat Mileage feature, you must be using:
|
Some setup is required to use this feature:
-
Activate the feature using system settings
-
Linking commodity classes with your vendor’s hazardous materials routing options
-
Assigning a commodity to a hazardous materials commodity class
Using system settings to activate the HazMat Mileage feature
General Info Table settings are used to activate the HazMat Mileage feature. The following table identifies the settings, their required value, and which mileage systems use them.
| Setting name | Type of setting | Required value | Used by |
|---|---|---|---|
General Info Table |
OLD |
PC*Miler, PC*MILER|Streets, IntelliRoute |
|
General Info Table |
Y |
PC*Miler, PC*MILER|Streets |
Linking commodity classes to your vendor’s hazardous materials routing options
Whether your mileage vendor is ALK Technologies or Rand McNally, you must link your commodity classes to the vendor’s HazMat routing options.
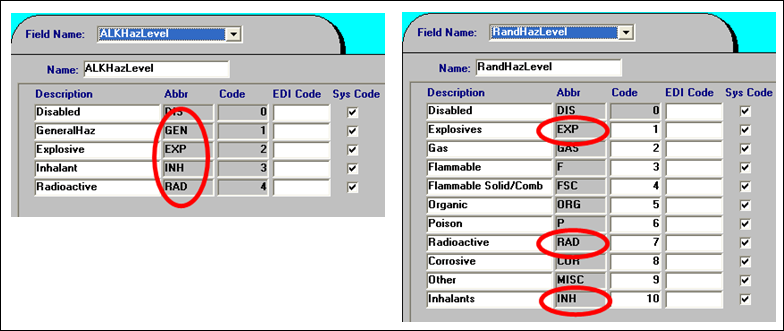
-
For ALK Technologies, the matching options are system codes in the ALKHazLevel label.
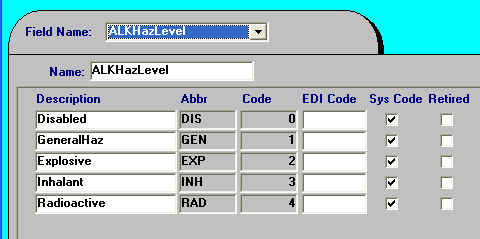
ALKHazLevel label
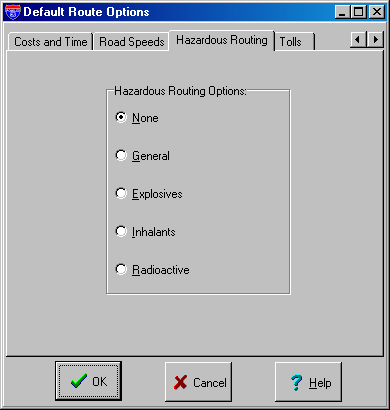
ALK Hazardous Routing options
-
For Rand McNally, the matching options are system codes in the RandHazLevel label.
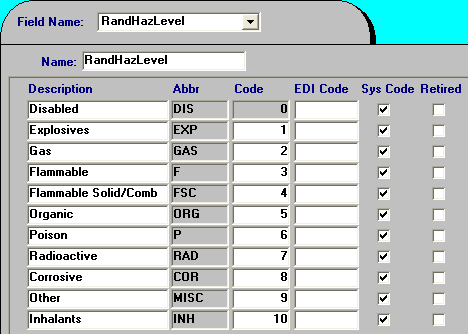
RandHazLevel label
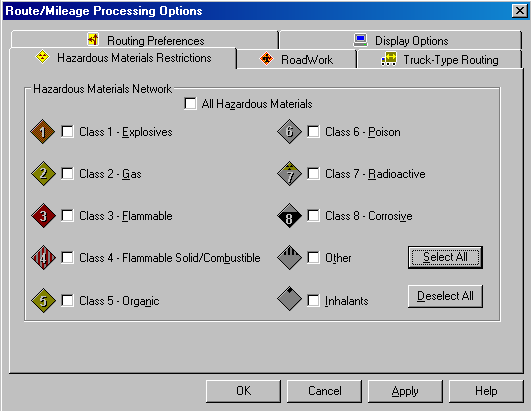
IntelliRoute Hazardous Materials Restrictions
The instructions below are applicable to both vendors.
-
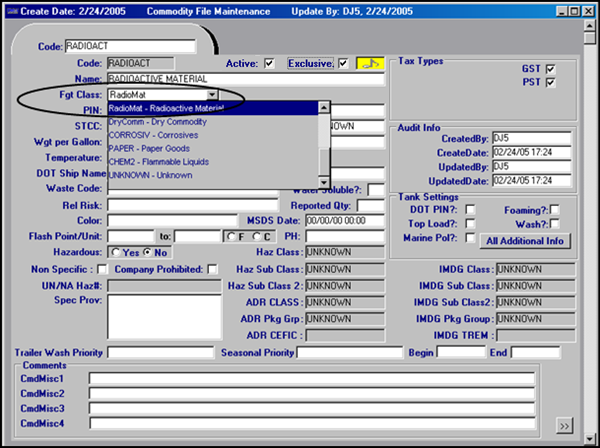
Open any commodity profile.
-
Click
 Commodity Class. The Commodity Class Maintenance Selection Window is displayed. Since commodity classes can only be linked to a mileage system’s hazardous materials routing options in the Add/Maintain Commodity Class window, select the Commodity Class check box.
 -
The Add/Maintain Commodity Class window is displayed.
Locate the first commodity class you want to link to a hazardous materials routing and do one of the following:
-
If you are using PC*Miler or PC*MILER|Streets, make your selection in the ALKHazLevel field for that commodity class.
-
If you are using IntelliRoute, make your selection in the RandHazLevel field for that commodity class.
-
-
Save your entries before closing the window.
Linking a HazMat commodity to a HazMat commodity class
After linking your HazMat commodity classes to your vendor’s hazardous materials routing options, you must link your applicable commodities to appropriate commodity classes.
-
Open the appropriate HazMat commodity profile.
-
In the Fgt Class field, select the appropriate commodity class that you previously linked to one of your vendor’s hazardous routing options.
-
Save your entries.
-
Repeat Steps 1 - 3 to link all your HazMat commodities to the appropriate HazMat classes.
Using the Haz Class field to determine hazardous routing requirements
When the HazMat Mileage feature is enabled, the system examines the commodities assigned to a load to determine if hazardous routing is required. By default, it uses the Fgt Class field value to identify hazardous commodities.
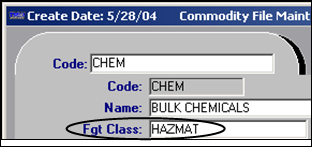
If you want, you can set up the system to use the Haz Class field instead of the Fgt Class field for this identification process.

To do so, you must:
-
Have the
[MileageInterface]HazMatLookupMode=CmdHazClasssetting in your TTS50.ini file. -
Link the CmdHazClass label options to your vendor’s hazardous routing methods.
Linking Haz Class field options to your vendor’s hazardous routing methods
To use the Haz Class field, you must link it with your vendor’s hazardous routing options. You use the CmdHazClass label to do this.

The only system code entry in the CmdHazClass label is UNKNOWN. This allows you to make entries that match the ALKHazLevel or RandHazLevel labels, depending on which vendor’s mileage system you are using. Both those labels have system code entries that correspond to the vendor’s routing options.