Associating time assignments to task assignments
You use the Task Time sub tab on the Job Code Definitions page to associate task times with task assignments. With task time assignments, you can track any part of a checklist as well as allowing retail shops to bill by task performed instead of the total time assigned to the Job Code. Task times are regulated by settings. For details on the settings, see Job Code Definitions.
|
You must complete the steps listed in Assigning tasks to Job Code Assignments before associating times with task assignments. |
To assign time to task assignments:
-
Go to Menu > Setup > Order Setup > Job Code Definitions.
For versions earlier than V. 2020.2, go to Menu > Setup > Repair Order Setup > Job Code Definitions.
The Job Code Definition page opens. -
Select the Assignments tab.
By default, the Job Code Assignment sub tab is selected and the Job Code Assignments section is displayed. -
Select the Task Time tab.
The Task Time and Job Code Tasks sections are displayed.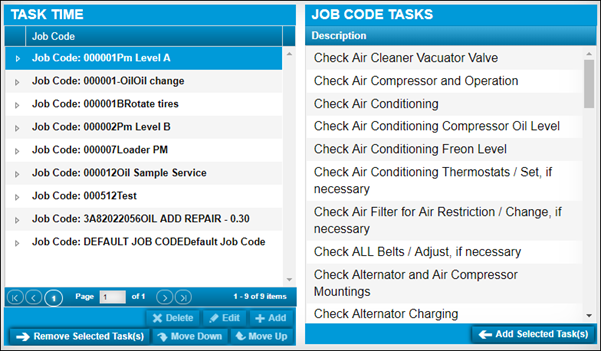
-
In the Task Part section, expand the needed Job Code.
Associated task time assignments are displayed under the Job Code. -
Select the needed task assignment.
-
Click Add.
The Task Time Assignments - Inserting window opens.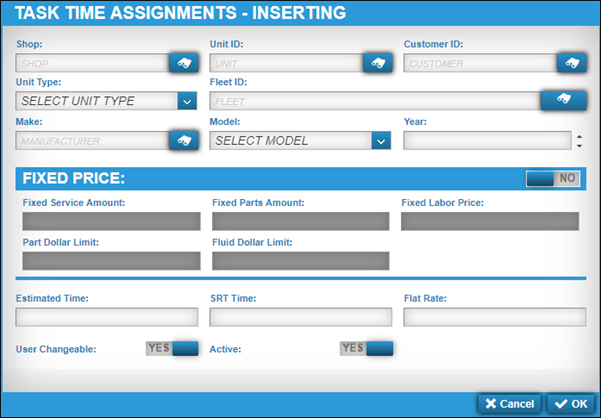
-
Make entries in the following fields as needed:
-
Shop
-
Unit ID
-
Customer ID
-
Unit Type
-
Fleet ID
-
Make
-
Model
-
Year
-
User Changeable
-
Active
For details on these fields, see Assignments tab: Job Code Assignment sub tab.
-
-
Do one of the following:
-
Use fixed pricing for this task.
Follow the steps listed in Enabling fixed pricing for task assignments.
-
Use baseline pricing for this task.
Enter values in the Estimated Time, SRT Time, and Flat Rate fields.
For details on these fields, see Assignments tab: Job Code Assignment sub tab.
-
-
Click OK.
The Job Code’s task time assignment is updated.
Expand a task to view the associated time assignments. To close this window without saving your changes, click Cancel.
Editing task time assignments
To edit an existing task time assignment:
|
Editing an existing task time assignment does not alter existing task time assignments on existing repair orders. |
-
Go to Menu > Setup > Order Setup > Job Code Definitions.
For versions earlier than V. 2020.2, go to Menu > Setup > Repair Order Setup > Job Code Definitions.
The Job Code Definition page opens. -
Select the Assignments tab.
-
Select the Task Time tab.
The Task Time and Job Code Tasks sections are displayed. -
In the Task Time section, expand the needed Job Code.
Associated task time assignments are displayed under the Job Code. -
Expand the needed task assignment.
Associated Job Code task assignments are displayed under the task time assignment.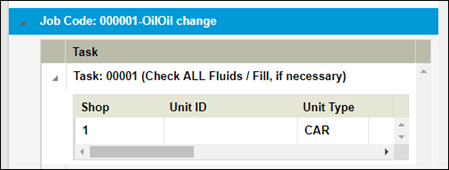
-
Select the needed task time assignment and click Edit.
The Task Time Assignments - Editing window opens.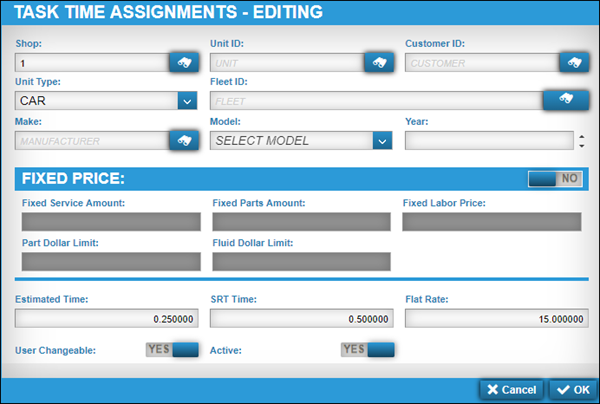
-
Make changes as needed.
Note: If you need to make changes to fixed pricing, see Editing fixed pricing for task time assignments.
-
Click OK.
The task time assignment is updated.
To close this window without saving your changes, click Cancel.
Deleting task time assignments
To delete an existing task time assignment:
|
Deleting an existing task time assignment does not alter existing task time assignments on existing repair orders. |
-
Go to Menu > Setup > Order Setup > Job Code Definitions.
For versions earlier than V. 2020.2, go to Menu > Setup > Repair Order Setup > Job Code Definitions.
The Job Code Definition page opens. -
Select the Assignments tab.
-
Select the Task Time tab.
The Task Time and Job Code Tasks sections are displayed. -
In the Task Time section, expand the needed Job Code.
Associated task time assignments are displayed under the Job Code. -
Expand the needed task assignment.
Associated Job Code task assignments are displayed under the task time assignment. -
Select the need task time assignment and click Delete.
The Delete Task Time Assignment message window opens. It asks, "Are you sure you want to delete the Task Time Assignment?"Note: If this task time assignment included fixed pricing, deleting the task time assignment deletes the fixed pricing.
-
Click Delete.
The task time assignment is removed from the task assignment.
To close this window without deleting the task time assignment, click Cancel.