Gate In, Gate Out, Inspection Tickets, and Yard Checks
|
Interactive Workstation (IWS) is available only in V.2022.2.2 and earlier. As of V.2022.3, IWS has been replaced with Trimble Technician Portal (TTP). |
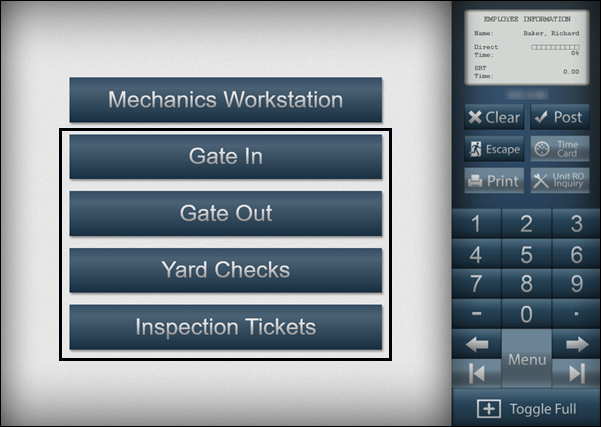
You use the Interactive Workstation page to access the following features:
-
Mechanic Workstation
For details on the Mechanic Workstation, see Mechanic Workstation (MWS) overview. -
Gate In
Used when a driver checks units into the yard. -
Gate Out
Used when a driver checks units out of the yard. -
Yard Checks
Used when performing a physical check of the units in the yard. -
Inspection Tickets
Used to create unit condition reports.
Working with Gate In or Gate Out
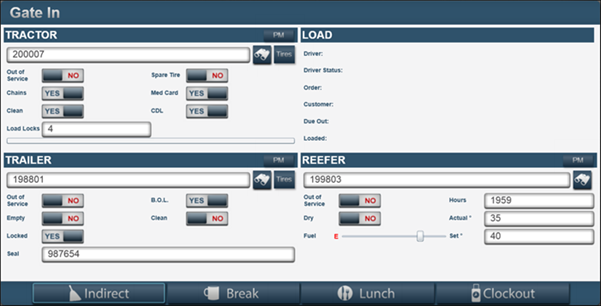
The Gate In feature allows a brief set of checks to be performed whenever a driver checks a unit into the yard. You use the Gate In section on the Interactive Workstation page to use this feature.
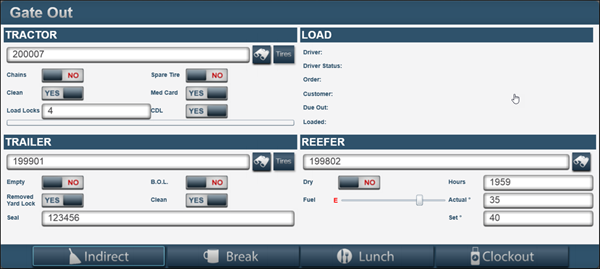
The Gate Out feature allows a brief set of checks to be performed whenever a driver checks a unit out of the yard. You use the Gate Out section on the Interactive Workstation page to use this feature.
|
As of V.2020.2, you open IWS by going to Menu > Activities > Interactive Workstation > Interactive Workstation. In earlier versions, you opened IWS by going to Menu > Activities > Interactive Workstation. |
IWS Gate In overview
To open the Gate In feature:
-
Go to Menu > Activities > Interactive Workstation > Interactive Workstation.
For versions earlier than V.2020.2, go to Menu > Activities > Interactive Workstation.
The Interactive Workstation page opens.
-
From the IWS Menu, click Gate In.
The Gate In section is displayed.
This page is divided into four sections:
-
Tractor
-
Trailer
-
Load
-
Reefer
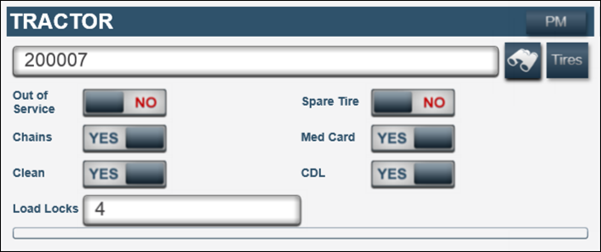
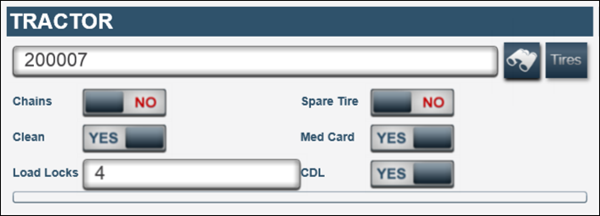
IWS Gate In: Tractor
| Field | Definition |
|---|---|
Tractor Number |
Unit number |
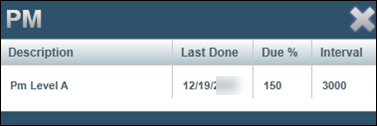
PM |
If the unit has PMs due, the PM button is displayed in the header. Click PM to display a list of preventive maintenance repairs.
|
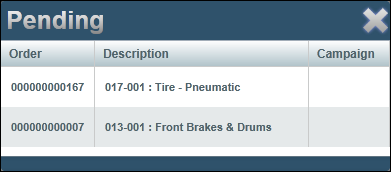
Pending |
If the unit has pending repair orders, the Pending button is displayed in the header. Click Pending to display a list of pending repairs.
|
Tires |
Record and view information about the tires |
Out of Service |
Can the unit be dispatched?
|
Spare Tire |
Does the unit have a spare tire?
|
Chains |
Are chains present?
|
Med Card |
Does the driver have a medical card?
|
Clean |
Is the unit clean?
|
CDL |
Does the driver have a CDL?
|
Load Locks |
Number of load locks on the unit |
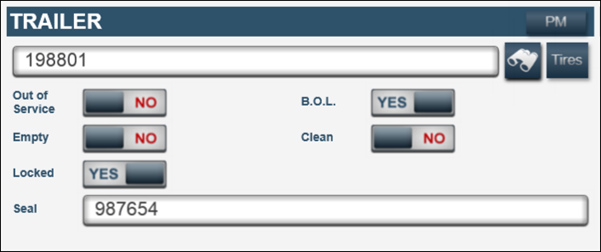
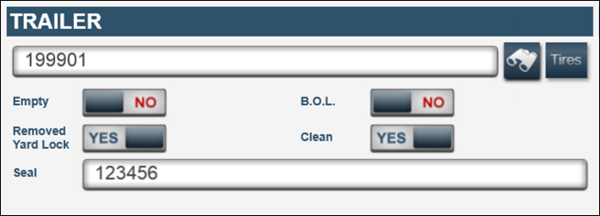
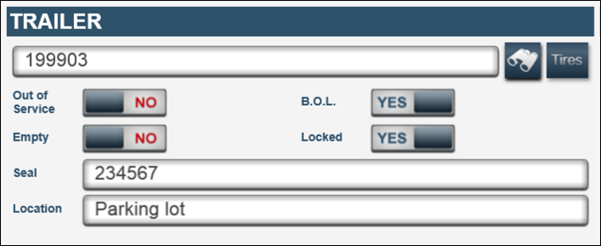
IWS Gate In: Trailer
| Field | Definition |
|---|---|
Trailer Number |
Unit number |
PM |
If the unit has PMs due, the PM button is displayed in the header. Click PM to display a list of preventive maintenance repairs.
|
Pending |
If the unit has pending repair orders, the Pending button is displayed in the header. Click Pending to display a list of pending repairs.
|
Tires |
Record and view information about the tires. |
Out of Service |
Can the unit be dispatched?
|
B.O.L. |
Is there a Bill of Lading?
|
Empty |
Is the trailer empty?
|
Clean |
Is the trailer clean?
|
Locked |
Is the trailer locked?
|
Seal/Pallets |
Seal tab number/number of pallets on the trailer If the Empty option is set to NO, the Seal field is displayed. If the Empty option is set to YES, the Pallets field replaces the Seal field. |
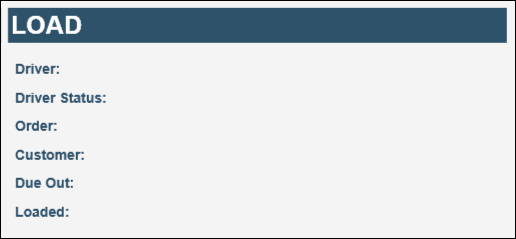
IWS Gate In: Load
The Load section displays read-only information, imported from the TMW.Suite integration.
| If you do not have this integration or the integration is inactive, this section is blank. |
| Field | Definition |
|---|---|
Driver |
Driver’s name |
Driver Status |
Driver’s status |
Order |
TMW.Suite order number |
Customer |
TMW.Suite consignee |
Due Out |
Date the load needs to leave the shop |
Loaded |
Identifies if the trailer is loaded |
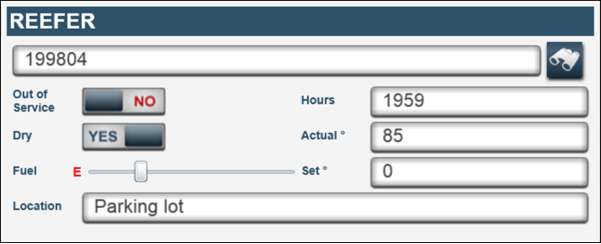
IWS Gate In: Reefer
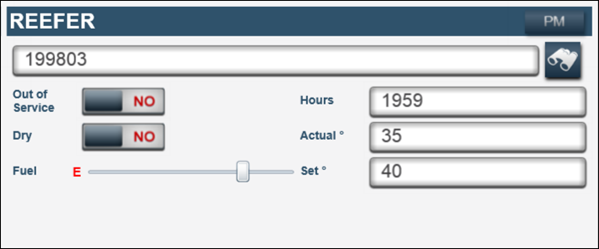
| Field | Definition |
|---|---|
Reefer Number |
Unit number |
PM |
If the reefer has PMs due, the PM button is displayed in the header. Click PM to display a list of preventive maintenance repairs.
|
Pending |
If the reefer has pending repair orders, the Pending button is displayed in the header. Click Pending to display a list of pending repairs.
|
Out of Service |
Can the reefer be dispatched?
|
Hours |
Number running hours |
Dry |
Is the reefer being used for a dry load?
|
Actual ° |
Actual temperature of the reefer |
Fuel |
Slider that represents the amount of fuel for the reefer Fuel is measured by 1/4 tank increments. |
Set |
Reefer thermostat temperature setting |
IWS Gate Out overview
To open the Gate Out feature:
-
Go to Menu > Activities > Interactive Workstation > Interactive Workstation.
For versions earlier than V.2020.2, go to Menu > Activities > Interactive Workstation.
The Interactive Workstation page opens.
-
From the IWS Menu, click Gate Out.
The Gate Out section is displayed.
This page is divided into four sections:
-
Tractor
-
Trailer
-
Load
-
Reefer
IWS Gate Out: Tractor
| Field | Definition |
|---|---|
Tractor Number |
Unit number |
Tires |
Record and view information about the tires |
Chains |
Are chains present?
|
Spare Tire |
If the unit has a spare tire, toggle to YES The default is set to NO. |
Clean |
Is the unit clean?
|
Med Card |
Does the driver have a medical card?
|
Load Locks |
Number of load locks on the unit |
CDL |
Does the driver have a CDL?
|
IWS Gate Out: Trailer
| Field | Definition |
|---|---|
Trailer Number |
Unit number |
Tires |
Record and view information about the tires |
Empty |
Is the trailer empty?
|
B.O.L. |
Is there a Bill of Lading?
|
Removed Yard Lock |
Is the trailer locked?
|
Clean |
Is the trailer clean?
|
Seal/Pallets |
Seal tab number/number of pallets on the trailer If the Empty option is set to NO, the Seal field is displayed. If the Empty option is set to YES, the Pallets field replaces the Seal field. |
IWS Gate Out: Load
The Load section displays read-only information, imported from the TMW.Suite integration.
| If you do not have this integration or the integration is inactive, this section is blank. |
| Field | Definition |
|---|---|
Driver |
Driver’s name |
Driver Status |
Driver’s status |
Order |
TMW.Suite order number |
Customer |
TMW.Suite consignee |
Due Out |
Date the load needs to leave the shop |
Loaded |
Identifies if the trailer is loaded |
IWS Gate Out: Reefer
| Field | Definition |
|---|---|
Reefer Number |
Unit number |
PM |
If the reefer has PMs due, the PM button is displayed in the header. Click PM to display a list of preventive maintenance repairs.
|
Pending |
If the reefer has pending repair orders, the Pending button is displayed in the header. Click Pending to display a list of pending repairs.
|
Out of Service |
Can the reefer be dispatched?
|
Hours |
Number running hours |
Dry |
Is the reefer being used for a dry load?
|
Actual ° |
Actual temperature of the reefer |
Fuel |
Slider that represents the amount of fuel for the reefer Fuel is measured by 1/4 tank increments. |
Set |
Reefer thermostat temperature setting |
Checking in units
To check in units:
-
Go to Menu > Activities > Interactive Workstation > Interactive Workstation.
For versions earlier than V.2020.2, go to Menu > Activities > Interactive Workstation.
-
From the IWS Menu, click Gate In.
The Gate In section is displayed. -
Make entries in the following sections as needed:
Tractor-
In the Tractor Number field, enter the tractor’s ID and press TAB.
Note: If the TMW.Suite integration is running, load information will display in the Load section.
-
Toggle options as needed.
For details on individual fields, see IWS Gate In: Tractor. -
If needed, enter the number of Load Locks.
-
Do the following as needed:
-
Enter tire information.
Click Tires to enter pressure and tread depths readings.Note: The Tire Module must be licensed for the Gate In Tire feature to be enabled.
-
View pending repair orders.
Click Pending to view a list of pending repair orders. -
View preventive repair orders
Click PM to view a list of preventive maintenance repair orders.
-
Trailer-
In the Trailer Number field, enter the trailer’s ID and press TAB.
-
Toggle options as needed.
For details on individual fields, see IWS Gate In: Trailer. -
If needed, enter the Seal tag number.
-
If needed, click Tires.
The Tire Data section is displayed.Note: The Tire Module must be licensed for the Gate In Tire feature to be enabled.
Reefer-
In the Reefer Number field, enter the trailer’s ID and press TAB.
Note: Use this section for reefer trailers only. -
Toggle options as needed.
For details on individual fields, see IWS Gate In: Reefer. -
Use the slider to adjust the Fuel level.
Note: Fuel is measured by 1/4 tank increments. -
Make entries in the following fields:
-
In the Hours field, enter the hour meter reading.
-
In the Actual field, enter the actual temperature reading.
-
In the Set field, enter the set temperature reading.
-
-
-
Click Post.
The page refreshes.Note: A single entry or dual entry for tractor, trailer and/or reefer can be entered. All three unit type sections do not have to be completed prior to clicking Post.
Checking out units
To check out units:
-
Go to Menu > Activities > Interactive Workstation > Interactive Workstation.
For versions earlier than V.2020.2, go to Menu > Activities > Interactive Workstation.
-
From the IWS Menu, click Gate Out.
The Gate Out section is displayed. -
Make entries in the following sections as needed:
Tractor-
In the Tractor Number field, enter the tractor’s ID and press TAB.
Note: If the TMW.Suite integration is running, load information will display in the Load section. -
Toggle options as needed.
For details on individual fields, see IWS Gate Out: Tractor. -
If needed, enter the number of Load Locks.
-
Do the following as needed:
-
Enter tire information.
Click Tires to enter pressure and tread depths readings.Note: The Tire Module must be licensed for the Gate Out Tire feature to be enabled.
-
View pending repair orders.
Click Pending to view a list of pending repair orders. -
View preventive repair orders
Click PM to view a list of preventive maintenance repair orders.
-
Trailer-
In the Trailer Number field, enter the trailer’s ID and press TAB.
-
Toggle options as needed.
For details on individual fields, see IWS Gate Out: Trailer. -
If needed, enter the Seal tag number.
-
If needed, click Tires.
The Tire Data section is displayed.Note: The Tire Module must be licensed for the Gate Out Tire feature to be enabled.
Reefer-
In the Reefer Number field, enter the trailer’s ID and press TAB.
Note: Use this section for reefer trailers only. -
Toggle options as needed.
For details on individual fields, see IWS Gate Out: Reefer. -
Use the slider to adjust the Fuel level.
Note: Fuel is measured by 1/4 tank increments. -
Make entries in the following fields:
-
In the Hours field, enter the hour meter reading.
-
In the Actual field, enter the actual temperature reading.
-
In the Set field, enter the set temperature reading.
-
-
-
Click Post.
The page refreshes.Note: A single entry or dual entry for tractor, trailer and/or reefer can be entered. All three unit type sections do not have to be completed prior to clicking Post.
Working with Inspection Tickets
The inspection ticket is a unit condition report. They can be customized based on unit type or inspection ticket type.
Examples of an inspection tickets:
-
Safety lane inspections
-
Driver’s vehicle inspection reports (DVIR)
Inspection tickets can be created manually in the system or imported through a third party eDVIR integration.
General inspection ticket rules:
-
If a unit does not have a Gate In record, one will be created for it when you create the inspection ticket.
-
On the Inspection Tickets section, the list of inspection tickets is for units that have open inspection tickets and are in the yard.
Inspection Tickets overview
To open the Inspection Tickets feature:
-
Go to Menu > Activities > Interactive Workstation > Interactive Workstation.
For versions earlier than V.2020.2, go to Menu > Activities > Interactive Workstation.
-
From the IWS Menu, click Inspection Tickets.
The Inspection Tickets section is displayed.Show me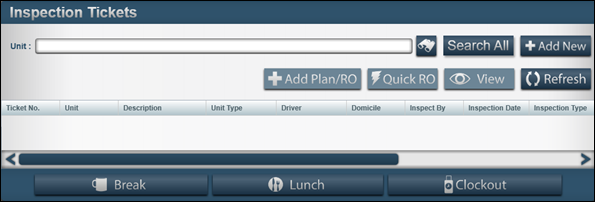
-
Unit field
Field used to filter results for a specific unit number. -
Search
 icon
icon
The Unit Search section is displayed. -
Search All
Displays all existing inspection tickets. -
Add new
Creates a new inspection ticket. -
Add Plan/RO
Allows you to create a plan or repair order from an existing inspection ticket. -
Quick RO
Creates a minor repair order. -
View
The Inspection Ticket section is displayed. -
Refresh
Allows you to create a plan or repair order from an existing inspection ticket.
If you click the Search All button, existing inspection tickets will display.
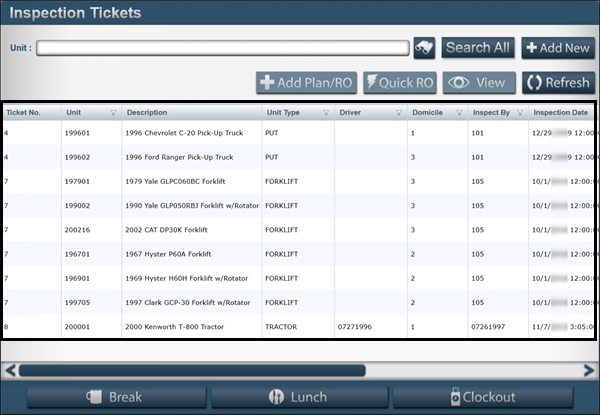 Field definitions
Field Definition Ticket No.
Inspection ticket number generated by the system
Unit
Unit number
Description
Description of the unit based on the unit master record
Unit Type
Unit type of the unit as defined by the unit master record
Driver
Driver ID number, if available
Domicile
Shop assigned to the unit based on the unit master record
Inspect By
Employee ID that inspected the unit
Note: If the inspection ticket was imported through a third-party integration, the Inspect By is defined by the integration setup.
Inspection Date
Date the inspection ticket was created
Inspection Type
Type of inspection performed
Remarks
Comments entered for the inspection ticket, if available
-
Viewing IWS inspection ticket details
-
Go to Menu > Activities > Interactive Workstation > Interactive Workstation.
For versions earlier than V.2020.2, go to Menu > Activities > Interactive Workstation.
-
From the IWS Menu, click Inspection Ticket.
The Inspection Tickets section is displayed.Show me -
Use a search method to find the needed inspection ticket.
For details on search methods, see Inspection Tickets overview. -
From the Inspection Tickets grid, select the inspection ticket that you want to view.
-
Click View.
The Inspection Ticket Number section is displayed.Note: The Inspection Ticket is not editable, and it will show the failed inspection items only.
-
Click Escape to return to the previous section.
The Inspection Tickets section is displayed.
Creating an IWS inspection ticket
To create a new Interactive Workstation inspection ticket:
-
Go to Menu > Activities > Interactive Workstation > Interactive Workstation.
For versions earlier than V.2020.2, go to Menu > Activities > Interactive Workstation.
-
From the IWS Menu, click Inspection Ticket.
The Inspection Tickets section is displayed.Show me -
Click Add New.
The Inspection Ticket Number section is displayed.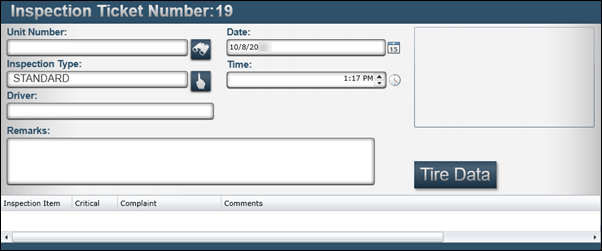
Note: The Inspection Type defaults to Standard.
-
Enter the Unit Number.
-
If needed, change the Date and Time fields.
-
If needed, change the inspection type.
-
Click the Selection
 icon next to the Inspection Type field.
The Select Inspection Type window opens.Show me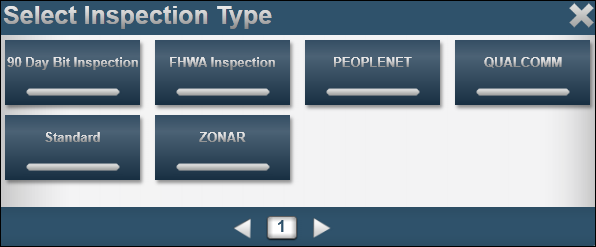
Note: The default is Standard. The Inspection Items will change if the inspection type changes.
-
Select the inspection type needed.
-
-
In the Driver field, enter the driver’s name as needed.
-
In the Remarks field, enter general remarks as needed.
-
If needed, update Tire Data.
-
Click Tire Data.
The Tire Data section is displayed.Show me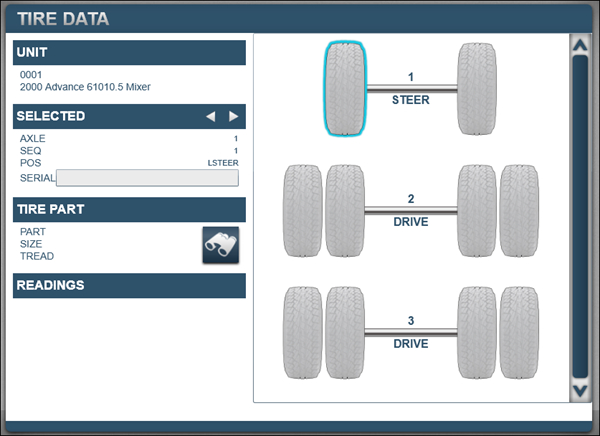
Note: The Tire Module must be licensed.
-
Make changes as needed.
-
Click Post.
-
Click Escape.
The system returns you to the Inspection Ticket Number section.
-
-
Identify the complaint type.
-
Click the Selection
icon.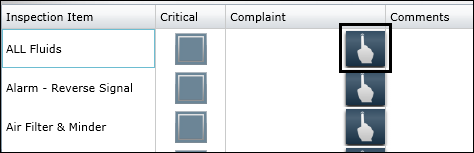
The Select Complaint window opens.
Show me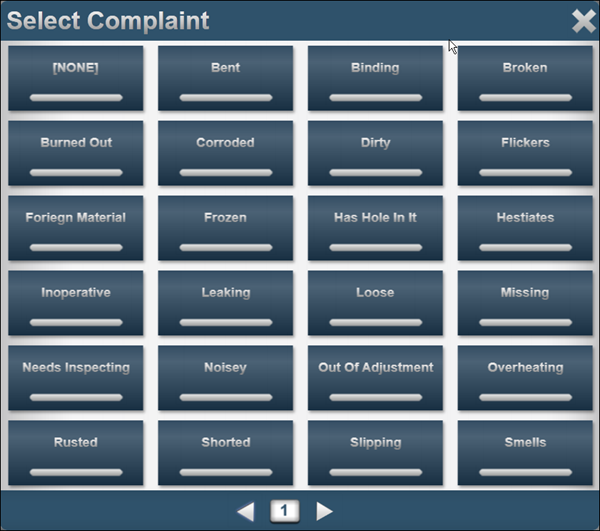
Note: You can use the Page Arrows at the bottom of the window for additional complaints.
-
Select the Complaint needed.
-
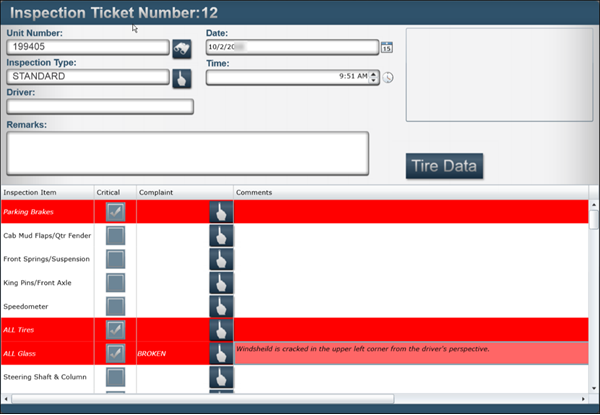
Click in the Comments column for the inspection item selected.
-
Enter specific comments for the issue.
This illustration shows an example of an inspection ticket with comments. If Critical items were flagged during the inspection ticket setup, those items will be highlighted in Red.
-
-
Click Post.
The Inspection Ticket Number section refreshes. -
Repeat Steps 3-11 as needed.
-
When finished, click Escape.
Process existing inspection tickets
There are four primary ways to process inspection tickets.
-
Plan Only
Creates a work plan and adds it to the Shop Planner. -
Pending
Creates a pending repair order. -
RO
Creates a standard repair order. -
VRO
Creates a vendor repair order.
| If you require meter readings on repair orders, go to Masters > Units > Meters and select the option to add the meter reading to Inspection Tickets for each unit. If you do not do this you will not be able to use the Add Plan/RO or to create Quick RO features. |
To process an existing inspection ticket:
-
Go to Menu > Activities > Interactive Workstation > Interactive Workstation.
For versions earlier than V.2020.2, go to Menu > Activities > Interactive Workstation.
-
From the IWS Menu, click Inspection Ticket.
The Inspection Tickets section is displayed.Show me -
Use a search method to find the needed inspection ticket.
For details on search methods, see Inspection Tickets overview. -
From the Inspection Tickets grid, select the inspection ticket that you want to process.
-
Click Add Plan/RO.
The Create Plan/RO window opens.Show me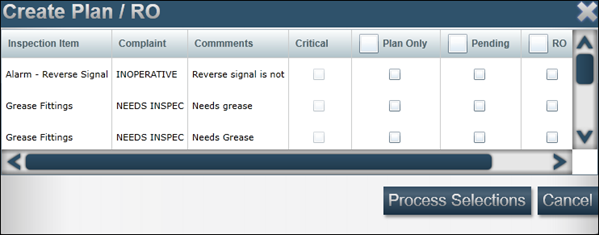
-
For each inspection item, select the checkbox for the process type needed.
-
Click Process Selections.
The Select Shop window opens.Show me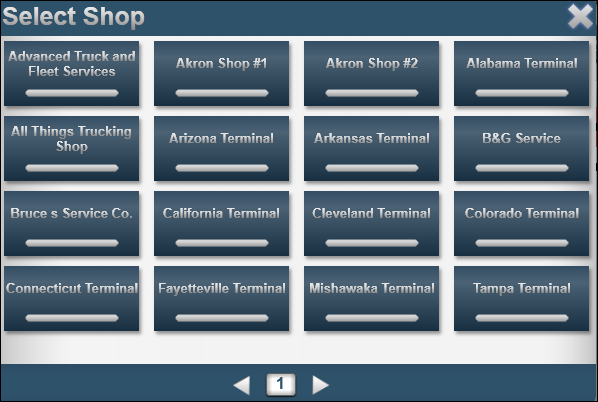
-
Select the shop.

The system does one of the following depending on the process type:
-
Plan Only, Pending, or RO
The system creates the corresponding plan or order and returns you to the Inspection Tickets section.Repeat Steps 3-8 as needed.
-
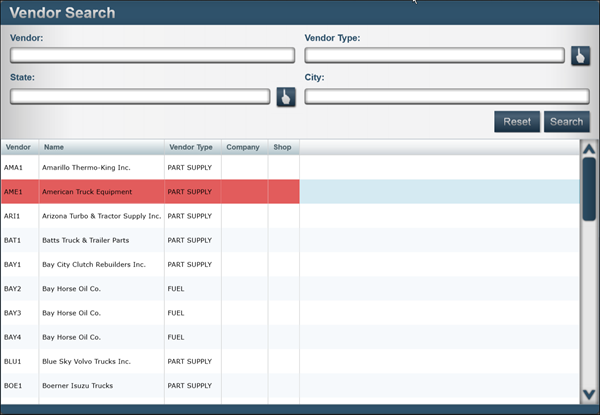
VRO
The Vendor Search section is displayed.-
Use the Vendor Search restrictions to narrow the list of available vendors.
-
Select the vendor performing the repair(s).
-
Click Post.
The system creates a Vendor Repair Order and returns you to the Inspection Tickets section.Note: Each issue is created as a separate RO section.
-
Repeat Steps 3-8 as needed.
-
Once all inspection items have been processed, the inspection ticket is removed from the Inspection Tickets section.
-
Creating a quick repair order
Quick repair orders were designed as a way to create repair orders for minor repairs discovered during inspections. You use the Quick ROs feature to create a repair order for tasks such as:
-
Replacing trailer light bulbs
-
Replacing wiper blades
-
Adding oil
|
To process an existing inspection ticket:
-
Go to Menu > Activities > Interactive Workstation > Interactive Workstation.
For versions earlier than V.2020.2, go to Menu > Activities > Interactive Workstation.
-
From the IWS Menu, click Inspection Ticket.
The Inspection Tickets section is displayed. -
Use a search method to find the needed inspection ticket.
For details on search methods, see Inspection Tickets overview. -
From the Inspection Tickets grid, select the inspection ticket needed.
-
Click **Quick RO.
The Quick RO window opens.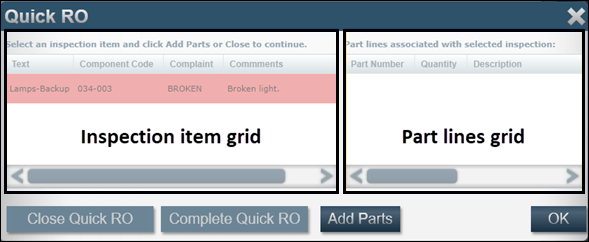
-
In the Inspection Item grid, select the inspection item needed.
-
Click Add Parts.
The Charge Parts section is displayed. -
In the Part number field, enter the Part Number and press TAB.
-
In the Quantity field, enter the quantity needed.
-
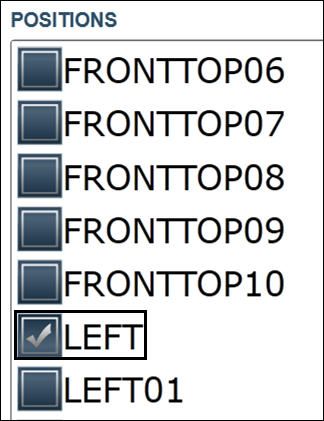
If needed, select the Position.
-
Click Post.
A blank Charge Parts window is displayed. -
Do one of the following:
-
Repeat Steps 6-11 as needed.
-
Click Escape.
The Quick RO window opens.Select the inspection item to see a list of parts.
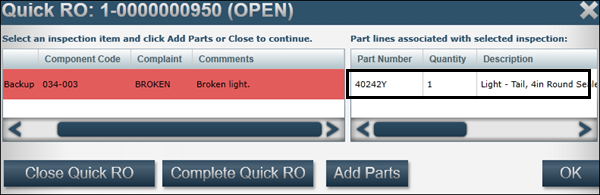
Once you have added parts to the quick repair order, the Close Quick RO and Complete Quick RO buttons are enabled.
-
-
When you are finished with the repair, select the inspection item and do one of the following:
-
To close the quick repair order, click Close Quick RO.
The Confirmation message window opens. It asks, "Are you sure you want to close order order number?" -
To complete the quick repair order, click Complete Quick RO.
The Confirmation message window opens. It asks, "Are you sure you want to complete order order number?"Note: Use this if a manager needs to review the quick repair order before closing it.
-
-
Click Yes to close either confirmation message.
The Inspection Tickets section is displayed.
Once all inspection items are completed or closed, the inspection ticket is removed from the inspection tickets listing.
Working with Yard Checks
You can use yard checks to update unit locations in the yard or on reefers verify that the unit has fuel and maintains the proper temperature.
IWS Yard Checks Overview
To view an existing yard check record:
-
Go to Menu > Activities > Interactive Workstation > Interactive Workstation.
For versions earlier than V.2020.2, go to Menu > Activities > Interactive Workstation.
-
From the IWS Menu, click Yard Checks.
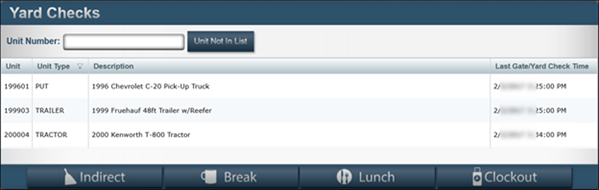
The Yard Checks section is displayed.
| Field | Definition |
|---|---|
Unit |
Unit number |
Unit Type |
Type of unit |
Description |
Unit description as displayed in the unit master record |
Last Gate/Yard Check Time |
Date and time the gate in/yard check was entered into the system |
-
In the Yard Checks grid, select the yard check needed.
-
Click Post.
The Yard Check section is displayed.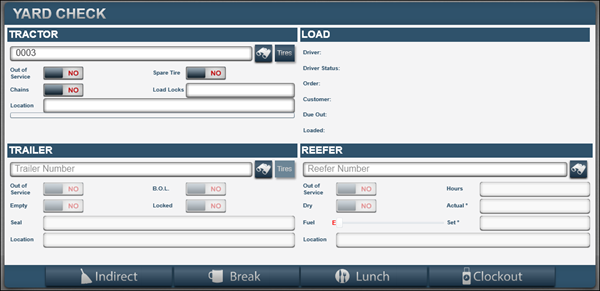
IWS Yard Check: Tractor
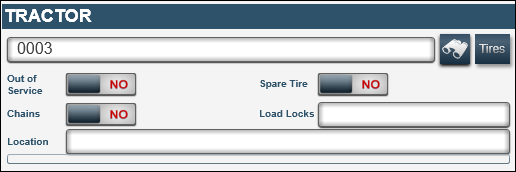
| Field | Definition |
|---|---|
Tractor |
Unit number |
Tires |
Record and view information about the tires |
Out of Service |
To set the unit out of service, toggle to YES The default is set to NO. |
Chains |
If chains are present, toggle to YES The default is set to NO. |
Load Locks |
Number of load locks on the unit |
Location |
Unit’s location in the yard |
IWS Yard Check: Trailer
| Field | Definition |
|---|---|
Trailer |
Unit number |
Tires |
Record and view information about the tires |
Out of Service |
To set the unit out of service, toggle to YES The default is set to NO. |
B.O.L. |
If the unit has a Bill of Lading, toggle to YES The default is set to NO. |
Empty |
If the unit is empty, toggle to YES The default is set to NO. |
Locked |
If the unit is locked, toggle to YES The default is set to NO. |
Seal/Pallets |
Seal tab number/number of pallets on the trailer If the Empty option is set to NO, the Seal field is displayed. If the Empty option is set to YES, the Pallets field replaces the Seal field. |
Location |
Unit’s location in the yard |
IWS Yard Check: Load
The Load section displays read-only information, imported from the TMW.Suite integration.
| If you do not have this integration or the integration is inactive, this section is blank. |
| Field | Definition |
|---|---|
Driver |
Driver’s name |
Driver Status |
Driver’s status |
Order |
TMW.Suite order number |
Customer |
TMW.Suite consignee |
Due Out |
Date the load needs to leave the shop |
Loaded |
Identifies if the trailer is loaded |
IWS Yard Check: Reefer
| Field | Definition |
|---|---|
Reefer |
Unit number |
Out of Service |
To set the unit out of service, toggle to YES The default is set to NO. |
Dry |
Is the reefer being used for a dry load?
|
Fuel |
Slide the bar to represent the amount of fuel for the reefer Fuel is measured by 1/4 tank increments. |
Location |
Unit’s location in the yard |
Hours |
Number running hours |
Actual |
Actual temperature of the reefer |
Set |
Reefer thermostat temperature setting |
Update existing Yard Checks
To view an existing yard check record:
-
Go to Menu > Activities > Interactive Workstation > Interactive Workstation.
For versions earlier than V.2020.2, go to Menu > Activities > Interactive Workstation.
-
From the IWS Menu, click Yard Checks.
The Yard Checks section is displayed.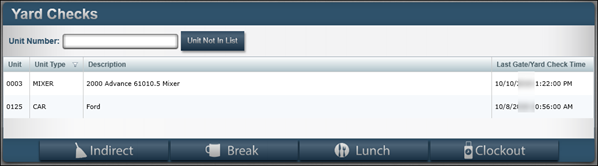
-
In the Yard Checks grid, select the yard check needed.
-
Click Post.
The Yard Check section is displayed.Show me -
Make changes in the following sections as needed:
Tractor-
In the Tractor Number field, enter the tractor’s ID and press TAB.
Note: If the TMW.Suite integration is running, load information will display in the Load section. -
Toggle options as needed.
For details on individual fields, see IWS Yard Check: Tractor. -
If needed, enter the number of Load Locks.
-
In the Location field, specify where the unit is located in the yard.
-
Do the following as needed:
-
Enter tire information.
Click Tires to enter pressure and tread depths readings.Note: The Tire Module must be licensed for the Gate In Tire feature to be enabled.
-
View pending repair orders.
Click Pending to view a list of pending repair orders. -
View preventive repair orders
Click PM to view a list of preventive maintenance repair orders.
-
Trailer-
In the Trailer Number field, enter the trailer’s ID and press TAB.
-
Toggle options as needed.
For details on individual fields, see IWS Yard Check: Trailer. -
If needed, enter the Seal tag number.
-
In the Location field, specify where the unit is located in the yard.
-
If needed, click Tires.
The Tire Data section is displayed.Note: The Tire Module must be licensed for the Gate In Tire feature to be enabled.
Reefer-
In the Reefer Number field, enter the trailer’s ID and press TAB.
Note: Use this section for reefer trailers only. -
Toggle options as needed.
For details on individual fields, see IWS Yard Check: Reefer. -
Use the slider to adjust the Fuel level.
Note: Fuel is measured by 1/4 tank increments. -
Make entries in the following fields:
-
In the Hours field, enter the hour meter reading.
-
In the Actual field, enter the actual temperature reading.
-
In the Set field, enter the set temperature reading.
-
In the Location field, specify where the unit is located in the yard.
-
-
-
Click Post.
The page refreshes. -
Click Escape.
The system returns you to the Yard Checks section.
Creating a new Yard Check
To create a new Yard Check:
-
Go to Menu > Activities > Interactive Workstation > Interactive Workstation.
For versions earlier than V.2020.2, go to Menu > Activities > Interactive Workstation.
-
From the IWS Menu, click Yard Checks.
The Yard Checks section is displayed. -
Click Unit Not In List.
The Yard Check section is displayed. -
Make entries in the following sections as needed:
-
Tractor
-
Trailer
-
Reefer
For details on these sections, see IWS Yard Checks Overview.
-
-
When finished, click Post.
The page refreshes. -
Click Escape.
The system returns you to the Yard Checks section.