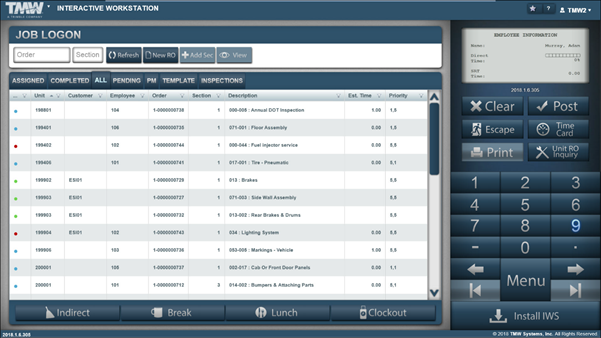
Working with the MWS Job Logon page
|
Interactive Workstation (IWS) and Mechanics Workstation (MWS) are available only in V.2022.2.2 and earlier. As of V.2022.3, IWS and MWS have been replaced with Trimble Technician Portal (TTP). |
You access the Mechanic Workstation (MWS) Job Logon page by selecting Mechanic Workstation from the menu page in Interactive Workstation (IWS). See Logging into the IWS for details.
MWS Job Logon overview
The Job Logon page is where you start your work within Mechanic Workstation (MWS).
| Field | Definition |
|---|---|
… |
Section status See Repair Order color scheme for details. |
… |
When viewing repair order information on the Assigned, Complete, and All Logon tabs, colored dots indicate the status of a repair order section.
|
Unit |
Unit number Unit numbers are available on all tabs. |
Customer |
When present, the customer being invoiced for the repair Customer numbers are not available on the Templates tab. |
Order |
Repair order number Not available on the PMs, Inspections, or Templates tabs |
Section |
Repair order section number Not available on the Templates tab |
Description |
Component Code and component code description Notes: . The description on the Inspections tab represents the unit description (by default, Year, Make, Model, Unit Type).
|
Est. Time |
When present, the Estimated Time to complete the repair Not available on the PMs, Inspections, or Templates tabs |
Priority |
Repair order and Section priorities (,) Not available on the PMs, Inspections, or Templates tabs |
Campaign |
When present, the Campaign number that created the pending repair order section Only available on the Templates tab |
Due % |
The percent due of the PM Only available on the PMs tab |
Last Done |
Last done date of the PM Only available on the PMs tab |
Meter Type |
The meter type that triggered the PM becoming due Only available on the PMs tab |
Type |
The type of schedule assigned to the PM on the unit
Only available on the PMs tab |
Template |
Template number Only available on the Templates tab |
Ticket |
Inspection ticket number Only available on the Inspections tab |
Total Defects |
Number of items identified on the inspection ticket Only available on the Inspections tab |
Critical |
Identifies a defect as a critical item Only available on the Inspections tab |
Features
On the MWS Job Logon page, you can use function buttons to accomplish certain tasks.

| Field | Definition |
|---|---|
Search for a Repair Order Section |
Repair order section search Enter the complete order number and section number to find the section. Available on the Assigned, Completed, All, and Pending tabs. |
Refresh |
Updates the displayed data with changes made throughout the programs |
New RO |
Creates a new repair order See Creating repair orders from the MWS Job Logon page for details. Available on the All tab |
Add Sec |
With an existing repair order section selected, allows a new section to be added See Adding a Section on the MWS Job Logon page for details. Available on the Assigned, Completed, and All tabs |
View |
With an existing repair order section selected, you can view the details of the repair order. See Viewing Repair Order details on the MWS Job Logon page for details. Available on the Assigned, Completed, All, and Pending tabs |
Tabs
The MWS Job Logon page contains a set of tabs.

You use them to view information about the repair order. You can also start work from each of these tabs.
| Field | Definition |
|---|---|
Assigned |
Use the Assigned tab to view lists of all Open repair order sections assigned to you. Starting work on an Assigned Repair Order Section:
This starts labor tracking for you on that repair order section. |
Completed |
The Completed tab lists all Completed or Closed repair order sections assigned to the employee logged into MWS. Note: The repair order status is Open. To reopen Section for work:
This reopens the section and starts tracking your labor time. |
All |
The All tab lists all Open repair order sections in the shop. Color-coding identifies each repair order section’s status. See Repair Order Color Scheme in MWS Job Logon page for details. Starting work on an All repair order section:
This starts labor tracking for the employee on that repair order section. Note: Logging into a repair order section not previously assigned to an employee adds it to the employee’s Assigned tab. |
Pending |
The Pending tab lists all Pending repair order sections. Starting work on a Pending section:
This creates a new repair order with the selected pending work and place the repair order section on your Assigned tab. |
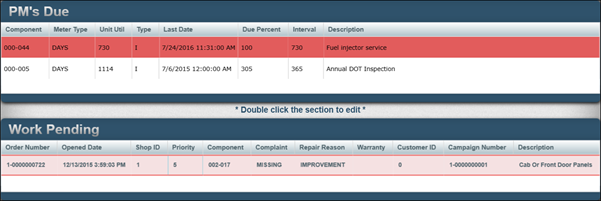
PM |
The PM tab lists all PM levels that are due for units assigned to the shop and that have no started repair orders. You can create a new repair order for any PM in the list. Starting work on a due PM:
This creates a new repair order with the selected pending work and places the repair order section on your Assigned tab. |
Template |
The Template tab displays a list of pre-determined repair order activities. You can create a new repair order for any template in the list. Starting work from a Template:
This creates a new repair order with the selected template work and starts tracking your labor time. Note: The repair order section created from the template will also add the repair order section to your Assigned tab. |
Inspections |
The Inspections tab lists available Inspection Tickets with issues where no repair orders have been started. You can create a new repair order for any Inspection in the list. Starting work from an Inspection:
This creates a new repair order from the selected inspection and place the repair order section on your Assigned tab. |
Commands

The MWS Job Logon page contains four command buttons:
| Field | Definition |
|---|---|
Indirect |
Track time not associated with a repair order |
Break |
Break tracks time that is considered paid |
Lunch |
Lunch tracks time that is considered as not paid. |
Clockout |
Ends the shift time card |
Repair Order color scheme
When viewing repair order information on the Assigned, Complete, and All Logon tabs, colored dots indicate the status of a repair order section.
| Field | Definition |
|---|---|
Black |
The repair order section is complete and the section status is Closed. Mechanic assignment is not considered. Note: You can reopen a Completed section by selecting it to perform work within Mechanic Workstation. |
Blue |
The repair order section is assigned to another employee and the section status is Open. |
Green |
The repair order section has not been assigned to an employee and the section status is Open. |
Red |
The repair order section is assigned to you and the section status is Open. |

Creating repair orders from the MWS Job Logon page
To create a new repair order:
-
Click New RO.
The Repair Order page opens. -
Enter the Unit Number.
If the Application or Shop Options
[IWS: Repairs]AllowAutomaticCreationOfPendings/PMsandSelectPMsDue&WorkPendings ToCreateSectionsare set to YES, the PM’s Due/Work Pending page appears.Note: Both options must be set to YES for the PM’s Due/Work Pending page to appear.
-
Click the PMs and/or Pending items if they are to be added as sections on the repair order.
-
Click Post.
The Repair Order page opens. -
Make appropriate entries in the remaining fields.
See Repair order header for field definitions. -
Click Post.

The Add Section page opens.
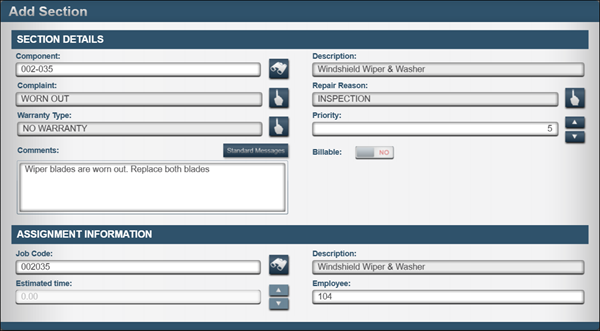
Adding a Section on the MWS Job Logon page
To add a new repair order section to an existing repair order:
-
Make the appropriate entries in these fields:
Field definitionsRequired field: *
Read-only field: §
Field Definition Component *
Enter a component code.
Component codes are based on the Vehicle Maintenance Reporting Standards (VMRS) standard component codes for Systems, Assemblies, and Parts on a unit. The codes are developed in three sets of three digits. They are separated by dashes:
-
XXX
Three digits represent a System on a unit. This is the highest level of a component. For example, 013 is the component code for Brakes. -
XXX-XXX
Three digits dash three digits represent an Assembly on a unit. For example, 013-001 is the component code for the Front Brakes and Drums.Note: Trimble recommends using an assembly code wherever possible.
-
XXX-XXX-XXX
Three digits dash three digits dash three digits represent a Part on a unit. For example, 013-001-014 is a Front Brake Shoe.
Description §
Component code description
Complaint *
Enter the complaint.
The complaint code represents the problem that prompted the repair. Complaint codes are based on the component code you select. Some examples of complaint codes include Broken, Worn Out, and Cracked.
Repair Reason *
Enter the reason for the repair.
By default, the system shows standard ATA reasons for repairs, based on the component code you enter.
Warranty Type
Type of warranty in effect for the section
Valid types are:
-
Campaign
Start campaign -
Expired
Warranty expired -
Extended
Additional warranty on component -
No warranty
Item not covered by warranty -
Original Equipment Manufacturer (OEM)
Bumper-to-Bumper -
Policy Adj
Policy adjustment -
Recall
Recall issued by vendor -
Special
Special case
Priority
Select a number from 1-5 to set the priority level for the section.
The number 1 represents the highest priority and 5 represents the lowest.
Alternatively, you can give each section a number to indicate the order in which to complete them.
Comments
Use this field to enter instructions associated with maintenance requirements.
When available, you can add Job Code Messages in place of general section comments or in addition to section comments.
The Job Code Messages field becomes active when you enter a Job Code in the Assignment Information section.
Standard Messages
Billable
If the Billable option is set to YES, the section will be included on the invoice for the repair order.
Note: This feature only works if the Invoice module has been installed.
Job Code
Job code’s ID
Job Codes are used to establish baseline hours for activities.
Description §
Job code’s description
Estimated time
Estimated time to complete the job
Employee
Mechanic (Employee ID) assigned to complete the job
-
-
Enter the Component.
The Description field autofills with the component description.When you exit the Component field, the Select Complaint window appears.
-
Click the Complaint.
The Select Repair Reason window appears. -
Click the Repair Reason.
The Warranty Type field fills, based on the warranty parameters established on the unit master. If there are no unit warranty parameters, the default is No Warranty. -
Change the Warranty Type, if needed.
-
Enter the section Priority, if needed.
Note: The default is 5 (lowest priority). -
Enter instructions in the Comments field, if needed.
-
Toggle the Billable option as needed.
Note: If the repair order does not have a customer identified on the Repair Order page, the Billable option is not enabled. -
If you are adding a Job Code to the section, see Assigning Job Codes to Sections on the MWS Job Logon page for details. Otherwise, click Post.
Assigning Job Codes to Sections on the MWS Job Logon page
In the Assignment Information pane:
-
Enter the Job Code.
Note: The use of Job Codes is dependent on option settings.The system autofills the Description field with the Job Code description.
-
Enter the Estimated Time.
Note: If the Job Code option Make User Changeable is set to NO, the Estimated Time field is not enabled. -
Enter the Employee.
Note: The Employee field defaults to the ID of the user creating the repair order. You can edit this field. -
Click Post.
The new repair order section appears on the Job Logon page’s Assigned tab.
Viewing Repair Order details on the MWS Job Logon page
View allows you to see the details on the repair order without logging time against it. To view the repair order details:
-
Click the order line.
-
Click View.
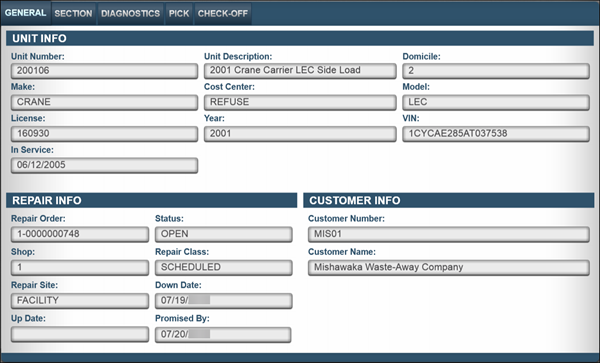
The General tab opens. -
Click the tab to view the details.
Viewing general information on the MWS Job Logon page
The General tab displays general information for the repair order. The tab has three grids:
-
Unit Info
General information for the unit -
Repair Info
The repair order details -
Customer Info
Information on the customer that owns the unit, when available
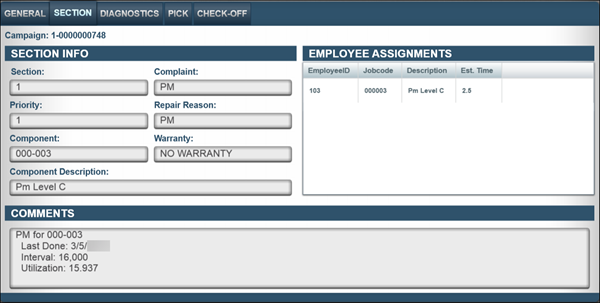
Viewing Section information on the MWS Job Logon page
The Section tab displays information for the selected section. The tab has three grids:
-
Section Info
General information for the repair order section -
Employee Assignments
All employees assigned to the section and estimated times for completion of the work -
Comments
Instructions to complete the work
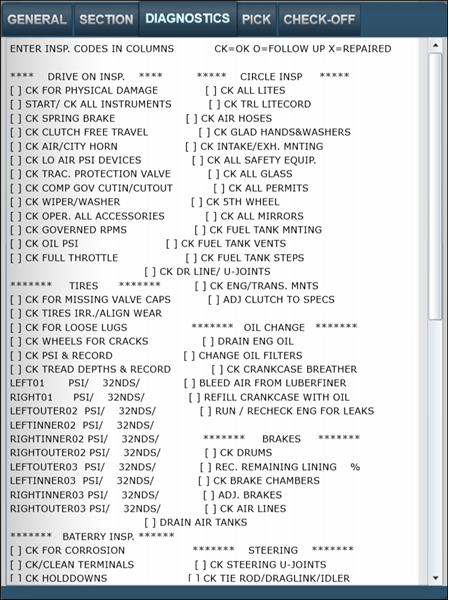
Viewing diagnostics on the MWS Job Logon page
The Diagnostics tab displays the diagnostics definition listing, when available.
Adding a Section to an existing Repair Order on the MWS Job Logon page
To add a section to an existing repair order:
-
Select the repair order from the Assigned, Completed, or All tab.
-
Click Add Sec.
See Adding a Section on the MWS Job Logon page.
Creating a Repair Order from a Pending on the MWS Job Logon page
To create a repair order from a Pending order:
-
Click the Pending tab.
-
Select the Pending.
-
Click Post.
The Repair Order page opens. -
Complete all fields, as needed. See Creating repair orders from the MWS Job Logon page for details.
-
Click Post.
The Add Section page opens. -
Complete all fields, as needed. See Adding a Section on the MWS Job Logon page for details.
-
Click Post.
The system places the repair section on the employee’s Assigned tab.
Creating a Repair Order from a PM on the MWS Job Logon page
Preventive Maintenance (PM) is regularly performed on a piece of equipment to reduce the likelihood of failure. Preventive maintenance ensures that anything of value to your organization receives consistent maintenance to avoid unexpected breakdowns and costly disruptions.

To create a repair order from a PM:
-
Click the PM tab.
-
Click the PM.
-
Click Post.
The Repair Order page opens. -
Complete all fields, as needed. See Creating repair orders from the MWS Job Logon page for details.
-
Click Post.
The Add Section page opens. -
Complete all fields, as needed. See Adding a Section on the MWS Job Logon page for details.
-
Click Post.
The new repair order section appears on your Assigned tab.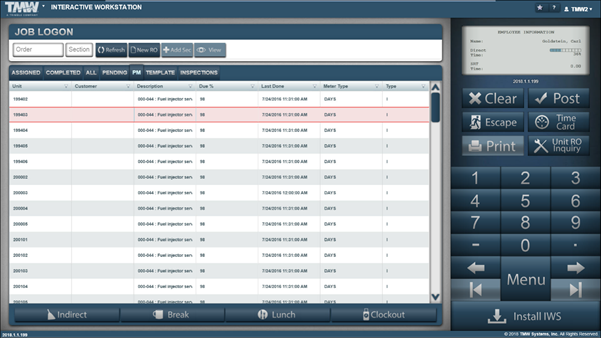
Creating a Repair Order from a Template on the MWS Job Logon page
Before you can create a repair order from a template, the template must already exist. For details, see Create a repair order template.

To create a repair order from a Template:
-
Click the Template tab.
-
Click the Template.
-
Click Post.
The Unit Search page appears.Note: The shop a unit is in can affect whether you can find it with Unit Search. For details, see How Application options affect shop restrictions.
-
Make entries in any combination of the fields and click Search.
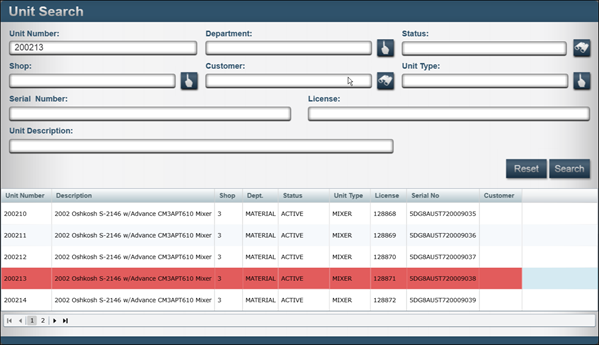
-
Click Post.
The Assignment window appears. -
Enter the Job Code.
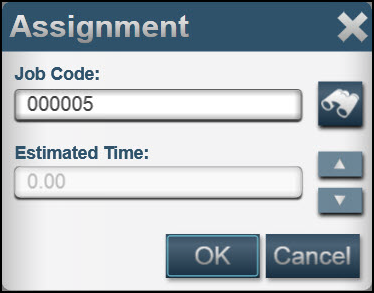
-
Click Post.
The system logs you onto the repair order section and returns to the Log In page.
Creating a Repair Order from an Inspection on the MWS Job Logon page
To create a repair order from an Inspection:
-
Click the Inspections tab.
-
Click the Inspection.
-
Click Post.
The Repair Order page opens. -
Complete all fields, as needed. See Creating repair orders from the MWS Job Logon page for details.
-
Click Post.
The Add Section page opens. -
Complete all fields, as needed. See Adding a Section on the MWS Job Logon page for details.
-
Click Post.
The new repair order section appears on your Assigned tab.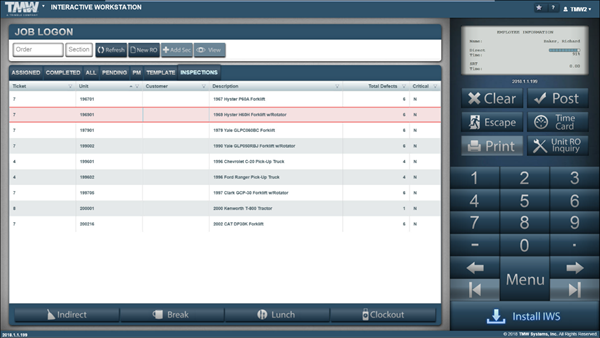
Logging onto a Repair Order section in MWS Job Logon page
To start tracking time on a repair order section from the Assigned, Completed, or All tab:
-
Select the Repair Order Section.
-
Click Post.
If you are not assigned to the repair order section, the Assignment window appears. -
Enter the Job Code.
-
Click OK.
Creating an Indirect Charge
You use the Indirect button to create a new indirect charge order.
To create an Indirect Charge:
-
Click Indirect.
The Select Indirect window appears.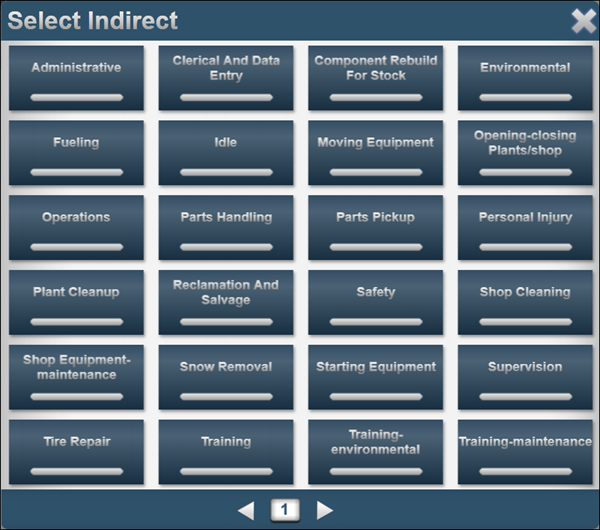
Note: The bottom of the page shows a page number, and Next and Previous arrows. This indicates there are more options.
-
Select the Indirect Charge code.
The Job Activity page opens.
Taking a Break or Lunch from the MWS Job Logon page
Mechanic Workstation (MWS) allows you to track two non-order related functions.
-
Break
-
Lunch

| Field | Definition |
|---|---|
Break |
Use the Break button to track breaks that are included in paid time. The time is not counted toward a repair or indirect order. |
Lunch |
Use the Lunch button to track a lunch or break that is considered non-paid time. This time is not counted toward a repair or indirect order. Note: When you log back into MWS from a break or lunch session, the systems stops tracking time on the session and displays the Job Logon page. |
To start a break or lunch, click the appropriate button.
The Log In page opens.
