Working with substitute, superseded, and cross-reference parts
Use the Cross Ref tab on the Parts Catalog page to:
-
Create a substitute part
-
View a superseded part
-
Create a cross-reference part
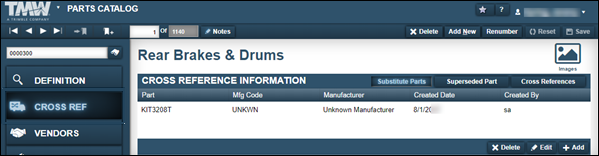
Understanding cross-referenced and substitute parts
People often get confused between cross-referenced parts and substitute parts. In both cases, the parts are so similar that one can replace the other. The difference comes from how the program treats the parts as inventory.
Parts are cross-referenced when you use one part number to cover several similar parts. For example, assume you stock three fuel filters:
-
Baldwin BF957
-
Donaldson P550105
-
Fleetguard FF105
You can use Baldwin BF957 as your official shop part number. Then you can cross-reference the Donaldson and Fleetguard filters under it. When you select Baldwin BF957 on an order, you can use any one of the three parts. The order shows the part number Baldwin BF957, no matter which part you used.
|
All cross-referenced parts use the same part number. If you need to know which specific part was used in an order, you may want to use substitute parts instead. |
Substitute parts each have their own part number, but you can use one to replace another. For example, assume you stock both the Donaldson P55958 lube filter and the Fleetguard LF3000 lube filter. You can mark each filter as a substitute part for the other. When you select a lube filter for an order, you can pick either part. The order shows the part number for the part you actually used.
Managing substitute parts
Substitute parts are part numbers that you can use in place of a selected part on a repair order.
The reasons for having both part records in the system may be due to warranty considerations or the need to employ an exact match when replacing a part on a unit (normally in a retail environment).
When you use a substitute part number on a repair order, the system uses the correct part in inventory or displays a list of parts for that substitute part number automatically.
Creating a substitute part
To create a substitute part:
-
Select the Cross Ref tab.
The Substitute Parts tab is displayed.
-
Click Add.
The Add Substitute Part window opens.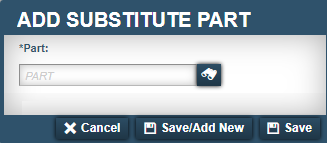
-
In the Part field, enter the ID of the substitute part you want to add.
-
Do one of the following:
-
To add the substitute part, click Save.
The system saves the part information. The window closes. -
To save and add another substitute part, click Save/Add New.
The system saves the part information. The window remains open to allow you to add another substitute part. -
To close the window without saving your changes, click Cancel.
-
Editing a substitute part
To edit a substitute part:
-
Select the Cross Ref tab.
The Substitute Parts tab is displayed. -
Select the row you want to edit and click Edit.
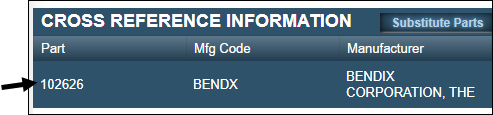
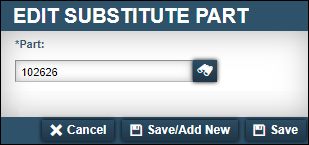
The Edit Substitute Part window opens.
-
Change the part number in the Part field.
-
Click Save.
The Cross Reference Information section displays your changes.To close this window without saving your changes, click Cancel.
Deleting a substitute part
To delete a substitute part:
-
Select the Cross Ref tab.
The Substitute Parts tab is displayed. -
Select the row you want to edit and click Delete.
The Delete Part system message window opens. It asks, "Are you sure you want to delete substitute part Part Number?"
-
Click Delete.
To close this window without saving your changes, click Cancel.
Managing superseded parts
Sometimes a manufacturer may discontinue a part (such as an alternator) and replace it with a new part number. When this happens, the new part replaces the old part and the old part is no longer available.
| You cannot create a superseded part in the Parts Catalog. Instead, you must renumber a part record and select the option Renumber and Add to Superseded Parts. |
When you select a superseded part number on an order, the system updates open orders with the new part information and number automatically.
Viewing superseded parts
The system hides the superseded (old) part number by default. If you enter the old part number in the Part field, a System Message opens. It states, "*_Part Number> is not a valid part."
To view a superseded part record:
-
Go to Menu > Masters > Parts Catalog.
The Parts Catalog page opens. -
Next to the Part field, click
 Search.
The Parts Catalog Search window opens.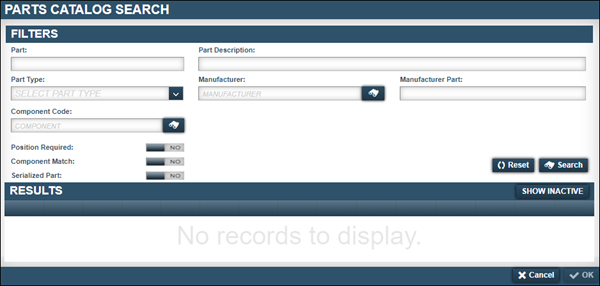
-
In the Part field, enter the superseded part’s ID.
Note: A superseded part has an Inactive status. -
In the Results section, click Show Inactive.

-
In the Filters section, click
Search.
The system displays the superseded part in the Results section.Note: The Active field displays N for the superseded part.
-
Select the superseded part record.
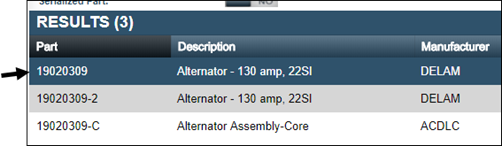
-
Click OK.
A System Message displays. It states, "No part information found." -
Click OK to close the window.
The superseded part record is displayed.
Deleting a superseded part
There may be times when you need to delete superseded part information. Once a part number has been superseded, you must delete the superseded cross-reference information from the Superseded Part list to use the original part number.
To delete a superseded record:
-
Follow Steps 1-8 in Viewing superseded parts.
-
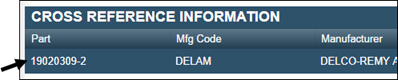
Click the Cross Ref tab.
-
In the Cross Reference Information section, click Superseded Part.
The system displays superseded part information.
-
Select the row you want to delete.
-
Click Delete.
The Delete Part message window opens. It asks, "Are you sure you want to delete superseded part Part Number?" -
Click Delete.
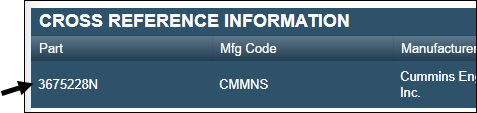
Managing cross-referenced parts
Cross-reference parts are part numbers that refer back to the current part number. When you select a cross-referenced part on an order, the system uses the part in inventory or shows a list of the parts that you can use for the cross-reference part number.
Creating a part cross-reference
To create a part cross-reference:
-
Click the Cross Ref tab.
The Substitute Parts tab is displayed. -
Click Cross References.
The system displays cross-referenced parts.
-
Click Add.
The Add Cross Reference Part window opens.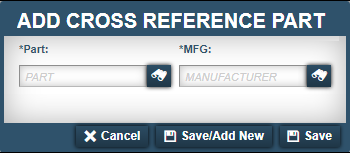
-
In the Part field, enter the ID of the part that you want to cross-reference.
-
In the MFG field, enter the manufacturer of the part you want to cross-reference.
-
Do one of the following:
-
To add the cross-reference part, click Save.
The system saves the part information. The window closes. -
To save and add another cross-reference part, click Save/Add New.
The system saves the part information. The window remains open to allow you to add another cross-reference part. -
To close the window without saving your changes, click Cancel.
-
Editing a cross-reference part
To edit a cross-reference part:
-
Click the Cross Ref tab.
The Substitute Parts tab is displayed. -
Click Cross References.
The system displays cross-referenced parts.
-
Select the row you want to edit.
-
Click Edit.
The Edit Cross Reference Part window opens.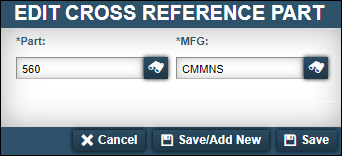
-
Make changes as needed.
For information on individual field definitions, see Cross Ref tab. -
Click Save.
The updated cross-reference part is displayed.
Deleting a cross-reference part
To delete a cross-reference part:
-
Click the Cross Ref tab.
The Substitute Parts tab is displayed. -
Click Cross References.
The system displays cross-referenced parts.
-
Select the row you want to delete.

-
Click Delete.
The Delete Part system message window opens. It asks, "Are you sure you want to delete cross-reference Part Number?" -
Click Delete.
The cross-referenced part is removed from the Cross Reference Information section.To close the window without saving your changes, click Cancel.