Shop Planner Repair view
You open Shop Planner Repair View by going to Menu > Activities > Shop Planner. This opens the Shop Planner page in Planner view. Select Open Repairs in the top-left area to open the repair view.

Open Repair view features
While the Open Repair table shares many features in common with the Planner view, there are a few features that are only available in this view.
Row color-coding
The Open Repair table, similar to the Repair Order Listing page, uses colors to show different statuses of repair orders (ROs):
-
White: The repair order and its sections are both open.
-
Orange: The repair order needs approval, or its cost is over the approved amount. This color shows up if the
[Repairs-Approvals]Require RO Approval Levelssetting is set to YES. -
Red: An employee is working on a section of the repair order, which is open. This needs the Shop Floor module.
-
Green: The repair order is finished or closed, has a customer, and has at least one section that can be billed. This needs the Invoice module.
-
Blue: The repair order is open, but all its sections are finished or closed, or it has no sections.
Customized column view
You can customize the columns in the Open Repair table the same way you can for the Shop Planner view. For more information, see Customize the column view.
The Priority column works differently in this view than in the Shop Planner view. Each cell has two Priority values:
-
The first value is for the RO Header.
-
The second value is for the Section.
This lets you see repairs in Header/Section priority order. For example, an RO marked 5,1 has a higher priority than one marked 5,5.
View related information
Any cell value with an underline is a link you can select to see more information. The links you can select depend on which columns you have visible. The order the links appear in also depends on how you have the columns arranged. Here are some common links you can select.
-
Repair Order
-
Shop
-
Unit
-
Employee
-
Vendor
-
Customer
Use Open Repair Actions
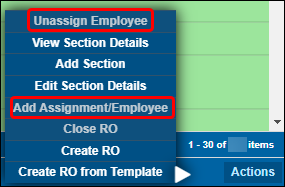
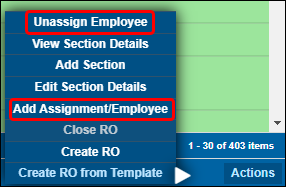
There are certain options that you can only do using the Actions menu. Which actions you can use depends on the RO row you’ve selected and the data in it. For example, if your selected row doesn’t have an assigned employee, the Unassign Employee and Add Assignment/Employee actions are not available. If the row does have an assigned employee, the actions are available. The illustrations below show the difference.
|
|
To use the Actions menu:
-
Select a plan row.
-
Select Actions in the lower-right corner of the screen. This opens the Actions menu, which has these options:
-
Unassign Employee: Unassigns (removes) the employee from the selected RO.
-
View Section Details: Opens the View Section/Lines window for the selected RO.
-
Add Section: Opens the Add Section window. This window uses most of the same sections and fields as the Repair Order Add/Edit/View Section window. The only two fields not included are Estimated Time and Mechanic. The functions of both windows are the same.
-
Edit Section Details: Opens the Edit Section Detail window. This window uses most of the same sections and fields as the Repair Order Add/Edit/View Section window. The differences are:
-
The Edit Section Detail window has an Assignment Information section that includes the Job Code and Description fields. The Add/Edit/View Section window does not.
-
The Edit Section Detail window does not have a Billable field. The Add/Edit/View Section window does.
-
The Edit Section Detail window has two more fields in the Section Details section: PO Number and Vendor. The Add/Edit/View Section window Section Details section does not.
-
-
Add Assignment/Employee: Opens the Add Assignment/Employee window. For more information see Add Assignments and Employees in Shop Planner.
-
Close RO: Closes the RO. This function is only available if all sections of the RO are closed.
-
Create RO: Opens the Manage Forms window with the Repair Order form inside it. For more information on creating ROs, see Create Repair Orders.
-
Create RO from Template: Opens the Repair Order Template Select window. Complete the fields to create an RO. For more information, see Repair Order Template page overview.
-
-
Select the option you want.

