Add a repair order with Road Call and Trimble Maps
If you have the Road Call Advanced package with integration to Trimble Maps, you can use the Trimble Maps button on the Road Call page to view the unit’s location, find a nearby service provider, and create a repair order (RO) from the same page.

| The Trimble Maps button is only available on existing road calls. It does not appear when you create a new road call, because there is no unit to track at that point. |
For this example, assume you have a unit near Atlanta, Georgia. The driver calls in to tell you one of their left front tires has had a blow out. You can use Road Call and Trimble Maps to schedule a repair order for a tire provider near the unit’s current location.
-
Go to Menu > Activities > Road Calls > Road Calls Listing. This opens the Road Calls Listing page.
-
Open a road call by selecting its link in the Call Number column. The Road Call page opens.
-
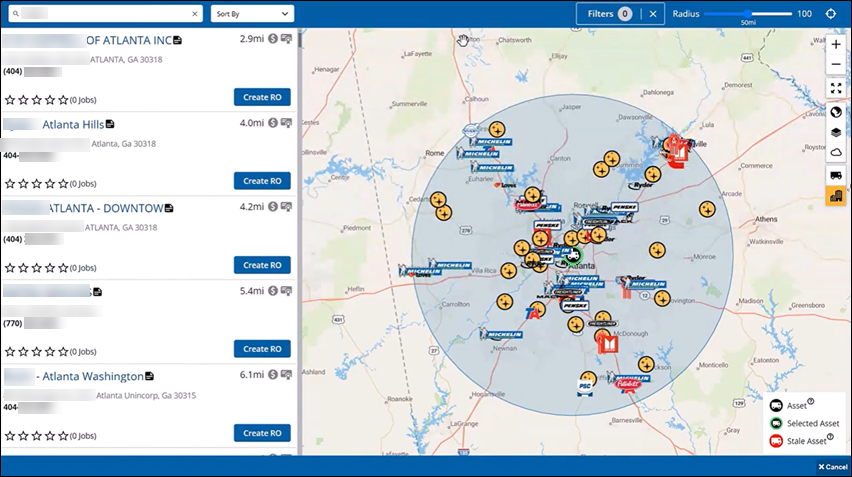
Select Trimble Maps in the heading section. This opens the Trimble Maps page centered on the unit’s location. The unit is marked as a white truck in a black circle. There is a green ring around the circle to show it is the selected asset.

-
If you want, you can apply filters to reduce the amount of information shown on the map.
-
Select Filters in the upper-right corner of the page. The Filters menu opens.
-
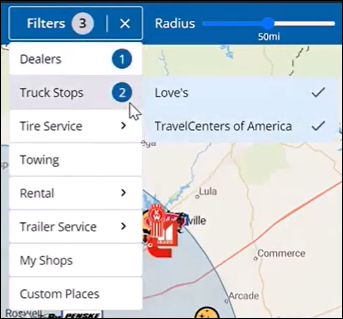
Select the provider types you want to see, such as Dealers, Truck Stops, and Custom Places. Some options let you narrow your selections even further. For example, you can select Truck Stops and then select which truck stops you want to see.
As you select providers:
-
The Filters heading shows you how many filters are in use.
-
The map removes the options you didn’t select.
-
The providers pane removes providers that don’t match your selections.
In this illustration, the user selected one dealer and two truck stops, so the Filters menu shows three filters in use.

-
-
If you want, you can look at weather data to see if the weather might influence which provider you want to use.
-
Select the
 Weather icon in the upper-right section of the page. This opens the Weather Layers menu.
 -
Select the layers you want to see by selecting their toggle switches, such as Doppler Radar, Weather Alerts (US & Can.), and Wind Speeds.
-
Select the
 Weather icon again to close the Weather Layers menu. The map updates to show the weather information you selected.
-
-
From the provider’s pane, select a provider. The map opens a card with more information about the provider, such as any amenities or services they provide. You can also get directions by selecting the Get Directions button. The card then shows how far the unit is from the provider in miles and time. The map also shows a route in blue.
-
Once you’ve found the provider you want to use, select Create RO on their card. The Manage Forms window opens with the Repair Order form.

-
The program completes many of the RO fields for you, such as Repair Shop, Order Number, Unit, Vendor, and so on. Complete the rest of the RO form.
-
Select Save.
-
Close the Manage Forms window. The program returns you to the Road Call page. It also adds the new repair order to the Orders tab.
-
If you want, you can enter a Road Call note, such as "Mobile repair tech is en route." Select Save Note to save your changes.
-
If you want, you can also change the Call Status, such as changing the status from Triage to Enroute.
-
Select Save in the upper-right corner to save your changes.