Physical Inventory page overview

You open the Physical Inventory page by going to Menu > Inventory > Physical Inventory. You must then select a shop. You can enter the shop ID or find one using the Search icon Search icon.

You use this page to make inventory counts. During an inventory count, employees will go out to the shop and count the parts on the shelf and in bins. Once you enter the employee counts on the Physical Inventory page and close the inventory count, TMT will update the on hand quantity information for the parts.

The page has two tabs: Inventories and Counts. The Inventories tab is active by default.

The Physical Inventory Inventories tab

This illustration shows the Physical Inventory page with the Inventories tab active.

Physical Inventory page

1

The Shop ID field.

2

The Inventories and Counts tabs.

  • The Inventories tab lists the inventories available and gives you options for processing inventories.

  • The Counts tab is where you prepare for a physical inventory count and then enter the number of parts found.

3

The Physical Inventories section. By default, this section lists inventories in OPEN status.

4

The Show Closed Inventories and Reports buttons.

  • Select Show Closed Inventories to see inventories in CLOSED status. The page then refreshes to show closed inventories instead of open inventories. To return to the original view, select Show Closed Inventories again.

  • Select Reports to run these reports:

    • Inventory Count Sheet Report: This report has two options, All and Only Uncounted Items. Run this report when you want to print sheets for counting your inventory items. The options let you select which items you need to review.

    • Inventory Count Sheet with Barcodes Report: This report has two options, All and Only Uncounted Items. Run this report when you want to print sheets with barcodes that you can scan when counting your inventory items. The options let you select which items you need to review.

    • Inventory Exceptions Report: This report has two options, Sort By: Part and Sort By: Bin. An inventory exception is when the physical count (that is, the items in the shop) doesn’t match the calculated count (the item totals in TMT). Run this report to review exceptions by part or by bin.

5

The navigation controls row. If you have pages of inventories that you can review, you can use the controls to:

  • Go back to the first page: |<

  • Go back one page: <

  • See the page you are on, such as page 1.

  • Go forward one page: >

  • Go forward to the last page: >|

  • Set how many items are shown on a page using the Page Size dropdown list. You can set the number of items shown on the page to 10, 20, or 50 items.

The navigation controls row also shows how many inventories and pages are available, such as 62 items in 7 pages.

6

The action buttons:

  • Delete: Lets you delete the selected inventory.

  • Adjust: Opens the Inventory Adjustment window so that you can correct inventory errors for one part at a time.

  • Reprocess: You use this button to update an inventory after you have made corrections. For example, if a part count fails when you try to close the inventory, you would fix the issue and select Reprocess. The program recalculates the inventory and corrects it.

  • Close: Lets you change the selected inventory from OPEN status to CLOSED.

  • New: Opens the New Physical Inventory window so you can set up a new physical inventory count.

7

Physical Inventory Comments section: You can enter comments here about the selected inventory.

8

Physical Inventory Comments Save button: Select this button to save your inventory comments.

9

Collapse/Expand tab bar icon: Select this icon to shrink the tab bar to give the page more room to show data. Select the icon again to restore the tab bar.

The Physical Inventory page Counts tab

The Counts tab is where you enter the results of your part counts.
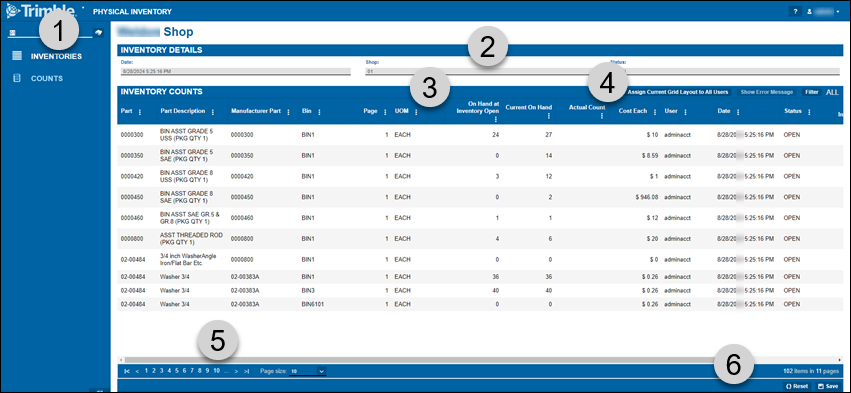
Physical Inventory page with the Counts tab active

1

The Shop ID field.

2

Inventory Details section: Shows the date, shop, and status of the physical inventory selected on the Inventories tab.

3

Inventory Counts section: Shows information for each part selected on the New Physical Inventory window. You can select which columns appear in this section, so this list may be different from yours depending on your setup:

  • Part: The part ID number

  • Description: The part description

  • Manufacturer Part: The manufacturer’s part ID number

  • Bin: The bin identifier

  • Page: The page number where this part is listed on the Inventory Count Sheet report

  • UOM: Unit of measure, such as EACH

  • On Hand at Inventory Open: How many of this part the program calculates you had when you opened the new physical inventory.

  • Current On Hand: How many of this part the program calculates you currently have during the physical inventory count.

  • Actual Count: This value is blank until you enter the number from your printed count sheet. As you enter the count for each part row, the program highlights the cell so that you know you’ve made a change. The highlights remain until you save your changes.

    Note: The column doesn’t look like you can enter data, but if you click in the column, the text field appears. You can also use TAB to move from field to field.

  • Cost Each: How much the part costs per UOM

  • User: The user name of the person who last modified the count record

  • Date: The date the inventory count was opened

  • Status: Show the part’s inventory status. Available options are:

    • OPEN: The count for this part is still open.

    • CLOSED: The count for this part was successfully closed.

    • FAILED: The count for this part failed when the user tried to close the physical inventory. For example, this can happen if a part is used in a repair order while a physical inventory is still open. When the user closes the inventory, the program finds the discrepancy between the Current On Hand and the Actual Count and fails the count for that part. You can select Show Error Message to see why the count failed.

  • On Hand at Inventory Close: How many of this part the program calculates you have when you close the new physical inventory and before updates are made based on your actual count

  • Serial Part: If the part is serialized, this column will show Y for Yes. If not, the column shows N for No.

4

Action buttons:

  • Assign Current Grid Layout to All Users: If you have administrator privileges, you can apply your customized view to all other users. For example, assume you didn’t want other employees to know the Cost Each for the parts. You could remove that column and select the button. The program would then remove the Cost Each column from all users, and those users would not be able to add the column from the grid menu. You could then restore the column to your view to see the data.

  • Show Error message: Shows the applicable error message for the selected row, such as "The quantity of Part 0000350 in Shop ShopName was updated after the Physical Inventory was opened. Please make sure the Actual Count you entered still matches the amount in the bin and reprocess the Physical Inventory."

  • Filter: Opens the Page Filter menu. Once you have selected an option, select OK to close the menu and update the page.

    Available options are:

    • All Pages (default)

    • With Exceptions: Limits the view to rows where the Current On Hand value does not match the Actual Count value.

    • Uncounted: Limits the view to rows where the Actual Count value is blank.

    • Process Failures: Limits the view to rows where the Status is FAILED.

    • Selected Page: If you select this option, you can jump to the page you want to view. This corresponds to the page number on the Inventory Count Sheet report.

  • Filter Name: Shows the filter in use. For example, if the filter is set to the All Pages option, beside the filter you will see the word ALL. If the filter is set to With Exceptions, you will see EXCPT.

5

The navigation controls row. If you have pages of inventories that you can review, you can use the controls to:

  • Go back to the first page:|<

  • Go back one page: <

  • See the page you are on, such as page 1.

  • Go forward one page: >

  • Go forward to the last page: >|

  • Set how many items are shown on a page using the Page Size dropdown list. You can set the number of items shown on the page to 10, 20, or 50 items.

The navigation controls row also shows how many items and pages are available, such as 62 items in 7 pages.

6

The action buttons:

  • Reset: Lets you delete the counts you have entered so far on the selected inventory.

  • Save: Saves your changes.