TTP Job Activity screen overview
The Job Activity screen is where you:
To open the Job Activity screen, select Start or Continue on a job card.

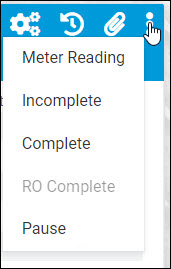
From the Job Activity screen, you can use the  Selection Menu to:
-
Mark the entire RO as complete.
Note: This option is not available unless one or both of these TMT Application options is set to YES.
The menu is found in the upper-right corner of the screen.

|
For information on the icons shown on the Job Activity screen, see the TTP icon Quick Reference. |
The Charge Parts tab
There are two ways to add parts.
-
Select
 Parts Search and scan a part bar code label.
 -
Select the Part field and enter one or more search criteria. You only have to enter a portion of the part number to use the search.
This illustration shows the Job Activity screen. The Charge Parts tab is open by default.

If you scan a part bar code, or enter a part number in the Part field, no search is needed. TTP uses smart search. You do not need to enter the whole part number to find matching parts. You can do an advanced search on the Part Search screen. Select  Parts Search to open it.

After you enter your search criteria, the screen shows all matching results. Results include the:
-
Part number
-
Description
-
Quantity on hand
This illustration shows the results of a part search. The user searched for 102. All results include 102 in their part numbers.

You can select a row from the parts returned in the search. Selecting OK adds the part to your job and opens a screen so that you can enter more parts, if needed. You can change the quantity up to the number in stock.

Core parts
If your setup has Enable Core Tracking set to YES, then when you add a parent part to an RO, the program automatically adds a matching number of the core part. The price is assigned based on the existing default last cost of that part. If the program cannot find a matching price, then it will use a price of $0.00.
If you want, you can charge the parent part and core part independently. The program then displays the barcode based on the quantity charged and the charged part type.
The program displays a separate audit purpose line with a negative quantity value on the Job Detail pane with a price of $0.00. You can also see these audit purpose lines on the Used Core Bank Listing page in TMT.
Deleting a parent part from an RO works a little differently. Whether you delete a parent part or a core part, the program deletes each part independently. That is, deleting the parent part does not delete the core part, and deleting the core part doesn’t delete the parent part. The shop inventory records the actual part or parts accordingly.
If you delete the core part audit line on the RO, the Audit line will be deleted independently on the RO and on the Used Core Bank Listing page.
The Comments tab
Selecting the Comments tab lets you enter:
-
Order Notes
-
Section Comments
-
Line Comments
On the first line, select the type you want. Enter your comment on the second line. Select OK to continue.
This illustration shows the program when the user is adding a Section Comment.

The Check-off tab
Selecting the Check-off tab lets you complete any required checks and comments. It also shows the technician and time completed.

Chronic Repairs message
When open an existing section that is a chronic repair, the Job Activity panel display the Chronic Repairs message at the top of the page, as it does when creating a new section. This information is crucial for a technician who is logging into an existing repair that may have been created by a shop foreman or other technician.
The message appears as red text on a yellow background using the format "Chronic Repairs: number in number of days." In this illustration, the chronic is the first (1) in 60 days.
