Adding a hyperlink to a window
Use this procedure to add a hyperlink to a Fuel Dispatch window. You can add:
-
Links to executable files, such as .EXE, .COM, .BAT, and .VBS.
The user must have access to the executable file’s location. -
Links to files associated with known executables, such as .MPS, .JPG, .XLS, and .adoc.
The user must have access to the file’s location and an associated executable. -
Hyperlinks to web sites.
The user must have access to the Internet.
Any of these hyperlinks can be configured with SQL commands and/or expressions, which run when the user clicks on the hyperlink, to reference information in your TMWSuite database.
-
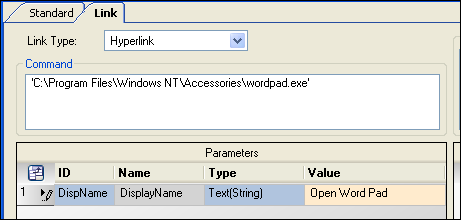
Simple hyperlink to an executable
This sample shows a simple hyperlink to launch Microsoft’s WordPad.
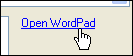
The settings for this hyperlink are shown here.
-
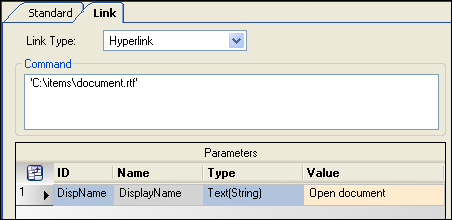
Simple hyperlink to a file
This sample shows a simple hyperlink to a document that is opened with the user’s associated word processing application.
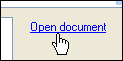
The settings for this hyperlink are shown here.
-
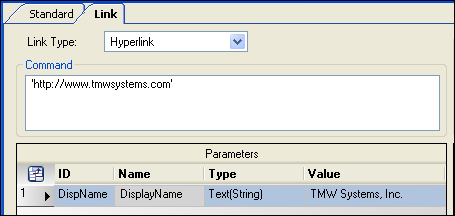
Simple hyperlink to a website
This sample shows a simple hyperlink to launch your browser and open a defined web site.
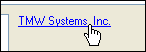
The settings for this hyperlink are shown here.
-
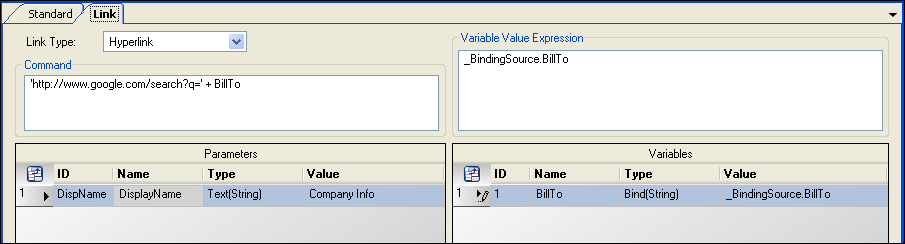
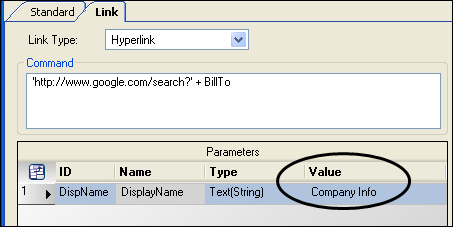
Hyperlink to a website referencing information from the displayed record
This sample shows a hyperlink to Google search, where the open record’s BillTo ID will automatically populate the search field.

The settings for this hyperlink are shown here. The Company Info link text is the same for all records displayed in the window.
-
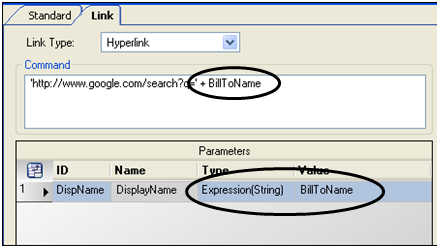
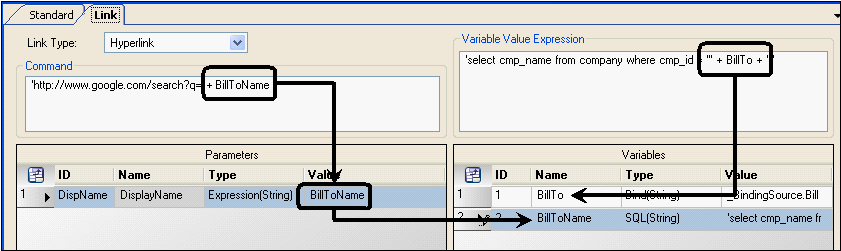
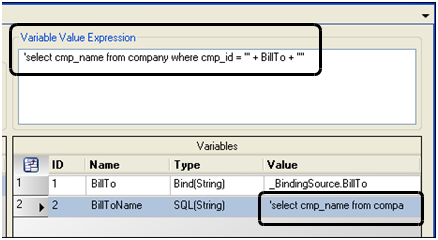
Hyperlink to a website with a SQL expression
This sample shows a hyperlink to Google search, where the open record’s Company Name, based on the BillTo ID, will automatically populate the search field.

The settings for this hyperlink are shown here.
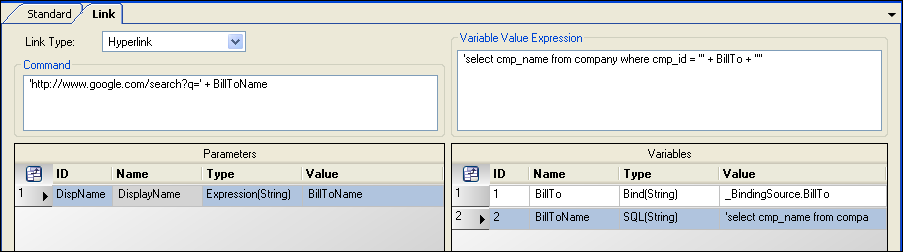
When the user clicks this hyperlink, the company name is automatically populated in the search window, and the search results are shown.

| Adding hyperlinks to a window may require you to make room for it by moving or resizing other items. |
-
Right-click in the approximate location for the hyperlink, and select Add New Item.
After a brief pause, the Add New Item window opens. -
Click on the Link tab.
-
In the Link Type field, select Hyperlink.
The window displays sections appropriate for configuring the hyperlink.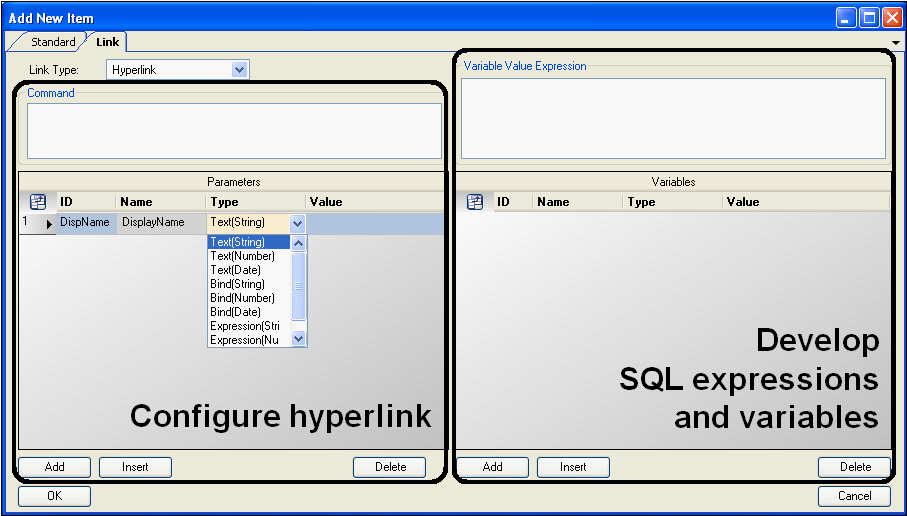
-
Configure the hyperlink command.
Complete this section to identify how the hyperlink will behave and how it will display on the window.
-
In the Command text box, enter the command line.
Notes:
-
The command must be enclosed in single quotation marks.
-
If you want, include parameters to reference data stored in the TMWSuite database.
-
-
In the Parameters section, select the appropriate ID and Name.
The default DisplayName parameter is automatically listed. -
For the DisplayName, select the appropriate Type.
This parameter defines the actual text that will display on the window as the hyperlink.
-
Text options require you to enter a fixed text string in the Value field.
The same text will display on the window for any open record. -
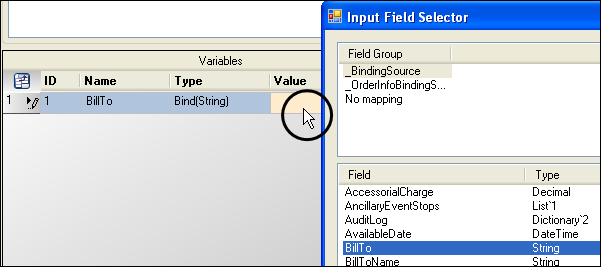
Bind options allow you to bind or attach the hyperlink property to an entry on your window.
The text that displays on the window changes with the data from the open record.Note: When you select a bind option, you can double-click in the Value column to open the Input Field Selector window, where you select an item to bind.
-
Expression options require you to enter additional expressions in the Variable Value Expression sections of the window. These expressions must address the values in the Parameters.
The text that displays on the window changes with the data from the open record.
-
-
Enter or select the Value for the type.
-
Click Add or Insert to add other parameter rows as required.
If necessary, to remove a row, select it and click Delete.This example shows a fixed Text(String) that will display on the window.
This example shows that the DisplayName is determined by an Expression(String) with a variable of BillToName. Additional commands must be entered in the Variables and Expressions sections of the window to address this BillToName value.
-
-
Develop the SQL expressions and variables.
Use this work area to build the list of commands and/or expressions that will run when the user clicks on the hyperlink. Add as many (maximum of 40) expressions and variables as required to address the parameters in the command line and yield the desired result.
-
Click Add or Insert to add other parameter rows as required. If necessary, to remove a row, select it and click Delete.
Note: Multiple command rows must be numbered and listed in the order in which they are to be executed.
-
In the Variables section, select the appropriate Type.
-
Text options require you to enter a fixed text string in the Value field.
-
SQL options require you to enter a valid SQL string in the Value field.
Note: The SQL string must be enclosed in single quotation marks
-
Bind options allow you to bind or attach the hyperlink to an entry in your database.
Note: When you select a bind option, you can double-click in the Value column to open the Input Field Selector window, where you select an item to bind.
-
Expression options require you to enter valid expressions in the Value field.
-
-
Enter the Value.
Note: When you select a listed variable row, the Value displays in the Variable Value Expression section, where you can more easily enter or edit the text.
-
-
When you are finished, click OK.
-
Toggle out of QuickDesigner mode.
-
If you want to change the settings for the hyperlink, do the following:
-
Toggle into QuickDesigner mode.
-
Right-click on the hyperlink, and select Show Preferences.
The settings are shown in the Field Preferences window.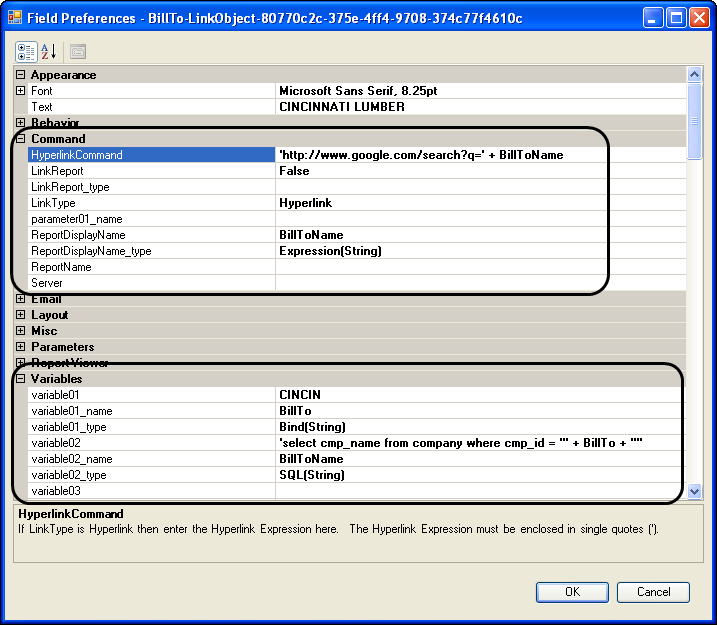
-
Make your changes.
-
Click OK.
-
Toggle out of QuickDesigner mode.
-