Performing preliminary setup
Fuel Dispatch supports order creation for the fuel delivery industry or the oil industry. These topics describe how to activate Fuel Dispatch’s Oil Field Order Entry window and set up features unique to oil field orders.
Activating the Oil Field Order Entry feature
To enable access to the Oil Field Order Entry window, use the [FuelDispatch]ShowOilFieldOrderEntry setting in your TTS50. This setting adds the Oil Field Order Entry command to the Fuel Dispatch Application menu.
Setting default pickup or drop times
First available in TMW Fuel Dispatch: 16.10
Orders entered in the Oil Field Order Entry window are assigned pickup and drop dates/times automatically. These dates and times determine how early or late stops should happen.
By default, the system assigns the system dates/times to stops:
-
Genesis date/time (01/01/50 00:00)
The system assigns the genesis date/time as the earliest pickup date and the earliest drop date/time.
Show me
-
Apocalypse date/time (12/31/49 23:59)
The system assigns the apocalypse date/time as the latest pickup date and the latest drop date/time.
Show me
Note: For more details on system dates, see Understanding the default dates/times.
If you want, you can change the default pickup or drop dates/times by modifying INI settings in your TTS50. For example, you could set the earliest pickup date/time to be tomorrow at 8:00 am.
Setting the earliest pickup time
Orders entered in the Oil Field Order Entry window are assigned an earliest pickup date/time. By default, this is the genesis date/time. If you want, you can use the [Order]InitEarlyPckUpDt setting in your TTS50 to specify the earliest pickup date/time.
Setting the earliest drop time
Orders entered in the Oil Field Order Entry window are assigned an earliest drop date/time. By default, this is the genesis date/time. However, you can modify the [Order]InitEarlyDrpDt setting in your TTS50 to change the earliest drop date/time.
Setting the latest pickup time
Orders entered in the Oil Field Order Entry window are assigned a latest pickup date/time. By default, this is the apocalypse date/time. However, you can modify the [Order]InitLatPckUpDt setting in your TTS50 to change the latest pickup date/time.
Setting the latest drop time
Orders entered in the Oil Field Order Entry window are assigned a latest drop date/time. By default, this is the apocalypse date/time. However, you can modify the [Order]InitLatDrpDt setting in your TTS50 to change the latest drop date/time.
Making Oil Barrels the default volume unit of measure
The WeightUnits, VolumeUnits, and CountUnits fields in the Oil Field Order Entry Freight grid display the system’s default measurement units. Initially, these defaults are set to Pounds, Gallons, and Pieces. However, each field provides a drop-down list where you can select a different measurement unit on an order-by-order basis.
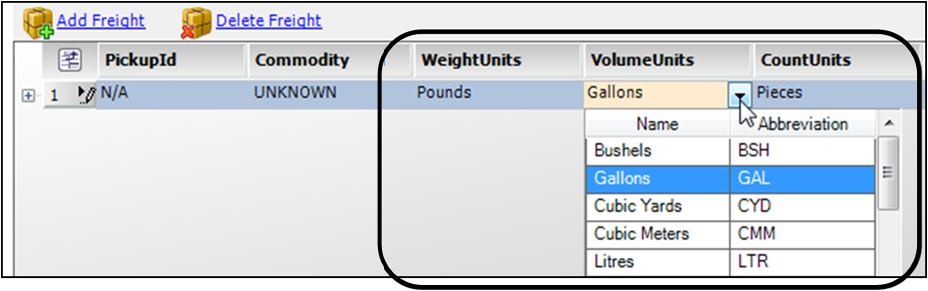
The default units and options available in each list are determined by:
-
WeightUnits, VolumeUnits, and CountUnits labels
The
[Order]DefaultWgtVolCountsetting uses one option abbreviation (Abbr) from each label to specify a default weight, volume, or count unit of measurement.Show VolumeUnits example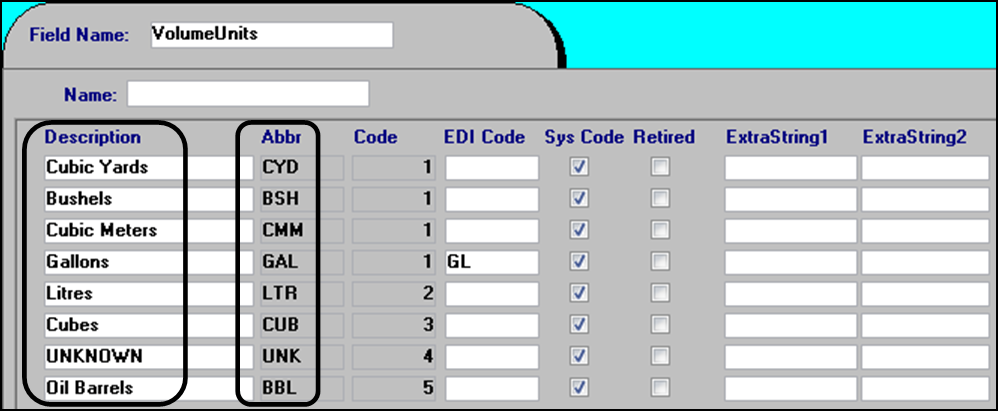
Note: Each label contains options designated as system codes (Sys Code). You cannot change or delete a system code, but you can add options to the label.
-
The
[Order]DefaultWgtVolCountsetting in your TTS50This setting specifies the system’s default weight, volume, and count measurement units. The string consists of one abbreviation (Abbr) from the WeightUnits, VolumeUnits, and CountUnits labels, separated by commas. The default setting is:
DefaultWgtVolCount=LBS,GAL,PCS`
For Order Field Order Entry, the commonly used volume unit is Oil Barrels. To change the default volume unit to Oil Barrels, modify the setting as follows:
DefaultWgtVolCount=<Wgt>,BBL,<Count>
where
<Wgt>and<Count>are the abbreviations for the desired WeightUnits and CountUnits options. If you omit any abbreviation from the setting string, the comma separators are still required. The omitted unit of measure reverts to the matching default setting (LBS,GAL, orPCS).
Creating commodity profiles for Oil Field Order Entry
Before you can add a commodity to an oil field order, you must create a profile for it. You use the Commodity Profile window. See Setting up commodity classes and commodities for instructions.
Creating company profiles unique to Oil Field Order Entry
To some degree, operations in the oil field industry are the reverse of those in the fuel delivery industry.
-
For fuel orders, commodities (gasoline, diesel, etc.) are picked up at a fuel refinery or rack for delivery to one or more stores or filling stations. Orders are created manually in the Call On Demand Oil Entry window, or automatically by the Inventory Services forecaster.
-
For oil field orders, commodities (crude oil) are picked up from one or more leases (oil wells or tanks) and delivered to a refinery. Orders are created in the Oil Field Order Entry window; there is no equivalent of the Inventory Services forecaster for oil field orders. Also note that oil field operations may involve the transportation of oil drilling supplies and by-products to and from the well site.
Fuel orders and oil field orders both involve companies that supply and receive commodities, pay for shipping, and serve other roles. These companies are known by different names in each industry, but you set up companies for both in Fuel Dispatch using the same windows and methods.
| Company Function | Company type in Fuel Orders | Company type in Oil Field Orders | In Company Profile Switches, select |
|---|---|---|---|
Pickup location |
Shipper |
Lease1 |
Shipper |
Delivery location |
Consignee |
Refiner |
Consignee |
Pays for shipping |
Bill To |
Producer, Purchaser, or Operator |
Bill To |
Company with sub-companies or divisions, designated as Bill Tos |
Parent |
Master |
Parent |
Sells branded and unbranded fuel to service stations |
Supplier |
N/A2 |
Supplier |
Purchases fuel from a supplier and resells it to service stations |
N/A2 |
3 |
|
1 For oil field orders, a storage tank can also be set up as a lease. 2 Generally, this company type is not used in oil field orders. You can select other checkboxes in the Company Profile window’s Switches section as needed. 3 In the Company Profile window, create the company profile as usual. In the Company Relations Profile window (Maintenance > Company Relations Profile), select the Account Of checkbox. |
|||
For more information on setting up company profiles, see Entering company data.
Specifying how many IDs appear in a company ID list
By default, the drop-down lists shown for the CompanyID and Company_AltID fields can display up to 11 IDs plus the UNKNOWN option. These fields are located in the Oil Field Order Entry window’s Stops grid. If you want, you can show a larger or smaller maximum number of IDs using the [StopOrderEntry]OFOECompanyIdStopDropDownCount setting in your TTS50.
Filtering companies by master company
In some cases, a customer may be a master (parent) company. A master company may have multiple sub companies or divisions. The setup of a master company and its divisions is useful when billing rates for sub companies are based on the parent.
In the Company Profile window, you:
-
Identify a company as a master company by selecting the Parent checkbox. The checkbox is located in the Switches section.
-
Link shipper and/or consignee companies to a master company. You use the Div of Parent field in the Other section to identify the master company for shippers and consignees.
|
You can set up the system so that when you create an order in the Oil Field Order Entry window, shipper and consignee companies available in the Stops grid are limited to those having the same master company as the Bill To. Use the [StopOrderEntry]BillToParentCmpRestriction setting in your TTS50.
Defaulting an order’s Bill To, consignee, and commodity from the shipper
When you create an order in Oil Field Order Entry, you can have the system fill in the Bill To, consignee, and/or commodity based on the order’s shipper.
|
You record these defaults in the shipper’s profile.
|
The system inserts the:
-
Bill To in the Order Header
-
Consignee in the Stop Detail
-
Commodity in the Freight Detail
You can also set up your system to change the Bill To, consignee, and/or commodity automatically on an order when you change the shipper.
You control the use of each default by a separate INI setting.
Use the [StopOrderEntry]AutoPopulateConsignee setting to record the shipper’s default consignee on orders.
Use the [StopOrderEntry]AutoPopulateCommodity setting to record the shipper’s default commodity on orders.
Use the [StopOrderEntry]SetBillToFromShipper setting to record the shipper’s default Bill To on orders.
Allowing any company to be the Order By on an order
By default, the Oil Field Order Entry window requires that an order’s Order By company is an Account Of company.
| You identify a company as an Account Of company in its Company Relations Profile. |
If you want, you can remove this restriction using the [StopOrderEntry]DisableOrderByFilterOnOrderBy INI setting.
Restricting an order’s shipper by the Order By company
First available in Fuel Dispatch V.16.10
If you want, you can set up the Oil Field Order Entry window to restrict shipper companies based on the order’s Order By company. This restriction limits shippers to those having the Order By company as their parent company.
To set up the Order By and shipper companies to use this restriction, you must:
-
Identify the Order By company as a parent and as an Account Of company.
Note: In Oil Field Order Entry, only an Account Of company can be the Order By on an order. If you want, you can change this restriction. For details, see Allowing any company to be the Order By on an order.
-
Specify the Order By company as the parent in shipper company profiles.
Notes:
-
In Fuel Dispatch, you set the shipper’s parent company in the Company Profile window. On the Information tab, select the Order By/parent company’s ID in the Div of Parent field.
-
In TMWSuite’s File Maintenance application, open the shipper’s profile in the Company File Maintenance window. In the Miscellaneous section, select the Order By/parent company’s ID in the DivOf/Parent field.
-
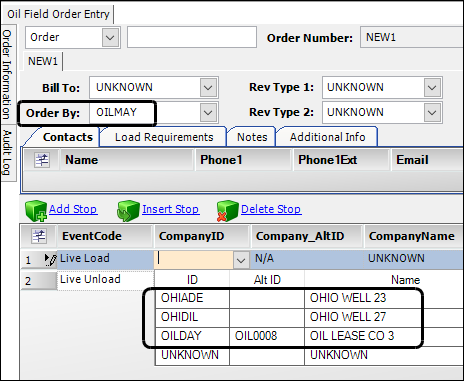
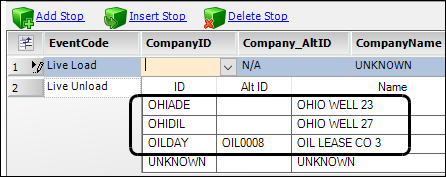
The restricted list of shipper companies appears in the pickup stop’s CompanyID field, in the Stop Detail section.
This illustration shows a restricted list of shippers. The Order By company is OILMAY. The shippers (OHIADE, OHIDIL, OILDAY) all have OILMAY recorded as their parent in their company profiles.
You activate the Order By/shipper restriction using the [StopOrderEntry]ShipperParentCmpRestriction setting in your TTS50.
To use a restricted shippers list, follow these steps.
-
Create a new order in Oil Field Order Entry.
-
In the Order By field, enter the Order By company’s ID, and then press TAB.
-
In the Stop Detail, click in the Company ID field for the Live Load event.
-
Press BACKSPACE.
The drop-down list of available shippers opens. It shows only shippers that have the Order By company as their parent.
| You can specify a default commodity and/or a default consignee in a shipper’s company profile. You can set up the system to default these values to orders associated with the shipper. This functionality continues when you restrict shipper companies by the order’s Order By company. For details, see Defaulting an order’s Bill To, consignee, and commodity from the shipper. |