Recording service exceptions
A service exception is any event that fails to provide appropriate service to a customer, for example accidents, breakdowns, and detours. Trucking companies use service exceptions to track the performance of assets, carriers, users, and companies.
First available in Fuel Dispatch V.2016.10
You can use service exceptions to track a store’s tank-specific exception events, such as runouts.
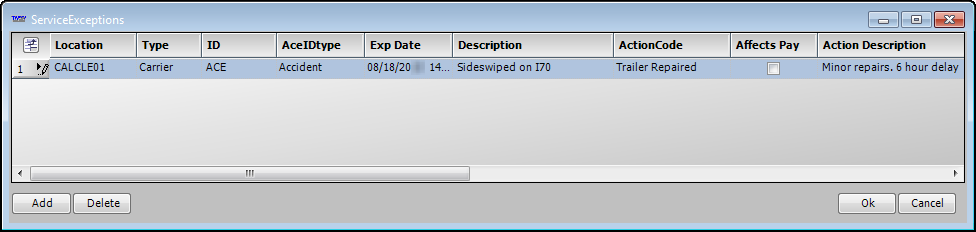
You record service exceptions in Call on Demand Order Entry’s Service Exceptions window. For each service exception, you can record the corrective action taken. For those that are driver-specific, you can indicate whether the exception should affect pay. When you add a service exception to an order, you can apply it to the move as well.
| By default, a service exception is created for a move, not an order. When working with service exceptions, you can look it up by move number or order number. |
Establishing reason and action codes
Labels are edited in the System Administration application. Make entries in the labels based on how your company categorizes and deals with exceptions.
The Service Exceptions feature uses these labels:
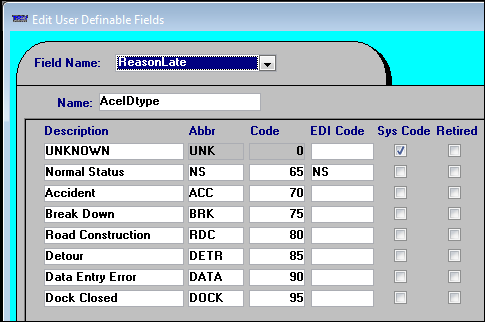
Identifies the reason a service exception occurred. Sample reason late entries are shown here.
Note: The Customer Service Report in TMWSuite Dispatch also uses this label.
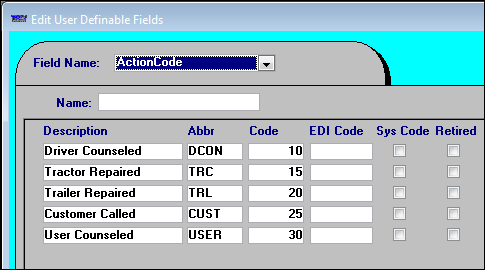
Identifies the corrective actions you may take to handle a service exception. Sample entries for the ActionCode label are shown here.
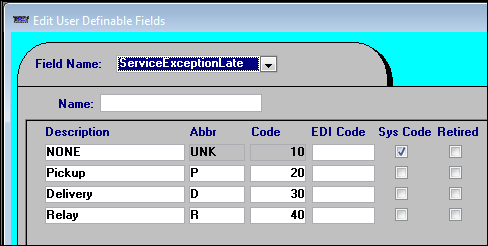
Identifies the event affected by the service exception. Sample entries for the ServiceExceptionLate label are shown here.
Working with service exceptions
Using the Call on Demand Order Entry’s Service Exceptions window, you can record, review, and delete service exceptions.
-
The service exception is attached to the order or movement in view.
-
You can enter multiple service exceptions against an order or movement.
Service exceptions are user-defined. This allows you to record options applicable to Fuel Dispatch.
|
While you can record service exceptions in Call On Demand Order Entry, Fuel Dispatch does not provide standard service exception reports. You can run an exception report in TMWSuite’s Trip Folder. For details, see: Guide: Dispatch | Chapter: Running Dispatch reports | Section: Printing a Service Exceptions report |
To open the Service Exception window, follow these steps.
-
In Call On Demand Order Entry, look up the move or order number for which a service exception occurred.
-
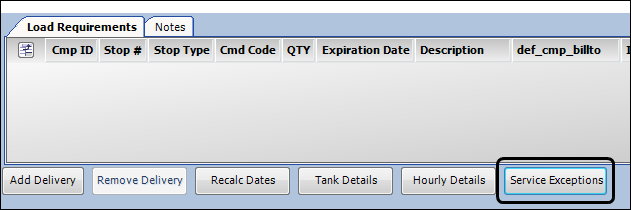
Below the Load Requirement tab, click Service Exceptions.
Show meThe Service Exceptions window opens.
-
Entering a service exception
To record a service exception, follow these steps:
-
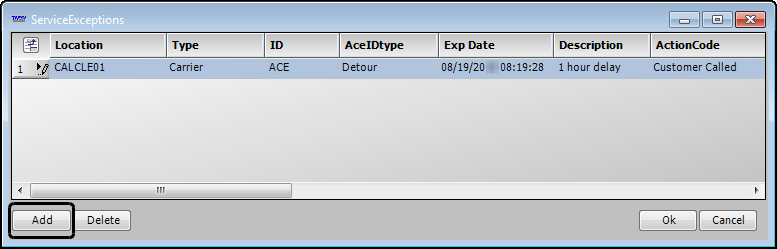
In the Service Exception window, click Add.
-
Make entries in the appropriate fields:
Field definitions
Required field: *
Location |
If appropriate, select the company ID of the location where the exception took place. |
Type* |
Select the category of the party responsible for the service exception. Options are:
First available in Fuel Dispatch V.2016.10 To add a service exception for a store’s tank(s), you must select the store in the Location field. When you select Tank as the type, the system automatically:
Notes: You can delete any tank row for which you do not want to add a service exception. If you mistakenly select Tank from the Type field, you must delete the row to correct the error.
|
ID* |
Enter the ID of the responsible party. |
AceIDtype |
Select the reason for the exception. Note: The options are set up in the ReasonLate label. |
ExpDate |
Date/time the exception was recorded Note: This field defaults to the current system date/time. |
Description |
Enter free-form text to describe further the reason for the exception. |
ActionCode |
Select the action taken in response to the exception. Note: The options are set up in the ActionCode label. |
Affects Pay |
This field is applicable for resource-specific exceptions. Select the checkbox if the exception will affect how the resource is paid. Note: This entry is informational only. Actual changes to pay must be performed manually. |
Action Description |
Enter free-form text to further describe the action taken. |
ServiceExceptionLate |
Select the option that defines the part of the load that was late. Note: The options are set up in the ServiceExceptionLate label. |
Corrective Action Description |
Enter free-form text to describe the corrective action taken. |
Contact Customer |
Select this checkbox if the customer must be notified of the service exception. |
Corrective Action Received |
Select this checkbox if corrective action was received. |
sxn_ord_hdrnumber |
Order header number of the order to which the service exception applies Notes:
|
Apply To Entire Move |
This checkbox is selected by default. Do one of the following:
Note: Service exceptions applied to a move are attached to orders associated with the move.
This causes the order number to appear in the sxn_ord_hdrnumber field. |
-
Repeat these steps for each additional exception.
-
Click OK to save your entries.
The color of the Service Exceptions button changes to yellow.
-
Click
 Close to exit the Service Exceptions window.
Viewing or editing a service exception
You can view information on service exceptions in Fuel Dispatch.
-
In the Service Exception window, review the list of exceptions.
-
If changes are needed, click in the appropriate field and update your entries.
-
Click OK to save your entries.
-
Click
Close to exit the Service Exceptions window.
Deleting a service exception
If a service exception was recorded in error, you can delete it.
-
In the Service Exception window, click in the row of the service exception you want to remove.
-
Click Delete.
The service exception is immediately removed. -
Click OK to save the deletion.
-
Click
Close to exit the Service Exceptions window.