On-Demand Forecasting overview
First available in Fuel Dispatch: 17.50
When you service forecasted locations, getting the right amount of product to a store at the right time is critical. When reviewing a store’s available orders, you may need to adjust the quantities on the next order. Normally, you would have to wait for the next time the Forecaster runs to see how your change affects the store’s remaining forecasted orders.
With On-Demand Forecasting, you can run the forecaster to see how your change affects the store’s remaining orders. When you use the Run Forecaster command, the forecaster:
-
Locks the changed volume on the changed order so no additional quantity changes can be made.
-
Adjusts the retain/runout time on the changed order.
-
Adjusts the quantities and retain/runout times on the remaining orders.
On-Demand Forecasting is available in the Dispatch Dashboard and in Call On Demand Order Entry. In the Dispatch Dashboard, you cannot change the commodities on an order, only the amount to be delivered. If you need to add or remove a commodity, you must open the order in Call On Demand Order Entry.
Reforecasting in the Dispatch Dashboard
When reviewing a store’s orders in the Dispatch Dashboard, you may need to change the volume on a single order. When you do, you can see how your change affects the rest of the store’s forecasted orders.
-
In the Dispatch Dashboard, retrieve stores.
-
Select a store in the Stores List.
-
In the Store’s Orders grid, select the order you want to change.
-
Change the quantity of the product you want to adjust in its Volume field, and then press TAB.
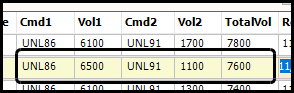
Show meThis illustration shows the original forecasted volume for the two commodities on order #15863.

This illustration shows the volume changes for both commodities.
-
Click Run Forecaster.
The system:-
Selects the changed order’s LockVolume checkbox so it cannot be changed.
-
Adjusts the quantities and dates on the remaining forecasted orders.
Note: The PlacedHour field shows the number of hours from the current time that each order is expected to be delivered.
Show me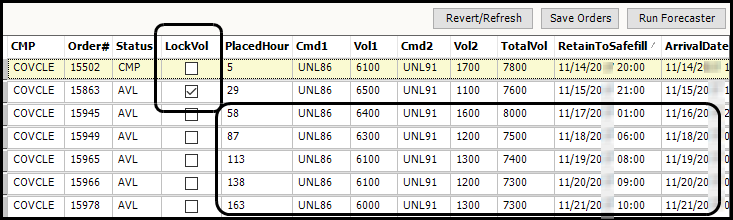
-
-
Do one of the following:
-
If you are satisfied with the time adjustments to the remaining available orders, click Save Orders to keep the new times
-
If you made volume adjustments and are satisfied with the adjustments to the remaining available orders, click Save Orders.
-
If you are not satisfied with the volume adjustments you made, you can undo your changes if you have not clicked Save Orders. Click Revert/Refresh in the Store’s Orders grid to undo your changes.
-
If you are not satisfied with the adjustments made by your volume changes, you can undo them if you have not clicked Save Orders.
-
Clear the LockVol checkbox.
-
Click Run Forecaster.
-
Click Save Orders in the Store’s Orders grid.
-
-
| If you want to change the commodity on an order, you must do so in Call On Demand Order Entry. You can access it by double-clicking on the order you want to modify in the Store’s Orders grid. |
Reforecasting in Call On Demand Order Entry
You can reforecast a store’s orders in Call On Demand Order Entry when you need to remove a commodity from an order or add one to it.
The window now includes the Forecaster tab, which is located at the top of the window.
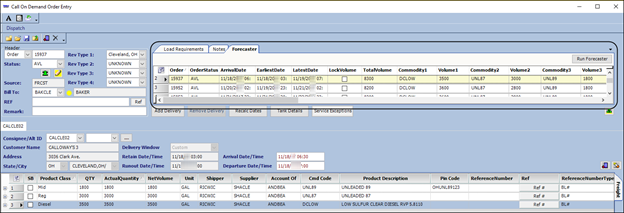
The tab shows all of the store’s available orders in a grid. Information about the commodities on the displayed order appears in the Freight Details grid.
The order’s original volumes appear on the Forecaster tab and in the Freight Detail grid.

| If you are working in the Dispatch Dashboard, double-clicking on the order you want in the Store’s Orders grid will open it in Call On Demand Order Entry. |
When working with On-Demand Forecasting in Call On Demand Order Entry, you can make any of these changes to an order:
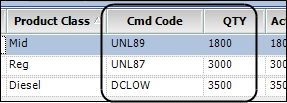
In the commodity’s freight detail, change the value in the Qty field. When you tab out of the field, the commodity’s corresponding Volume# field on the Forecaster tab reflects your change.
Note: You cannot change the quantity on the Forecaster tab.
If needed, you can add a commodity to the order in the Freight Detail grid.
-
Click
 Add Freight.
A blank freight detail row is added to the grid. -
Enter the information for the additional commodity.
Your addition is shown on the Forecaster tab.Note: You can add only commodities found in the store’s list of commodities. When you define a store’s tanks, you identify the commodities they hold. For details, see Setting up the store’s tanks in the Inventory Services online help.
If needed, you can remove a commodity from the order.
-
Select the commodity’s row in the Freight Detail grid.
-
Click
 Remove Freight.
A confirmation message appears, asking if you are sure you want to delete the freight record. -
Click Yes to remove the freight.
The commodity’s corresponding Volume# field on the Forecaster tab shows a value of 0 (zero).
When your changes are complete, you can see how they affect the store’s remaining orders by clicking Run Forecaster, located on the Forecaster tab.
The system selects the LockVolume checkbox on the Forecaster tab so that the order will not be reforecast. The quantities and retain/runout times on the subsequent orders are adjusted.
To commit your changes, click ![]() Save.
Save.
| Your changes appear in the Dispatch Dashboard’s Store’s Orders grid. |