Setting up tank profiles
Tank profiles are used in Oil Field Order Entry to calculate the quantity of oil in the tanks. The system uses gauge or meter readings and the lease company’s tank size or model to calculate the volume of product. The tank’s capacity can be identified with these measurements:
-
Number of barrels or gallons per inch
These measurements assume the tank is a perfect cylinder, that one inch of product at one tank depth is exactly the same as one inch of product at another depth.
-
Strapping measurements
These precise measurements include variances for the bulges and dents in a tank. One inch of product at one tank depth would then vary from one inch of product at another depth.
Using tank models
Tank models are used to store strapping measurements. Because these measurements include variances for the bulges and dents in a tank, they provide greater accuracy when determining product volume. Use the [InventoryService]TieStrapReadingsToDips setting in your TTS50 to allow the system to calculate quantity by combining the information from the gauge or meter readings and the information from a tank model.
Creating tank models
Use this procedure to record tank model information and strapping measurements. When setting up the tanks for a lease, you can select the recorded and saved Model ID in the Tanks tab of the Company Relations Profile window. See Defining a lease’s tanks.
The Tank Model Maintenance window allows you to add tank details that define a tank’s volume capacity, for example, its model, dimensions, and dip information.
To access the window, go to Maintenance > Tank Model Maintenance.
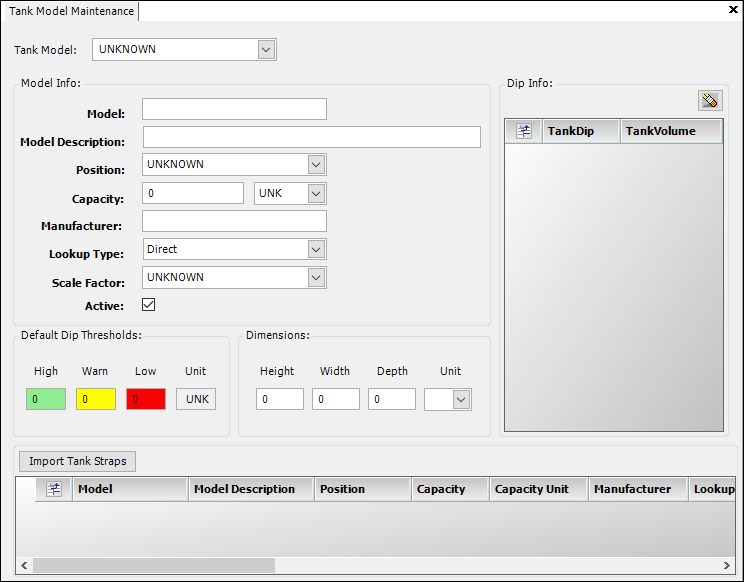
You can add tank model information and strapping measurements manually or electronically. To add the information electronically, you upload a data file. Field values that require a specific format in the data file appear below in parentheses
Required field: *
Field |
Definition |
Model* |
Enter the tank model name. |
Model Description |
Enter a description for the tank model. This field accepts up to 255 characters. |
Position |
Select the location of the tank as above or below ground.
|
Capacity |
Two fields:
|
Manufacturer |
Enter the name of the tank’s manufacturer. |
Lookup Type* |
The Tank Dip measurements represent the key height measurements at which the tank is strapped. Select one of the following ways each strapping band or section is identified:
|
Scale Factor |
This field applies only when you select the Cumulative or Incremental Lookup Type. It indicates the scale of dip unit to conversion factor. For example, if you measure the dips in inches, and Scale Factor is per 1/4 inch, the conversion factor is .25.
|
Active |
This checkbox specifies whether the tank is active.
Active tanks appear in the Model ID column on the Tanks tab in the Company Relations Profile window. |
Default Dip Thresholds |
High, Warn, Low, and Unit These fields, in percent (%), are not used as factors in system calculations, but are available in the database table for reporting purposes. They can be edited, but not left blank. |
Dimensions |
Height, Width, Depth, and Unit These fields are not used as factors in system calculations, but are available in the database table for reporting purposes. They can be edited, but not left blank. The unit of measure options for Unit are:
|
Use either of these procedures to record tank model information and strapping measurements.
Record tank model information manually
-
Go to Maintenance > Tank Model Maintenance.
The Tank Model Maintenance window opens. -
Click
 New.
New. -
Complete the fields as needed.
For field definitions, see Creating tank models.
-
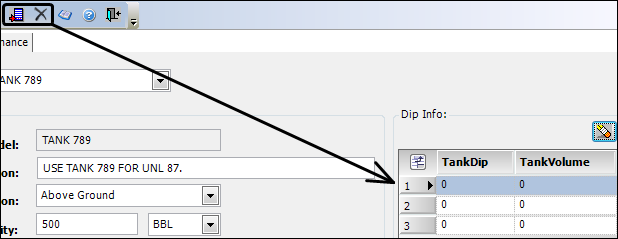
Enter the strapping measurements.
-
Click
 Add for each tank dip measurement you need to record.
New rows are added to the Dip Info grid.
-
-
Under TankDip, enter the dip level in inches.
-
Under TankVolume, enter the corresponding factor.
For a Lookup Type of:
-
Direct, enter the volume at the level that the dip states.
-
Cumulative or Incremental, enter the strapping factor used in the volume calculation for that model.
To determine the volume for that strapping section, the strapping factor is multiplied by the dip meaurement, and then divided by the Scale Factor (for example, .25).
To determine the total volume, the volume in each strapping section is added to the volumes in the sections beneath it.
-
Repeat Steps a, b, and c for each dip measurement recorded for the Tank Model.
-
If you added more rows than you need, select each blank row and click
 Delete.
Note: You can use CTRL or SHIFT to select multiple rows.
-
Click
 Save.
Save.
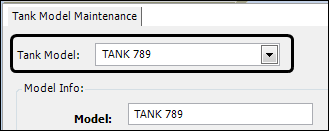
The new Tank Model ID is displayed in the Tank Model field.
Import tank model information electronically
Entering tank model information manually on a daily or weekly basis can be time consuming. You can use the Import Tank Straps feature to upload this information electronically.
-
Go to Maintenance > Tank Model Maintenance.
The Tank Model Maintenance window opens. -
Click
New. -
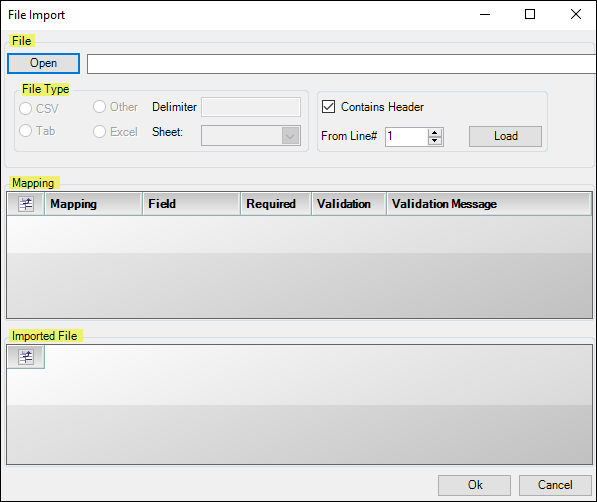
To upload tank model and strapping information, click Import Tank Straps.
The File Import window opens.
It includes the File, File Type, Mapping, and Impoted File panes. The system selects the Contains Header checkbox by default. If you do not want to include column headers in the imported file, clear the checkbox.
-
Click Open.
Your default file directory opens. -
Select the file you want to import, and then click Open.
The file path displays in the Open field.
The system selects a File Type radio button automatically based on the type of file you upload.
They include:
-
CSV
This option activates the From Line# field. This field pertains to CSV files only.
-
Other
This option activates the Delimiter field
-
Tab
This option may activate the Delimiter field
-
Excel
This option activates the Sheet field.
-
If the From Line#, Delimiter, or Sheet field is activated, do one of the following:
-
In the From Line# field, identify from which row in the import file you want to start loading tank data. The system loads the data into the Imported File grid.
-
In the Sheet field, select an available option. The system provides options in this field by default, based on the type of file imported.
-
In the Delimiter field, enter the delimiter character used to separate the data values.
-
Values may include entries, such as:
-
Commas (,)
-
Double quotes ("x")
-
Pipes (|)
-
Semi-colons (;)
-
Spaces
-
Tabs
-
-
-
Click Load.
The system uploads the Tank Model information and strapping measurements to the Mapping and Imported File panes. -
Use the Imported File pane to review field values. To edit values, select a field and make your change.
-
Use the Mapping pane to map data from the imported file to the appropriate fields in the Tank Model Maintenance window. When you map fields, the columns in the Imported File pane turn green.
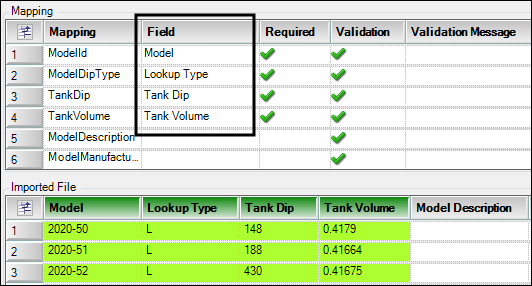
Note: When mapping, do not select a column name more than once.
Field definitions
Required field: *
Read-only field: §
Field |
Definition |
Mapping § |
The Mapping fields represent the fields located in the Model Info, Dip Info, Default Dip Threshholds, and Dimensions panes in the Tank Model Maintenance window. |
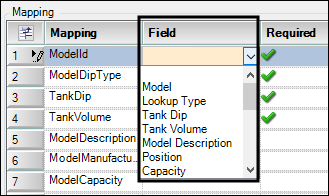
Field* |
Select a column name to map it to a field in the Tank Model Maintenance window. Each cell in the Field column shows a list of the column names that appear in the Imported File pane.
Note: Only the Modelid, ModelDipType, TankDip, and Tank Volume field values are required. |
Required § |
A field that requires a value |
Validation § |
Indicates whether a mapped field passes validation or causes an error.
The mapped field value matches the type of value the Tank Model Maintenance field accepts. For example, Direct (L) and Incremental (I) are Lookup Type values so the imported data should match one of those values.
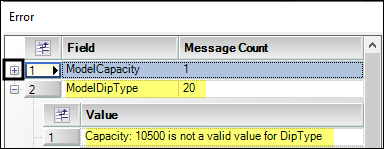
The mapped field value does not match the type of value the Tank Model Maintenance field accepts. When this occurs, you can:
An Error window opens and shows the error information. To review error details, click
|
Validation Message § |
Identifies the type of mapping error that occurred |

-
Click Ok to upload the information from the imported file to the Tank Model Maintenance window.
The system displays the imported information in the Tank Model Maintenance window.
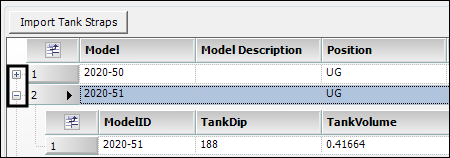
The window shows information for the specific tank model you select in the Imported Tank Straps pane.
To view a tank model’s details, click ![]() Expand to the left of the model row.
Expand to the left of the model row.
-
Correct import errors, if needed.
The ![]() Exclamation icon appears next to a field to identify an import error. You must clear all errors from the imported data before saving the tank model information.
Exclamation icon appears next to a field to identify an import error. You must clear all errors from the imported data before saving the tank model information.
This illustration shows errors for the Model and Tank Dip fields. Place your pointer over the Exclamation icon, to open a ToolTip that describes the error.
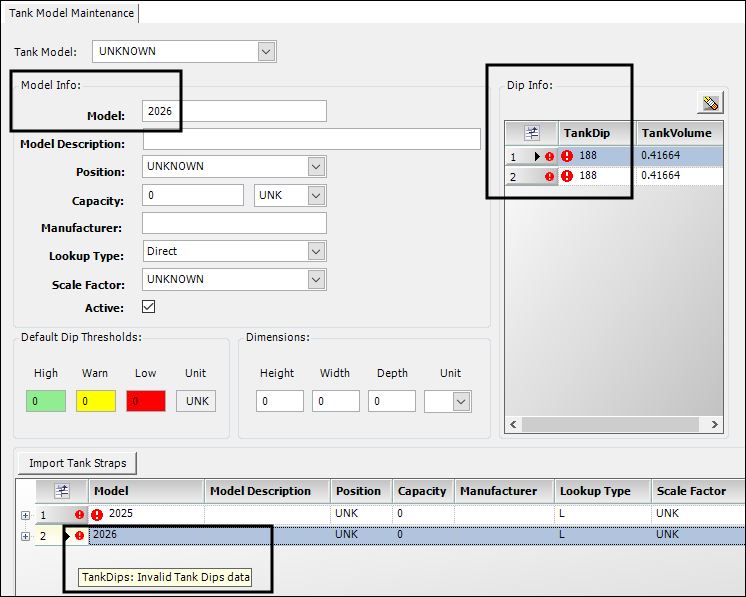
Field values in the Import Tank Straps grid are not editable. To clear errors, change the field values in the upper half of the window that correspond to the fields with errors in the grid. For example, to correct a model name or tank dip information, modify the values in the Model or TankDip fields. As you make changes, the system refreshes the grid’s data to clear errors.
-
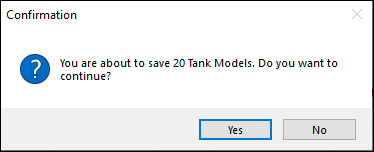
Click
Save.
The Confirmation window opens and states, "You are about to save N Tank Models. Do you want to continue?"
-
Click Yes.
The Information window opens and states, "Import Save Completed Successfully."
-
To import another file, click Import Tank Straps.
Modifying existing tank model records
Use this procedure to look up the strapping measurements for an existing tank model record, or to update the information in the record.
| Changes to a tank model’s strapping information affect only new reading calculations. |
-
Go to Maintenance > Tank Model Maintenance.
The Tank Model Maintenance window opens.Show me -
In the Tank Model field, use instant best match to select the tank model to update.
The tank model information populates the window. -
Update the information as needed.
-
Click
Save.
Defining a lease’s tanks
Oil clients use a company designated as a shipper for their lease properties. By default, the system allows tank setup for companies designated only as consignees. You must enable the Tanks tab on the Company Relations Profile window for companies designated as shippers. Once enabled, you can enter the appropriate tank information.
Enabling the Tanks tab for leases
Use the [FuelDispatch]TankSetupCompanyTypeFilter setting in your TTS50 to allow tank setup for shippers (leases) as well as consignees.
Allowing more than ten tanks for a lease
First available in Fuel Dispatch: 16.20
By default, you can set up a maximum of ten tanks for a lease. If you want, you can set up the system to allow more than 10 tanks at a lease. When you use the [StopOrderEntry]OFOETankMode setting in your TTS50 to allow for more than 10 tanks, the system also adds run ticket details on the Oil Field Readings tab automatically. The details are added for each freight detail you add to an oil field order.
Entering tank information
Use this procedure to define the lease’s (shipper’s) tanks. You must enable the Tanks tab in the Company Relations Profile window for companies designated as shippers. See Enabling the Tanks tab for leases.
-
Go to Maintenance > Company Relations Profile.
The Company Relations Profile window opens. -
Retrieve the lease company.
-
On the Tanks tab, click Add.
A new row is added to the grid.Show meUse Retrieve and Save for each company.
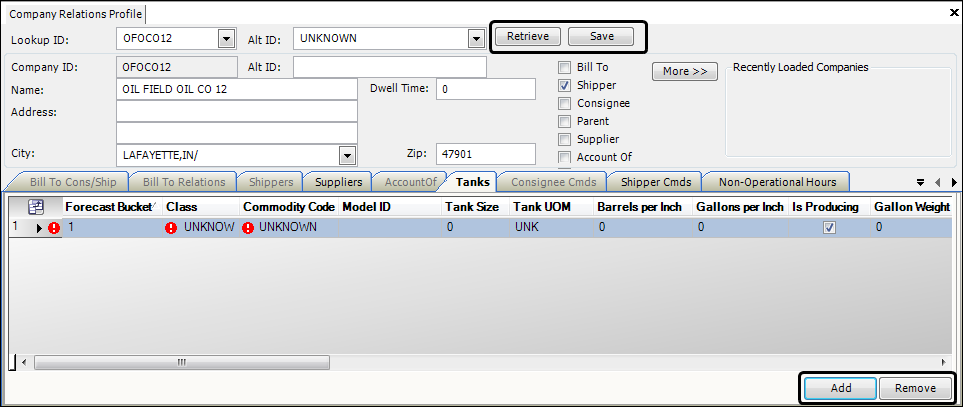
Use Add and Remove for the rows in the grid.
-
Make entries in the fields as appropriate.
Field definitionsRequired field: *
Field
Definition
Forecast Bucket*
Enter a number to identify the tank. The forecast bucket shows as the tank ID in Oil Field Order Entry.
Note: Bucket numbers must be unique and sequential in relation to this shipper.
Class*
Select the freight class that categorizes the commodity the tank holds.
Commodity Code*
Select one of the commodities that are included in the selected Class.
Is Producing
The checkbox is selected by default. Clear the checkbox when the tank is not actively filling with commodity.
Gallon Weight / VolumeWeightUnit
These two fields work together:
-
If you enter the weight of one gallon of commodity in the tank, the system will calculate the corresponding VolumeWeightUnit.
-
If you enter the weight of one volume unit of commodity in the tank, the system will calculate the corresponding GallonWeight.
ShrinkageIncrustationFactor
First available in: Fuel Dispatch V.15.40
Wear and tear causes a tank’s maximum volume to shrink. Incrusted residue may remain inside empty tanks. Selecting a factor for shrinkage/incrustation can increase accuracy and avoid over-measurement.
Enter a numeric factor for shrinkage/incrustation to be used when the system calculates a tank’s total volume.
MeterCorrectionFactor
First available in: Fuel Dispatch V.15.40
Custom field that indicates a correction factor for metered tickets.
TemperatureCompensated
First available in: Fuel Dispatch V.15.40
Indicate whether the system makes adjustments to compensate for changes in temperature
-
N
The system does not compensate for temperature changes.
-
Y
The system compensates for temperature changes.
Valid Commodity List
Used with the Active Commodity field to identify available commodity blends, such as seasonal blends.
Enter the ID for each commodity that can be substituted for the commodity displayed in the Commodity Code field.
Notes:
-
Separate multiple commodity IDs with commas.
-
Each valid commodity must have a TMW commodity profile.
-
In the Commodity Profile window, the valid commodity and original commodity must be assigned to the same freight class.
Active Commodity
Select the ID of the currently active commodity. This commodity will be used by the Forecaster when creating orders as long as it remains in the field.
Notes:
-
. The active commodity must be included in the Valid Commodity list.
-
. In the Commodity Profile window, the active commodity and original commodity must be assigned to the same freight class.
-
If the tank measurement information is saved as a tank model, complete the following:
Model ID
If the tank measurement information, including strapping measurements, is saved as a tank model, select the tank model. See Creating tank models.
-
If the tank measurement information is not based on a tank model, complete the following:
Tank Size
If the tank measurement information is not saved as a tank model, enter the number of units the tank is designed to hold.
Tank UOM
If the tank measurement information is not saved as a tank model, select the unit of measurement for the tank, such as oil barrels or gallons.
Barrels per inch
If the tank’s unit of measure is oil barrels, enter the equivalent number of barrels per one inch of height of product in the tank. The system will calculate the corresponding Gallons per inch.
Gallons per inch
If the tank’s unit of measure is gallons, enter the equivalent number of gallons per one inch of height of product in the tank. The system will calculate the corresponding Barrels per inch.
-
-
Repeat Steps 3 and 4 for each tank.
Note: By default, the system allows you to add ten tanks to a single lease. If you have leases that have more than ten tanks, see Allowing more than ten tanks for a lease.
-
To remove a tank data row, select the row and click Remove at the bottom of the window.
-
When finished, click Save at the top of the window.
Viewing a tank’s model history
First available in Fuel Dispatch V.16.20
When you set up a lease’s tanks, you can record a tank model ID for a tank. Tank models are used to store strapping measurements and provide greater accuracy when determining product volume.
Over time, a tank’s model may change. To show this, you would update the tank’s Model ID in its profile. The system records these changes and displays the history in the Tank Model History window.
To view tank model history, follow these steps:
-
Go to Maintenance > Company Relations Profile.
The Company Relations Profile window opens. -
Retrieve the lease company.
-
Select the Tanks tab.
The grid displays a list of tanks for that lease.

-
In the row of the tank for which you want to view model history, click Edit in the Tank Model History field.
The Tank Model History window opens.
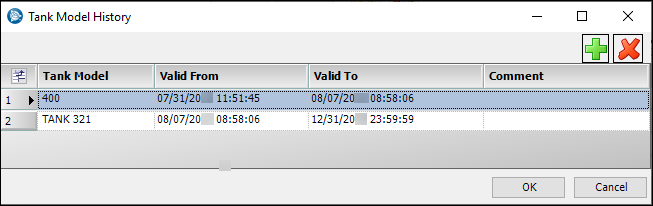
Tank Model |
Displays the tank model name For details, see Using tank models. |
Valid From/Valid To |
Displays the active date range for the selected tank model Note: The last Valid To date will always be the system apocalypse date. |
Comment |
Displays comments |
Note: Do not use the Tank Model History to assign a new tank model to a tank.
Click ![]() Add to add a new row. You can make entries in the fields. However, the system does not recognize this as a valid tank model change. Your entry does not change the current model name displayed in the Tanks tab’s Model ID field. To change the tank’s model, you must make the change on the Tanks tab.
Add to add a new row. You can make entries in the fields. However, the system does not recognize this as a valid tank model change. Your entry does not change the current model name displayed in the Tanks tab’s Model ID field. To change the tank’s model, you must make the change on the Tanks tab.
|
Selecting a row and clicking |
-
Do one of the following:
-
Click OK.
If you made changes, click OK to save your changes and close the window.
-
Click Cancel.
Closes the window without saving your changes.
-
Changing gross barrel calculations
First available in Fuel Dispatch V16.20
Your company may use a third-party application to perform gross barrel calculations. When a tank model changes, the accuracy of the gross barrel calculations is affected.
By default, when you change a tank’s tank model, the system updates the Company_tankdetail table. It contains general tank information, such as tank size, and company ID. However, it shows only the current tank model ID. By default, this table is used when third party applications calculate gross barrels.
To ensure more accurate calculations, you can set up the system to record tank model changes in the CompanyTankModel table. This table contains a record of all changes made to a tank’s model ID, such as the dates/times the model ID was changed. This table can be used to calculate gross barrels. It provides readings that are more accurate because it associates the tank model ID with a date range. For example, your company has changed a tank’s model twice in the past five years. For the first four years, the tank model ID was A1. Then, it changed to B2 for the fifth year. If you needed to obtain a gross barrel calculation for that second year, this table would use tank model A1 instead of the B2 model ID.
You use the [FuelDispatch]UseCompanyTankModelHistory setting in your TTS50 to identify which table is used for gross barrel calculations.
Preventing non-producing tanks from being used on orders
To reduce data entry errors in Oil Field Order Entry, you can limit the selectable tanks to those that are actively producing. Tanks are flagged this way when they have the Is Producing checkbox selected in their profiles.
Use the [FuelDispatch]TankSetupCompanyTypeFilter=S, SC, or CS in your TTS50 to enable the tanks for lease selection.
You must set [StopOrderEntry]IsProducingEnablesTanks=Y in your TTS50.