Setting up the Card Planner and Planning Worksheet
The system administrator has the ability to set up the Card Planner so that it is easy for users to view the data they need most. You can:
-
Add, remove, or rearrange fields that are shown in the Shift pane and the Assignment Plan pane.
-
Turn off the display of the Timeline or Gantt bar.
-
Change the way the trips in the Assignment Plan pane behave when you remove assigned trips.
-
Disable the user’s ability to overwrite group and global defaults for Planning Worksheet grid layouts and Card Planner driver and trip layouts. To do so, you must have
[FuelDispatch]OnlyAdminCanSavePublicLayouts=Yin your TTS50.
Designing the cell layouts for the Shift and Assignment Plan panes
For each driver who is available for work, the Shift pane displays a grid of information, which is made up of data elements called cells. The Assignment Plan pane also uses cells to display data for each trip assigned to a driver.
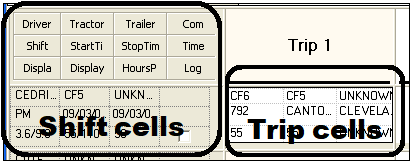
When Fuel Dispatch is first installed, the cells are arranged in default layouts. However, you may prefer to use a different set of fields for the cells, and/or a different data arrangement. A special configuration tool called the Cell Designer allows you to modify cell layouts. The Cell Designer enables you to:
-
Add or remove the data elements that make up cells.
-
Resize or rearrange cells.
-
Save the cell configuration for a particular user or group of users.
|
-
In the Card Planner, click Refresh to populate the Shift pane.
-
If you want to design a Trip cells layout, temporarily plan one trip to populate the Assignment Plan pane. (You do not need to save the assignment.)
-
Right-click in the Shift cells or Trip cells area.
A shortcut menu is shown. -
Click Cell Designer.
The Cell Designer window opens.Show me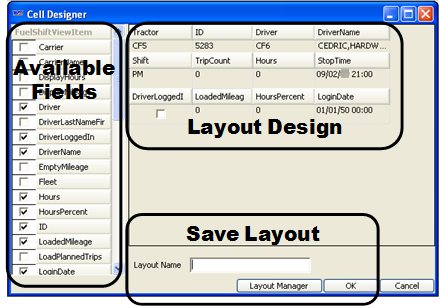
-
Use any of these tools to design your layout.
Add fieldsDo either of the following:
-
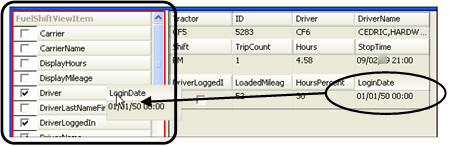
From the Available Fields section, select the checkbox to the left of each field to be added as a cell.
-
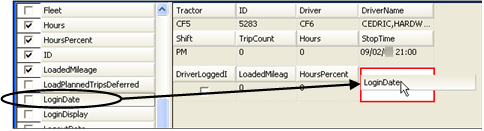
From the Available Fields section, drag an item to the desired location in the Layout Design section.
As you drag, the system displays a red box (as shown below) or red arrows to indicate where the field would be positioned on the existing grid if you were to drop it.
Note: The Shift cells area is limited to 12 cells in a four-by-three grid. If you add more, they will not be displayed.
Remove fieldsDo either of the following:
-
From the Available Fields section, clear the checkboxes of those fields you do not want displayed.
-
From the Layout Design section, drag an unwanted item to the Available Fields section.
The system displays a red box around the Available Fields section to indicate that you are returning the field there.
 Rearrange fields
In the Layout Design section, move the fields to the desired locations.
As you drag, the system displays red arrows to indicate where the field would be positioned on the existing grid if you were to drop it.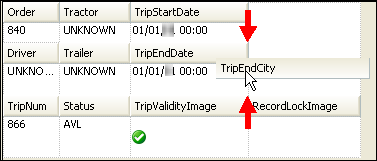 Resize fields
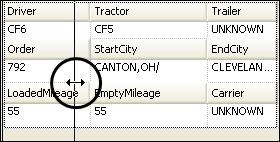
In the Layout Design section, position the mouse over a grid line until the pointer turns into a double-headed arrow. Drag the gird line to the desired size.
-
Increase or decrease the row height:
-
Increase or decrease the column width:
-
-
If you want, apply conditional formatting to any field.
-
If you want, for the Shift cells, change a label displayed in the column header.
-
In the Layout Name text box, enter a name for the new layout.
Note: This is a required field.
-
When finished, click OK.
If you decide not to save the changes after all, click Cancel instead.
Assigning a layout to a user or group of users
After designing a layout of the Shift or Trip cells areas, use this procedure to assign the layout to a user or group of users.
-
Do one of the following:
-
To assign a Shift cells layout, click Refresh to populate the Shift pane, and then right-click in the Shift pane.
A shortcut menu is shown. -
To assign a Trip cells layout, temporarily assign a trip to a driver, and then right-click in the planned trip. (You do not need to save the assignment.)
A shortcut menu is shown.
-
-
Click Cell Designer.
The Cell Designer window opens. -
Click Layout Manager.
-
Under Layout Name, select the layout you want to assign.
If users or user groups are already assigned, they are listed in the lower part of the window.Show me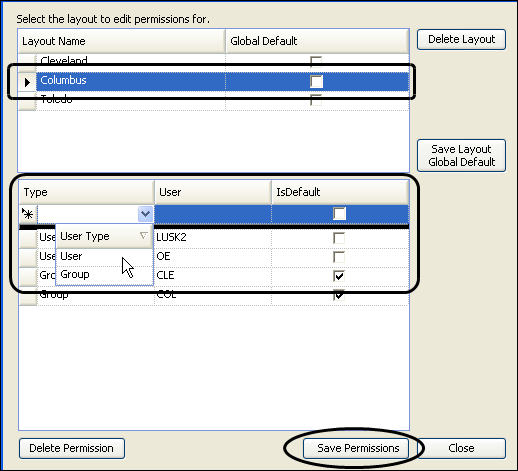
-
Under Type, click New, and select the assignment type as User or Group.
-
Under User, select the user or group name to assign.
-
If you want this layout to be the default layout for the user or group instead of the Global Default layout, select the checkbox under IsDefault.
-
Click Save Permissions.
-
When finished, click Close.
Removing a layout assignment from a user or group of users
Use this procedure to delete a layout assignment from a user or group of users.
-
Do one of the following:
-
To access a Shift cells layout, click Refresh to populate the Shift pane, and then right-click in the Shift pane.
A shortcut menu is shown. -
To access a Trip cells layout, temporarily assign a trip to a driver, and then right-click in the planned trip. (You do not need to save the assignment.)
A shortcut menu is shown.
-
-
Click Cell Designer.
The Cell Designer window opens. -
Click Layout Manager.
-
Under Layout Name, select the layout to which the user or group is assigned.
Users or groups assigned to the selected layout are listed in the lower part of the window. -
Select the user or group for which you want to remove the assignment.
-
When finished, click Close.
-
To access a Shift cells layout, click Refresh to populate the Shift pane, and then right-click in the Shift pane.
A shortcut menu is shown. -
To access a Trip cells layout, temporarily assign a trip to a driver, and then right-click in the planned trip. (You do not need to save the assignment.)
A shortcut menu is shown.
-
-
Click Delete Permission.
The permission is removed for that user or group. -
Click Save Permissions.
Modifying a layout
Use this procedure to change a saved layout.
-
Do one of the following:
-
To change a Shift cells layout, click Refresh to populate the Shift pane, and then right-click in the Shift pane.
A shortcut menu is shown. -
To assign a Trip cells layout, temporarily assign a trip to a driver, and then right-click in the planned trip. (You do not need to save the assignment.)
A shortcut menu is shown.
-
-
Click Cell Designer.
The Cell Designer window opens. -
Change the displayed layout, following the steps above for designing the layout.
-
In the Layout Name text box, enter the name of the layout you are changing.
Note: The name you enter and the saved name must be identical.
-
Click OK.
If you decide not to make the changes after all, click Cancel instead.
Deleting a layout
Use this procedure to remove a saved layout that you no longer need.
-
Do one of the following:
-
To delete a Shift cells layout, click Refresh to populate the Shift pane, and then right-click in the Shift pane.
A shortcut menu is shown. -
To assign a Trip cells layout, temporarily assign a trip to a driver, and then right-click in the planned trip. (You do not need to save the assignment.)
A shortcut menu is shown.
-
-
Click Cell Designer.
The Cell Designer window opens. -
Click Layout Manager.
-
Under Layout Name, select the layout to delete.
If users are already assigned, they are listed in the lower part of the window.Show me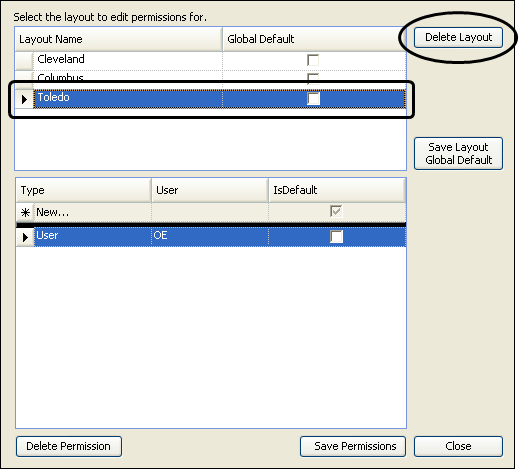
-
If users or groups are assigned, you must remove their layout assignment.
-
Click Delete Layout.
-
In the confirmation window, click OK.
If you decide not to delete the layout after all, click Cancel instead. -
Click Save Permissions.
The layout is removed from the list. -
Click Close.
Turning off the Gantt bar (Timeline)
By default, the Card Planner displays the Timeline or Gantt bar above the drivers' trips. If you want, you can use the [FuelDispatch]DisplayGanttBar setting to turn it off. This frees up space in the Card Planner window to display more data rows for available trips, resources, and drivers' trips for the day.
You can combine removing the Gantt bar with changing the layout to a vertical display.
Changing the position of the Card Planner panes
By default, the Card Planner displays the sections of the window in a horizontal layout, where the Trips/Resources pane is on the top, and the Shift and Assignment Plan panes are on the bottom. The system administrator can use the [FuelDispatch]CardPlannerVertSplit setting to change the layout to a vertical orientation, where the Trips/Resources pane is on the left, and the Shift and Assignment Plan panes are on the right.
You can combine this setting with Turning off the Gantt bar.
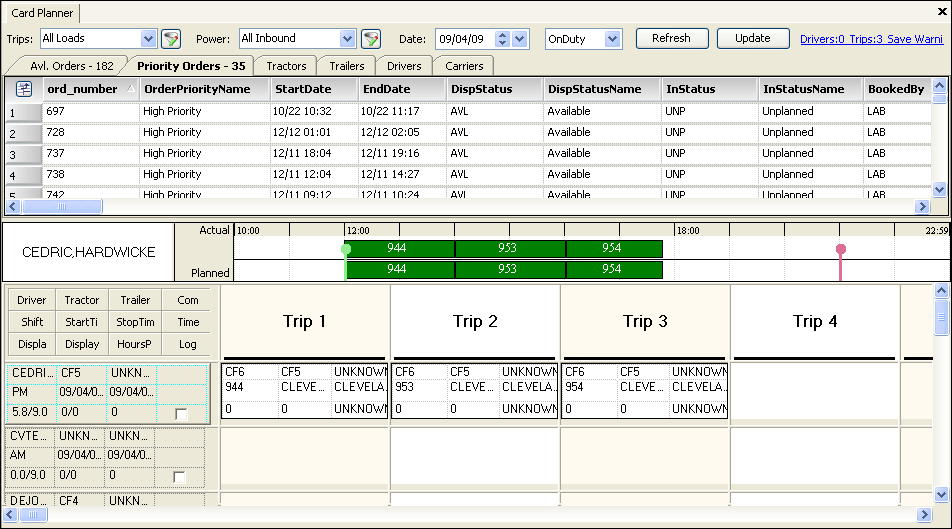
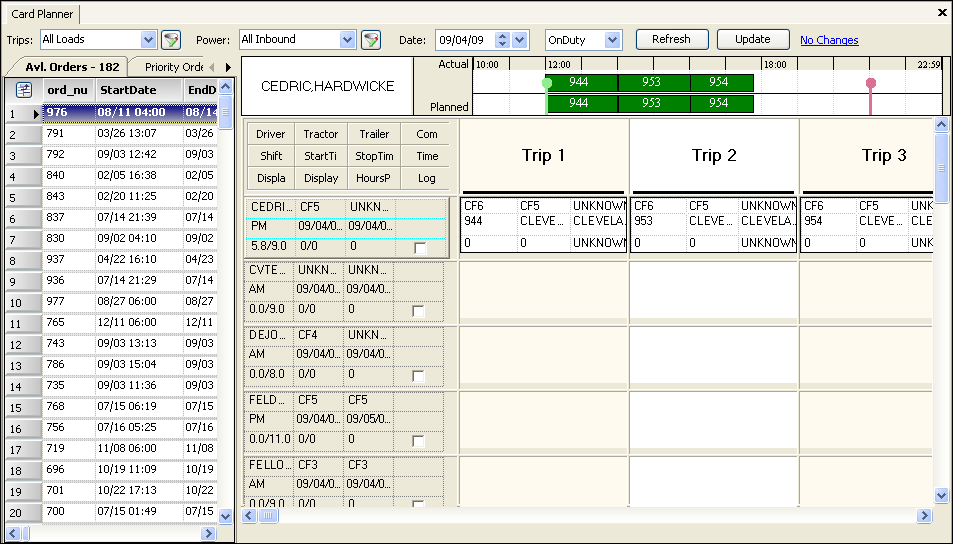
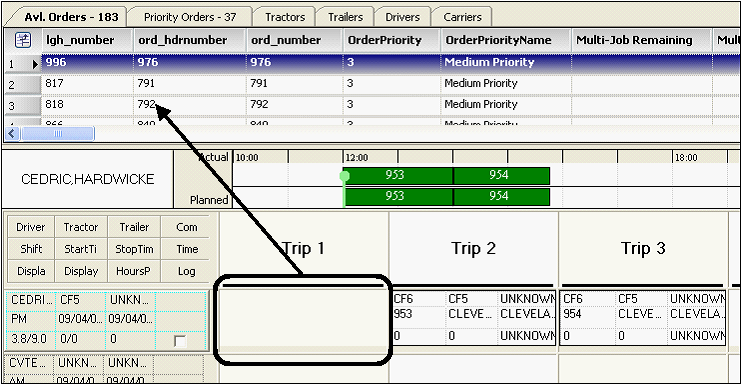
Preventing or allowing gaps in a driver’s daily trip assignments
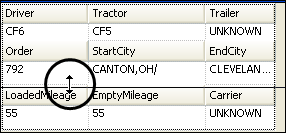
By default, when you remove a planned trip from a driver on the Card Planner’s Assignment Plan pane, the system automatically closes the gap by sliding trips that followed it to the left. This behavior, called auto-collapsing, prevents any holes in the driver’s schedule. However, you may prefer to keep the remaining planned trips in their original time slots.
You can use the [FuelDispatch]AutoCollapseCardPlanner setting so that the Card Planner leaves the time block for the removed trip open. This is helpful when, for example, you have planned trips one and three, but are not sure about trip two, or when you remove a trip, but want the space left open for another trip. You can set it up so that:
-
The trips never auto-collapse
or
-
The trips auto-collapse when the driver is logged in, so that no gaps are left in the driver’s trips for the day. However, they do not auto-collapse when the driver is logged out, which allows you to continue to plan (or un-plan) the trips for the day.
In this sample, when the driver’s first trip is removed, the cell is left open for another trip.
Setting up a GPS alert
If you are using a mobile communication application with Fuel Dispatch, you can also adjust how soon you are alerted that you are not receiving GPS information from a resource. You can do this by using the [FuelDispatch]MinutesAllowedOutOfRange INI setting.
Setting up common features in the Card Planner and Planning Worksheet
Some features apply to both the Card Planner and the Planning Worksheet. These topics describe those features and how to set them up.
Viewing site snap shots
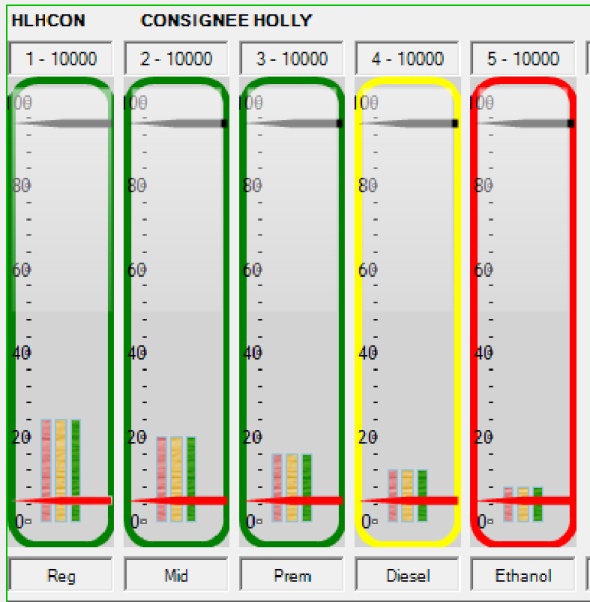
If you use Inventory Services to monitor customer products, the Site Snap Shot feature allows you to review the projections at each store receiving a delivery.
When you select an assigned delivery, a color-coded graph provides the following information about each tank at the store:
-
Tank number and size
-
Commodity
-
Manifold group
-
Safe fill percentage and value
-
Shut down percentage and value
-
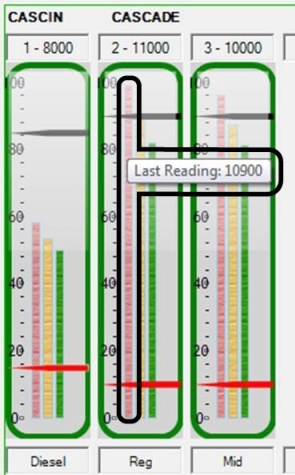
Last reading amount
-
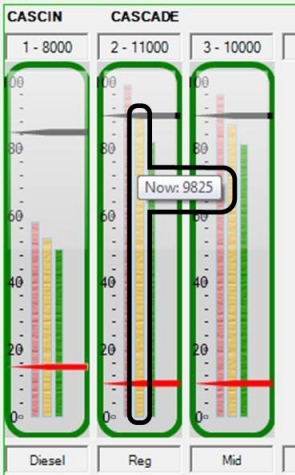
Estimated reading for the current date/time
-
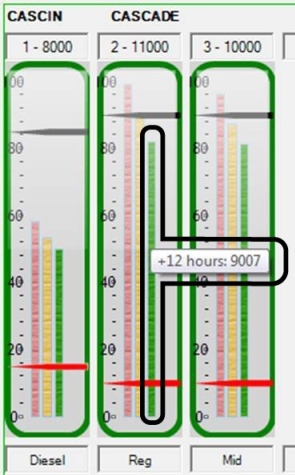
Estimated reading for the current date/time plus 12 hours
-
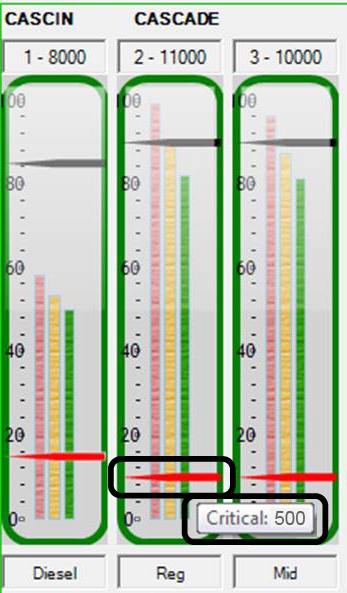
Critical level percentage
|
Accessing a store’s snap shot
To access a store’s snap shot in the Card Planner or Planning Worksheet, follow these steps:
-
In the Assignment Plan pane, right-click on an assigned order.
The shortcut menu opens. -
Select Site Snap Shot in the shortcut menu.
Note: To close the snap shot window, click outside of the Site Snap Shot window.
Site snap shot layout
The Site Snap Shot window has two sections.
The top section shows:
-
The store’s ID and name
-
Each tank’s number and capacity
-
A fuel gauge of each of its tanks.
The bottom of the window shows corresponding data for each of the store’s tanks in a grid.
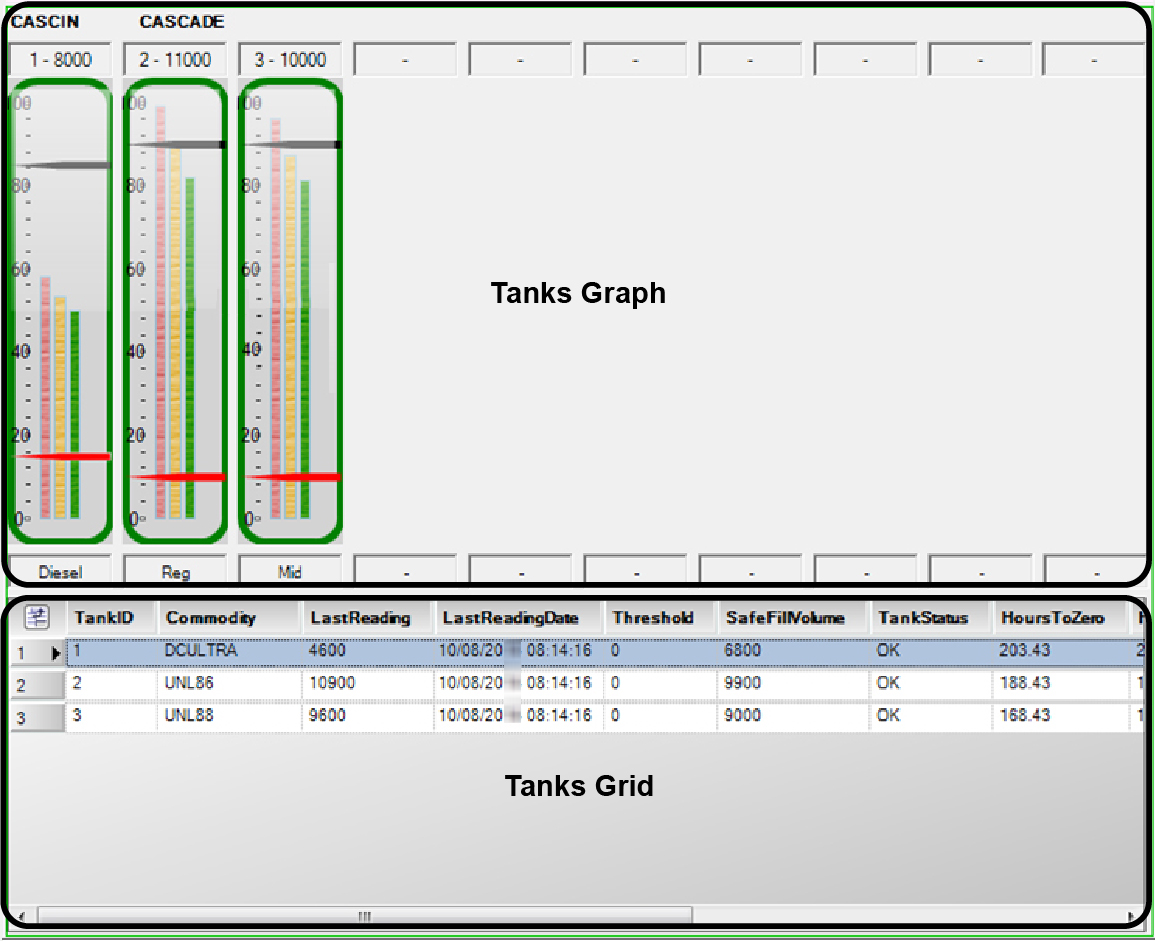
| You cannot customize the Tanks Graph portion of the window. You can customize the Tanks Grid using standard grid customization methods. For details about grid customization, see Using data grids. |
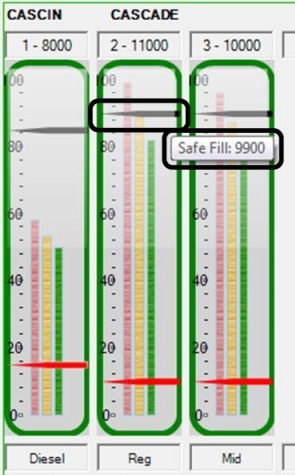
Tanks graph ToolTips
ToolTips appear when you rest the mouse pointer on a tank’s fuel gauge.
Indicates the highest amount the tank can hold safely
Indicates the amount in the tank at the last reading
Indicates the estimated amount in the tank at the current time
Weekly Sales data in Inventory Services is used to average the amount of fuel sales for the span of time between the last reading and the current time. This amount is deducted from the last reading.
For details on Weekly Sales setup see Setting up a store’s commodity forecasts > Creating a commodity forecast > Recording product sales information in the Inventory Services help system.
Indicates the estimated amount in the tank 12 hours from the current time
The system uses the tank’s Weekly Sales data in Inventory Services to average 12 hours of fuel sales and deduct that amount from the last reading.
For details on Weekly Sales setup, see Setting up a store’s commodity forecasts > Creating a commodity forecast > Recording product sales information in the Inventory Services help system.
Indicates the lowest predetermined warning amount that a tank reaches before run out / shut down
The shut down value comes from the store’s tank setup window. It is the value recorded in the Shut Down field, on the Company Tank Setup window’s Tanks tab.
Tanks graph border color
The color of a tank’s border indicates its fuel levels.
-
Red
Reading is within 5% of Critical
-
Yellow
Reading is within 10% of Critical
-
Green
Reading is greater than 10% of Critical
Tanks grid column definitions
The corresponding data for each tank is shown in the Tanks Grid.
Note: For fields displaying volume, the unit of measure is specified in the tank’s profile in the Company Tank Setup window.
TankID |
The unique identification number assigned to the tank in the store’s Company Tank Setup profile This number determines the order in which tanks appear in the Tanks Graph. |
Commodity |
The identification code of the tank’s commodity |
LastReading |
The volume of fuel from the last reading This value shows in the Last Reading ToolTip. |
LastReadingDate |
The date of the last reading |
Threshold |
The meaning of the value depends on the Tank Generation Rule recorded for the store.
|
SafeFillVolume |
The volume the tank can safely hold |
TankStatus |
The current status of the tank The status is calculated using the values recorded in the Generation Rule and Threshold fields in the store’s tank setup. These fields are found on the Company Tank Setup window’s Tanks tab. Statuses include:
This status is assigned when either of these situations exist:
Note: If the Generation Rule is set to PercentOfSales, the tank will display OK.
This status is assigned when either of these situations exist:
Note: If the Generation Rule is set to PercentOfSales, the tank will display OK.
This status is assigned when there are no current or valid readings for the tank |
SalesDaily |
The estimated daily sales of fuel per tank |
TargetOnHand |
The target volume of fuel that should be available |
CMDAverageDaily |
The average daily sales of fuel per commodity |
HoursToThreshold |
The estimated time until the fuel level reaches critical status |
HoursToZero |
The estimated time until the fuel level reaches shutdown (same as critical) |
Turning off the Site Snap Shot
By default, the Site Snap Shot window displays when you right-click on an assigned trip in the Assignment Plan pane. If you want, you can use the [FuelDispatch]EnableSiteSnapShotMenuOption setting to disable this feature.